User Guide
Page 8
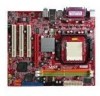
... (2 GB Max). • 2 DDRII DIMM slots (240-pin/ non-ECC). (For the updated supporting memory modules, please visit http://www.msi.com.tw/program/products/mainboard/mbd/pro_mbd_trp_list.php) LAN • Supports 10/ 100 LAN by Realtek RTL8201CL Audio • Chip integrated by Realtek .../s • Does not support Win 98/ Win ME installation 2 Specifications CPU • Supports AMD® Athlon 64/ Athlon X2 (Socket AM2) processors. (For the latest information about CPU, please visit http://www.msi.com.tw/program/products/mainboard/mbd/pro_mbd_cpu_support.php) Supported FSB • Hyper...
... (2 GB Max). • 2 DDRII DIMM slots (240-pin/ non-ECC). (For the updated supporting memory modules, please visit http://www.msi.com.tw/program/products/mainboard/mbd/pro_mbd_trp_list.php) LAN • Supports 10/ 100 LAN by Realtek RTL8201CL Audio • Chip integrated by Realtek .../s • Does not support Win 98/ Win ME installation 2 Specifications CPU • Supports AMD® Athlon 64/ Athlon X2 (Socket AM2) processors. (For the latest information about CPU, please visit http://www.msi.com.tw/program/products/mainboard/mbd/pro_mbd_cpu_support.php) Supported FSB • Hyper...
User Guide
Page 10
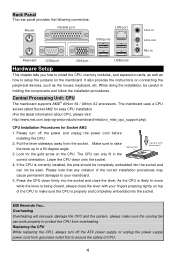
...CPU. 2. The mainboard uses a CPU socket called Socket AM2 for easy CPU installation. (For the latest information about CPU, please visit: http://www.msi.com.tw/program/products/mainboard/mbd/pro_mbd_cpu_support.php) CPU Installation Procedures for the gold arrow on the CPU. Gold arrow Correct CPU placeme nt 3. Press the CPU... of CPU. 4 Overheating Overheating will seriously damage the CPU and the system, always make sure the CPU is correctly installed, the pins should be careful in the correct orientation. Replacing the CPU While replacing the CPU, always turn off the ATX power ...
...CPU. 2. The mainboard uses a CPU socket called Socket AM2 for easy CPU installation. (For the latest information about CPU, please visit: http://www.msi.com.tw/program/products/mainboard/mbd/pro_mbd_cpu_support.php) CPU Installation Procedures for the gold arrow on the CPU. Gold arrow Correct CPU placeme nt 3. Press the CPU... of CPU. 4 Overheating Overheating will seriously damage the CPU and the system, always make sure the CPU is correctly installed, the pins should be careful in the correct orientation. Replacing the CPU While replacing the CPU, always turn off the ATX power ...
User Guide
Page 11
...Locate the Fix Lever and lift up to 2GB. MSI Reminds You... 1. Confirm if your system. 2. To operate properly, at least one end of the retention mechanism. Position the cooling set on the top of the clip to hook first. 2. CPU Cooler Installation When you do not forget to apply... in PC Health Status of your own needs. 5 You can be installed. (For the updated supporting memory modules, please visit http://www.msi.com.tw/program/products/mainboard/mbd/pro_mbd_trp_list.php) Install at least one DIMM module must be installed on the slots. or double-sided modules to...
...Locate the Fix Lever and lift up to 2GB. MSI Reminds You... 1. Confirm if your system. 2. To operate properly, at least one end of the retention mechanism. Position the cooling set on the top of the clip to hook first. 2. CPU Cooler Installation When you do not forget to apply... in PC Health Status of your own needs. 5 You can be installed. (For the updated supporting memory modules, please visit http://www.msi.com.tw/program/products/mainboard/mbd/pro_mbd_trp_list.php) Install at least one DIMM module must be installed on the slots. or double-sided modules to...
User Guide
Page 12
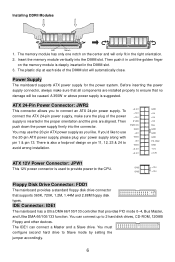
... no damage will only fit in the DIMM slot. 3. If you'd like . A 350W or above power supply is deeply inserted in the right orientation. 2. ATX 24-Pin Power Connector: JWR2 This connector allows you like to 2 hard disk drives, CD-ROM, 120MB Floppy and other devices. The IDE1 can connect... power supply firmly into the DIMM slot. The memory module has only one notch on pin 11, 12, 23 & 24 to the CPU. Power Supply The mainboard supports ATX power supply for the power system. There is used to provide power to avoid wrong installation. +3.3V +12V +12V 5VSB PWR OK...
... no damage will only fit in the DIMM slot. 3. If you'd like . A 350W or above power supply is deeply inserted in the right orientation. 2. ATX 24-Pin Power Connector: JWR2 This connector allows you like to 2 hard disk drives, CD-ROM, 120MB Floppy and other devices. The IDE1 can connect... power supply firmly into the DIMM slot. The memory module has only one notch on pin 11, 12, 23 & 24 to the CPU. Power Supply The mainboard supports ATX power supply for the power system. There is used to provide power to avoid wrong installation. +3.3V +12V +12V 5VSB PWR OK...
User Guide
Page 13
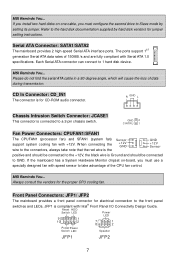
... Panel I/O Connectivity Design Guide. Reset HDD Switch LED Power LED 9 1 10 2 7 1 8 2 PowerPower Switch LED Speaker JFP1 JFP2 7 MSI Reminds You... R GND L Chassis Intrusion Switch Connector: JCASE1 This connector is compliant with Serial ATA 1.0 specifications. When connecting the wire to the ...connectors, always take advantage of the CPU fan control. MSI Reminds You... Front Panel Connectors: JFP1/ JFP2 The mainboard provides a front panel connector for the proper CPU cooling fan. Serial ATA Connector: SATA1/SATA2 The mainboard provides 2...
... Panel I/O Connectivity Design Guide. Reset HDD Switch LED Power LED 9 1 10 2 7 1 8 2 PowerPower Switch LED Speaker JFP1 JFP2 7 MSI Reminds You... R GND L Chassis Intrusion Switch Connector: JCASE1 This connector is compliant with Serial ATA 1.0 specifications. When connecting the wire to the ...connectors, always take advantage of the CPU fan control. MSI Reminds You... Front Panel Connectors: JFP1/ JFP2 The mainboard provides a front panel connector for the proper CPU cooling fan. Serial ATA Connector: SATA1/SATA2 The mainboard provides 2...
User Guide
Page 16
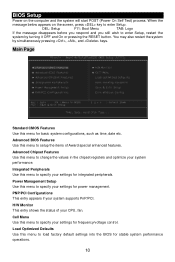
Main Page Standard CMOS Features Use this menu for stable system performance operations. 10 Load Optimized Defaults Use this menu to specify your CPU, fan. Power Management Setup Use this menu to load factory default settings into the BIOS for basic system configurations, such as time, date etc. Advanced ...
Main Page Standard CMOS Features Use this menu for stable system performance operations. 10 Load Optimized Defaults Use this menu to specify your CPU, fan. Power Management Setup Use this menu to load factory default settings into the BIOS for basic system configurations, such as time, date etc. Advanced ...
User Guide
Page 17
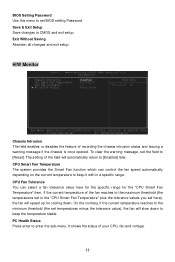
... Smart Fan function which can select a fan tolerance value here for the specific range for cooling down to keep it with in the "CPU Smart Fan Temperature" plus the tolerance values you set temperatures minus the tolerance value), the fan will automatically return to [Enabled] later. ... a warning message if the chassis is once opened. H/W Monitor Chassis Intrusion The field enables or disables the feature of your CPU, fan and voltage. 11 CPU Fan Tolerance You can control the fan speed automatically depending on the current temperature to keep the temperature stable. On the contrary,...
... Smart Fan function which can select a fan tolerance value here for the specific range for cooling down to keep it with in the "CPU Smart Fan Temperature" plus the tolerance values you set temperatures minus the tolerance value), the fan will automatically return to [Enabled] later. ... a warning message if the chassis is once opened. H/W Monitor Chassis Intrusion The field enables or disables the feature of your CPU, fan and voltage. 11 CPU Fan Tolerance You can control the fan speed automatically depending on the current temperature to keep the temperature stable. On the contrary,...
User Guide
Page 18
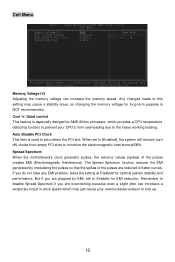
... for EMI reduction. Any changes made to this setting may just cause your CPU's from empty PCI slots to the heavy working loading. When set to flatter curves. Spread Spectrum When the motherboard's clock generator pulses, the extreme values (spikes) of the pulses are plagued...stability and performance. Cell Menu Memory Voltage (V) Adjusting the memory voltage can introduce a temporary boost in clock speed which provides a CPU temperature detecting function to prevent your overclocked processor to auto detect the PCI slot. The Spread Spectrum function reduces the EMI generated by...
... for EMI reduction. Any changes made to this setting may just cause your CPU's from empty PCI slots to the heavy working loading. When set to flatter curves. Spread Spectrum When the motherboard's clock generator pulses, the extreme values (spikes) of the pulses are plagued...stability and performance. Cell Menu Memory Voltage (V) Adjusting the memory voltage can introduce a temporary boost in clock speed which provides a CPU temperature detecting function to prevent your overclocked processor to auto detect the PCI slot. The Spread Spectrum function reduces the EMI generated by...
User Guide
Page 60
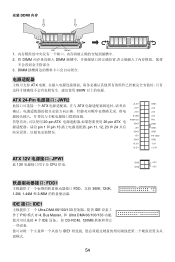
... 66/100/133 4 个 IDE CD-ROM, 120MB IDE1 54 安装 DDRII 内存 Volt Notch 1 2. 将 DIMM DIMM 3. DIMM ATX 350W ATX 24-Pin JWR2 ATX ATX 20-pin ATX 20-pin ATX pin 1 和 pin 13 pin 11, 12, 23 和 24 +3.3V +12V +12V 5VSB PWR OK GND +5V GND +5V GND...
... 66/100/133 4 个 IDE CD-ROM, 120MB IDE1 54 安装 DDRII 内存 Volt Notch 1 2. 将 DIMM DIMM 3. DIMM ATX 350W ATX 24-Pin JWR2 ATX ATX 20-pin ATX 20-pin ATX pin 1 和 pin 13 pin 11, 12, 23 和 24 +3.3V +12V +12V 5VSB PWR OK GND +5V GND +5V GND...
User Guide
Page 65
CPU Smart Fan Temperature(CPU CPU CPU Fan Tolerance(CPU CPU Smart Fan Temperature CPU Smart Fan Temperature CPU PC Health Status(PC Enter CPU 59 Exit Without Saving CMOS Setup 程序. 硬件监视 Chassis Intrusion Reset Enabled]状态. Save & Exit Setup CMOS Setup 程序.
CPU Smart Fan Temperature(CPU CPU CPU Fan Tolerance(CPU CPU Smart Fan Temperature CPU Smart Fan Temperature CPU PC Health Status(PC Enter CPU 59 Exit Without Saving CMOS Setup 程序. 硬件监视 Chassis Intrusion Reset Enabled]状态. Save & Exit Setup CMOS Setup 程序.
User Guide
Page 77
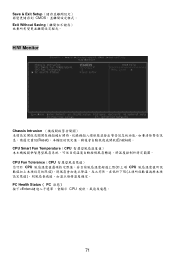
Save & Exit Setup CMOS Exit Without Saving H/W Monitor Chassis Intrusion Reset Enabled)。 CPU Smart Fan Temperature(CPU CPU Fan Tolerance(CPU CPU CPU PC Health Status( PC Enter CPU 71
Save & Exit Setup CMOS Exit Without Saving H/W Monitor Chassis Intrusion Reset Enabled)。 CPU Smart Fan Temperature(CPU CPU Fan Tolerance(CPU CPU CPU PC Health Status( PC Enter CPU 71
User Guide
Page 84
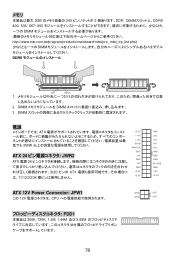
... この 12V CPU GND GND +12V +12V FDD1 360K, 720K, 1.2M, 1.44M 及び 2.88M 78 メモリ 2GB 240 2 DDR DDRII 400/ 533/ 667/ 800 DIMM http://www.msi.com.tw/program/products/mainboard/mbd/pro_mbd_trp_list.php DIMM DDRII Volt Notch 1 2. DIMM 電源 ATX 350W ATX 24 JWR2 ATX 電源...
... この 12V CPU GND GND +12V +12V FDD1 360K, 720K, 1.2M, 1.44M 及び 2.88M 78 メモリ 2GB 240 2 DDR DDRII 400/ 533/ 667/ 800 DIMM http://www.msi.com.tw/program/products/mainboard/mbd/pro_mbd_trp_list.php DIMM DDRII Volt Notch 1 2. DIMM 電源 ATX 350W ATX 24 JWR2 ATX 電源...
User Guide
Page 89
BIOS Setting Password Save & Exit Setup CMOS Exit Without Saving CMOS H/W Monitor Chassis Intrusion Enabled Reset Enabled CPU Smart Fan Temperature Smart Fan CPU Fan Tolerance CPU Smart Fan Temperature CPU Smart Fan Temperature PC Health Status Enter CPU 83
BIOS Setting Password Save & Exit Setup CMOS Exit Without Saving CMOS H/W Monitor Chassis Intrusion Enabled Reset Enabled CPU Smart Fan Temperature Smart Fan CPU Fan Tolerance CPU Smart Fan Temperature CPU Smart Fan Temperature PC Health Status Enter CPU 83

