
User Guide
Page 8
...CPU Cooler Set 2-5 Memory ...2-6 Memory Module Population Rules 2-6 Installing DDRII Modules 2-7 Power Supply ...2-8 ATX 24-Pin Power Connector: ATX1 2-8 ATX 12V Power Connector: JPW 1 2-8 Back Panel ...2-9 Connectors ...2-11 Floppy Disk Drive Connector: FDD1 ...2-11 ATA133 Hard Disk Connectors: IDE1 2-11 Serial ATA II Connectors: SATA1~SATA4 2-12 Fan Power Connectors: CPUFAN1, SYSFAN1 2-13 Chassis Intrusion Switch Connector: JCI1 2-13 CD-In Connector: JCD1 2-13 Front Panel Audio...
...CPU Cooler Set 2-5 Memory ...2-6 Memory Module Population Rules 2-6 Installing DDRII Modules 2-7 Power Supply ...2-8 ATX 24-Pin Power Connector: ATX1 2-8 ATX 12V Power Connector: JPW 1 2-8 Back Panel ...2-9 Connectors ...2-11 Floppy Disk Drive Connector: FDD1 ...2-11 ATA133 Hard Disk Connectors: IDE1 2-11 Serial ATA II Connectors: SATA1~SATA4 2-12 Fan Power Connectors: CPUFAN1, SYSFAN1 2-13 Chassis Intrusion Switch Connector: JCI1 2-13 CD-In Connector: JCD1 2-13 Front Panel Audio...

User Guide
Page 9
.../PCI Configurations 3-18 H/W Monitor ...3-21 Load Optimized Defaults 3-22 BIOS Setting Password 3-22 Appendix A Realtek ALC888 Audio A-1 Installation for W indows 2000/XP A-2 Installing the Realtek HD Audio Driver A-2 Software Configuration A-4 Sound Effect A-5 Mixer ...A-8 Audio I/O ...A-12 Microphone A-16 3D Audio Demo A-17 Information A-18 Hardware Setup A-18 Appendix B ATi SATA RAID B-1 RAID Configuration B-2 Installing the...
.../PCI Configurations 3-18 H/W Monitor ...3-21 Load Optimized Defaults 3-22 BIOS Setting Password 3-22 Appendix A Realtek ALC888 Audio A-1 Installation for W indows 2000/XP A-2 Installing the Realtek HD Audio Driver A-2 Software Configuration A-4 Sound Effect A-5 Mixer ...A-8 Audio I/O ...A-12 Microphone A-16 3D Audio Demo A-17 Information A-18 Hardware Setup A-18 Appendix B ATi SATA RAID B-1 RAID Configuration B-2 Installing the...
User Guide
Page 11
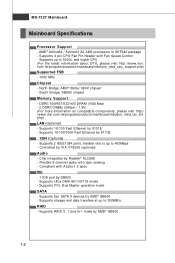
.../533/400 DRAM (4GB Max) - 2 DDRII DIMMs (240pin / 1.8V) (For m ore information on compatible components, please visit http:/ /www.msi.com.tw/program/products/mainboard/mbd/pro_mbd_trp_list. Supports up to 400Mbps - South Bridge: SB600 chipset Memory Support - Supports 10/100/1000 Fast Ethernet by AMD...® SB600 - Flexible 8-channel audio with Azalia 1.0 spec IDE - 1 IDE port by SB600 - AMD® Athlon64 / Athlon64 X2 AM2 processors in SKT940 package - Supports Ultra DMA...
.../533/400 DRAM (4GB Max) - 2 DDRII DIMMs (240pin / 1.8V) (For m ore information on compatible components, please visit http:/ /www.msi.com.tw/program/products/mainboard/mbd/pro_mbd_trp_list. Supports up to 400Mbps - South Bridge: SB600 chipset Memory Support - Supports 10/100/1000 Fast Ethernet by AMD...® SB600 - Flexible 8-channel audio with Azalia 1.0 spec IDE - 1 IDE port by SB600 - AMD® Athlon64 / Athlon64 X2 AM2 processors in SKT940 package - Supports Ultra DMA...
User Guide
Page 12
...-Board Pinheaders - 3 USB 2.0 pinheaders - 1 1394 pinheader (optional) - 1 TV-out pinheader (optional) - 1 Audio pinheader - 1 CD-in connector - 1 SPDIF out connector (optional) - 1 SPDIF in connector (optional) - 4 Serial ATA ports Slots - 1 PCI Express x16 slot - 2 PCI slots - 1 PCI Express x 1 slot Form Factor - Getting Started Floppy - 1 floppy port - Micro-ATX (24.4cm X 21.5 cm) Mounting - 6 mounting holes 1-3
...-Board Pinheaders - 3 USB 2.0 pinheaders - 1 1394 pinheader (optional) - 1 TV-out pinheader (optional) - 1 Audio pinheader - 1 CD-in connector - 1 SPDIF out connector (optional) - 1 SPDIF in connector (optional) - 4 Serial ATA ports Slots - 1 PCI Express x16 slot - 2 PCI slots - 1 PCI Express x 1 slot Form Factor - Getting Started Floppy - 1 floppy port - Micro-ATX (24.4cm X 21.5 cm) Mounting - 6 mounting holes 1-3
User Guide
Page 15
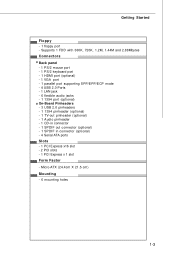
... CD into the CDROM drive. Click Next to : Start -> Control Panel -> Sounds and Audio Devices W hen the ATI HDMI Audio Driver is correctly installed, there will automatically appear. 2. Click ATI HDMI Audio Driver. 3. The setup screen will be one device for the Realtek HDA HDMI Out in ...Sound playback under Sounds and Audio Devices Properties. Setup Sounds and Audio Devices Go to install the driver. 4. Restart the computer after the driver installation procedure. Select the item and then click the...
... CD into the CDROM drive. Click Next to : Start -> Control Panel -> Sounds and Audio Devices W hen the ATI HDMI Audio Driver is correctly installed, there will automatically appear. 2. Click ATI HDMI Audio Driver. 3. The setup screen will be one device for the Realtek HDA HDMI Out in ...Sound playback under Sounds and Audio Devices Properties. Setup Sounds and Audio Devices Go to install the driver. 4. Restart the computer after the driver installation procedure. Select the item and then click the...
User Guide
Page 24
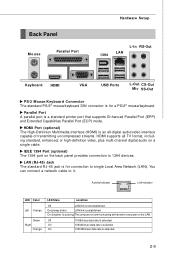
...1000 Mbit/sec data rate is selected. HDM I Port (optional) The High-Definition Multimedia Interface (HDMI) is an all-digital audio/video interface capable of transmitting uncompressed streams. HDMI supports all TV format, including standard, enhanced, or high-definition video, plus multi-channel digital... audio on the LAN. You can connect a network cable to 1394 devices. Activity Indicator Link Indicator LED Color Left Orange Green ...
...1000 Mbit/sec data rate is selected. HDM I Port (optional) The High-Definition Multimedia Interface (HDMI) is an all-digital audio/video interface capable of transmitting uncompressed streams. HDMI supports all TV format, including standard, enhanced, or high-definition video, plus multi-channel digital... audio on the LAN. You can connect a network cable to 1394 devices. Activity Indicator Link Indicator LED Color Left Orange Green ...

User Guide
Page 25
... a connector for external CD player, tapeplayer or other USB-compatible devices. You can differentiate the color of the audio jacks for attaching USB devices such as keyboard, mouse, or other audio devices. Black audio jack - Pink audio jack - MS-7327 Mainboard USB Connectors The OHCI (Open Host Controller Interface) Universal Serial Bus root is...
... a connector for external CD player, tapeplayer or other USB-compatible devices. You can differentiate the color of the audio jacks for attaching USB devices such as keyboard, mouse, or other audio devices. Black audio jack - Pink audio jack - MS-7327 Mainboard USB Connectors The OHCI (Open Host Controller Interface) Universal Serial Bus root is...
User Guide
Page 28
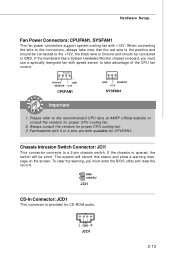
Always consult the vendors for CD-ROM audio. Control GND SENSOR +1 2V CPUFAN1 GND SE NS OR +1 2V SYSFAN1 Important 1. Fan/heatsink with speed sensor to GND. L GND R JCD1 2-13 Chassis Intrusion Switch ...
Always consult the vendors for CD-ROM audio. Control GND SENSOR +1 2V CPUFAN1 GND SE NS OR +1 2V SYSFAN1 Important 1. Fan/heatsink with speed sensor to GND. L GND R JCD1 2-13 Chassis Intrusion Switch ...
User Guide
Page 29
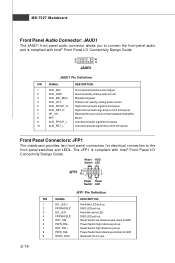
... panel microphone input signal 2 AUD_GND Ground used by analog audio circuits 3 AUD_MIC_BIAS Microphone power 4 AUD_VCC Filtered +5V used by analog audio circuits 5 AUD_FPOUT_R Right channel audio signal to front panel 6 AUD_RET_R Right channel audio signal return from front panel 7 HP_ON Reserved for future use... LEDs. Do not use to control headphone amplifier 8 KEY No pin 9 AUD_FPOUT_L Left channel audio signal to front panel 10 AUD_RET_L Left channel audio signal return from front panel Front Panel Connectors: JFP1 The mainboard provides two front panel connectors...
... panel microphone input signal 2 AUD_GND Ground used by analog audio circuits 3 AUD_MIC_BIAS Microphone power 4 AUD_VCC Filtered +5V used by analog audio circuits 5 AUD_FPOUT_R Right channel audio signal to front panel 6 AUD_RET_R Right channel audio signal return from front panel 7 HP_ON Reserved for future use... LEDs. Do not use to control headphone amplifier 8 KEY No pin 9 AUD_FPOUT_L Left channel audio signal to front panel 10 AUD_RET_L Left channel audio signal return from front panel Front Panel Connectors: JFP1 The mainboard provides two front panel connectors...
User Guide
Page 33
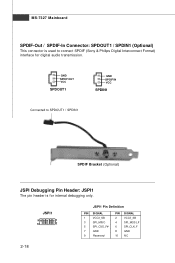
GND SPDIF OUT VCC SPDOUT1 GND SPDIF IN VCC SPDIN1 Connected to SPDOUT1 / SPDIN1 SPDIF Bracket (Optional) JSPI Debugging Pin Header: JSPI1 The pin header is used to connect SPDIF (Sony & Philips Digital Interconnect Format) interface for internal debugging only. MS-7327 Mainboard SPDIF-Out / SPDIF-In Connector: SPDOUT1 / SPDIN1 (Optional) This connector is for digital audio transmission. JSPI1 9 1 10 2 JSPI1 Pin Definition PIN SIGNAL 1 VCC3_SB 3 SPI_MISO 5 SPI_CSO_F# 7 GND 9 Reserved PIN SIGNAL 2 VCC3_SB 4 SPI_MOSI_F 6 SPI_CLK_F 8 GND 10 NC 2-18
GND SPDIF OUT VCC SPDOUT1 GND SPDIF IN VCC SPDIN1 Connected to SPDOUT1 / SPDIN1 SPDIF Bracket (Optional) JSPI Debugging Pin Header: JSPI1 The pin header is used to connect SPDIF (Sony & Philips Digital Interconnect Format) interface for internal debugging only. MS-7327 Mainboard SPDIF-Out / SPDIF-In Connector: SPDOUT1 / SPDIN1 (Optional) This connector is for digital audio transmission. JSPI1 9 1 10 2 JSPI1 Pin Definition PIN SIGNAL 1 VCC3_SB 3 SPI_MISO 5 SPI_CSO_F# 7 GND 9 Reserved PIN SIGNAL 2 VCC3_SB 4 SPI_MOSI_F 6 SPI_CLK_F 8 GND 10 NC 2-18
User Guide
Page 49
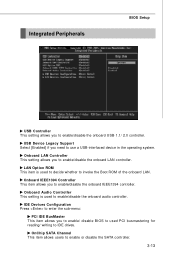
... controller. OnChip SATA Channel This item allows users to IDE drives. LAN Option ROM This item is used to enable/disable the onboard audio controller. Onboard IEEE1394 Controller This item allows you to enable/disable the onboard LAN controller. IDE Devices Configuration Press to enter the sub-menu...USB-interfaced device in the operating system. USB Device Legacy Support Select [Enabled] if you to enable/disable the onboard USB 1.1/ 2.0 controller. Onboard Audio Controller This setting is used PCI busmastering for reading/ writing to enable or disable the SATA controller. 3-13
... controller. OnChip SATA Channel This item allows users to IDE drives. LAN Option ROM This item is used to enable/disable the onboard audio controller. Onboard IEEE1394 Controller This item allows you to enable/disable the onboard LAN controller. IDE Devices Configuration Press to enter the sub-menu...USB-interfaced device in the operating system. USB Device Legacy Support Select [Enabled] if you to enable/disable the onboard USB 1.1/ 2.0 controller. Onboard Audio Controller This setting is used PCI busmastering for reading/ writing to enable or disable the SATA controller. 3-13
User Guide
Page 59
Appendix A Realtek ALC888 Audio The Realtek ALC888 provides 10-channel DAC that simultaneously supports 7.1 sound playback and 2 channels of independent stereo sound output (multiple streaming) through the Front-Out-Left and Front-OutRight channels.
Appendix A Realtek ALC888 Audio The Realtek ALC888 provides 10-channel DAC that simultaneously supports 7.1 sound playback and 2 channels of independent stereo sound output (multiple streaming) through the Front-Out-Left and Front-OutRight channels.
User Guide
Page 60
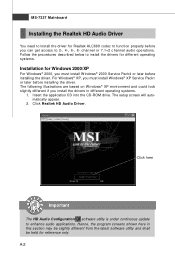
...2-, 4-, 6-, 8- Insert the application CD into the CD-ROM drive. Click Realtek HD Audio Driver. The setup screen will automatically appear. 2. Follow the procedures described below to enhance audio applications. A-2 The following illustrations are based on W indows® XP environment and could ... you must install W indows® 2000 Service Pack4 or later before installing the driver. Click here Important The HD Audio Configuration software utility is under continuous update to install the drivers for different operating systems. Installation for reference only. Hence,...
...2-, 4-, 6-, 8- Insert the application CD into the CD-ROM drive. Click Realtek HD Audio Driver. The setup screen will automatically appear. 2. Follow the procedures described below to enhance audio applications. A-2 The following illustrations are based on W indows® XP environment and could ... you must install W indows® 2000 Service Pack4 or later before installing the driver. Click here Important The HD Audio Configuration software utility is under continuous update to install the drivers for different operating systems. Installation for reference only. Hence,...
User Guide
Page 61
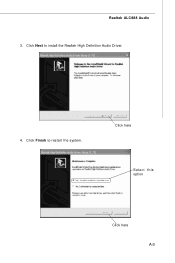
Realtek ALC888 Audio 3. Click Finish to install the Realtek High Definition Audio Driver. 4. Click here Select this option Click here A-3 Click Next to restart the system.
Realtek ALC888 Audio 3. Click Finish to install the Realtek High Definition Audio Driver. 4. Click here Select this option Click here A-3 Click Next to restart the system.
User Guide
Page 62
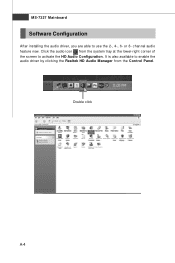
Double click A-4 It is also available to activate the HD Audio Configuration. channel audio feature now. or 8- Click the audio icon from the system tray at the lower-right corner of the screen to enable the audio driver by clicking the Realtek HD Audio M anager from the Control Panel. MS-7327 Mainboard Software Configuration After installing the audio driver, you are able to use the 2-, 4-, 6-
Double click A-4 It is also available to activate the HD Audio Configuration. channel audio feature now. or 8- Click the audio icon from the system tray at the lower-right corner of the screen to enable the audio driver by clicking the Realtek HD Audio M anager from the Control Panel. MS-7327 Mainboard Software Configuration After installing the audio driver, you are able to use the 2-, 4-, 6-

User Guide
Page 63
..." for you like , you may choose the provided sound effects, and the equalizer will adjust automatically. A-5 Realtek ALC888 Audio Sound Effect Here you can select a sound effect you to enjoy different sound experience by pulling down the arrow, totally 23 kinds of sound effect ...
..." for you like , you may choose the provided sound effects, and the equalizer will adjust automatically. A-5 Realtek ALC888 Audio Sound Effect Here you can select a sound effect you to enjoy different sound experience by pulling down the arrow, totally 23 kinds of sound effect ...
User Guide
Page 65
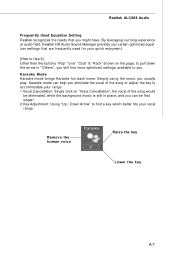
Karaoke Mode Karaoke mode brings Karaoke fun back home. Remove the human voice Raise the key Lower the key A-7 Realtek ALC888 Audio Frequently Used Equalizer Setting Realtek recognizes the needs that you can help you eliminate the vocal of the song or adjust the key...using the music you usually play, Karaoke mode can be that are frequently used for your vocal range. By leveraging our long experience at audio field, Realtek HD Audio Sound Manager provides you certain optimized equalizer settings that singer! 2.Key Adjustment: Using "Up / Down Arrow" to find more optimized settings...
Karaoke Mode Karaoke mode brings Karaoke fun back home. Remove the human voice Raise the key Lower the key A-7 Realtek ALC888 Audio Frequently Used Equalizer Setting Realtek recognizes the needs that you can help you eliminate the vocal of the song or adjust the key...using the music you usually play, Karaoke mode can be that are frequently used for your vocal range. By leveraging our long experience at audio field, Realtek HD Audio Sound Manager provides you certain optimized equalizer settings that singer! 2.Key Adjustment: Using "Up / Down Arrow" to find more optimized settings...

User Guide
Page 66
... simultaneously and let them output respectively from the indicated real panel or front panel. The Realtek HD Audio front output item will appear. A-8 Multi-Stream Function ALC888 supports an outstanding feature called Multi-Stream, which means you may adjust the volumes of the ...speakers that you pluged in front or rear panel by select the Realtek HD Audio rear output or Realtek HD Audio front output items. Important Before set up, please make sure the playback devices are using the same computer together for different purposes...
... simultaneously and let them output respectively from the indicated real panel or front panel. The Realtek HD Audio front output item will appear. A-8 Multi-Stream Function ALC888 supports an outstanding feature called Multi-Stream, which means you may adjust the volumes of the ...speakers that you pluged in front or rear panel by select the Realtek HD Audio rear output or Realtek HD Audio front output items. Important Before set up, please make sure the playback devices are using the same computer together for different purposes...

User Guide
Page 67
A-9 You will find that the second audio source (MP3 music) will be played from the rear panel, which is the default setting. Realtek ALC888 Audio W hen you must to select the Realtek HD Audio front output from the scroll list first, and use a different program to play the second audio source (for example: use Winamp to play MP3 files). Then you are playing the first audio source (for example: use W indows Media Player to play DVD/VCD), the output will come out from the Line-Out audio jack of Front Panel.
A-9 You will find that the second audio source (MP3 music) will be played from the rear panel, which is the default setting. Realtek ALC888 Audio W hen you must to select the Realtek HD Audio front output from the scroll list first, and use a different program to play the second audio source (for example: use Winamp to play MP3 files). Then you are playing the first audio source (for example: use W indows Media Player to play DVD/VCD), the output will come out from the Line-Out audio jack of Front Panel.

User Guide
Page 68
...- Show the following volume controls This is to let you freely decide which volume control items to be able to have an audio chat with your friends via headphone (stream 1 from front panel) while still have maximum 2 streams operating simultaneously. A-10 MS-...7327 Mainboard 3. Playback control Tool Mute Playback device This function is essential when multistreamingplayback enabled. - Realtek HD Audio Front Output Mute You may choose to mute single or multiple volume controls or to output the sound. Enable playback multi-streaming W ...
...- Show the following volume controls This is to let you freely decide which volume control items to be able to have an audio chat with your friends via headphone (stream 1 from front panel) while still have maximum 2 streams operating simultaneously. A-10 MS-...7327 Mainboard 3. Playback control Tool Mute Playback device This function is essential when multistreamingplayback enabled. - Realtek HD Audio Front Output Mute You may choose to mute single or multiple volume controls or to output the sound. Enable playback multi-streaming W ...
