
User Guide
Page 2
...tw/program/service/faq/ faq/esc_faq_list.php Contact our technical staff at: http://support.msi.com.tw/ ii Alternatively, please try the following help resources for FAQ, technical guide, BIOS updates, driver updates, and other countries. Trademarks All trademarks are registered trademarks of its contents.... We take every care in the preparation of this document is the intellectual property of International Business Machines Corporation. Visit the MSI website for further guidance. Copyright Notice The material in this document, but no solution can be obtained from the user's manual...
...tw/program/service/faq/ faq/esc_faq_list.php Contact our technical staff at: http://support.msi.com.tw/ ii Alternatively, please try the following help resources for FAQ, technical guide, BIOS updates, driver updates, and other countries. Trademarks All trademarks are registered trademarks of its contents.... We take every care in the preparation of this document is the intellectual property of International Business Machines Corporation. Visit the MSI website for further guidance. Copyright Notice The material in this document, but no solution can be obtained from the user's manual...
User Guide
Page 9
Slots ...2-19 PCI (Peripheral Component Interconnect) Express Slots 2-19 PCI Interrupt Request Routing 2-20 Chapter 3 BIOS Setup 3-1 Entering Setup ...3-2 Control Keys 3-3 Getting Help 3-3 General Help
Slots ...2-19 PCI (Peripheral Component Interconnect) Express Slots 2-19 PCI Interrupt Request Routing 2-20 Chapter 3 BIOS Setup 3-1 Entering Setup ...3-2 Control Keys 3-3 Getting Help 3-3 General Help
User Guide
Page 10
NVIDIA IDE Drive/ RAID Utility Installation B-9 Installing the NVIDIA RAID Software Under W indows B-9 (for Non-bootable RAID Array B-9 Initializing and Using the Disk Array B-10 NVRAID Management Utility B-12 Viewing RAID Array Configurations B-12 Setting Up a Spare RAID Disk B-13 Morphing From One RAID Array to Another B-17 Hot Plug Array B-18 Initializing a RAID Array B-19 Rebuilding a RAID Array B-22 Synchronizing a RAID Array B-25 Appendix C nVidia System Driver C-1 nVidia System Driver Installation C-2 NVIDIA System Driver C-2 nVidia Utility Installation C-5 x
NVIDIA IDE Drive/ RAID Utility Installation B-9 Installing the NVIDIA RAID Software Under W indows B-9 (for Non-bootable RAID Array B-9 Initializing and Using the Disk Array B-10 NVRAID Management Utility B-12 Viewing RAID Array Configurations B-12 Setting Up a Spare RAID Disk B-13 Morphing From One RAID Array to Another B-17 Hot Plug Array B-18 Initializing a RAID Array B-19 Rebuilding a RAID Array B-22 Synchronizing a RAID Array B-25 Appendix C nVidia System Driver C-1 nVidia System Driver Installation C-2 NVIDIA System Driver C-2 nVidia Utility Installation C-5 x

User Guide
Page 15
Packing Checklist Getting Started MSI motherboard MSI Driver/Utility CD Power Cable SATA Cable Standard Cable for IDE Devices Standard Cable for Floppy Disk Back IO Shield User's Guide * The pictures are for reference only and may vary from the packing contents of the product you purchased. 1-5
Packing Checklist Getting Started MSI motherboard MSI Driver/Utility CD Power Cable SATA Cable Standard Cable for IDE Devices Standard Cable for Floppy Disk Back IO Shield User's Guide * The pictures are for reference only and may vary from the packing contents of the product you purchased. 1-5
User Guide
Page 66
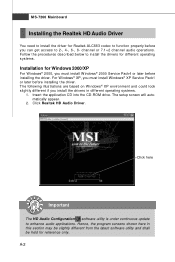
...environment and could look slightly different if you must install W indows® 2000 Service Pack4 or later before installing the driver. Click here Important The HD Audio Configuration software utility is under continuous update to enhance audio applications. Follow the procedures ...indows® 2000, you can get access to 2-, 4-, 6-, 8- Insert the application CD into the CD-ROM drive. Click Realtek HD Audio Driver. A-2 The setup screen will automatically appear. 2. Hence, the program screens shown here in different operating systems. 1. channel or 7.1+2 channel audio...
...environment and could look slightly different if you must install W indows® 2000 Service Pack4 or later before installing the driver. Click here Important The HD Audio Configuration software utility is under continuous update to enhance audio applications. Follow the procedures ...indows® 2000, you can get access to 2-, 4-, 6-, 8- Insert the application CD into the CD-ROM drive. Click Realtek HD Audio Driver. A-2 The setup screen will automatically appear. 2. Hence, the program screens shown here in different operating systems. 1. channel or 7.1+2 channel audio...
User Guide
Page 67
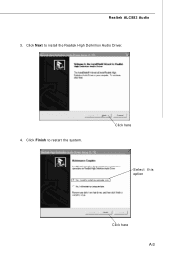
Click here Select this option Click here A-3 Click Finish to install the Realtek High Definition Audio Driver. 4. Realtek ALC883 Audio 3. Click Next to restart the system.
Click here Select this option Click here A-3 Click Finish to install the Realtek High Definition Audio Driver. 4. Realtek ALC883 Audio 3. Click Next to restart the system.
User Guide
Page 68
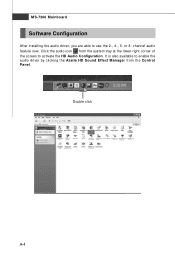
or 8- MS-7260 Mainboard Software Configuration After installing the audio driver, you are able to activate the HD Audio Configuration. Click the audio icon from the Control Panel. Double click A-4 It is also available to enable the audio driver by clicking the Azalia HD Sound Effect M anager from the system tray at the lower-right corner of the screen to use the 2-, 4-, 6- channel audio feature now.
or 8- MS-7260 Mainboard Software Configuration After installing the audio driver, you are able to activate the HD Audio Configuration. Click the audio icon from the Control Panel. Double click A-4 It is also available to enable the audio driver by clicking the Azalia HD Sound Effect M anager from the system tray at the lower-right corner of the screen to use the 2-, 4-, 6- channel audio feature now.
User Guide
Page 81
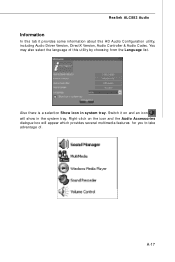
You may also select the language of . Switch it provides some information about this HD Audio Configuration utility, including Audio Driver Version, DirectX Version, Audio Controller & Audio Codec. A-17 Right-click on and an icon will appear which provides several multimedia features for you to take advantage of this utility by choosing from the Language list. Realtek ALC883 Audio Information In this tab it on the icon and the Audio Accessories dialogue box will show in system tray. Also there is a selection Show icon in the system tray.
You may also select the language of . Switch it provides some information about this HD Audio Configuration utility, including Audio Driver Version, DirectX Version, Audio Controller & Audio Codec. A-17 Right-click on and an icon will appear which provides several multimedia features for you to take advantage of this utility by choosing from the Language list. Realtek ALC883 Audio Information In this tab it on the icon and the Audio Accessories dialogue box will show in system tray. Also there is a selection Show icon in the system tray.

User Guide
Page 88
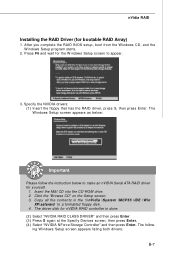
... are to copy and install the nForce RAID software. (Check p.C-7 for details.) 4. Initialize the NVRAID Array Disks. Choose the hard disks that has the RAID driver to be RAID enabled in the system BIOS. (To enable the SATA 0/ 1 Primary/ Secondary Channel in nVidia RAID Setup of Integrated Peripherals in BIOS.) 2. Specify...
... are to copy and install the nForce RAID software. (Check p.C-7 for details.) 4. Initialize the NVRAID Array Disks. Choose the hard disks that has the RAID driver to be RAID enabled in the system BIOS. (To enable the SATA 0/ 1 Primary/ Secondary Channel in nVidia RAID Setup of Integrated Peripherals in BIOS.) 2. Specify...
User Guide
Page 91
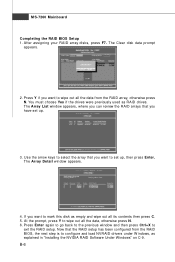
... the data from the RAID BIOS, the next step is to set up , then press Enter. Press Y if you want to configure and load NVRAID drivers under W indows, as RAID drives. Use the arrow keys to select the array that you want to exit the RAID setup. B-6
... the data from the RAID BIOS, the next step is to set up , then press Enter. Press Y if you want to configure and load NVRAID drivers under W indows, as RAID drives. Use the arrow keys to select the array that you want to exit the RAID setup. B-6
User Guide
Page 92
... Copy all the contents in the :\\nVidia \System \MCP55 \IDE \Win XP\sataraid to a formatted floppy disk. 4. The driver disk for yourself. 1. nVidia RAID Installing the RAID Driver (for the W indows Setup screen to appear. 3. Click the "Browse CD" on the Setup screen. 3. ing W indows... Setup screen appears listing both drivers: B-7 Insert the MSI CD into the CD-ROM drive. 2. Specify the NVIDIA drivers: (1) Insert the floppy that has the RAID driver, press S, then press Enter. Press F6 and wait for bootable RAID Array) 1.
... Copy all the contents in the :\\nVidia \System \MCP55 \IDE \Win XP\sataraid to a formatted floppy disk. 4. The driver disk for yourself. 1. nVidia RAID Installing the RAID Driver (for the W indows Setup screen to appear. 3. Click the "Browse CD" on the Setup screen. 3. ing W indows... Setup screen appears listing both drivers: B-7 Insert the MSI CD into the CD-ROM drive. 2. Specify the NVIDIA drivers: (1) Insert the floppy that has the RAID driver, press S, then press Enter. Press F6 and wait for bootable RAID Array) 1.
User Guide
Page 93
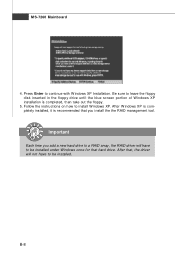
... have to be installed under Windows once for that you add a new hard drive to a RAID array, the RAID driver will not have to leave the floppy disk inserted in the floppy drive until the blue screen portion of W indows XP installation is recommended that ...
... have to be installed under Windows once for that you add a new hard drive to a RAID array, the RAID driver will not have to leave the floppy disk inserted in the floppy drive until the blue screen portion of W indows XP installation is recommended that ...

User Guide
Page 94
...NVIDIA RAID. Important You must be upgraded to use the NVIDIA IDE Parallel ATA driver (as well as the Serial ATA driver if SATA is enabled) must install the NVIDIA IDE driver in order to open the NVIDIA W indows nForce Drivers page. 2. After the installation is enabled). After the reboot, initialize the ...IDE Drive/ RAID Utility Installation Installing the NVIDIA RAID Software Under Windows (for Non-bootable RAID Array) The existing W indows IDE Parallel ATA driver (as well as the NV Serial ATA driver if SATA is completed, be enabled. 3. Make sure that you do not install the NVIDIA IDE...
...NVIDIA RAID. Important You must be upgraded to use the NVIDIA IDE Parallel ATA driver (as well as the Serial ATA driver if SATA is enabled) must install the NVIDIA IDE driver in order to open the NVIDIA W indows nForce Drivers page. 2. After the installation is enabled). After the reboot, initialize the ...IDE Drive/ RAID Utility Installation Installing the NVIDIA RAID Software Under Windows (for Non-bootable RAID Array) The existing W indows IDE Parallel ATA driver (as well as the NV Serial ATA driver if SATA is completed, be enabled. 3. Make sure that you do not install the NVIDIA IDE...
User Guide
Page 111
C-1 Installation of nVidia System Driver Appendix C nVidia System Driver MSI provides a setup CD along with your mainboard, which contains the required drivers for your system, and many other useful and powerful utility to bring you the best experience for your office professional working and for your home leisure entertainment.
C-1 Installation of nVidia System Driver Appendix C nVidia System Driver MSI provides a setup CD along with your mainboard, which contains the required drivers for your system, and many other useful and powerful utility to bring you the best experience for your office professional working and for your home leisure entertainment.
User Guide
Page 112
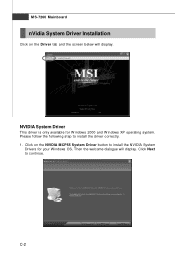
NVIDIA System Driver This driver is only available for your Windows OS. MS-7260 Mainboard nVidia System Driver Installation Click on the NVIDIA MCP55 System Driver button to install the NVIDIA System Drivers for W indows 2000 and W indows XP operating system. Click Next to install the driver correctly. 1. C-2 Click on the Driver tab and the screen below will display. Then the welcome dialogue will display. Please follow the following step to continue.
NVIDIA System Driver This driver is only available for your Windows OS. MS-7260 Mainboard nVidia System Driver Installation Click on the NVIDIA MCP55 System Driver button to install the NVIDIA System Drivers for W indows 2000 and W indows XP operating system. Click Next to install the driver correctly. 1. C-2 Click on the Driver tab and the screen below will display. Then the welcome dialogue will display. Please follow the following step to continue.
User Guide
Page 113
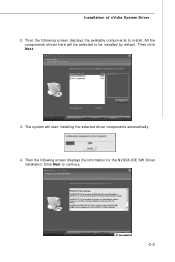
Then the following screen displays the information for the NVIDIA IDE SW Driver installation. The system will be selected to continue. C-3 Then the following screen displays the available components to install. Installation of nVidia System Driver 2. Then click Next. 3. Click Next to be installed by default. All the components shown here will start installing the selected driver components automatically. 4.
Then the following screen displays the information for the NVIDIA IDE SW Driver installation. The system will be selected to continue. C-3 Then the following screen displays the available components to install. Installation of nVidia System Driver 2. Then click Next. 3. Click Next to be installed by default. All the components shown here will start installing the selected driver components automatically. 4.
User Guide
Page 114
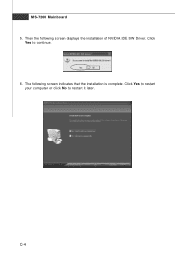
Click Yes to restart your computer or click No to continue. 6. C-4 Then the following screen indicates that the installation is complete. Click Yes to restart it later. MS-7260 Mainboard 5. The following screen displays the installation of NVIDIA IDE SW Driver.
Click Yes to restart your computer or click No to continue. 6. C-4 Then the following screen indicates that the installation is complete. Click Yes to restart it later. MS-7260 Mainboard 5. The following screen displays the installation of NVIDIA IDE SW Driver.

User Guide
Page 115
NVIDIA nTune Utility - Then click on the Utility tab and the screen below will display. 2. Click on the NVIDIA Utility tab and the screen below will display. 3. Click the nTune Utility icon to optimize PC performance. C-5 provides a safe and easy way to install it. Installation of nVidia System Driver nVidia Utility Installation 1.
NVIDIA nTune Utility - Then click on the Utility tab and the screen below will display. 2. Click on the NVIDIA Utility tab and the screen below will display. 3. Click the nTune Utility icon to optimize PC performance. C-5 provides a safe and easy way to install it. Installation of nVidia System Driver nVidia Utility Installation 1.


