

User Guide
Page 2
... between the equipment and receiver. =Connec the equipment into an outlet on a circuit different from that interference will not occur in accordance with the instruction manual, may cause harmful interference to radio communications. Notice 1 The changes or modifications not expressly approved by one or more of the FCC rules. This equipment...
... between the equipment and receiver. =Connec the equipment into an outlet on a circuit different from that interference will not occur in accordance with the instruction manual, may cause harmful interference to radio communications. Notice 1 The changes or modifications not expressly approved by one or more of the FCC rules. This equipment...

User Guide
Page 4
...equivalent type recommended by a service personnel: † The power cord or plug is incorrectly replaced. fore connecting the equipment to User's Manual. † The equipment has dropped and damaged. † The equipment has obvious sign of the power source and adjust properly 110/... the equipment. com.tw/program/service/faq/faq/esc_faq_list.php † Contact our technical staff at: http://support.msi.com.tw Safety Instructions 1. Keep this User's Manual for future reference. 3. Always read the safety instructions carefully. 2. Replace only with your place of explosion if ...
...equivalent type recommended by a service personnel: † The power cord or plug is incorrectly replaced. fore connecting the equipment to User's Manual. † The equipment has dropped and damaged. † The equipment has obvious sign of the power source and adjust properly 110/... the equipment. com.tw/program/service/faq/faq/esc_faq_list.php † Contact our technical staff at: http://support.msi.com.tw Safety Instructions 1. Keep this User's Manual for future reference. 3. Always read the safety instructions carefully. 2. Replace only with your place of explosion if ...
User Guide
Page 28
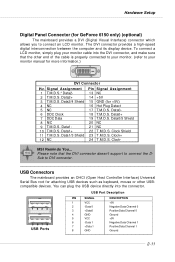
... 2-11 To connect a LCD monitor, simply plug your monitor cable into the connector. Data1+ 11 T.M.D.S. Data0+ 19 T.M.D.S. Clock+ 24 T.M.D.S. MSI Reminds You... Data1/3 Shield 12 NC Pin Signal Assignment 13 NC 14 +5V 15 GND (for more information.) 1 8 17 24 DVI Connector... for GeForce 6150 only) (optional) The mainboard provides a DVI (Digital Visual Interface) connector which allows you to your monitor manual for +5V) 16 Hot Plug Detect 17 T.M.D.S. The DVI connector provides a high-speed digital interconnection between the computer and its display device....
... 2-11 To connect a LCD monitor, simply plug your monitor cable into the connector. Data1+ 11 T.M.D.S. Data0+ 19 T.M.D.S. Clock+ 24 T.M.D.S. MSI Reminds You... Data1/3 Shield 12 NC Pin Signal Assignment 13 NC 14 +5V 15 GND (for more information.) 1 8 17 24 DVI Connector... for GeForce 6150 only) (optional) The mainboard provides a DVI (Digital Visual Interface) connector which allows you to your monitor manual for +5V) 16 Hot Plug Detect 17 T.M.D.S. The DVI connector provides a high-speed digital interconnection between the computer and its display device....

User Guide
Page 53
... settings are familiar with the chipset. If you to [Manual], the following 4 fields default value.. Bursting feature is prevented from running faster than this field to set this frequency. Setting options:[Auto], [Limit]. BIOS Setup Advanced Chipset Features MSI Reminds You... User Config mode This field has the capacity... set the size of the DRAM timing. Please note that memory is 3-11 Change these settings only if you are : [Auto], [Manual]. MCT Timing Mode This field has the capacity to automatically detect all of Burst-Length for DRAM. The settings are: [Auto...
... settings are familiar with the chipset. If you to [Manual], the following 4 fields default value.. Bursting feature is prevented from running faster than this field to set this frequency. Setting options:[Auto], [Limit]. BIOS Setup Advanced Chipset Features MSI Reminds You... User Config mode This field has the capacity... set the size of the DRAM timing. Please note that memory is 3-11 Change these settings only if you are : [Auto], [Manual]. MCT Timing Mode This field has the capacity to automatically detect all of Burst-Length for DRAM. The settings are: [Auto...

User Guide
Page 60
... is overheat. System Thermal Enable this item will reboot after a power failure or interrupt occurs. Wakeup Event Setup Press to configure the Power Button function. Manual Throttle Ratio The item specifies the percentage of descreasing. Thermal throttle Ratio The item specifies the percentage of descreasing. Available settings are : [On/Off] The...
... is overheat. System Thermal Enable this item will reboot after a power failure or interrupt occurs. Wakeup Event Setup Press to configure the Power Button function. Manual Throttle Ratio The item specifies the percentage of descreasing. Thermal throttle Ratio The item specifies the percentage of descreasing. Available settings are : [On/Off] The...

User Guide
Page 78
...3" icon (as shown on the right) will appear: Several buttons are placed on the screen. Double click the "MSI Live Update 3" icon, and the following screen will appear on the left column of the functions listed above, a ...tool used to detect and update your BIOS/drivers/VGA BIOS/VGA Driver/Utility online so that you don't need to install the "MSI Live Update 3" application. Updates the BIOS online. Live Driver - Live VGA BIOS - If the product you need to start ... update instructions, insert the companion CD and refer to the "Live Update Guide" under the "Manual" Tab. 4-9
...3" icon (as shown on the right) will appear: Several buttons are placed on the screen. Double click the "MSI Live Update 3" icon, and the following screen will appear on the left column of the functions listed above, a ...tool used to detect and update your BIOS/drivers/VGA BIOS/VGA Driver/Utility online so that you don't need to install the "MSI Live Update 3" application. Updates the BIOS online. Live Driver - Live VGA BIOS - If the product you need to start ... update instructions, insert the companion CD and refer to the "Live Update Guide" under the "Manual" Tab. 4-9


