
User Manual
Page 3
Power Saving Function 3-2 AC Adapter ...3-4 Battery Pack ...3-6 Using the Battery Pack...3-9 Basic Operations ...3-11 Safety and Comfort Tips...3-11 Having a Good Work Habit...3-12 Knowing the Keyboard ...3-13 Knowing the Touchpad ...3-17 About Hard Disk Drive...3-20 Using the Optical Storage Device 3-21 Connecting the External Devices 3-24 Connecting the Peripheral Devices 3-25 Connecting the Communication Devices 3-27 Express Card Installation...3-29 Removing the Express card 3-29 Preface 1-3 Right Side View ...2-14 Left Side View...2-18 Rear...
Power Saving Function 3-2 AC Adapter ...3-4 Battery Pack ...3-6 Using the Battery Pack...3-9 Basic Operations ...3-11 Safety and Comfort Tips...3-11 Having a Good Work Habit...3-12 Knowing the Keyboard ...3-13 Knowing the Touchpad ...3-17 About Hard Disk Drive...3-20 Using the Optical Storage Device 3-21 Connecting the External Devices 3-24 Connecting the Peripheral Devices 3-25 Connecting the Communication Devices 3-27 Express Card Installation...3-29 Removing the Express card 3-29 Preface 1-3 Right Side View ...2-14 Left Side View...2-18 Rear...

User Manual
Page 8
1-8 Preface Place the power cord in a safe place. Always keep the battery in a way that the metal shield is reliable connected to the TV Tuner, it . If any add-on card or module. Do not place anything on it is...work according to User's Manual. Š The equipment was dropped and damaged. Š The equipment has obvious signs of the power cord. Always keep the strong magnetic or electrical objects away from the equipment. When installing the coaxial cable to protective earthing system of battery recommended by improper battery replacement, use the same or equivalent type...
1-8 Preface Place the power cord in a safe place. Always keep the battery in a way that the metal shield is reliable connected to the TV Tuner, it . If any add-on card or module. Do not place anything on it is...work according to User's Manual. Š The equipment was dropped and damaged. Š The equipment has obvious signs of the power cord. Always keep the strong magnetic or electrical objects away from the equipment. When installing the coaxial cable to protective earthing system of battery recommended by improper battery replacement, use the same or equivalent type...
User Manual
Page 23
... packing box. We are also provided to operate this notebook. It is recommended to using keyboard, touchpad, hard disk drive, and optical storage drive. It is recommended to read these accessories is interrelated to check out that if you a delightful and professional experience in using this notebook. and the procedures of installing and uninstalling the battery; Chapter 3, Getting Started, gives the basic operation instructions on using this notebook.
... packing box. We are also provided to operate this notebook. It is recommended to using keyboard, touchpad, hard disk drive, and optical storage drive. It is recommended to read these accessories is interrelated to check out that if you a delightful and professional experience in using this notebook. and the procedures of installing and uninstalling the battery; Chapter 3, Getting Started, gives the basic operation instructions on using this notebook.
User Manual
Page 31
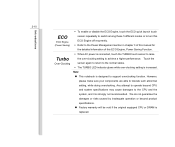
... to support overclocking function. Any attempt to the CPU and the system, and it is strongly not recommended. Note „ This notebook is designed to tolerate such abnormal setting, while doing overclocking. Introductions 2-10 Š To enable or disable the ECO Engine, touch the ECO quick launch touch ECO ECO Engine (Power Saving) sensor repeatedly to switch among these 5 different modes or to turn...
... to support overclocking function. Any attempt to the CPU and the system, and it is strongly not recommended. Note „ This notebook is designed to tolerate such abnormal setting, while doing overclocking. Introductions 2-10 Š To enable or disable the ECO Engine, touch the ECO quick launch touch ECO ECO Engine (Power Saving) sensor repeatedly to switch among these 5 different modes or to turn...

User Manual
Page 32
... low battery status. Š Blinking amber if the battery fails and it is fully charged or when the AC adapter is recommended to replace a new battery. Caps Lock: Glowing blue when the Caps Lock function is turned off. Introductions 2-11 3. Status LED Num Lock: Glowing blue when the Num Lock function is enabled. Š LED indicator goes out when both functions are disabled. Wireless LAN and Bluetooth: Š LED indicator glows blue when Wireless LAN or Bluetooth function is activated. Consult...
... low battery status. Š Blinking amber if the battery fails and it is fully charged or when the AC adapter is recommended to replace a new battery. Caps Lock: Glowing blue when the Caps Lock function is turned off. Introductions 2-11 3. Status LED Num Lock: Glowing blue when the Num Lock function is enabled. Š LED indicator goes out when both functions are disabled. Wireless LAN and Bluetooth: Š LED indicator glows blue when Wireless LAN or Bluetooth function is activated. Consult...

User Manual
Page 38
Users can now utilize shielded cable outside the notebook to take advantage of adaptor. plug the supplied TV-Tuner adaptor into the connector. E-SATA Connector (External Serial ATA) / USB Port The E-SATA Connector ...cable at the other end of the benefits the SATA interface brings to connect USB-interface peripheral devices, such as an USB Port. 7. USB Port The USB 2.0 port allows you to cool the system. Introductions 2-17 5. This connector also works as the mouse, keyboard, modem, portable hard disk module, printer and more. 6. TV-Tuner Antenna Connector (Optional) Notebook...
Users can now utilize shielded cable outside the notebook to take advantage of adaptor. plug the supplied TV-Tuner adaptor into the connector. E-SATA Connector (External Serial ATA) / USB Port The E-SATA Connector ...cable at the other end of the benefits the SATA interface brings to connect USB-interface peripheral devices, such as an USB Port. 7. USB Port The USB 2.0 port allows you to cool the system. Introductions 2-17 5. This connector also works as the mouse, keyboard, modem, portable hard disk module, printer and more. 6. TV-Tuner Antenna Connector (Optional) Notebook...
User Manual
Page 42
VGA Port The 15-pin-D-sub VGA port allows you to connect an external monitor or other standard VGA-compatible device (such as a projector) for a great view of the computer display. 5. Battery Pack This notebook will be powered by the battery pack when the AC adapter is disconnected. Introductions 2-21 4.
VGA Port The 15-pin-D-sub VGA port allows you to connect an external monitor or other standard VGA-compatible device (such as a projector) for a great view of the computer display. 5. Battery Pack This notebook will be powered by the battery pack when the AC adapter is disconnected. Introductions 2-21 4.
User Manual
Page 52
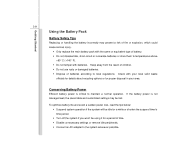
... a normal operation. Conserving Battery Power Efficient battery power is not managed well, the saved data and customized settings may present a risk of fire or explosion, which could cause serious injury. Š Only replace the main battery pack with your local solid waste officials for details about recycling options or for a while or shorten the suspend timer's time period. Š Turn off...
... a normal operation. Conserving Battery Power Efficient battery power is not managed well, the saved data and customized settings may present a risk of fire or explosion, which could cause serious injury. Š Only replace the main battery pack with your local solid waste officials for details about recycling options or for a while or shorten the suspend timer's time period. Š Turn off...
User Manual
Page 59
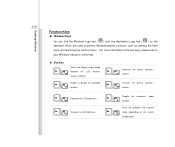
... + configuration). Increase the built-in speaker's + volume. Decrease the built-in speaker's + volume. For more information of the two keys, please refer to perform Windows-specific functions, such as opening the Start menu and launching the shortcut menu. Enable or disable the touchpad function. Force the computer into suspend mode (depending on the keyboard, which are used to your Windows manual or online help. „ [Fn] Key + + Switch the display output mode between the LCD, external monitor...
... + configuration). Increase the built-in speaker's + volume. Decrease the built-in speaker's + volume. For more information of the two keys, please refer to perform Windows-specific functions, such as opening the Start menu and launching the shortcut menu. Enable or disable the touchpad function. Force the computer into suspend mode (depending on the keyboard, which are used to your Windows manual or online help. „ [Fn] Key + + Switch the display output mode between the LCD, external monitor...
User Manual
Page 60
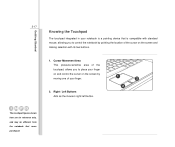
... mouse, allowing you to control the notebook by moving one of the cursor on the screen and making selection with its two buttons. 1. Getting Started 3-17 Knowing the Touchpad The touchpad integrated in your finger. 2. Cursor Movement Area This pressure-sensitive area of the touchpad, allows you to place your finger on and control the cursor on the screen by pointing the location...
... mouse, allowing you to control the notebook by moving one of the cursor on the screen and making selection with its two buttons. 1. Getting Started 3-17 Knowing the Touchpad The touchpad integrated in your finger. 2. Cursor Movement Area This pressure-sensitive area of the touchpad, allows you to place your finger on and control the cursor on the screen by pointing the location...
User Manual
Page 61
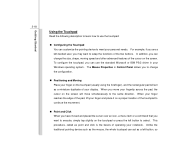
... you can change the configuration. „ Positioning and Moving Place your Windows operating system. When your finger reaches the edge of the pad, lift your finger and place it on a proper location of the touchpad to continue ...driver in Control Panel allows you want to swap the functions of the two buttons. To configure the touchpad, you may want to execute, simply tap slightly on the touchpad (usually using the forefinger), and the rectangular pad will move your display. This procedure, called as a left -handed user, you can use the touchpad: „ Configuring the Touchpad...
... you can change the configuration. „ Positioning and Moving Place your Windows operating system. When your finger reaches the edge of the pad, lift your finger and place it on a proper location of the touchpad to continue ...driver in Control Panel allows you want to swap the functions of the two buttons. To configure the touchpad, you may want to execute, simply tap slightly on the touchpad (usually using the forefinger), and the rectangular pad will move your display. This procedure, called as a left -handed user, you can use the touchpad: „ Configuring the Touchpad...

User Manual
Page 67
... new device. To connect these devices, install the drivers for connecting various USB devices, such as mouse, keyboard, digital camera, webcam, printer, and external optical storage device, ete.. This notebook is capable to auto detect the USB devices installed, and if there is no detection of the devices, please manually enable the USB devices by going to Start Menu / Control Panel / Add Hardware to connect peripheral devices. Connecting the Peripheral Devices Connecting the USB devices This notebook provides USB ports for each device first if necessary, and then connect the device...
... new device. To connect these devices, install the drivers for connecting various USB devices, such as mouse, keyboard, digital camera, webcam, printer, and external optical storage device, ete.. This notebook is capable to auto detect the USB devices installed, and if there is no detection of the devices, please manually enable the USB devices by going to Start Menu / Control Panel / Add Hardware to connect peripheral devices. Connecting the Peripheral Devices Connecting the USB devices This notebook provides USB ports for each device first if necessary, and then connect the device...
User Manual
Page 68
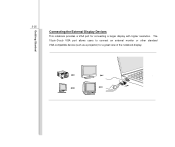
Getting Started 3-25 Connecting the External Display Devices This notebook provides a VGA port for a great view of the notebook display. The 15-pin-D-sub VGA port allows users to connect an external monitor or other standard VGA-compatible device (such as a projector) for connecting a larger display with higher resolution.
Getting Started 3-25 Connecting the External Display Devices This notebook provides a VGA port for a great view of the notebook display. The 15-pin-D-sub VGA port allows users to connect an external monitor or other standard VGA-compatible device (such as a projector) for connecting a larger display with higher resolution.
User Manual
Page 69
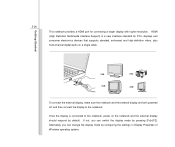
... Interface Support) is connected to the notebook. To connect the external display, make sure the notebook and the external display are both powered off, and then connect the display to the notebook, power on a single cable. Alternately, you can change the display mode by pressing [Fn]+[F2]. If not, you can switch the display mode by configuring the settings in Display Properties of Windows operating system. Getting Started 3-26 This notebook provides a HDMI port for PCs, displays and consumer electronics devices that supports standard...
... Interface Support) is connected to the notebook. To connect the external display, make sure the notebook and the external display are both powered off, and then connect the display to the notebook, power on a single cable. Alternately, you can change the display mode by pressing [Fn]+[F2]. If not, you can switch the display mode by configuring the settings in Display Properties of Windows operating system. Getting Started 3-26 This notebook provides a HDMI port for PCs, displays and consumer electronics devices that supports standard...
User Manual
Page 71
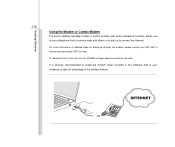
... Bluetooth function) allows you to use only No. 26 AWG or larger telecommunication line cord. Getting Started 3-28 Using the Modem or Combo Modem The built-in 56Kbps fax/data modem or combo modem (with others or to dial-up through the modem, please consult your notebook... to take full advantage of the modem feature. For more instructions or detailed steps on dialing-up to install the modem driver included in the software disk of your MIS staff or Internet service provider (ISP) for help. It is strongly recommended to connect the Internet.
... Bluetooth function) allows you to use only No. 26 AWG or larger telecommunication line cord. Getting Started 3-28 Using the Modem or Combo Modem The built-in 56Kbps fax/data modem or combo modem (with others or to dial-up through the modem, please consult your notebook... to take full advantage of the modem feature. For more instructions or detailed steps on dialing-up to install the modem driver included in the software disk of your MIS staff or Internet service provider (ISP) for help. It is strongly recommended to connect the Internet.

User Manual
Page 78
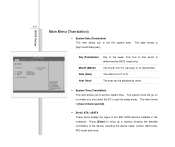
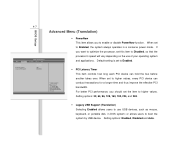
... boot type and boot sequence. F1: General Help F2: Previous Values F9: Optimized Default F4: Save Main Menu (Translation) Show system overview information about BIOS version, CPU features, memory size and setting of the notebook. Security Menu (Translation) Install or clear the password settings for supervisor and user. Advanced Menu (Translation) Adjust the advanced settings of system time and date. BIOS Setup 4-4 BIOS Setup Menu Once you enter the BIOS Setup Utility, the Main Menu will appear on the screen...
... boot type and boot sequence. F1: General Help F2: Previous Values F9: Optimized Default F4: Save Main Menu (Translation) Show system overview information about BIOS version, CPU features, memory size and setting of the notebook. Security Menu (Translation) Install or clear the password settings for supervisor and user. Advanced Menu (Translation) Adjust the advanced settings of system time and date. BIOS Setup 4-4 BIOS Setup Menu Once you enter the BIOS Setup Utility, the Main Menu will appear on the screen...
User Manual
Page 79
... from 01 to set the system date. The system clock will go on no matter you to 31. Main Advanced BISO SETUP UTILITY Security Boot Exit Market Name Model Name System Date System Time [Wed 05/14/2008] [18:08:53] Serial ATA Serial ATA eSATA [Hard Disk] [ATAPI CDROM] [Not Detected] System Infomation :Select Screen :Select Item Enter: Select +/-: Change Opt.
... from 01 to set the system date. The system clock will go on no matter you to 31. Main Advanced BISO SETUP UTILITY Security Boot Exit Market Name Model Name System Date System Time [Wed 05/14/2008] [18:08:53] Serial ATA Serial ATA eSATA [Hard Disk] [ATAPI CDROM] [Not Detected] System Infomation :Select Screen :Select Item Enter: Select +/-: Change Opt.
User Manual
Page 81
... on the use USB devices, such as mouse, keyboard, or portable disk, in a conserve power mode. For better PCI performance, you to enable or disable PowerNow function. When set to Enabled. :Select Screen :Select Item Enter: Select +/-: Change Opt. Setting options: 32, 64, 96, 128, 160, 192, 224, and 248. Š Legacy USB Support (Translation) Selecting Enabled allows users to use of your operating system and applications. Setting options: Enabled, Disabled and Auto. 4-7 BIOS Setup Main Advanced BISO SETUP UTILITY Security Boot Exit...
... on the use USB devices, such as mouse, keyboard, or portable disk, in a conserve power mode. For better PCI performance, you to enable or disable PowerNow function. When set to Enabled. :Select Screen :Select Item Enter: Select +/-: Change Opt. Setting options: 32, 64, 96, 128, 160, 192, 224, and 248. Š Legacy USB Support (Translation) Selecting Enabled allows users to use of your operating system and applications. Setting options: Enabled, Disabled and Auto. 4-7 BIOS Setup Main Advanced BISO SETUP UTILITY Security Boot Exit...

User Manual
Page 82
... the type of BIOS password protection that is set password from CMOS memory. The Password Check item is used to run Setup. Settings are described below : Main Advanced BISO SETUP UTILITY Security Boot Exit Supervisor Password :Not Installed User Password :Not Installed Change Supervisor Password :Select Screen :Select Item Enter: Select +/-: Change Opt. F1: General Help F2: Previous Values F9: Optimized Default F4: Save Enter New Password Type the password, up to abort the selection without entering a password. When the Supervisor Password is...
... the type of BIOS password protection that is set password from CMOS memory. The Password Check item is used to run Setup. Settings are described below : Main Advanced BISO SETUP UTILITY Security Boot Exit Supervisor Password :Not Installed User Password :Not Installed Change Supervisor Password :Select Screen :Select Item Enter: Select +/-: Change Opt. F1: General Help F2: Previous Values F9: Optimized Default F4: Save Enter New Password Type the password, up to abort the selection without entering a password. When the Supervisor Password is...
User Manual
Page 83
... prompted to enter the password. Supervisor Password allows the user to make changes. User Password only allows the user to enter the setup menu, but do not have the right to enter and change the settings of the setup menu; Once the password is powered on or when end users try to run Setup. To clear a set password, just press [Enter] when you can enter Setup without entering any password. BIOS Setup 4-9 Always A password prompt appears every time when the Notebook is disabled, the...
... prompted to enter the password. Supervisor Password allows the user to make changes. User Password only allows the user to enter the setup menu, but do not have the right to enter and change the settings of the setup menu; Once the password is powered on or when end users try to run Setup. To clear a set password, just press [Enter] when you can enter Setup without entering any password. BIOS Setup 4-9 Always A password prompt appears every time when the Notebook is disabled, the...


