User Guide
Page 2
... 1-7 System Specifications 1-8 Component Replacement & Upgrade 1-9 2. System Operations 3-1 System Booting Setup for the first time 3-2 Creating System Recovery Disk 3-3 Network Connection under Windows 7 3-9 RALINK Wireless LAN Connection (Optional 3-14 SRS Premium Sound (Optional 3-16 Power Management 3-18 System Recovery 3-20 ii ▍ Preface ▍ table of Replaceable Parts iv Technical Support iv FCC-B Radio Frequency Interference Statement v Safety Instructions vi WEEE Statement viii 1. Getting Started 2-1 Safety & Comfort Tips 2-2 Having Good Working Habits...
... 1-7 System Specifications 1-8 Component Replacement & Upgrade 1-9 2. System Operations 3-1 System Booting Setup for the first time 3-2 Creating System Recovery Disk 3-3 Network Connection under Windows 7 3-9 RALINK Wireless LAN Connection (Optional 3-14 SRS Premium Sound (Optional 3-16 Power Management 3-18 System Recovery 3-20 ii ▍ Preface ▍ table of Replaceable Parts iv Technical Support iv FCC-B Radio Frequency Interference Statement v Safety Instructions vi WEEE Statement viii 1. Getting Started 2-1 Safety & Comfort Tips 2-2 Having Good Working Habits...

User Guide
Page 4
... specifications in the product may be fulfilled by user's request. Alternatively, please try the following help resources for further guidance. ◙ Visit the MSI website for FAQ, technical guide, BIOS updates, driver updates and other information via http://www.msi.com/index.php?func=service ◙ Contact our technical staff via http://www.msicomputer.com/msi_user/ msi_rma/ for any component of spare parts...
... specifications in the product may be fulfilled by user's request. Alternatively, please try the following help resources for further guidance. ◙ Visit the MSI website for FAQ, technical guide, BIOS updates, driver updates and other information via http://www.msi.com/index.php?func=service ◙ Contact our technical staff via http://www.msicomputer.com/msi_user/ msi_rma/ for any component of spare parts...

User Guide
Page 6
... may damage the equipment. Do not disable the protective earth pin from humidity and high temperature. ▍ Preface Safety Instructions Read the safety instructions carefully and thoroughly. The ventilator on the equipment or user's manual should be connected to an earthed mains socket-outlet. ◙ Always unplug the AC power cord before installing any add-on a reliable flat surface before...
... may damage the equipment. Do not disable the protective earth pin from humidity and high temperature. ▍ Preface Safety Instructions Read the safety instructions carefully and thoroughly. The ventilator on the equipment or user's manual should be connected to an earthed mains socket-outlet. ◙ Always unplug the AC power cord before installing any add-on a reliable flat surface before...

User Guide
Page 7
... of breakage. The optical storage devices are offered for recycling or special disposal. vii MS-6667 Never pour any of the following situations arises, get it work well or you can not get the equipment checked by service personnel: ◙ The power cord or plug is damaged. ◙ Liquid has penetrated into the opening that the metal...
... of breakage. The optical storage devices are offered for recycling or special disposal. vii MS-6667 Never pour any of the following situations arises, get it work well or you can not get the equipment checked by service personnel: ◙ The power cord or plug is damaged. ◙ Liquid has penetrated into the opening that the metal...

User Guide
Page 14
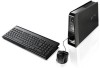
▍ Overview Packing Contents Wind Box Series AC/ DC Adapter AC Power Cord Driver/ Utility Disk User Manual & Quick Guide Wall Mount Kit (Optional) Keyboard (Optional) Mouse (Optional) IR Remote Controller (Optional) * Please contact us immediately if any of the items is damaged or missing. * The picture is for your reference only and your packing contents may slightly vary depending on the model you purchased. 1-2
▍ Overview Packing Contents Wind Box Series AC/ DC Adapter AC Power Cord Driver/ Utility Disk User Manual & Quick Guide Wall Mount Kit (Optional) Keyboard (Optional) Mouse (Optional) IR Remote Controller (Optional) * Please contact us immediately if any of the items is damaged or missing. * The picture is for your reference only and your packing contents may slightly vary depending on the model you purchased. 1-2

User Guide
Page 15
... further information and please be noted that usually used in card reader may support various types of memory card, such as XD (eXtreme Digital), SD (Secure Digital), SDHC (SD High Capacity), MS (Memory Stick), MS Pro (Memory Stick Pro) or MMC (Multi-Media Card) cards that the supported memory cards may vary without notice. 1-3 Do not cover the ventilator. Contact the local dealer for air convection...
... further information and please be noted that usually used in card reader may support various types of memory card, such as XD (eXtreme Digital), SD (Secure Digital), SDHC (SD High Capacity), MS (Memory Stick), MS Pro (Memory Stick Pro) or MMC (Multi-Media Card) cards that the supported memory cards may vary without notice. 1-3 Do not cover the ventilator. Contact the local dealer for air convection...

User Guide
Page 16
...; Overview USB Port The USB (Universal Serial Bus) port is provided for safety concerns. 1-4 the blue power LED is off when you turn on when you turn the system on when data is provided for remote controller. Power Button Press the power button to turn off . Important We suggest that you connect the AC/ DC adapter to your system first and then connect the AC power cord to the hard disk drive. IR...
...; Overview USB Port The USB (Universal Serial Bus) port is provided for safety concerns. 1-4 the blue power LED is off when you turn on when you turn the system on when data is provided for remote controller. Power Button Press the power button to turn off . Important We suggest that you connect the AC/ DC adapter to your system first and then connect the AC power cord to the hard disk drive. IR...

User Guide
Page 18
... the PC. VGA Port The 15-pin-D-sub VGA port allows you to the Local Area Network (LAN). LAN link is provided for a great view of transmitting uncompressed streams. HDMI supports all -digital audio/ video interface capable of the computer display. LAN Jack The standard RJ-45 LAN jack is established. HDMI Port (Optional) The High-Definition Multimedia Interface (HDMI) is provided for attaching USB devices such as a projector) for connection to connect an external monitor...
... the PC. VGA Port The 15-pin-D-sub VGA port allows you to the Local Area Network (LAN). LAN link is provided for a great view of transmitting uncompressed streams. HDMI supports all -digital audio/ video interface capable of the computer display. LAN Jack The standard RJ-45 LAN jack is established. HDMI Port (Optional) The High-Definition Multimedia Interface (HDMI) is provided for attaching USB devices such as a projector) for connection to connect an external monitor...

User Guide
Page 20
▍ Overview System Specifications Input / Output (I/O) ■ 1 DC power jack ■ 1 VGA-Out port ■ 4 USB ports ■ 1 RJ-45 LAN jack ■ 1 HDMI port (Optional) ■ 1 microphone jack ■ 1 headphone/ speaker jack (with S/PDIF-Out via adapter) Power Supply ■ 65 watt AC/ DC adapter with active PFC ■ Input: 100-240V~, 50-60Hz, 1.5A ■ Output: 19V 3.42A Built-In Card ■ 1 wireless LAN card Built-In Drive ■ 1 card reader drive ■ 1 hard disk drive (3.5" regular type) Dimension ■ 297 mm (W) X 223 mm (H) X 60.2 mm (D) 1-8
▍ Overview System Specifications Input / Output (I/O) ■ 1 DC power jack ■ 1 VGA-Out port ■ 4 USB ports ■ 1 RJ-45 LAN jack ■ 1 HDMI port (Optional) ■ 1 microphone jack ■ 1 headphone/ speaker jack (with S/PDIF-Out via adapter) Power Supply ■ 65 watt AC/ DC adapter with active PFC ■ Input: 100-240V~, 50-60Hz, 1.5A ■ Output: 19V 3.42A Built-In Card ■ 1 wireless LAN card Built-In Drive ■ 1 card reader drive ■ 1 hard disk drive (3.5" regular type) Dimension ■ 297 mm (W) X 223 mm (H) X 60.2 mm (D) 1-8
User Guide
Page 21
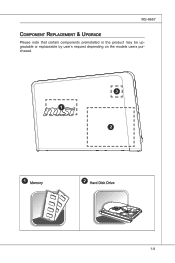
MS-6667 Component Replacement & Upgrade Please note that certain components preinstalled in the product may be upgradable or replaceable by user's request depending on the models users purchased. 3 1 2 1 Memory 2 Hard Disk Drive 1-9
MS-6667 Component Replacement & Upgrade Please note that certain components preinstalled in the product may be upgradable or replaceable by user's request depending on the models users purchased. 3 1 2 1 Memory 2 Hard Disk Drive 1-9

User Guide
Page 26
▍ Getting Started Knowing the Keyboard (Optional) Wind Box DE200/ DC200 packs with a wired or wireless (optional) keyboard that helps your control of the system. ▶ Specifications ■ Compatible with EU/UK/US/JP/KR language layout ■ Isolated keycap for easy typing ■ Low profile with silk printing technology ■ USB interface for all Windows® OS ■ Keystroke life: 12 million ■ Dimensions: 376.4 (L) X 155...
▍ Getting Started Knowing the Keyboard (Optional) Wind Box DE200/ DC200 packs with a wired or wireless (optional) keyboard that helps your control of the system. ▶ Specifications ■ Compatible with EU/UK/US/JP/KR language layout ■ Isolated keycap for easy typing ■ Low profile with silk printing technology ■ USB interface for all Windows® OS ■ Keystroke life: 12 million ■ Dimensions: 376.4 (L) X 155...
User Guide
Page 28
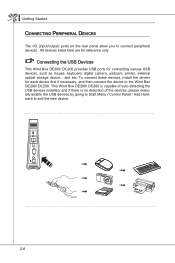
... various USB devices, such as mouse, keyboard, digital camera, webcam, printer, external optical storage device,.. This Wind Box DE200/ DC200 is capable of auto detecting the USB devices installed, and if there is no detection of the devices, please manually enable the USB devices by going to Start Menu / Control Panel / Add Hardware to connect peripheral devices. and etc. ▍ Getting Started Connecting Peripheral Devices The I/O (input/output) ports on the rear panel allow you to add the new device. 2-6 Connecting the USB Devices This Wind Box DE200/ DC200 provides USB ports for...
... various USB devices, such as mouse, keyboard, digital camera, webcam, printer, external optical storage device,.. This Wind Box DE200/ DC200 is capable of auto detecting the USB devices installed, and if there is no detection of the devices, please manually enable the USB devices by going to Start Menu / Control Panel / Add Hardware to connect peripheral devices. and etc. ▍ Getting Started Connecting Peripheral Devices The I/O (input/output) ports on the rear panel allow you to add the new device. 2-6 Connecting the USB Devices This Wind Box DE200/ DC200 provides USB ports for...
User Guide
Page 29
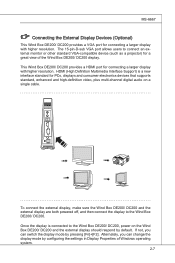
... by configuring the settings in Display Properties of the Wind Box DE200/ DC200 display. Alternately, you can change the display mode by default. MS-6667 Connecting the External Display Devices (Optional) This Wind Box DE200/ DC200 provides a VGA port for connecting a larger display with higher resolution. To connect the external display, make sure the Wind Box DE200/ DC200 and the external display are both powered off, and then connect the display to connect an external monitor or other standard VGA-compatible device (such as a projector) for a great view of Windows operating system...
... by configuring the settings in Display Properties of the Wind Box DE200/ DC200 display. Alternately, you can change the display mode by default. MS-6667 Connecting the External Display Devices (Optional) This Wind Box DE200/ DC200 provides a VGA port for connecting a larger display with higher resolution. To connect the external display, make sure the Wind Box DE200/ DC200 and the external display are both powered off, and then connect the display to connect an external monitor or other standard VGA-compatible device (such as a projector) for a great view of Windows operating system...
User Guide
Page 30
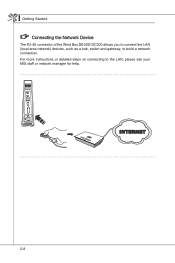
For more instructions or detailed steps on connecting to build a network connection. ▍ Getting Started Connecting the Network Device The RJ-45 connector of the Wind Box DE200/ DC200 allows you to connect the LAN (local area network) devices, such as a hub, switch and gateway, to the LAN, please ask your MIS staff or network manager for help. 2-8
For more instructions or detailed steps on connecting to build a network connection. ▍ Getting Started Connecting the Network Device The RJ-45 connector of the Wind Box DE200/ DC200 allows you to connect the LAN (local area network) devices, such as a hub, switch and gateway, to the LAN, please ask your MIS staff or network manager for help. 2-8

User Guide
Page 32
... remove or install the hard disk drive when the Wind Box DE200/ DC200 is turned on . ▍ Getting Started About Hard Disk Drive Your Wind Box DE200/ DC200 is on . The replacement of hard disk drive should be done by an authorized retailer or service representative. 2-10 Do not turn off the Wind Box DE200/ DC200 when the hard disk In-use LED is equipped with much higher speed and larger capacity than other storage devices, such as the floppy disk drive and optical...
... remove or install the hard disk drive when the Wind Box DE200/ DC200 is turned on . ▍ Getting Started About Hard Disk Drive Your Wind Box DE200/ DC200 is on . The replacement of hard disk drive should be done by an authorized retailer or service representative. 2-10 Do not turn off the Wind Box DE200/ DC200 when the hard disk In-use LED is equipped with much higher speed and larger capacity than other storage devices, such as the floppy disk drive and optical...
User Guide
Page 36
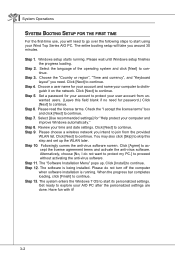
... booting setup will need to go over the following steps to start its personalized settings. Choose the "Country or region", "Time and currency", and "Keyboard layout" you around 30 minutes. Step 4. Step 5. Please read the license terms. Check the "I do not turn off the computer when software installation is being installed. Select [Use recommended settings] for your account and name your Wind Top Series AIO PC...
... booting setup will need to go over the following steps to start its personalized settings. Choose the "Country or region", "Time and currency", and "Keyboard layout" you around 30 minutes. Step 4. Step 5. Please read the license terms. Check the "I do not turn off the computer when software installation is being installed. Select [Use recommended settings] for your account and name your Wind Top Series AIO PC...

User Guide
Page 39
Step 5. Follow the on-screen instructions to create the image of blank DVD disks. Insert the blank DVD disk into the optical disk drive and click [Next] to finish the processing. It takes some time to continue. 3-5 The progress bar starts running to prepare enough number of recovery disk. MS-6667 Step 4.
Step 5. Follow the on-screen instructions to create the image of blank DVD disks. Insert the blank DVD disk into the optical disk drive and click [Next] to finish the processing. It takes some time to continue. 3-5 The progress bar starts running to prepare enough number of recovery disk. MS-6667 Step 4.

User Guide
Page 43
Select [Connect to [Start] > [Control Panel]. Go to the Internet] under Windows 7 Wired LAN Step 1. MS-6667 Step 2. Network Connection under [Network and Internet]. 3-9
Select [Connect to [Start] > [Control Panel]. Go to the Internet] under Windows 7 Wired LAN Step 1. MS-6667 Step 2. Network Connection under [Network and Internet]. 3-9

User Guide
Page 52
..., turn off your display or set your personal needs. You may also finetune the settings by clicking [Change plan settings]. 3-18 Go to save significant amounts of electricity as well as deliver environmental benefits. Select a power plan that suits your PC to control the power management features of user inactivity. Power Management in Windows OS ■ [Power Options] in Windows OS allow you to sleep mode after a period of your display, hard drive, and battery.
..., turn off your display or set your personal needs. You may also finetune the settings by clicking [Change plan settings]. 3-18 Go to save significant amounts of electricity as well as deliver environmental benefits. Select a power plan that suits your PC to control the power management features of user inactivity. Power Management in Windows OS ■ [Power Options] in Windows OS allow you to sleep mode after a period of your display, hard drive, and battery.

User Guide
Page 56
... the instructions below to reboot the system and access Windows operating system as usual. Recover the System with the Recovery Disk If your system is proceeding now. 8. ▍ System Operations 7. Press the F11 hotkey on the keyboard when the following message indicates successful system recovery. The following image appears. 3-22 The System Recovery Function is equipped with an optical disk drive or an external one, you...
... the instructions below to reboot the system and access Windows operating system as usual. Recover the System with the Recovery Disk If your system is proceeding now. 8. ▍ System Operations 7. Press the F11 hotkey on the keyboard when the following message indicates successful system recovery. The following image appears. 3-22 The System Recovery Function is equipped with an optical disk drive or an external one, you...


