
User Manual
Page 20
Package contents Please check the contents of the above items are damaged or missing, please contact your motherboard package. It should contain: y Motherboard y Driver DVD y User Manual y Quick Installation Guide y I/O Shielding y SATA 6G Cable X2 y Case Badge y Product Registration Card y M.2 Screw x2 Important If any of your retailer. 20 Package contents
Package contents Please check the contents of the above items are damaged or missing, please contact your motherboard package. It should contain: y Motherboard y Driver DVD y User Manual y Quick Installation Guide y I/O Shielding y SATA 6G Cable X2 y Case Badge y Product Registration Card y M.2 Screw x2 Important If any of your retailer. 20 Package contents
User Manual
Page 35
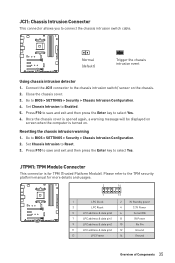
... > SETTINGS > Security > Chassis Intrusion Configuration. 4. Please refer to Enabled. 5. Resetting the chassis intrusion warning 1. Go to Reset. 3. Set Chassis Intrusion to the TPM security platform manual for TPM (Trusted Platform Module). JTPM1: TPM Module Connector This connector is turned on the chassis. 2.
... > SETTINGS > Security > Chassis Intrusion Configuration. 4. Please refer to Enabled. 5. Resetting the chassis intrusion warning 1. Go to Reset. 3. Set Chassis Intrusion to the TPM security platform manual for TPM (Trusted Platform Module). JTPM1: TPM Module Connector This connector is turned on the chassis. 2.
User Manual
Page 42
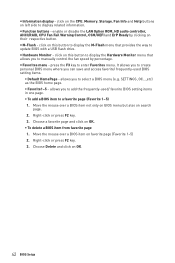
... the F3 key to add the frequently-used BIOS setting items. ƒ Default HomePage - It allows you to create personal BIOS menu where you to manually control the fan speed by clicking on left side to display related information. y Information display - y M-Flash - allows you to select a BIOS menu (e.g. Move the mouse...
... the F3 key to add the frequently-used BIOS setting items. ƒ Default HomePage - It allows you to create personal BIOS menu where you to manually control the fan speed by clicking on left side to display related information. y Information display - y M-Flash - allows you to select a BIOS menu (e.g. Move the mouse...
User Manual
Page 47
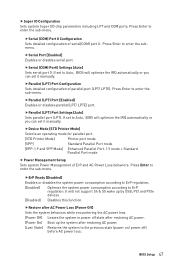
... power off state after restoring AC power. [Last State] Restores the system to Auto, BIOS will optimize the IRQ automatically or you can set it manually. If set to the previous state (power on/ power off) before AC power loss. fParallel (LPT) Port Settings [Auto] Sets parallel port (...LPT). Press Enter to enter the submenu. If set it manually. It will optimize the IRQ automatically or you can set to enter the sub-menu. fParallel (LPT) Port [Enabled] Enables or disables parallel(LPT/ LPTE...
... power off state after restoring AC power. [Last State] Restores the system to Auto, BIOS will optimize the IRQ automatically or you can set it manually. If set to the previous state (power on/ power off) before AC power loss. fParallel (LPT) Port Settings [Auto] Sets parallel port (...LPT). Press Enter to enter the submenu. If set it manually. It will optimize the IRQ automatically or you can set to enter the sub-menu. fParallel (LPT) Port [Enabled] Enables or disables parallel(LPT/ LPTE...
User Manual
Page 53
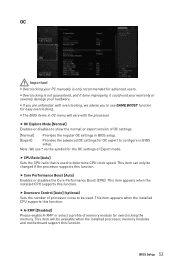
... . f CPU Ratio [Auto] Sets the CPU ratio that is not guaranteed, and if done improperly, it could void your warranty or severely damage your PC manually is only recommended for easy overclocking. This item appears when the installed CPU supports this function. y The BIOS items in BIOS setup. y If you are...
... . f CPU Ratio [Auto] Sets the CPU ratio that is not guaranteed, and if done improperly, it could void your warranty or severely damage your PC manually is only recommended for easy overclocking. This item appears when the installed CPU supports this function. y The BIOS items in BIOS setup. y If you are...
User Manual
Page 55
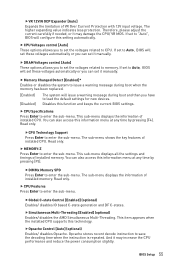
... of installed memory. If set to enter the sub-menu. f CPU Specifications Press Enter to "Auto", BIOS will set it manually. fCPU Technology Support Press Enter to save the decoding time when the instruction is repeated. The sub-menu displays the information of VR Over Current...]. The sub-menu shows the key features of installed memory. This sub-menu displays all the settings and timings of installed CPU. If set it manually. f CPU Features Press Enter to memory. Therefore, please adjust the current carefully if needed, or it may damage the CPU/ VR MOS. f...
... of installed memory. If set to enter the sub-menu. f CPU Specifications Press Enter to "Auto", BIOS will set it manually. fCPU Technology Support Press Enter to save the decoding time when the instruction is repeated. The sub-menu displays the information of VR Over Current...]. The sub-menu shows the key features of installed memory. This sub-menu displays all the settings and timings of installed CPU. If set it manually. f CPU Features Press Enter to memory. Therefore, please adjust the current carefully if needed, or it may damage the CPU/ VR MOS. f...
User Manual
Page 56
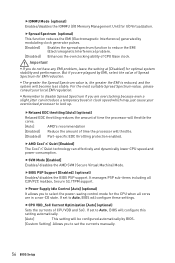
... if you to set to reduce the EMI (Electromagnetic Interference) problem. [Disabled] Enhances the overclocking ability of CPU VDD and SoC. If set the currents manually. 56 BIOS Setup fSpread Spectrum (optional) This function reduces the EMI (Electromagnetic Interference) generated by modulating clock generator pulses. [Enabled] Enables the spread spectrum function...
... if you to set to reduce the EMI (Electromagnetic Interference) problem. [Disabled] Enhances the overclocking ability of CPU VDD and SoC. If set the currents manually. 56 BIOS Setup fSpread Spectrum (optional) This function reduces the EMI (Electromagnetic Interference) generated by modulating clock generator pulses. [Enabled] Enables the spread spectrum function...
User Manual
Page 60
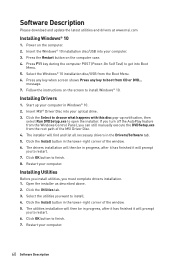
...button on the computer. 2. Start up notification, then select Run DVDSetup.exe to restart. 6. Open the installer as described above. 2. Insert MSI® Driver Disc into your computer in the lower-right corner of the window. 5. Click the Install button in Windows® 10. 2. ... feature from the Windows Control Panel, you want to finish. 7. Click OK button to restart. 7. Select the utilities you can still manually execute the DVDSetup.exe from the Boot Menu. 6. The installer will prompt you must complete drivers installation. 1. Click OK button to install...
...button on the computer. 2. Start up notification, then select Run DVDSetup.exe to restart. 6. Open the installer as described above. 2. Insert MSI® Driver Disc into your computer in the lower-right corner of the window. 5. Click the Install button in Windows® 10. 2. ... feature from the Windows Control Panel, you want to finish. 7. Click OK button to restart. 7. Select the utilities you can still manually execute the DVDSetup.exe from the Boot Menu. 6. The installer will prompt you must complete drivers installation. 1. Click OK button to install...
User Manual
Page 63
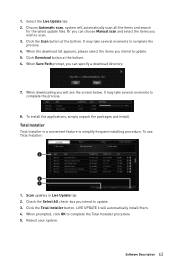
... check-box you intend to complete the process. 4. Reboot your system. Click the Scan button at the bottom. 6. When Save Path prompt, you can choose Manual scan and select the items you can specify a download directory. 7. To use Total Installer: 2 3 1 1. LIVE UPDATE 6 will automatically scan all the items and search for...
... check-box you intend to complete the process. 4. Reboot your system. Click the Scan button at the bottom. 6. When Save Path prompt, you can choose Manual scan and select the items you can specify a download directory. 7. To use Total Installer: 2 3 1 1. LIVE UPDATE 6 will automatically scan all the items and search for...
User Manual
Page 65
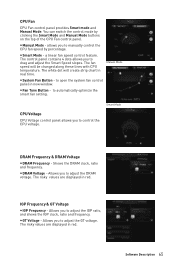
... y DRAM Frequency - You can switch the control mode by percentage. y Manual Mode - allows you to drag and adjust the Smart Speed slopes. to manually control the CPU fan speed by clicking the Smart Mode and Manual Mode buttons on the top of the CPU Fan control panel. Allows you... The risky values are displayed in new window. Software Description 65 CPU Fan CPU Fan control panel provides Smart mode and Manual Mode. y Fan Tune Button - Manual Mode y System Fan Button - Shows the DRAM clock, ratio and frequency. a linear fan speed control feature. y GT Voltage -
... y DRAM Frequency - You can switch the control mode by percentage. y Manual Mode - allows you to drag and adjust the Smart Speed slopes. to manually control the CPU fan speed by clicking the Smart Mode and Manual Mode buttons on the top of the CPU Fan control panel. Allows you... The risky values are displayed in new window. Software Description 65 CPU Fan CPU Fan control panel provides Smart mode and Manual Mode. y Fan Tune Button - Manual Mode y System Fan Button - Shows the DRAM clock, ratio and frequency. a linear fan speed control feature. y GT Voltage -

User Manual
Page 85
... change settings, refer to store any temporary information on the RAM disk. set the path to improve reading speed. RAMDISK allows you to following instructions. manually backup files. ƒ Restore On Boot - check this box to delete files. Remove the RAM disk Dislpay information Delete files in your SSD's life by...
... change settings, refer to store any temporary information on the RAM disk. set the path to improve reading speed. RAMDISK allows you to following instructions. manually backup files. ƒ Restore On Boot - check this box to delete files. Remove the RAM disk Dislpay information Delete files in your SSD's life by...

User Manual
Page 90
... Web GUI. ƒ Default credentials are: ˜ Username - When prompt you can still manually execute the DVDSetup.exe from the root path of the drivers while installing operating system. 1. Insert the MSI Driver Disc into the optical drive. 3. Navigate to finish. 7. Select the (rcraid.inf) ... RAID driver, and Windows setup should continue. 9. Installing RAID Driver New Operating System Installation The following details the installation of the MSI Driver Disc. 4. Windows setup will need to copy the files after selecting the location to install Windows click on Load driver button...
... Web GUI. ƒ Default credentials are: ˜ Username - When prompt you can still manually execute the DVDSetup.exe from the root path of the drivers while installing operating system. 1. Insert the MSI Driver Disc into the optical drive. 3. Navigate to finish. 7. Select the (rcraid.inf) ... RAID driver, and Windows setup should continue. 9. Installing RAID Driver New Operating System Installation The following details the installation of the MSI Driver Disc. 4. Windows setup will need to copy the files after selecting the location to install Windows click on Load driver button...


