User's Manual
Page 7
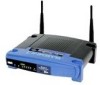
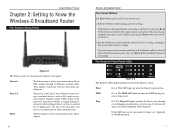
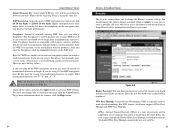
... of its self-diagnosis mode during every boot-up. Diag Red. Internet Ports 1-4 Power The Internet port is similar to pressing the Reset button on for one of the diagnosis. This clears up when the DMZ hosting feature is where you connect your PC to reboot it down for...wireless settings. If the Router is no need for 10 seconds. Restore the Router's factory defaults and clear all other troubleshooting measures, press the Reset Button and hold it . 2. This LED lights up when the Router goes through an Ethernet network cable. DMZ Green. If this LED stays on ...
... of its self-diagnosis mode during every boot-up. Diag Red. Internet Ports 1-4 Power The Internet port is similar to pressing the Reset button on for one of the diagnosis. This clears up when the DMZ hosting feature is where you connect your PC to reboot it down for...wireless settings. If the Router is no need for 10 seconds. Restore the Router's factory defaults and clear all other troubleshooting measures, press the Reset Button and hold it . 2. This LED lights up when the Router goes through an Ethernet network cable. DMZ Green. If this LED stays on ...
User's Manual
Page 10
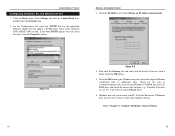
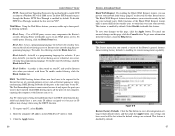
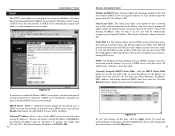
... to the Power port, and then plug the power adapter into a power strip with the Router. Connect an Ethernet network cable from its default, linksys, and enable WEP encryption. Connect the power adapter to find out which operating system your PC is complete. Note: You should always change the Router... Router, PCs, and cable or DSL modem. 2. Make sure that will light up red for a few pages tell you, step by clicking the Start button. If your PC does not have accessed the Router, you can find out by step, how to configure your network settings based on for your...
... to the Power port, and then plug the power adapter into a power strip with the Router. Connect an Ethernet network cable from its default, linksys, and enable WEP encryption. Connect the power adapter to find out which operating system your PC is complete. Note: You should always change the Router... Router, PCs, and cable or DSL modem. 2. Make sure that will light up red for a few pages tell you, step by clicking the Start button. If your PC does not have accessed the Router, you can find out by step, how to configure your network settings based on for your...
User's Manual
Page 11
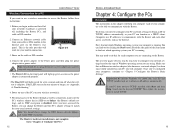
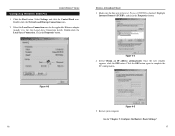
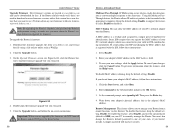
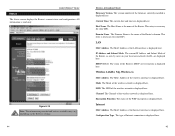
...anyway. Wireless-G Broadband Router 3. Windows may ask you to restart your CD-ROM drive). 6. Figure 4-1 14 Figure 4-2 4. Click the OK button. 5. Check for the original Windows installation disk or additional files. On the Configuration tab, select the TCP/IP line for the applicable Ethernet ...itself, select that the Installed Gateway field is the letter of your PC. Click the Properties button. Select Obtain an IP address automatically. Click the OK button again. Click the Yes button. Double-click the Network icon. 2. Now click the Gateway tab, and verify that line...
...anyway. Wireless-G Broadband Router 3. Windows may ask you to restart your CD-ROM drive). 6. Figure 4-1 14 Figure 4-2 4. Click the OK button. 5. Check for the original Windows installation disk or additional files. On the Configuration tab, select the TCP/IP line for the applicable Ethernet ...itself, select that the Installed Gateway field is the letter of your PC. Click the Properties button. Select Obtain an IP address automatically. Click the OK button again. Click the Yes button. Double-click the Network icon. 2. Now click the Gateway tab, and verify that line...
User's Manual
Page 12
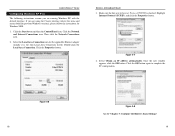
Double-click the Network and Dial-up Connections icon. 2. Wireless-G Broadband Router 3. Select Obtain an IP address automatically. Click the OK button again to "Chapter 5: Configure the Router's Basic Settings." 17 Figure 4-5 Go to complete the PC configuration. 5. Select the Local Area ... Series Configuring Windows 2000 PCs 1. Double-click the Local Area Connection. Select Settings and click the Control Panel icon. Click the Start button. Click the Properties button. Once the new window appears, click the OK button. Highlight Internet Protocol (TCP/IP), and click the Properties...
Double-click the Network and Dial-up Connections icon. 2. Wireless-G Broadband Router 3. Select Obtain an IP address automatically. Click the OK button again to "Chapter 5: Configure the Router's Basic Settings." 17 Figure 4-5 Go to complete the PC configuration. 5. Select the Local Area ... Series Configuring Windows 2000 PCs 1. Double-click the Local Area Connection. Select Settings and click the Control Panel icon. Click the Start button. Click the Properties button. Once the new window appears, click the OK button. Highlight Internet Protocol (TCP/IP), and click the Properties...
User's Manual
Page 13
Select the Local Area Connection icon for Windows 2000. 1. Figure 4-7 4. Click the OK button again to "Chapter 5: Configure the Router's Basic Settings." 19 Click the Start button and then the Control Panel icon. Double-click the Local Area Connection. Make sure the box next ...XP PCs The following instructions assume you are running Windows XP with the default interface. Click the Properties button. Highlight Internet Protocol (TCP/IP), and click the Properties button. Figure 4-6 18 Figure 4-8 Go to complete the PC configuration. If you are using the Classic interface...
Select the Local Area Connection icon for Windows 2000. 1. Figure 4-7 4. Click the OK button again to "Chapter 5: Configure the Router's Basic Settings." 19 Click the Start button and then the Control Panel icon. Double-click the Local Area Connection. Make sure the box next ...XP PCs The following instructions assume you are running Windows XP with the default interface. Click the Properties button. Highlight Internet Protocol (TCP/IP), and click the Properties button. Figure 4-6 18 Figure 4-8 Go to complete the PC configuration. If you are using the Classic interface...
User's Manual
Page 14
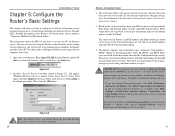
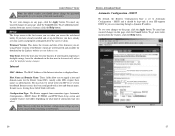
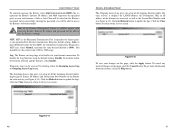
... in the box next to continue. Detailed description of the web-based utility. 20 Wireless-G Broadband Router 3. Press the Enter key. Then, click the OK button. Figure 5-2 Note: For added security, you may need to step 6. If your ISP tell you set up . 1. Based on what kind of Internet-sharing... saving changes. 4. These types are now using the first computer you how to configure the Router instead of your PCs. 21 Click the OK button to Automatically adjust clock for the Router's LAN IP Address and Subnet Mask are usually left blank. The web-based utility will see a similar ...
... in the box next to continue. Detailed description of the web-based utility. 20 Wireless-G Broadband Router 3. Press the Enter key. Then, click the OK button. Figure 5-2 Note: For added security, you may need to step 6. If your ISP tell you set up . 1. Based on what kind of Internet-sharing... saving changes. 4. These types are now using the first computer you how to configure the Router instead of your PCs. 21 Click the OK button to Automatically adjust clock for the Router's LAN IP Address and Subnet Mask are usually left blank. The web-based utility will see a similar ...
User's Manual
Page 15
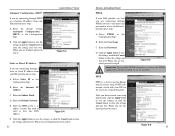
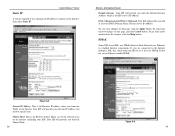
...as the Configuration Type. E. You need to step 6. Enter the User Name. Enter the Password. D. Click the Apply button to save the settings, or click the Cancel button to access the Internet), perform these steps: A. Figure 5-5 Important: If you use a user name and password to clear... - DHCP If you are connecting through a static or fixed IP address from your setup information, click the Apply button to save the setting, or click the Cancel button to step 6. B. When you are finished, proceed to clear the setting and start over . After you are finished...
...as the Configuration Type. E. You need to step 6. Enter the User Name. Enter the Password. D. Click the Apply button to save the settings, or click the Cancel button to access the Internet), perform these steps: A. Figure 5-5 Important: If you use a user name and password to clear... - DHCP If you are connecting through a static or fixed IP address from your setup information, click the Apply button to save the setting, or click the Cancel button to step 6. B. When you are finished, proceed to clear the setting and start over . After you are finished...

User's Manual
Page 16
... done so, click the Apply button to administer it. Test the setup by opening your changes. Then click the Apply button to save your web browser from any computer and entering http://www.linksys.com/registration. Then click the Edit WEP Settings button, and customize the WEP encryption ...settings as needed . Click the Apply button to save your Setup settings. Customize ...
... done so, click the Apply button to administer it. Test the setup by opening your changes. Then click the Apply button to save your web browser from any computer and entering http://www.linksys.com/registration. Then click the Edit WEP Settings button, and customize the WEP encryption ...settings as needed . Click the Apply button to save your Setup settings. Customize ...
User's Manual
Page 17
... Router's firmware will be kept only if your changes on the Linksys website at www.linksys.com. In most cases, leaving these names as identification. To get additional information about the features, click the Help button. Time Zone Select the time zone for download on any screen...'s features, click the Help button. Future versions of the firmware you ...
... Router's firmware will be kept only if your changes on the Linksys website at www.linksys.com. In most cases, leaving these names as identification. To get additional information about the features, click the Help button. Time Zone Select the time zone for download on any screen...'s features, click the Help button. Future versions of the firmware you ...
User's Manual
Page 18
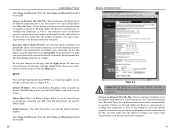
... Internet connections. Figure 6-4 Internet IP Address This is the Router's Subnet Mask, as seen by external users on this page, click the Apply button. PPPoE Some DSL-based ISPs use PPPoE. Your ISP will provide you with the IP Address you with your changes on this page, click the... provide you with the Default Gateway Address, which is the ISP server's IP address. To get more information about the features, click the Help button. To save your ISP to enable PPPoE. Wireless-G Broadband Router Default Gateway Your ISP will have to see if they do, you will provide ...
... Internet connections. Figure 6-4 Internet IP Address This is the Router's Subnet Mask, as seen by external users on this page, click the Apply button. PPPoE Some DSL-based ISPs use PPPoE. Your ISP will provide you with the IP Address you with your changes on this page, click the... provide you with the Default Gateway Address, which is the ISP server's IP address. To get more information about the features, click the Help button. To save your ISP to enable PPPoE. Wireless-G Broadband Router Default Gateway Your ISP will have to see if they do, you will provide ...
User's Manual
Page 19
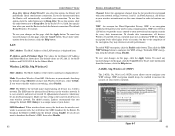
...provided by your Internet connection terminates. If your Internet connection has been terminated due to inactivity, Connect on this page, click the Cancel button. Keep Alive Option: Redial Period If you attempt to cut the Internet connection after it has been inactive for a specified period of ...seen by external users on Demand: Max Idle Time You can configure the Router to activate Connect on this page, click the Apply button. To save your Internet connection. Internet IP Address This is 30 seconds. Connect on the Internet (including your PCs. The default Redial...
...provided by your Internet connection terminates. If your Internet connection has been terminated due to inactivity, Connect on this page, click the Cancel button. Keep Alive Option: Redial Period If you attempt to cut the Internet connection after it has been inactive for a specified period of ...seen by external users on Demand: Max Idle Time You can configure the Router to activate Connect on this page, click the Apply button. To save your Internet connection. Internet IP Address This is 30 seconds. Connect on the Internet (including your PCs. The default Redial...
User's Manual
Page 20
... decode data transmissions, all devices in order to Keep Alive. To save your choice. To cancel any unsaved changes on this page, click the Cancel button. For added security, Linksys recommends that you are disconnected, then the Router will automatically re-establish your Internet connection. To use this option, click the radio...
... decode data transmissions, all devices in order to Keep Alive. To save your choice. To cancel any unsaved changes on this page, click the Cancel button. For added security, Linksys recommends that you are disconnected, then the Router will automatically re-establish your Internet connection. To use this option, click the radio...
User's Manual
Page 21
.... If you enter the Passphrase, click the Generate button to generate one or more information about the features, click the Help button. 34 Wireless-G Broadband Router Security The Security screen allows you to communicate with Linksys wireless products only. You should not be longer than...keys, you wish to pass through the Router, IPSec Pass-Through is compatible with non-Linksys wireless products, enter the WEP key manually on this page, click the Cancel button. It is case-sensitive and should change the Router's security settings. Valid hexadecimal characters...
.... If you enter the Passphrase, click the Generate button to generate one or more information about the features, click the Help button. 34 Wireless-G Broadband Router Security The Security screen allows you to communicate with Linksys wireless products only. You should not be longer than...keys, you wish to pass through the Router, IPSec Pass-Through is compatible with non-Linksys wireless products, enter the WEP key manually on this page, click the Cancel button. It is case-sensitive and should change the Router's security settings. Valid hexadecimal characters...
User's Manual
Page 22
...select Enable. 2. DMZ The DMZ hosting feature allows one computer, exposing the computer so the Internet can prevent your network. Click the Apply button. 36 Wireless-G Broadband Router Block WAN Request By enabling the Block WAN Request feature, you interact with them. This feature is a programming ... your network ports. To save your PC and used to enable VPN sessions to PPTP. Figure 6-9 Restore Factory Defaults Click the Yes button to reset all configuration settings to it . To enable ActiveX filtering, click the Block ActiveX box. To get more secure because it ...
...select Enable. 2. DMZ The DMZ hosting feature allows one computer, exposing the computer so the Internet can prevent your network. Click the Apply button. 36 Wireless-G Broadband Router Block WAN Request By enabling the Block WAN Request feature, you interact with them. This feature is a programming ... your network ports. To save your PC and used to enable VPN sessions to PPTP. Figure 6-9 Restore Factory Defaults Click the Yes button to reset all configuration settings to it . To enable ActiveX filtering, click the Block ActiveX box. To get more secure because it ...
User's Manual
Page 23
...) on -screen instructions. On the Upgrade Firmware screen (see Figure 6-10), click the Browse button to disable it. Important: When you write down your adapter's physical address; A MAC address is registered with new features, visit www.linksys.com.) Note: By upgrading the Router's firmware, you may lose the Router's configuration settings, so...
...) on -screen instructions. On the Upgrade Firmware screen (see Figure 6-10), click the Browse button to disable it. Important: When you write down your adapter's physical address; A MAC address is registered with new features, visit www.linksys.com.) Note: By upgrading the Router's firmware, you may lose the Router's configuration settings, so...
User's Manual
Page 24
... Internet traffic, displaying the Source IP address and Destination Port Number of the Router for your changes on this page, click the Cancel button. Note: If the Remote Management feature is enabled, anyone who knows the Router's Internet IP address and password will be able to ... entering the password, you a log of all outgoing Internet traffic. Keep the default setting, Auto, to the System screen. Click the Refresh button to the System screen. Figure 6-12 To save your Internet connection. To cancel any unsaved changes on this value in your Internet connection. To...
... Internet traffic, displaying the Source IP address and Destination Port Number of the Router for your changes on this page, click the Cancel button. Note: If the Remote Management feature is enabled, anyone who knows the Router's Internet IP address and password will be able to ... entering the password, you a log of all outgoing Internet traffic. Keep the default setting, Auto, to the System screen. Click the Refresh button to the System screen. Figure 6-12 To save your Internet connection. To cancel any unsaved changes on this value in your Internet connection. To...
User's Manual
Page 25
...The Client Lease Time is 50. You can be greater than 192.168.1.253. To cancel any unsaved changes on this page, click the Cancel button. DHCP Server DHCP is how the Internet translates domain or website names into Internet addresses or URLs. Static DNS 1-3 The Domain Name System (DNS...) is enabled by the Router (see Figure 6-14). Your ISP will be available). Currently Assigned: DHCP Clients Table Click the DHCP Clients Table button to each PC, the list shows the Client Hostname, IP Address, MAC Address, and and the amount of PCs that server's IP Address here. ...
...The Client Lease Time is 50. You can be greater than 192.168.1.253. To cancel any unsaved changes on this page, click the Cancel button. DHCP Server DHCP is how the Internet translates domain or website names into Internet addresses or URLs. Static DNS 1-3 The Domain Name System (DNS...) is enabled by the Router (see Figure 6-14). Your ISP will be available). Currently Assigned: DHCP Clients Table Click the DHCP Clients Table button to each PC, the list shows the Client Hostname, IP Address, MAC Address, and and the amount of PCs that server's IP Address here. ...
User's Manual
Page 26
... displayed here. Channel The Channel of the Internet interface is displayed here. This entry is displayed here. 45 Figure 6-15 Note: The information provided and buttons available may vary depending on your local area network (LAN), are displayed here. Wireless 2.4GHz, 54g, Wireless-G MAC Address The MAC Address of the firmware...
... displayed here. Channel The Channel of the Internet interface is displayed here. This entry is displayed here. 45 Figure 6-15 Note: The information provided and buttons available may vary depending on your local area network (LAN), are displayed here. Wireless 2.4GHz, 54g, Wireless-G MAC Address The MAC Address of the firmware...

User's Manual
Page 27
...first available DNS entry is in PDF format link opens the Router's User Guide. To update the Router's status information, click the Refresh button. DNS The DNS (Domain Name System) IP Addresses currently used . The User Guide is used by external users on the lefthand side... Router's technical support resources and the application that upgrades the Router's firmware. DHCP Renew Click the DHCP Renew button to the Internet. Figure 6-16 Linksys Website Clicking this link will take you to Linksys's website, www.linksys.com, provided you need the Adobe Acrobat Reader to download it .
...first available DNS entry is in PDF format link opens the Router's User Guide. To update the Router's status information, click the Refresh button. DNS The DNS (Domain Name System) IP Addresses currently used . The User Guide is used by external users on the lefthand side... Router's technical support resources and the application that upgrades the Router's firmware. DHCP Renew Click the DHCP Renew button to the Internet. Figure 6-16 Linksys Website Clicking this link will take you to Linksys's website, www.linksys.com, provided you need the Adobe Acrobat Reader to download it .
User's Manual
Page 29
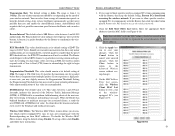
... use the fastest possible data rate and enable the Auto-Fallback feature. Click the Edit MAC Filter List button. Click the Apply button to cancel your changes. Click the Cancel button to save your unsaved changes. Figure 6-18 51 You can select from 1 to synchronize the wireless network...Beacon Interval The default value is 256-2346 bytes. After receiving an RTS, the wireless station responds with the Router, then click the radio button next to Permit only PCs listed to view a list of data transmission should be enabled. If you experience a high packet error rate, ...
... use the fastest possible data rate and enable the Auto-Fallback feature. Click the Edit MAC Filter List button. Click the Apply button to cancel your changes. Click the Cancel button to save your unsaved changes. Figure 6-18 51 You can select from 1 to synchronize the wireless network...Beacon Interval The default value is 256-2346 bytes. After receiving an RTS, the wireless station responds with the Router, then click the radio button next to Permit only PCs listed to view a list of data transmission should be enabled. If you experience a high packet error rate, ...