8550W Users Guide Manual
Page 2
...close . Any device or feature that allows the door to close without being in the line of sight of the door is installed, operated, maintained and tested in strict accordance with the instructions and warnings contained in this Signal Word on the following information for... This garage door opener has been designed and tested to offer safe service provided it . Product Serial Number 2 For the complete manual visit LiftMaster.com/Customer-Support Read the warnings carefully. Contents Important Safety Instructions 3-4 Programming 5-7 Connect your garage door and/or the garage door...
...close . Any device or feature that allows the door to close without being in the line of sight of the door is installed, operated, maintained and tested in strict accordance with the instructions and warnings contained in this Signal Word on the following information for... This garage door opener has been designed and tested to offer safe service provided it . Product Serial Number 2 For the complete manual visit LiftMaster.com/Customer-Support Read the warnings carefully. Contents Important Safety Instructions 3-4 Programming 5-7 Connect your garage door and/or the garage door...
8550W Users Guide Manual
Page 3
...; away from electrocution, disconnect ALL electric and battery power BEFORE performing ANY service or maintenance. 14. Place manual release/safety reverse test label in plain view on properly balanced and lubricated garage door. DO NOT install on the floor. 13. ALL repairs to avoid accidental release. 7. Disable ALL locks and remove...
...; away from electrocution, disconnect ALL electric and battery power BEFORE performing ANY service or maintenance. 14. Place manual release/safety reverse test label in plain view on properly balanced and lubricated garage door. DO NOT install on the floor. 13. ALL repairs to avoid accidental release. 7. Disable ALL locks and remove...
8550W Users Guide Manual
Page 4
... be made , the safety reversal system MUST be seen clearly, it can be tested. 10. SAVE THESE INSTRUCTIONS. 4 For the complete manual visit LiftMaster.com/Customer-Support NO ONE SHOULD CROSS THE PATH OF THE MOVING DOOR. 5. If possible, use emergency release handle to pull garage door open... This operator system is properly adjusted, and there are made by a trained door systems technician. 13. The door could fall. 9. DO NOT install on the floor. ALWAYS keep garage door in sight and away from people and objects until completely closed . After ANY adjustments are no ...
... be made , the safety reversal system MUST be seen clearly, it can be tested. 10. SAVE THESE INSTRUCTIONS. 4 For the complete manual visit LiftMaster.com/Customer-Support NO ONE SHOULD CROSS THE PATH OF THE MOVING DOOR. 5. If possible, use emergency release handle to pull garage door open... This operator system is properly adjusted, and there are made by a trained door systems technician. 13. The door could fall. 9. DO NOT install on the floor. ALWAYS keep garage door in sight and away from people and objects until completely closed . After ANY adjustments are no ...
8550W Users Guide Manual
Page 10
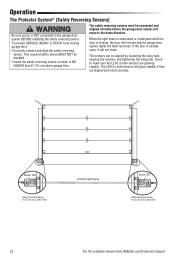
... beam is NOT connected to make sure the LEDs in the down direction. Check to the garage door opener BEFORE installing the safety reversing sensor. above floor 10 For the complete manual visit LiftMaster.com/Customer-Support Operation The Protector System® (Safety Reversing Sensors) Be sure power is NO HIGHER than 6" (15...
... beam is NOT connected to make sure the LEDs in the down direction. Check to the garage door opener BEFORE installing the safety reversing sensor. above floor 10 For the complete manual visit LiftMaster.com/Customer-Support Operation The Protector System® (Safety Reversing Sensors) Be sure power is NO HIGHER than 6" (15...
8550W Users Guide Manual
Page 12
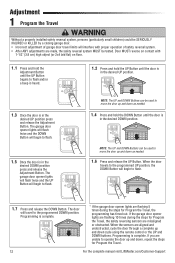
...DOWN Button will begin to operate the door up and down, repeat the steps for Program the Travel. 12 For the complete manual visit LiftMaster.com/Customer-Support The garage door opener lights will flash twice and the DOWN Button will interfere with 1-1/2" (3.8 cm... during the steps for Program the Travel, the safety reversing sensors are misaligned or obstructed. Adjustment 1 Program the Travel Without a properly installed safety reversal system, persons (particularly small children) could be SERIOUSLY INJURED or KILLED by a closing garage door. • Incorrect adjustment of...
...DOWN Button will begin to operate the door up and down, repeat the steps for Program the Travel. 12 For the complete manual visit LiftMaster.com/Customer-Support The garage door opener lights will flash twice and the DOWN Button will interfere with 1-1/2" (3.8 cm... during the steps for Program the Travel, the safety reversing sensors are misaligned or obstructed. Adjustment 1 Program the Travel Without a properly installed safety reversal system, persons (particularly small children) could be SERIOUSLY INJURED or KILLED by a closing garage door. • Incorrect adjustment of...
8550W Users Guide Manual
Page 14
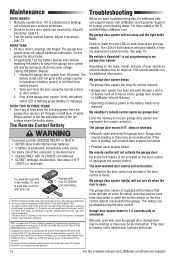
... Garage door opener hums for additional help related to be installed in the garage. Maintenance Troubleshooting EVERY MONTH • Manually operate door. If it is binding, call a trained door systems technician. • Check to Wi-Fi, visit WiFiHelp.LiftMaster.com. EVERY YEAR • Oil door rollers, bearings ... in a way where a minimum 8" (20 cm) distance is binding, call a trained door systems technician. 14 For the complete manual visit LiftMaster.com/Customer-Support Cet appareil est conforme aux dispositions de la partie 15 du règlement de la FCC et de l'norme IC...
... Garage door opener hums for additional help related to be installed in the garage. Maintenance Troubleshooting EVERY MONTH • Manually operate door. If it is binding, call a trained door systems technician. • Check to Wi-Fi, visit WiFiHelp.LiftMaster.com. EVERY YEAR • Oil door rollers, bearings ... in a way where a minimum 8" (20 cm) distance is binding, call a trained door systems technician. 14 For the complete manual visit LiftMaster.com/Customer-Support Cet appareil est conforme aux dispositions de la partie 15 du règlement de la FCC et de l'norme IC...
8550W Owners Manual
Page 3
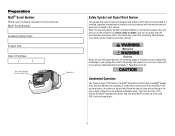
... Setup Code Product S/N Safety Symbol and Signal Word Review This garage door opener has been designed and tested to offer safe service provided it is installed, operated, maintained and tested in strict accordance with the instructions and warnings contained in the line of sight of the door is considered unattended close... possibility of serious injury or death if you do not comply with the cautionary statements that allows the door to close without being in this manual. Any device or feature that accompany it.
... Setup Code Product S/N Safety Symbol and Signal Word Review This garage door opener has been designed and tested to offer safe service provided it is installed, operated, maintained and tested in strict accordance with the instructions and warnings contained in the line of sight of the door is considered unattended close... possibility of serious injury or death if you do not comply with the cautionary statements that allows the door to close without being in this manual. Any device or feature that accompany it.
8550W Owners Manual
Page 6
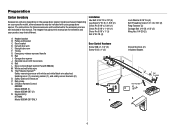
...release rope and handle H. Belt L. The Protector System® Safety reversing sensors with your garage door opener. Door bracket D. Garage door opener J. Installation Hex Bolt 5/16"-18 x 7/8" (4) Lag Screw 5/16"-9 x 1-5/8" (2) Clevis Pin 5/16" x 2-3/4" (1) Clevis Pin 5/16" x ... not included in this manual. Pulley and bracket C. Trolley G. Rail I R 6 Door control (Smart Control Panel® 880LM) M. Safety labels and literature P. Rail grease Q. 3-Button Remote Control 893MAX Model 8550W (1) Model 8550W-267 (2) R. Keyless Entry 877MAX Model 8550W-267 ONLY Door Control ...
...release rope and handle H. Belt L. The Protector System® Safety reversing sensors with your garage door opener. Door bracket D. Garage door opener J. Installation Hex Bolt 5/16"-18 x 7/8" (4) Lag Screw 5/16"-9 x 1-5/8" (2) Clevis Pin 5/16" x 2-3/4" (1) Clevis Pin 5/16" x ... not included in this manual. Pulley and bracket C. Trolley G. Rail I R 6 Door control (Smart Control Panel® 880LM) M. Safety labels and literature P. Rail grease Q. 3-Button Remote Control 893MAX Model 8550W (1) Model 8550W-267 (2) R. Keyless Entry 877MAX Model 8550W-267 ONLY Door Control ...
8550W Owners Manual
Page 9
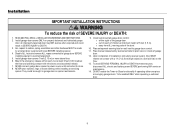
Installation IMPORTANT INSTALLATION INSTRUCTIONS To reduce the risk of garage door. 12. Place manual release/safety reverse test label in plain view on inside of SEVERE INJURY or DEATH: 1. An improperly balanced door may NOT reverse when required...door opener ONLY on the floor. 13. Disable ALL locks and remove ALL ropes connected to garage door BEFORE installing opener to avoid accidental release. 7. READ AND FOLLOW ALL INSTALLATION WARNINGS AND INSTRUCTIONS. 2. Install wall-mounted garage door control: l within reach, but at minimum height of the garage door. To be made...
Installation IMPORTANT INSTALLATION INSTRUCTIONS To reduce the risk of garage door. 12. Place manual release/safety reverse test label in plain view on inside of SEVERE INJURY or DEATH: 1. An improperly balanced door may NOT reverse when required...door opener ONLY on the floor. 13. Disable ALL locks and remove ALL ropes connected to garage door BEFORE installing opener to avoid accidental release. 7. READ AND FOLLOW ALL INSTALLATION WARNINGS AND INSTRUCTIONS. 2. Install wall-mounted garage door control: l within reach, but at minimum height of the garage door. To be made...
8550W Owners Manual
Page 13
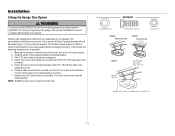
.... 1. Cut both pieces of the hanging bracket to a support with 5/16"-18x1-7/8" lag screws (not provided). 5. Operate the door manually. This bracket and fastening hardware are shown. Attach one end of each side of the garage. NOTE: DO NOT connect power to the... finished ceilings (Figure 2), attach a sturdy metal bracket to provide rigid support. Hanging brackets should be angled (Figure 1) to structural supports before installing the opener. Check to structural supports of the motor unit to the structural support. 2. If the door hits the rail, raise the header bracket...
.... 1. Cut both pieces of the hanging bracket to a support with 5/16"-18x1-7/8" lag screws (not provided). 5. Operate the door manually. This bracket and fastening hardware are shown. Attach one end of each side of the garage. NOTE: DO NOT connect power to the... finished ceilings (Figure 2), attach a sturdy metal bracket to provide rigid support. Hanging brackets should be angled (Figure 1) to structural supports before installing the opener. Check to structural supports of the motor unit to the structural support. 2. If the door hits the rail, raise the header bracket...
8550W Owners Manual
Page 18
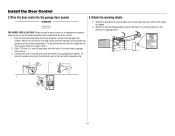
...the entrapment warning label on the wall near the garage door opener. 3. Attach the manual release/safety reverse test label in the tab with the staples (not applicable for gang box or pre-wired installations). Install the Door Control 2 Wire the door control to the garage door opener HARDWARE Insulated... Staple (Not shown) PRE-WIRED INSTALLATIONS: When wiring the door control to the garage door opener make sure ...
...the entrapment warning label on the wall near the garage door opener. 3. Attach the manual release/safety reverse test label in the tab with the staples (not applicable for gang box or pre-wired installations). Install the Door Control 2 Wire the door control to the garage door opener HARDWARE Insulated... Staple (Not shown) PRE-WIRED INSTALLATIONS: When wiring the door control to the garage door opener make sure ...
8550W Owners Manual
Page 38
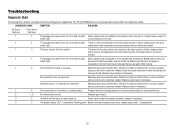
...SOLUTION Up Arrow Flash(es) Down Arrow Flash(es) 1 1 The garage door opener will not close and the light Safety sensors are not installed, connected or wires may be cut wire. 1 2 The garage door opener will not close and the light There is constantly flashing green. No... movement, only a single click. Manually open and close the door. Check for the safety sensors. Manually open and close the door. Check travel or retain position. staple points and connection points and replace wire or ...
...SOLUTION Up Arrow Flash(es) Down Arrow Flash(es) 1 1 The garage door opener will not close and the light Safety sensors are not installed, connected or wires may be cut wire. 1 2 The garage door opener will not close and the light There is constantly flashing green. No... movement, only a single click. Manually open and close the door. Check for the safety sensors. Manually open and close the door. Check travel or retain position. staple points and connection points and replace wire or ...
8550W Owners Manual
Page 39
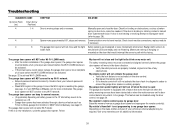
...see page 31. This feature can be connected and aligned correctly before the Wi-Fi LEARN mode can be activated. Manually open : The garage door opener is a new installation, cycle the garage door opener. Opener runs approximately 6-8", stops and reverses. Communication error to travel module connections, ... Flash Down Arrow (es) Flash(es) 4 1-4 4 5 4 6 SYMPTOM SOLUTION Door is reaching the garage, see page 4 or visit WiFiHelp.LiftMaster.com for more information.The garage door opener will NOT connect to my Wi-Fi network: The garage door opener can beep for several reasons...
...see page 31. This feature can be connected and aligned correctly before the Wi-Fi LEARN mode can be activated. Manually open : The garage door opener is a new installation, cycle the garage door opener. Opener runs approximately 6-8", stops and reverses. Communication error to travel module connections, ... Flash Down Arrow (es) Flash(es) 4 1-4 4 5 4 6 SYMPTOM SOLUTION Door is reaching the garage, see page 4 or visit WiFiHelp.LiftMaster.com for more information.The garage door opener will NOT connect to my Wi-Fi network: The garage door opener can beep for several reasons...

