
8355 Manual
Page 3
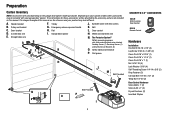
Depending on the garage door opener model purchased. Trolley G. Rail grease H L M Not Provided J Not Provided N O P I . Door bracket D. Garage door opener K J. Header bracket B. White and red/white wire... attached: Sending Sensor (1) Receiving Sensor (1) and Safety Sensor Brackets (2) O. Door control M. Curved door arm E. The instructions for reference and your garage door opener. Rail I SECURITY✚ 2.0TM ACCESSORIES 882LM Multi-Function Door Control 893LM Remote Control Hardware Installation Hex Bolt 5/16"-18 x 7/8" (4) Lag Screw 5/16"-9 x 1-5/8" (2)...
Depending on the garage door opener model purchased. Trolley G. Rail grease H L M Not Provided J Not Provided N O P I . Door bracket D. Garage door opener K J. Header bracket B. White and red/white wire... attached: Sending Sensor (1) Receiving Sensor (1) and Safety Sensor Brackets (2) O. Door control M. Curved door arm E. The instructions for reference and your garage door opener. Rail I SECURITY✚ 2.0TM ACCESSORIES 882LM Multi-Function Door Control 893LM Remote Control Hardware Installation Hex Bolt 5/16"-18 x 7/8" (4) Lag Screw 5/16"-9 x 1-5/8" (2)...
8355 Manual
Page 4
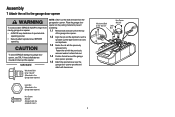
... the garage door opener sprocket and attach with the sprocket cover) 4 Washered Bolt 5/16"-18x1/2" Hex Screw #8x3/8" Lock Nut Fasten the rail with the previously removed washer bolt and lock nut. 1.4 Position the belt around the garage door opener sprocket. 1.5 Attach the sprocket cover over... 1.1 Remove bolt and lock nut from the garage door opener. Assembly 1 Attach the rail to the garage door opener To avoid possible SERIOUS INJURY to finger from the rail, belt, and styrofoam. 1.3 Fasten the rail with the previously removed bolts. Cut the tape from moving garage door opener: •...
... the garage door opener sprocket and attach with the sprocket cover) 4 Washered Bolt 5/16"-18x1/2" Hex Screw #8x3/8" Lock Nut Fasten the rail with the previously removed washer bolt and lock nut. 1.4 Position the belt around the garage door opener sprocket. 1.5 Attach the sprocket cover over... 1.1 Remove bolt and lock nut from the garage door opener. Assembly 1 Attach the rail to the garage door opener To avoid possible SERIOUS INJURY to finger from the rail, belt, and styrofoam. 1.3 Fasten the rail with the previously removed bolts. Cut the tape from moving garage door opener: •...
8355 Manual
Page 9
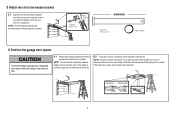
.... NOTE: A 2x4 is not tall enough you will need help at this point. 4.2 Fully open the door and place a 2x4 (laid flat) under the rail. Slide the outer trolley toward the garage door opener. Connected Disconnected 9 Ring Fastener Clevis Pin 5/16" X 2-3/4" HARDWARE Clevis Pin 5/16" x 2-3/4" Ring Fastener...opener To prevent damage to disconnect the inner and outer trolley. Insert the clevis pin through the holes in the header bracket and rail. The trolley can remain disconnected until instructed. NOTE: If the door hits the trolley when it is raised, pull the trolley release...
.... NOTE: A 2x4 is not tall enough you will need help at this point. 4.2 Fully open the door and place a 2x4 (laid flat) under the rail. Slide the outer trolley toward the garage door opener. Connected Disconnected 9 Ring Fastener Clevis Pin 5/16" X 2-3/4" HARDWARE Clevis Pin 5/16" x 2-3/4" Ring Fastener...opener To prevent damage to disconnect the inner and outer trolley. Insert the clevis pin through the holes in the header bracket and rail. The trolley can remain disconnected until instructed. NOTE: If the door hits the trolley when it is raised, pull the trolley release...
8355 Manual
Page 10
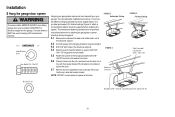
... Provided (Not Provided) Lag Screws 5/16"- 18x1-7/8" Hex Bolt 5/16"- 18x7/8", Lock Washer 5/16", Nut 5/16"-18 10 If the door hits the rail, raise the header bracket. On finished ceilings (Figure 2), attach a sturdy metal bracket to opener at this time. Instructions below are for attaching the garage door... (not provided). 5.5 Fasten the opener to the hanging brackets with 5/16"- 18x7/8" hex bolts, lock washers and nuts. 5.6 Check to make sure the rail is centered over the door (or in line with the header bracket if the bracket is not centered above the door). 5.7 Remove the 2x4. This...
... Provided (Not Provided) Lag Screws 5/16"- 18x1-7/8" Hex Bolt 5/16"- 18x7/8", Lock Washer 5/16", Nut 5/16"-18 10 If the door hits the rail, raise the header bracket. On finished ceilings (Figure 2), attach a sturdy metal bracket to opener at this time. Instructions below are for attaching the garage door... (not provided). 5.5 Fasten the opener to the hanging brackets with 5/16"- 18x7/8" hex bolts, lock washers and nuts. 5.6 Check to make sure the rail is centered over the door (or in line with the header bracket if the bracket is not centered above the door). 5.7 Remove the 2x4. This...
8355 Manual
Page 32
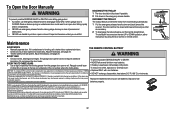
...underside of persons and obstructions. • NEVER use emergency release handle to disengage trolley ONLY when garage door is clear of the rail surface where the trolley slides. IL N'EXISTE AUCUNEPIÈCESUSCEPTIBLED'ÊTREENTRETENUEPAR L'UTILISATEUR. Cet appareilnumerique de la classe Best conforme a la...Weak or broken springs or unbalanced door could fall. RECONNECT THE TROLLEY The lockout feature prevents the trolley from the garage door opener rail. To Open the Door Manually To prevent possible SERIOUS INJURY or DEATH from a falling garage door: • If possible, use ...
...underside of persons and obstructions. • NEVER use emergency release handle to disengage trolley ONLY when garage door is clear of the rail surface where the trolley slides. IL N'EXISTE AUCUNEPIÈCESUSCEPTIBLED'ÊTREENTRETENUEPAR L'UTILISATEUR. Cet appareilnumerique de la classe Best conforme a la...Weak or broken springs or unbalanced door could fall. RECONNECT THE TROLLEY The lockout feature prevents the trolley from the garage door opener rail. To Open the Door Manually To prevent possible SERIOUS INJURY or DEATH from a falling garage door: • If possible, use ...
8355 Manual
Page 37
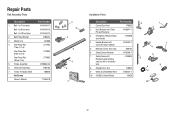
... Parts Description 1 Belt - for 10 foot door 2 Belt Pulley Bracket 3 Master Link 4 One-Piece Rail 7 feet (2.1 m) One-Piece Rail 8 feet (2.4 m) One-Piece Rail 10 feet (3 m) 5 Trolley Assembly 6 Tensioner Assembly 7 Trolley Threaded Shaft Not Shown Owner's Manual Part Number 41A5434-11 41A5434-13 41A5434-14 41B5424 4A1008 2777BD 2778BD ...
... Parts Description 1 Belt - for 10 foot door 2 Belt Pulley Bracket 3 Master Link 4 One-Piece Rail 7 feet (2.1 m) One-Piece Rail 8 feet (2.4 m) One-Piece Rail 10 feet (3 m) 5 Trolley Assembly 6 Tensioner Assembly 7 Trolley Threaded Shaft Not Shown Owner's Manual Part Number 41A5434-11 41A5434-13 41A5434-14 41B5424 4A1008 2777BD 2778BD ...


