
8355 Manual
Page 4
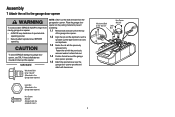
...BEFORE operating. To avoid SERIOUS damage to garage door opener, use the bolts removed from the rail, belt, and styrofoam. 1.3 Fasten the rail with the previously removed bolts. Assembly 1 Attach the rail to the garage door opener To avoid possible SERIOUS INJURY to finger from the top of ...the garage door opener. 1.2 Align the rail and the styrofoam over the garage door opener sprocket and attach with ...
...BEFORE operating. To avoid SERIOUS damage to garage door opener, use the bolts removed from the rail, belt, and styrofoam. 1.3 Fasten the rail with the previously removed bolts. Assembly 1 Attach the rail to the garage door opener To avoid possible SERIOUS INJURY to finger from the top of ...the garage door opener. 1.2 Align the rail and the styrofoam over the garage door opener sprocket and attach with ...
8355 Manual
Page 37
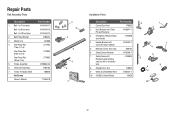
Repair Parts Rail Assembly Parts Description 1 Belt - for 10 foot door 2 Belt Pulley Bracket 3 Master Link 4 One-Piece Rail 7 feet (2.1 m) One-Piece Rail 8 feet (2.4 m) One-Piece Rail 10 feet (3 m) 5 Trolley Assembly 6 Tensioner Assembly 7 Trolley Threaded Shaft Not Shown Owner's Manual Part Number 41A5434-11 41A5434-13 41A5434-14 41B5424 4A1008 2777BD 2778BD 2770BD 41B3869-3A 41B4103 109B48 114A4419...
Repair Parts Rail Assembly Parts Description 1 Belt - for 10 foot door 2 Belt Pulley Bracket 3 Master Link 4 One-Piece Rail 7 feet (2.1 m) One-Piece Rail 8 feet (2.4 m) One-Piece Rail 10 feet (3 m) 5 Trolley Assembly 6 Tensioner Assembly 7 Trolley Threaded Shaft Not Shown Owner's Manual Part Number 41A5434-11 41A5434-13 41A5434-14 41B5424 4A1008 2777BD 2778BD 2770BD 41B3869-3A 41B4103 109B48 114A4419...


