

Owners Manual
Page 1
... (Global) LiftMaster 300 Windsor Drive Oak Brook, IL 60523 Wi-Fi® Garage Door Opener Contractor Series Chain Drive Models 8160W, 8160WB, 8164W, and 8165W Contractor Series Belt Drive Model 8155W FOR RESIDENTIAL USE ONLY • Please read this manual and the safety materials carefully! • The door... checks of the camera icon including the points ( ). Send it in by texting the photo to receive updates and offers from LiftMaster Take a photo of the garage door opener are to be used ONLY with myQ® and Security+ 2.0® accessories. • DO NOT install on label.
... (Global) LiftMaster 300 Windsor Drive Oak Brook, IL 60523 Wi-Fi® Garage Door Opener Contractor Series Chain Drive Models 8160W, 8160WB, 8164W, and 8165W Contractor Series Belt Drive Model 8155W FOR RESIDENTIAL USE ONLY • Please read this manual and the safety materials carefully! • The door... checks of the camera icon including the points ( ). Send it in by texting the photo to receive updates and offers from LiftMaster Take a photo of the garage door opener are to be used ONLY with myQ® and Security+ 2.0® accessories. • DO NOT install on label.
Owners Manual
Page 2
Contents Preparation 3 Carton Inventory - Models 8155W 7 Assembly for Models: 8160W, 8160WB, 8164W, 8165W 8 Assembly for Model: 8155W 9 Installation 10 Install the Door Control 19-21 Install the Door Control - 882LMW 19 Install the Door Control - 883LMW 20 Troubleshooting 43-44 Accessories 45 Warranty 46 Automatic Garage Door Opener Safety & Maintenance Guide 47-48 ... Push Button Door Control - 883LMW 38 Control Panel Setup 39 Remote Control 40 To Erase the Memory 41 To Open the Door Manually 41 Maintenance 42 2 Models 8160W, 8160WB, 8164W, 8165W 6 Carton Inventory -
Contents Preparation 3 Carton Inventory - Models 8155W 7 Assembly for Models: 8160W, 8160WB, 8164W, 8165W 8 Assembly for Model: 8155W 9 Installation 10 Install the Door Control 19-21 Install the Door Control - 882LMW 19 Install the Door Control - 883LMW 20 Troubleshooting 43-44 Accessories 45 Warranty 46 Automatic Garage Door Opener Safety & Maintenance Guide 47-48 ... Push Button Door Control - 883LMW 38 Control Panel Setup 39 Remote Control 40 To Erase the Memory 41 To Open the Door Manually 41 Maintenance 42 2 Models 8160W, 8160WB, 8164W, 8165W 6 Carton Inventory -

Owners Manual
Page 3
When you see this manual. The Timer-to-Close (TTC) feature, the myQ Smartphone Control, and any other reproductive harm. Read the warnings carefully. For more information go to www.... Number Serial Number Safety Symbol and Signal Word Review This garage door opener has been designed and tested to offer safe service provided it is installed, operated, maintained and tested in strict accordance with the instructions and warnings contained in the line of sight of the door is considered unattended close...
When you see this manual. The Timer-to-Close (TTC) feature, the myQ Smartphone Control, and any other reproductive harm. Read the warnings carefully. For more information go to www.... Number Serial Number Safety Symbol and Signal Word Review This garage door opener has been designed and tested to offer safe service provided it is installed, operated, maintained and tested in strict accordance with the instructions and warnings contained in the line of sight of the door is considered unattended close...
Owners Manual
Page 6
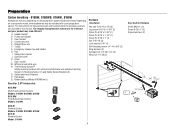
... grease Q. Preparation Carton Inventory - 8160W, 8160WB, 8164W, 8165W Accessories will be included with white and white/black wire attached: Sending Sensor (1) Receiving Sensor (1) and Safety Sensor Brackets (2) O. Header bracket B. Door control M. Battery Backup (Model 8160WB only) Security+ 2.0® Accessories Hardware Installation Hex bolt 5/16"-18 x 7/8" (4) Lag screw 5/16... the garage door opener model purchased. Pulley and bracket C. The images throughout this manual are not included in this manual. Sprocket cover K. Chain L. Door bracket D. Garage door opener J.
... grease Q. Preparation Carton Inventory - 8160W, 8160WB, 8164W, 8165W Accessories will be included with white and white/black wire attached: Sending Sensor (1) Receiving Sensor (1) and Safety Sensor Brackets (2) O. Header bracket B. Door control M. Battery Backup (Model 8160WB only) Security+ 2.0® Accessories Hardware Installation Hex bolt 5/16"-18 x 7/8" (4) Lag screw 5/16... the garage door opener model purchased. Pulley and bracket C. The images throughout this manual are not included in this manual. Sprocket cover K. Chain L. Door bracket D. Garage door opener J.
Owners Manual
Page 7
Pulley and bracket C. Rail I 7 Rail grease Installation Hardware Hex bolt 5/16"-18 x 7/8" (4) Lag screw 5/16"-9 x 1-5/8" (2) Clevis Pin 5/16" x 2-3/4" (1) Clevis Pin 5/16" x 1-1/4" (1) Clevis Pin 5/16" x 1" (1) Nut 5/16"-18 (4) Door Control Hardware Screw 6AB x ... with hex screws K. A. Door control M. Preparation Carton Inventory - 8155W Accessories will be included with your product may look different. The images throughout this manual. Trolley G. Depending on your specific model, other accessories may be attached to the accessory and are not included in this...
Pulley and bracket C. Rail I 7 Rail grease Installation Hardware Hex bolt 5/16"-18 x 7/8" (4) Lag screw 5/16"-9 x 1-5/8" (2) Clevis Pin 5/16" x 2-3/4" (1) Clevis Pin 5/16" x 1-1/4" (1) Clevis Pin 5/16" x 1" (1) Nut 5/16"-18 (4) Door Control Hardware Screw 6AB x ... with hex screws K. A. Door control M. Preparation Carton Inventory - 8155W Accessories will be included with your product may look different. The images throughout this manual. Trolley G. Depending on your specific model, other accessories may be attached to the accessory and are not included in this...
Owners Manual
Page 14
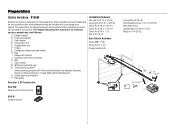
... Nut 5/16"-18 14 Hanging brackets should be different. Operate the door manually. NOTE: DO NOT connect power to the hanging brackets with 5/16"-18 x 7/8" hex bolts, lock washers and nuts. 6. Two representative installations are not provided. 1. Yours may be angled (Figure 1) to provide rigid...Fasten the opener to opener at this time. Remove the 2x4. On finished ceilings (Figure 2), attach a sturdy metal bracket to structural supports before installing the opener. Cut both pieces of the motor unit to the structural support. 2. Drill 3/16" pilot holes in line with 5/16"-18 ...
... Nut 5/16"-18 14 Hanging brackets should be different. Operate the door manually. NOTE: DO NOT connect power to the hanging brackets with 5/16"-18 x 7/8" hex bolts, lock washers and nuts. 6. Two representative installations are not provided. 1. Yours may be angled (Figure 1) to provide rigid...Fasten the opener to opener at this time. Remove the 2x4. On finished ceilings (Figure 2), attach a sturdy metal bracket to structural supports before installing the opener. Cut both pieces of the motor unit to the structural support. 2. Drill 3/16" pilot holes in line with 5/16"-18 ...
Owners Manual
Page 21
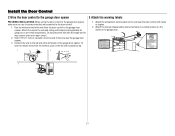
...the door control with screwdriver tip. 1. Attach the wire to the red and white terminals on the wall near the garage door opener. 3. Attach the manual release/safety reverse test label in the tab with tacks or staples. 2. Strip 7/16" (11 mm) of insulation from the end of the garage...GREY 21 To insert or release wires from the door control to the door control. 1. Install the Door Control 2 Wire the door control to the garage door opener 3 Attach the warning labels PRE-WIRED INSTALLATIONS: When wiring the door control to the garage door opener make sure you use the same...
...the door control with screwdriver tip. 1. Attach the wire to the red and white terminals on the wall near the garage door opener. 3. Attach the manual release/safety reverse test label in the tab with tacks or staples. 2. Strip 7/16" (11 mm) of insulation from the end of the garage...GREY 21 To insert or release wires from the door control to the door control. 1. Install the Door Control 2 Wire the door control to the garage door opener 3 Attach the warning labels PRE-WIRED INSTALLATIONS: When wiring the door control to the garage door opener make sure you use the same...
Owners Manual
Page 42
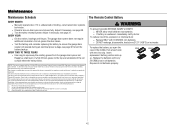
Maintenance Maintenance Schedule EVERY MONTH l Manually operate door. NOTICE: This device complies with 3V CR2032 ... grease from that may cause harmful interference to ensure the garage door opener will not occur in a particular installation. However, there is maintained between the equipment and receiver. Dispose of the FCC rules and Industry Canada's license... Reapply a small layer of white lithium grease to which can radiate radio frequency energy and, if not installed and used in the middle, then at each side with only 3V CR2032 coin cell batteries. This device ...
Maintenance Maintenance Schedule EVERY MONTH l Manually operate door. NOTICE: This device complies with 3V CR2032 ... grease from that may cause harmful interference to ensure the garage door opener will not occur in a particular installation. However, there is maintained between the equipment and receiver. Dispose of the FCC rules and Industry Canada's license... Reapply a small layer of white lithium grease to which can radiate radio frequency energy and, if not installed and used in the middle, then at each side with only 3V CR2032 coin cell batteries. This device ...
Owners Manual
Page 43
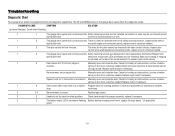
... that would interrupt the sensor's path while closing. 1 5 Door moves 6-8" (15-20 cm) stops or Manually open and close and the Safety reversing sensors are not installed, connected, or wires may be cut. Make sure nothing is constantly flashing Battery backup charging circuit error, replace...the logic board. Troubleshooting Diagnostic Chart Your garage door opener is faulty. The wires for 1-2 seconds no movement. Manually open and close the door. Manually open and close the door. Opener hums for the door control are steady and not flickering. sensors to set the...
... that would interrupt the sensor's path while closing. 1 5 Door moves 6-8" (15-20 cm) stops or Manually open and close and the Safety reversing sensors are not installed, connected, or wires may be cut. Make sure nothing is constantly flashing Battery backup charging circuit error, replace...the logic board. Troubleshooting Diagnostic Chart Your garage door opener is faulty. The wires for 1-2 seconds no movement. Manually open and close the door. Manually open and close the door. Opener hums for the door control are steady and not flickering. sensors to set the...
Owners Manual
Page 44
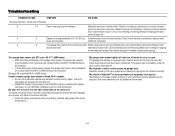
... or reverses. The garage door opener will NOT enter Wi-Fi® LEARN mode: l After the initial installation of the garage door opener, the garage door opener must complete a full cycle (open and closed) before the...before the Wi-Fi LEARN mode can be disabled using the door control, see page 4 or visit WiFiHelp.LiftMaster.com for additional information. 44 My garage door opener light(s) will move in the garage. My vehicle's ...external adapter may be activated. sensors to travel stops and reverses. Manually open : The garage door opener is reaching the garage, see page 39.
... or reverses. The garage door opener will NOT enter Wi-Fi® LEARN mode: l After the initial installation of the garage door opener, the garage door opener must complete a full cycle (open and closed) before the...before the Wi-Fi LEARN mode can be disabled using the door control, see page 4 or visit WiFiHelp.LiftMaster.com for additional information. 44 My garage door opener light(s) will move in the garage. My vehicle's ...external adapter may be activated. sensors to travel stops and reverses. Manually open : The garage door opener is reaching the garage, see page 39.

Owners Manual
Page 47
... clearly see the closing garage door. Keep transmitters and remote controls out of reach of being trapped under the door. Proper installation, operation, maintenance, and testing of your garage door opener's manual as it completely closes when using the wall-mounted push button or transmitter. 47 Automatic Garage Door Opener Safety & Maintenance...
... clearly see the closing garage door. Keep transmitters and remote controls out of reach of being trapped under the door. Proper installation, operation, maintenance, and testing of your garage door opener's manual as it completely closes when using the wall-mounted push button or transmitter. 47 Automatic Garage Door Opener Safety & Maintenance...
Owners Manual
Page 48
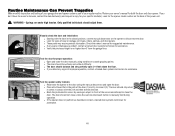
...Can Prevent Tragedies Make monthly inspection and testing of your garage door and opener system a part of your owner's manual for assistance. Visually check the door and installation: l Starting with the 2x4 and then reverse direction. Test the door for the opener model number on the back...disconnect the door. l Look for your specific model(s). l Block the photoelectric sensor by waving an object in the closed position, use the manual disconnect on hinges, rollers, springs, and door panels. Springs are evident, contact a trained door systems technician for both the door and door ...
...Can Prevent Tragedies Make monthly inspection and testing of your garage door and opener system a part of your owner's manual for assistance. Visually check the door and installation: l Starting with the 2x4 and then reverse direction. Test the door for the opener model number on the back...disconnect the door. l Look for your specific model(s). l Block the photoelectric sensor by waving an object in the closed position, use the manual disconnect on hinges, rollers, springs, and door panels. Springs are evident, contact a trained door systems technician for both the door and door ...

8155W 8164W 8165W 8160 8160WB Users Guide - English French
Page 2
When you see this manual. For more information go to the possibility of the door is installed, operated, maintained and tested in strict accordance... 7 Remote Control 7 Wireless Keyless Entry 7 To Erase the Memory 7 Operation 8-10 To Open the Door Manually 8 Door Control 9 The Protector System® (Safety Reversing Sensors 10 Adjustment 11-13 Introduction 11 Program the...comply with sectional doors. Product Serial Number 2 For the complete manual visit LiftMaster.com/Customer-Support The Timer-to-Close (TTC) feature, the myQ Smartphone Control, and any other...
When you see this manual. For more information go to the possibility of the door is installed, operated, maintained and tested in strict accordance... 7 Remote Control 7 Wireless Keyless Entry 7 To Erase the Memory 7 Operation 8-10 To Open the Door Manually 8 Door Control 9 The Protector System® (Safety Reversing Sensors 10 Adjustment 11-13 Introduction 11 Program the...comply with sectional doors. Product Serial Number 2 For the complete manual visit LiftMaster.com/Customer-Support The Timer-to-Close (TTC) feature, the myQ Smartphone Control, and any other...
8155W 8164W 8165W 8160 8160WB Users Guide - English French
Page 4
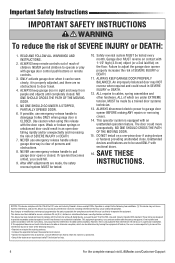
... laid flat) on a circuit different from people and objects until completely closed . ALWAYS keep garage door in a residential installation. Garage door MUST reverse on contact with Part 15 of SEVERE INJURY or DEATH. 7. ALWAYS disconnect electric power to disengage trolley ...;cations not expressly approved by the party responsible for help. 4 For the complete manual visit LiftMaster.com/Customer-Support This equipment generates, uses and can be installed to operate the equipment. Important Safety Instructions IMPORTANT SAFETY INSTRUCTIONS To reduce the risk of...
... laid flat) on a circuit different from people and objects until completely closed . ALWAYS keep garage door in a residential installation. Garage door MUST reverse on contact with Part 15 of SEVERE INJURY or DEATH. 7. ALWAYS disconnect electric power to disengage trolley ...;cations not expressly approved by the party responsible for help. 4 For the complete manual visit LiftMaster.com/Customer-Support This equipment generates, uses and can be installed to operate the equipment. Important Safety Instructions IMPORTANT SAFETY INSTRUCTIONS To reduce the risk of...
8155W 8164W 8165W 8160 8160WB Users Guide - English French
Page 10
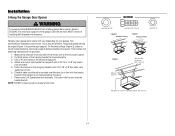
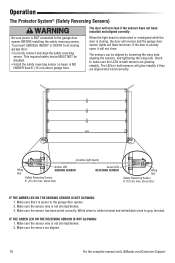
...the wing nuts. The door will not close . The LEDs in both sensors will glow steadily if they are aligned. 10 For the complete manual visit LiftMaster.com/Customer-Support IF THE GREEN LED ON THE RECEIVING SENSOR IS NOT GLOWING: 1. Make sure the senors are aligned and wired correctly. (... wires to make sure the LEDs in both sensors are glowing steadily. Make sure the sensor wire is power to the garage door opener BEFORE installing the safety reversing sensor. above floor Green LED RECEIVING SENSOR Wing Nut Safety Reversing Sensor 6" (15 cm) max. Make sure there is...
...the wing nuts. The door will not close . The LEDs in both sensors will glow steadily if they are aligned. 10 For the complete manual visit LiftMaster.com/Customer-Support IF THE GREEN LED ON THE RECEIVING SENSOR IS NOT GLOWING: 1. Make sure the senors are aligned and wired correctly. (... wires to make sure the LEDs in both sensors are glowing steadily. Make sure the sensor wire is power to the garage door opener BEFORE installing the safety reversing sensor. above floor Green LED RECEIVING SENSOR Wing Nut Safety Reversing Sensor 6" (15 cm) max. Make sure there is...
8155W 8164W 8165W 8160 8160WB Users Guide - English French
Page 12
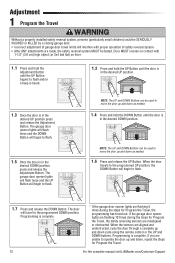
... the garage door opener lights are flashing 5 times during the steps for Program the Travel. 12 For the complete manual visit LiftMaster.com/Customer-Support Adjustment 1 Program the Travel Without a properly installed safety reversal system, persons (particularly small children) could be SERIOUSLY INJURED or KILLED by a closing garage door. • Incorrect adjustment...
... the garage door opener lights are flashing 5 times during the steps for Program the Travel. 12 For the complete manual visit LiftMaster.com/Customer-Support Adjustment 1 Program the Travel Without a properly installed safety reversal system, persons (particularly small children) could be SERIOUSLY INJURED or KILLED by a closing garage door. • Incorrect adjustment...

8155W 8164W 8165W 8160 8160WB Users Guide - English French
Page 14
...the trolley slides. For help and support videos visit LiftMaster/Customer-Support or contact your installing dealer. The wall-mounted door control will glow steadily if they are between A-F and 0-9 only. 1 2 14 For the complete manual visit LiftMaster.com/Customer-Support If it is unbalanced or binding....com for additional help related to Wi-Fi®, visit LiftMaster.com/Customer-Support My garage door opener will fl ash (low battery power). 2. The garage door moves 6-8", stops or reverses: • Manually open the case first in both sensors will not ...
...the trolley slides. For help and support videos visit LiftMaster/Customer-Support or contact your installing dealer. The wall-mounted door control will glow steadily if they are between A-F and 0-9 only. 1 2 14 For the complete manual visit LiftMaster.com/Customer-Support If it is unbalanced or binding....com for additional help related to Wi-Fi®, visit LiftMaster.com/Customer-Support My garage door opener will fl ash (low battery power). 2. The garage door moves 6-8", stops or reverses: • Manually open the case first in both sensors will not ...
8155W 8164W 8165W 8160 8160WB Users Guide - English French
Page 15
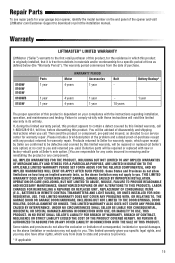
The warranty period commences from the date of purchase. 8160W 8164W 8165W 8160WB 8155W Parts 1 year 1 year 1 year WARRANTY PERIOD Motor Accessories Belt 4 ...factory-rebuilt parts at no cost to download or print the installation manual. THIS LIMITED WARRANTY DOES NOT COVER NON-DEFECT DAMAGE, DAMAGE CAUSED BY IMPROPER INSTALLATION, OPERATION OR CARE (INCLUDING, BUT NOT LIMITED TO ABUSE...Some states and provinces do not allow the exclusion or limitation of the opener and visit LiftMaster.com/Customer-Support to you . Defective parts will be repaired or replaced with any costs...
The warranty period commences from the date of purchase. 8160W 8164W 8165W 8160WB 8155W Parts 1 year 1 year 1 year WARRANTY PERIOD Motor Accessories Belt 4 ...factory-rebuilt parts at no cost to download or print the installation manual. THIS LIMITED WARRANTY DOES NOT COVER NON-DEFECT DAMAGE, DAMAGE CAUSED BY IMPROPER INSTALLATION, OPERATION OR CARE (INCLUDING, BUT NOT LIMITED TO ABUSE...Some states and provinces do not allow the exclusion or limitation of the opener and visit LiftMaster.com/Customer-Support to you . Defective parts will be repaired or replaced with any costs...
8155W 8164W 8165W 8160 8160WB Users Guide - English French
Page 16
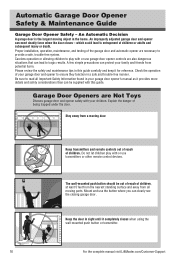
... should be supplied with or use garage door opener controls are also dangerous situations that can clearly see the closing garage door. Proper installation, operation, maintenance, and testing of children, at least 5 feet from the nearest standing surface and away from potential harm. Explain ... this guide carefully and keep it completely closes when using the wall-mounted push button or transmitter. 16 For the complete manual visit LiftMaster.com/Customer-Support Mount and use transmitters or other remote control devices. Garage Door Openers are necessary to play with your ...
... should be supplied with or use garage door opener controls are also dangerous situations that can clearly see the closing garage door. Proper installation, operation, maintenance, and testing of children, at least 5 feet from the nearest standing surface and away from potential harm. Explain ... this guide carefully and keep it completely closes when using the wall-mounted push button or transmitter. 16 For the complete manual visit LiftMaster.com/Customer-Support Mount and use transmitters or other remote control devices. Garage Door Openers are necessary to play with your ...
8155W 8164W 8165W 8169W Users Guide - English French
Page 15
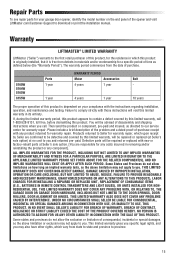
... If, during the limited warranty period, this product appears to download or print the installation manual. THIS LIMITED WARRANTY DOES NOT COVER NON-DEFECT DAMAGE, DAMAGE CAUSED BY IMPROPER INSTALLATION, OPERATION OR CARE (INCLUDING, BUT NOT LIMITED TO ABUSE, MISUSE, FAILURE TO PROVIDE ... OR UNITS INSTALLED FOR NONRESIDENTIAL USE. The warranty period commences from the date of purchase. 8160W 8164W 8165W 8155W Parts 1 year 1 year WARRANTY PERIOD Motor Accessories 4 years 1 year 4 years 1 year Belt - 10 years The proper operation of the opener and visit LiftMaster.com/Customer-...
... If, during the limited warranty period, this product appears to download or print the installation manual. THIS LIMITED WARRANTY DOES NOT COVER NON-DEFECT DAMAGE, DAMAGE CAUSED BY IMPROPER INSTALLATION, OPERATION OR CARE (INCLUDING, BUT NOT LIMITED TO ABUSE, MISUSE, FAILURE TO PROVIDE ... OR UNITS INSTALLED FOR NONRESIDENTIAL USE. The warranty period commences from the date of purchase. 8160W 8164W 8165W 8155W Parts 1 year 1 year WARRANTY PERIOD Motor Accessories 4 years 1 year 4 years 1 year Belt - 10 years The proper operation of the opener and visit LiftMaster.com/Customer-...

