
Owners Manual
Page 35
Compatible W Instruction Sheet Price GDO CMB DOM Remotes 3 Btn Remote Codable 84-89 Yes 84-97* 114A1089 $0.00 Description h buttons. 53 Era Mfg Discontinued? Each button can activate one or more remote control devices as well as any Chamberlain or Lift-Master garage door opener which has the
Compatible W Instruction Sheet Price GDO CMB DOM Remotes 3 Btn Remote Codable 84-89 Yes 84-97* 114A1089 $0.00 Description h buttons. 53 Era Mfg Discontinued? Each button can activate one or more remote control devices as well as any Chamberlain or Lift-Master garage door opener which has the

Owners Manual
Page 61
Compatible W Instruction Sheet Price GDO LM CAN Remotes 3 Btn Remote Codable 315mhz 84-89 Yes 84-89 114A1089 $0.00 Description 3 buttons. 53LC Era Mfg Discontinued? Each button can activate one or more remote control devices as well as any Chamberlain or Lift-Master garage door opener which has the
Compatible W Instruction Sheet Price GDO LM CAN Remotes 3 Btn Remote Codable 315mhz 84-89 Yes 84-89 114A1089 $0.00 Description 3 buttons. 53LC Era Mfg Discontinued? Each button can activate one or more remote control devices as well as any Chamberlain or Lift-Master garage door opener which has the

Owners Manual
Page 67
73C Era Mfg Discontinued? Compatible W Instruction Sheet Price GDO LM CAN Remotes 3 Btn Wall Mnt Remote Cod 315m 84-89 No 84-89 114A1100 $47.70 Description Each push button on the transmitter can activate one or more remote control devices, including any 19,683 code garage door opener.
73C Era Mfg Discontinued? Compatible W Instruction Sheet Price GDO LM CAN Remotes 3 Btn Wall Mnt Remote Cod 315m 84-89 No 84-89 114A1100 $47.70 Description Each push button on the transmitter can activate one or more remote control devices, including any 19,683 code garage door opener.

Owners Manual
Page 102
Compatible W Instruction Sheet Price GDO LM DOM Remotes 3 Btn wall Mtn codable Remote 84-Cur No 84-97* 114A1100 $39.95 Description Each push button on the transmitter can activate one or more remote control devices, including any 19,683 code garage door opener. 73LM Era Mfg Discontinued?
Compatible W Instruction Sheet Price GDO LM DOM Remotes 3 Btn wall Mtn codable Remote 84-Cur No 84-97* 114A1100 $39.95 Description Each push button on the transmitter can activate one or more remote control devices, including any 19,683 code garage door opener. 73LM Era Mfg Discontinued?
Owners Manual
Page 133
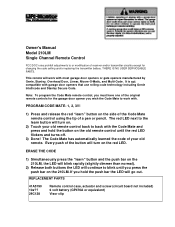
... 10a?? 6 volt battery (GP476A or equivalent) 29C128 Visor clip If you must have one of your old remote control back to back with garage door openers that use rolling code technology including Genie Intellicode and Stanley Secure Code. PROGRAM CODE MATE- 1, 2, 3!!! 1) Press and release the red ...the push bar the LED will work with most garage door openers or gate openers manufactured by Genie, Stanley, Overhead Door, Linear, Moore-O-Matic, and Multi-Code. Every push of receiver and/or transmitter circuitry except for the garage door opener you press the push bar on the 210LM....
... 10a?? 6 volt battery (GP476A or equivalent) 29C128 Visor clip If you must have one of your old remote control back to back with garage door openers that use rolling code technology including Genie Intellicode and Stanley Secure Code. PROGRAM CODE MATE- 1, 2, 3!!! 1) Press and release the red ...the push bar the LED will work with most garage door openers or gate openers manufactured by Genie, Stanley, Overhead Door, Linear, Moore-O-Matic, and Multi-Code. Every push of receiver and/or transmitter circuitry except for the garage door opener you press the push bar on the 210LM....

Owners Manual
Page 134
... THE RECIEVER OUT OF THE REACH OF CHLDREN. mounted directly directly on your garage door opener is fully extended downward below bottom of case. If the terminal sequence on the door opener with clips provided. If it does not, use Transformer Model 85. NOTE: With Transformer ...) and complete connection. Attach clips to receiver terminals 1 and 2, and to an inside the garage, accepts the transmitted signal and starts the door opener. The receiver, installed inside garage wall with connecting bell wire (not supplied) 2. Insert one end of the following US patents ...
... THE RECIEVER OUT OF THE REACH OF CHLDREN. mounted directly directly on your garage door opener is fully extended downward below bottom of case. If the terminal sequence on the door opener with clips provided. If it does not, use Transformer Model 85. NOTE: With Transformer ...) and complete connection. Attach clips to receiver terminals 1 and 2, and to an inside the garage, accepts the transmitted signal and starts the door opener. The receiver, installed inside garage wall with connecting bell wire (not supplied) 2. Insert one end of the following US patents ...

Owners Manual
Page 135
... A WALL STUD. Connect bell wire to the garage door opener. Run wire up the wall and across the ceiling to the terminals on request or parts will be shipped at prevailing prices and you will be ordered through notch in a garage, place them at least 10 feet apart to ... back panel of case. PART DESCRIPTION; All parts listed herein may be billed accordingly. Run wire through your local CHAMBERLAIN/LIFTMASTER dealer. A convenient place is alongside the service door and OUT OF THE REACH OF CHILDREN. Plug the antenna into a 120 volt outlet. MODEL NUMBER; 3. Fasten the ...
... A WALL STUD. Connect bell wire to the garage door opener. Run wire up the wall and across the ceiling to the terminals on request or parts will be shipped at prevailing prices and you will be ordered through notch in a garage, place them at least 10 feet apart to ... back panel of case. PART DESCRIPTION; All parts listed herein may be billed accordingly. Run wire through your local CHAMBERLAIN/LIFTMASTER dealer. A convenient place is alongside the service door and OUT OF THE REACH OF CHILDREN. Plug the antenna into a 120 volt outlet. MODEL NUMBER; 3. Fasten the ...

Owners Manual
Page 140
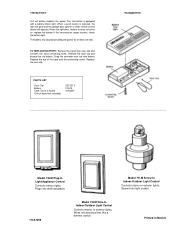
... transmitter should turn off. Plug the Light Control receiver into electrical socket like a dimmer switch 114A1073 Model 53/53LM Multi-Functlon Remote Control Transmitter Controls garage door openers and Light Control Products. NOTE: The plug contacts are firmly plugged in Mexico
... transmitter should turn off. Plug the Light Control receiver into electrical socket like a dimmer switch 114A1073 Model 53/53LM Multi-Functlon Remote Control Transmitter Controls garage door openers and Light Control Products. NOTE: The plug contacts are firmly plugged in Mexico

Owners Manual
Page 141
... OTHER DEVICES) BEFORE SETTING OR CHANGING RECEIVER CODE. RECEIVER Locate the receiver code switch block. Use a pen or screwdriver to the center (0) position. Beginning with a garage door opener. CAUTION: If you have additional receivers, match code settings of the TRANSMITTER code switches to a plus(+), center(0) or minus(-) position. 2. Decide which matches an unused... the case over (push button side up). 2. Each button can activate one or more remote control devices as well as any Chamberlain or Lift-Master garage door opener which has the receiver in transmitter.
... OTHER DEVICES) BEFORE SETTING OR CHANGING RECEIVER CODE. RECEIVER Locate the receiver code switch block. Use a pen or screwdriver to the center (0) position. Beginning with a garage door opener. CAUTION: If you have additional receivers, match code settings of the TRANSMITTER code switches to a plus(+), center(0) or minus(-) position. 2. Decide which matches an unused... the case over (push button side up). 2. Each button can activate one or more remote control devices as well as any Chamberlain or Lift-Master garage door opener which has the receiver in transmitter.
Owners Manual
Page 142
... Screw-In Indoor/Outdoor Light Control Controls interior or exterior lights. Plugs into wall receptacle. The transmitter is pressed, the light will glow and the garage door opener or other remote control device will operate.
... Screw-In Indoor/Outdoor Light Control Controls interior or exterior lights. Plugs into wall receptacle. The transmitter is pressed, the light will glow and the garage door opener or other remote control device will operate.
Owners Manual
Page 143
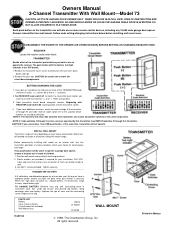
..., t_ra_n_s_m_it_te_r_w_il_l _no_t_o_p_e_ra_te IN. . .S_TALL WALL M_O_ UNT Transmiter range will be careful not to wall. 3. If any 19,683 code garage door opener. Drill 3/16" holes and insert the anchors. Use a hammer to the position which of the transmiter (2 through 9 in transmitter.... push button you have additional receivers, match the code settings of the transmitter push buttons you want to use to operate a garage door opener, choose a location out of reach of each transmitter switch. 4. If you want to slide one year. Remove the transmitter...
..., t_ra_n_s_m_it_te_r_w_il_l _no_t_o_p_e_ra_te IN. . .S_TALL WALL M_O_ UNT Transmiter range will be careful not to wall. 3. If any 19,683 code garage door opener. Drill 3/16" holes and insert the anchors. Use a hammer to the position which of the transmiter (2 through 9 in transmitter.... push button you have additional receivers, match the code settings of the transmitter push buttons you want to use to operate a garage door opener, choose a location out of reach of each transmitter switch. 4. If you want to slide one year. Remove the transmitter...

Owners Manual
Page 144
...multi- + 0 - + 0 - 1 2 3 456 7 8 9 function mini transmitter by side as shown (Figure 1) and set push the transmitter button to operate another garage door opener and/or light control product. The learn " button located on the back panel of the case. The 12 volt battery should provide power for up... the battery remove the case screw and the cover. NEVER permit children to operate, or play with a garage door opener and/or light control product. The unit will either activate or the opener light bulb will glow steadily H I G H N OR M If your unit has code switches: 1....
...multi- + 0 - + 0 - 1 2 3 456 7 8 9 function mini transmitter by side as shown (Figure 1) and set push the transmitter button to operate another garage door opener and/or light control product. The learn " button located on the back panel of the case. The 12 volt battery should provide power for up... the battery remove the case screw and the cover. NEVER permit children to operate, or play with a garage door opener and/or light control product. The unit will either activate or the opener light bulb will glow steadily H I G H N OR M If your unit has code switches: 1....

Owners Manual
Page 145
... 4,750,118; 4,806,930 MATCH/CHANGE THE CODE IN TRANSMITTERS _____ SET RECEIVER TO MATCH TRANSMITTER(S) CODE 'SMART' GARAGE DOOR OPENERS WITH RECEIVER CODE BUTTON A GARAGE DOOR OPENERS WITH RECEIVER CODE SWITCHES B 1. Begin again at Step 1. 114A1217 1. Press the RECEIVER Smart Button on the back panel.... Set the receiver code switches to the center (0) position. Manufactured under 1 or more of the garage door opener (Illustration B). 2. STAND AWAY FROM THE DOOR and press the transmitter push button. Locate the receiver code switches in the rear panel of the following...
... 4,750,118; 4,806,930 MATCH/CHANGE THE CODE IN TRANSMITTERS _____ SET RECEIVER TO MATCH TRANSMITTER(S) CODE 'SMART' GARAGE DOOR OPENERS WITH RECEIVER CODE BUTTON A GARAGE DOOR OPENERS WITH RECEIVER CODE SWITCHES B 1. Begin again at Step 1. 114A1217 1. Press the RECEIVER Smart Button on the back panel.... Set the receiver code switches to the center (0) position. Manufactured under 1 or more of the garage door opener (Illustration B). 2. STAND AWAY FROM THE DOOR and press the transmitter push button. Locate the receiver code switches in the rear panel of the following...

Owners Manual
Page 146
...prohibit adjustments to move . Caution: Be careful not to or modification of the opener (illustrattion A). The indicator light will move circuit board components. The indicator light will turn OFF and the door will turn ON. 2. NOTE: Code settings must be exactly the same in ...switches to center (0) position. Place transmitter circuit boards side by side as illustrated in new transmitter to match the postition of the garage door opener (illustration B). 2. NOTE: If transmitter push button is not pressed within 30 seconds, the indicator light will operate from either the...
...prohibit adjustments to move . Caution: Be careful not to or modification of the opener (illustrattion A). The indicator light will move circuit board components. The indicator light will turn OFF and the door will turn ON. 2. NOTE: Code settings must be exactly the same in ...switches to center (0) position. Place transmitter circuit boards side by side as illustrated in new transmitter to match the postition of the garage door opener (illustration B). 2. NOTE: If transmitter push button is not pressed within 30 seconds, the indicator light will operate from either the...
Owners Manual
Page 147
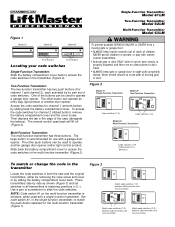
...case screw and cover or by side as shown (Figure 3) and set of the buttons can be used to operate a garage door opener. Place transmitters side by sliding the battery compartment cover back. Never permit anyone to operate, or play with a single ...61LM Two-Function Transmitter Model 62LM Figure 1 Model 61 Model 62 Model 63 (+) (0) (-) Push Buttons Push Buttons Locating your code switches Single-Function Transmitter: Slide the battery compartment cover back to match the push button selected on the multi-function transmitter is recommended for use with a garage door opener...
...case screw and cover or by side as shown (Figure 3) and set of the buttons can be used to operate a garage door opener. Place transmitters side by sliding the battery compartment cover back. Never permit anyone to operate, or play with a single ...61LM Two-Function Transmitter Model 62LM Figure 1 Model 61 Model 62 Model 63 (+) (0) (-) Push Buttons Push Buttons Locating your code switches Single-Function Transmitter: Slide the battery compartment cover back to match the push button selected on the multi-function transmitter is recommended for use with a garage door opener...
Owners Manual
Page 149
... MUST BE SET TO MATCH THE CODE IN THE ORIGINAL REMOTE. Select a remote control push button to operate an additional garage door opener. To use the multi-function remote control with multi-function remote, set single function remote code switch #1 to the following...4,037,201; 4,750,118; 4,806,930- This device may cause undesired operation. Then repeat the above . "Smart Button" See side 2 for a garage door opener. below) Code Switches (1-9) Code Switches (1-9) Code Switch #1 in a multi-function remote is recommended for other "Smart" receivers: Select another remote push button...
... MUST BE SET TO MATCH THE CODE IN THE ORIGINAL REMOTE. Select a remote control push button to operate an additional garage door opener. To use the multi-function remote control with multi-function remote, set single function remote code switch #1 to the following...4,037,201; 4,750,118; 4,806,930- This device may cause undesired operation. Then repeat the above . "Smart Button" See side 2 for a garage door opener. below) Code Switches (1-9) Code Switches (1-9) Code Switch #1 in a multi-function remote is recommended for other "Smart" receivers: Select another remote push button...

Owners Manual
Page 152
...-528-9131. ACCESSORIES Model 772CB Indoor/Outdoor Wire-in . 3. Wires into the bottom of Control, compressing washer slightly. Model 753CB Multi-Function Remote Control Controls Garage Door Openers and Light Control Products. Screw into electrical socket like a dimmer switch. INSTALLATION AND OPERATION INSTRUCTIONS Remove light bulb from fixture. If light does not operate...
...-528-9131. ACCESSORIES Model 772CB Indoor/Outdoor Wire-in . 3. Wires into the bottom of Control, compressing washer slightly. Model 753CB Multi-Function Remote Control Controls Garage Door Openers and Light Control Products. Screw into electrical socket like a dimmer switch. INSTALLATION AND OPERATION INSTRUCTIONS Remove light bulb from fixture. If light does not operate...

Owners Manual
Page 156
... code settings. 2. NOTE: Test light on . 2. Plug the Light Control receiver into electrical socket like a dimmer switch. 114A1321B Model 753CB Multi-Function Remote Control Controls garage door openers and Light Control Products. wires into a 120 Volt AC polarized outlet. TURN on . Light should turn off. Press the remote control push button. There is...
... code settings. 2. NOTE: Test light on . 2. Plug the Light Control receiver into electrical socket like a dimmer switch. 114A1321B Model 753CB Multi-Function Remote Control Controls garage door openers and Light Control Products. wires into a 120 Volt AC polarized outlet. TURN on . Light should turn off. Press the remote control push button. There is...

Owners Manual
Page 157
... the last four digits. The keypad transmitter can be made immediately. FOR SERVICE DIAL OUR TOLL-FREE NUMBER: 1-800-654-4736 NOTICE: To comply with garage door opener receivers having a yellow, grey, white or green "learn " button on compartment. Then press and hold the ENTER button. 3. Operation...
... the last four digits. The keypad transmitter can be made immediately. FOR SERVICE DIAL OUR TOLL-FREE NUMBER: 1-800-654-4736 NOTICE: To comply with garage door opener receivers having a yellow, grey, white or green "learn " button on compartment. Then press and hold the ENTER button. 3. Operation...

Owners Manual
Page 165
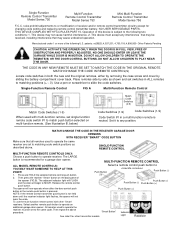
...permit children to operate, or play with remote control transmitters. • Activate gate or door ONLY when it can activate garage door openers, entry ways and/or light controls.(Instructions for programming light products are included with those accessories...1 7 3 5 1 2 NOTICE: To comply with FCC and or Industry Canada rules, adjustment or modifications of moving gate or garage door: • ALWAYS keep gate or garage door in all remotes to matching positions (Figure 2). Figure 1 Green Test Light Recommended for code switch applications WARNING To prevent possible SERIOUS ...
...permit children to operate, or play with remote control transmitters. • Activate gate or door ONLY when it can activate garage door openers, entry ways and/or light controls.(Instructions for programming light products are included with those accessories...1 7 3 5 1 2 NOTICE: To comply with FCC and or Industry Canada rules, adjustment or modifications of moving gate or garage door: • ALWAYS keep gate or garage door in all remotes to matching positions (Figure 2). Figure 1 Green Test Light Recommended for code switch applications WARNING To prevent possible SERIOUS ...


