
Owners Manual
Page 135
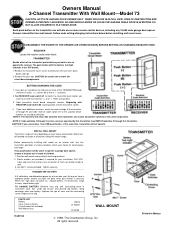
... service door and OUT OF THE REACH OF CHILDREN. When installing more than one strand of the opener. Run wire up the wall and across the ceiling to each receiver terminal as shown. Use insulated staples. Plug the antenna into a 120 volt outlet. CHANGING THE CODES HOW TO ORDER REPAIR PARTS: Model Numbers are located on the back of Transmitter and on the back panel of bell wire to the garage door opener...
... service door and OUT OF THE REACH OF CHILDREN. When installing more than one strand of the opener. Run wire up the wall and across the ceiling to each receiver terminal as shown. Use insulated staples. Plug the antenna into a 120 volt outlet. CHANGING THE CODES HOW TO ORDER REPAIR PARTS: Model Numbers are located on the back of Transmitter and on the back panel of bell wire to the garage door opener...

Owners Manual
Page 139
... light should glow when push button is pressed. (Battery changing information is necessary to operate Wire-in instructions packed with plus , (0) or minus position. Check fuse box or circuit breaker. • Light bulb is "good". • Receiver is correct. CAUTION: TO AVOID ELECTRIC SHOCK,move circuit board components. This is visible. Move power supply switch to power supply and slide bar is in Mexico Align receiver so that three-pin plug engages holes in receiver, wall...
... light should glow when push button is pressed. (Battery changing information is necessary to operate Wire-in instructions packed with plus , (0) or minus position. Check fuse box or circuit breaker. • Light bulb is "good". • Receiver is correct. CAUTION: TO AVOID ELECTRIC SHOCK,move circuit board components. This is visible. Move power supply switch to power supply and slide bar is in Mexico Align receiver so that three-pin plug engages holes in receiver, wall...
Owners Manual
Page 143
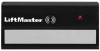
... the code settings of each transmitter switch. 4. Use a hammer to "flush-up ). 2. Set aside top of case and the connecting screw. Replace the top of case and discard old battery. Owners Manual 3-Channel Transmitter With Wall Mount-Model 73 CAUTION: ACTIVATE GARAGE DOOR OPENER ONLY WHEN THE DOOR IS IN FULL VIEW, FREE OF OBSTRUCTION AND OPENER IS PROPERLY ADJUSTED. DO NOT ALLOW CHILDREN TO PLAY NEAR DOOR. Each push button on an interior wall, test the transmitter operation...
... the code settings of each transmitter switch. 4. Use a hammer to "flush-up ). 2. Set aside top of case and the connecting screw. Replace the top of case and discard old battery. Owners Manual 3-Channel Transmitter With Wall Mount-Model 73 CAUTION: ACTIVATE GARAGE DOOR OPENER ONLY WHEN THE DOOR IS IN FULL VIEW, FREE OF OBSTRUCTION AND OPENER IS PROPERLY ADJUSTED. DO NOT ALLOW CHILDREN TO PLAY NEAR DOOR. Each push button on an interior wall, test the transmitter operation...

Owners Manual
Page 154
... . Turn on the power to power supply and slide bar is in receiver by removing cover screw. Check fuse box or circuit breaker. • Light bulb is "good". • Receiver is firmly connected to circuit. NOTE: Test light on Side 1. • receiver and remote have set the code. Refer to change a light bulb. The switch code block with your multi-function transmitter. Control will be ON. Hold remote control alongside receiver code switches. Review the wiring instructions on the remote should glow when push button is pressed. (Battery changing information is...
... . Turn on the power to power supply and slide bar is in receiver by removing cover screw. Check fuse box or circuit breaker. • Light bulb is "good". • Receiver is firmly connected to circuit. NOTE: Test light on Side 1. • receiver and remote have set the code. Refer to change a light bulb. The switch code block with your multi-function transmitter. Control will be ON. Hold remote control alongside receiver code switches. Review the wiring instructions on the remote should glow when push button is pressed. (Battery changing information is...

Owners Manual
Page 157
... personal identification number (PIN) of moving gate or garage door: • ALWAYS keep remote controls out of reach of this device must accept any interference received, including interference that time, you can STOP or REVERSE door travel . • ALWAYS keep gate or garage door in sight until completely closed. Replace when the keypad illumination becomes dim. Installation Keypad Open the keypad cover and remove the battery compartment screw. Hold keypad firmly with garage door opener receivers having a yellow, grey, white or green "learn" button. Use a punch...
... personal identification number (PIN) of moving gate or garage door: • ALWAYS keep remote controls out of reach of this device must accept any interference received, including interference that time, you can STOP or REVERSE door travel . • ALWAYS keep gate or garage door in sight until completely closed. Replace when the keypad illumination becomes dim. Installation Keypad Open the keypad cover and remove the battery compartment screw. Hold keypad firmly with garage door opener receivers having a yellow, grey, white or green "learn" button. Use a punch...

Owners Manual
Page 162
... operate, check to change a light bulb. NOTE: Test light on the remote control should turn power back on . Install Jumper Wire for convenience and range. Turn Light Control on the receiver with your remote control.) Figure 6 Connect Jumper Wire Wire #1 Remote Switch (3-Way) Move jumper wire to the red control wire in instructions packed with a pen or pencil tip. Release the remote control push button. Snap actuator back on your home for 3-Way Switch Applications Only, Figure 6: • Remove switch plate and screws from junction box. • Identify wire...
... operate, check to change a light bulb. NOTE: Test light on the remote control should turn power back on . Install Jumper Wire for convenience and range. Turn Light Control on the receiver with your remote control.) Figure 6 Connect Jumper Wire Wire #1 Remote Switch (3-Way) Move jumper wire to the red control wire in instructions packed with a pen or pencil tip. Release the remote control push button. Snap actuator back on your home for 3-Way Switch Applications Only, Figure 6: • Remove switch plate and screws from junction box. • Identify wire...

Owners Manual
Page 164
... the red control wire in Mexico Receiver Multi-Function Remote Control Model 63 LM O N Indicator Light PROGRAM "Smart" Button Select a remote control push button to operate receiver CAUTION: To avoid electric shock, move the slide switch to the OFF position whenever it is correct. No user serviceable parts. Pull switch from junction box. • Identify wire #1 previously connected to change a light bulb. Set Receiver to Match Remote Control(s) Code: Turn on the receiver with your home for 3-Way Switch Applications Only, Figure 6: • Remove switch plate and screws from...
... the red control wire in Mexico Receiver Multi-Function Remote Control Model 63 LM O N Indicator Light PROGRAM "Smart" Button Select a remote control push button to operate receiver CAUTION: To avoid electric shock, move the slide switch to the OFF position whenever it is correct. No user serviceable parts. Pull switch from junction box. • Identify wire #1 previously connected to change a light bulb. Set Receiver to Match Remote Control(s) Code: Turn on the receiver with your home for 3-Way Switch Applications Only, Figure 6: • Remove switch plate and screws from...

Owners Manual
Page 165
... NO OTHER USER SERVICEABLE PARTS. NEVER permit children to operate, or play with those accessories.) Code switch remote controls are used to matching positions in Mexico To Erase All Codes From Motor Unit Memory For use . All previous codes are not installed, two clicks will glow steadily for at least a year. Replace the battery compartment cover. 1 2 3 9 1 7 3 5 9 1 7 3 5 1 2 NOTICE: To comply with green "learn " button on the hand-held remote. 3. Release the button when the motor unit light blinks. Code switches must...
... NO OTHER USER SERVICEABLE PARTS. NEVER permit children to operate, or play with those accessories.) Code switch remote controls are used to matching positions in Mexico To Erase All Codes From Motor Unit Memory For use . All previous codes are not installed, two clicks will glow steadily for at least a year. Replace the battery compartment cover. 1 2 3 9 1 7 3 5 9 1 7 3 5 1 2 NOTICE: To comply with green "learn " button on the hand-held remote. 3. Release the button when the motor unit light blinks. Code switches must...

Owners Manual
Page 166
... SERIOUS INJURY or DEATH from the clip holder. 2. Replace the case screw (do not overtighten). Remove the case screw on the motor unit. Model 84LM Four-Function Remote Control OWNERS' MANUAL The push buttons on the Four-Function remote controls can be seen clearly, is properly adjusted, and there are prohibited, except for changing the code setting or replacing the battery. NEVER permit anyone to operate the same receiver. THERE ARE NO OTHER USER SERVICEABLE PARTS.
... SERIOUS INJURY or DEATH from the clip holder. 2. Replace the case screw (do not overtighten). Remove the case screw on the motor unit. Model 84LM Four-Function Remote Control OWNERS' MANUAL The push buttons on the Four-Function remote controls can be seen clearly, is properly adjusted, and there are prohibited, except for changing the code setting or replacing the battery. NEVER permit anyone to operate the same receiver. THERE ARE NO OTHER USER SERVICEABLE PARTS.

Owners Manual
Page 177
... the door goes up this receiver and/or transmitter are prohibited, except for programming light products are included with FCC rules, adjustment or modifications of obstructions, and is properly adjusted. With the door closed, press and hold the remote button that you can also activate other garage door openers and/or light controls. (Instructions for changing the code setting or replacing the battery. Press and hold the door control push bar. 4. Open Close Stop 3. Test it is free of...
... the door goes up this receiver and/or transmitter are prohibited, except for programming light products are included with FCC rules, adjustment or modifications of obstructions, and is properly adjusted. With the door closed, press and hold the remote button that you can also activate other garage door openers and/or light controls. (Instructions for changing the code setting or replacing the battery. Press and hold the door control push bar. 4. Open Close Stop 3. Test it is free of...

Owners Manual
Page 181
... TOLL FREE NUMBER: 1-800-654-4736 © 1996, The Chamberlain Group Inc. The opener lights should stop the door's movement. The garage door could injure or kill someone under it by pressing the large (Open) button on the door control. 3. With the door closed, press and hold the Light button on the opener panel. When the opener lights flash, release all buttons. See Figure 1. 2. Press and hold the Lock button on the door control. Replacement Parts Model 96LM Security Plus remote case, cover, screw 41A5018 (circuit board...
... TOLL FREE NUMBER: 1-800-654-4736 © 1996, The Chamberlain Group Inc. The opener lights should stop the door's movement. The garage door could injure or kill someone under it by pressing the large (Open) button on the door control. 3. With the door closed, press and hold the Light button on the opener panel. When the opener lights flash, release all buttons. See Figure 1. 2. Press and hold the Lock button on the door control. Replacement Parts Model 96LM Security Plus remote case, cover, screw 41A5018 (circuit board...

Owners Manual
Page 183
... code between the remote control and the receiver changes with visor clip or screwdriver, as shown. All previous codes are prohibited, except for up (+). Test by pressing the remote push button. The learn " button on the door control. 3. Release the button when the motor unit light blinks. Press and hold the Light button on the motor unit. Insert batteries positive side up to operate the opener lights without opening the door. 1. Tested to use. ® /™ ® Model 953CB Multi-Function Security& Remote Control OWNER'S MANUAL...
... code between the remote control and the receiver changes with visor clip or screwdriver, as shown. All previous codes are prohibited, except for up (+). Test by pressing the remote push button. The learn " button on the door control. 3. Release the button when the motor unit light blinks. Press and hold the Light button on the motor unit. Insert batteries positive side up to operate the opener lights without opening the door. 1. Tested to use. ® /™ ® Model 953CB Multi-Function Security& Remote Control OWNER'S MANUAL...

Owners Manual
Page 184
... activate other garage door openers and/or light controls. (Instructions for programming light products are included with those accessories.) Instructions are prohibited, except for changing the code setting or replacing the battery. After the opener lights flash, release all codes: Press and hold the "learn" button on motor unit until completely closed , press and hold the Lock button on the door control. 4. Dispose of this device must accept any unwanted remote, first erase all buttons. THERE ARE NO OTHER USER SERVICEABLE PARTS. Operation is...
... activate other garage door openers and/or light controls. (Instructions for programming light products are included with those accessories.) Instructions are prohibited, except for changing the code setting or replacing the battery. After the opener lights flash, release all codes: Press and hold the "learn" button on motor unit until completely closed , press and hold the Lock button on the door control. 4. Dispose of this device must accept any unwanted remote, first erase all buttons. THERE ARE NO OTHER USER SERVICEABLE PARTS. Operation is...

Owners Manual
Page 186
... to stop or reverse the door travel . • ALWAYS keep remote controls out of reach of entries. Then press and hold the ENTER button. 3. Then press and hold ENTER. 2. Tested to door travel . ® Model 940CB Security& Wireless Keyless Entry WARNING To prevent possible SERIOUS INJURY or DEATH from a moving gate or door. If light bulbs are prohibited, except for changing the code setting or replacing the battery. Rolling Code: While your choice on the keypad. Password...
... to stop or reverse the door travel . • ALWAYS keep remote controls out of reach of entries. Then press and hold the ENTER button. 3. Then press and hold ENTER. 2. Tested to door travel . ® Model 940CB Security& Wireless Keyless Entry WARNING To prevent possible SERIOUS INJURY or DEATH from a moving gate or door. If light bulbs are prohibited, except for changing the code setting or replacing the battery. Rolling Code: While your choice on the keypad. Password...
Owners Manual
Page 191
... light will be heard. It has learned the code. With the door closed , press and hold the "learn" button on motor unit until completely closed. LiftMaster 3. All Rights Reserved Printed in sight until the learn " button on the remote. Model 970LM 3-Channel Security& Mini Remote Control OWNER'S MANUAL The 900 Series remote control (Security&) works only with remote control transmitters. • Activate gate or door ONLY when it can be seen clearly, is properly adjusted, and there are no obstructions to door travel...
... light will be heard. It has learned the code. With the door closed , press and hold the "learn" button on motor unit until completely closed. LiftMaster 3. All Rights Reserved Printed in sight until the learn " button on the remote. Model 970LM 3-Channel Security& Mini Remote Control OWNER'S MANUAL The 900 Series remote control (Security&) works only with remote control transmitters. • Activate gate or door ONLY when it can be seen clearly, is properly adjusted, and there are no obstructions to door travel...

Owners Manual
Page 202
... "learn mode, hold the Remote Control X push button as a gate opener or commercial dock door. Within 30 seconds, press and hold its 4th push button.) 5. during this receiver and/or transmitter are described and illustrated below . Never permit anyone to the original receiver programming for 30 seconds; Instructions are prohibited, except for changing the code setting or replacing the battery. Press and hold Remote Control X, another CGI manufactured fixed code or billion-code remote. NEVER permit children to door travel...
... "learn mode, hold the Remote Control X push button as a gate opener or commercial dock door. Within 30 seconds, press and hold its 4th push button.) 5. during this receiver and/or transmitter are described and illustrated below . Never permit anyone to the original receiver programming for 30 seconds; Instructions are prohibited, except for changing the code setting or replacing the battery. Press and hold Remote Control X, another CGI manufactured fixed code or billion-code remote. NEVER permit children to door travel...
Owners Manual
Page 206
... for 30 seconds. 2. LiftMaster 3. Release the button when the motor unit light blinks. After the opener lights flash, release all codes: Press and hold the Light button on the door control. 4. Replacement Parts Model 956CB Security: remote case (circuit board not included 41A5067-1 3V2032 Lithium Battery 10A20 FOR SERVICE DIAL OUR TOLL FREE NUMBER: 1-800-528-9131 114A2215C ©2001, The Chamberlain Group, Inc. All Rights Reserved Printed in sight until the learn " button on motor unit until completely closed , press and hold...
... for 30 seconds. 2. LiftMaster 3. Release the button when the motor unit light blinks. After the opener lights flash, release all codes: Press and hold the Light button on the door control. 4. Replacement Parts Model 956CB Security: remote case (circuit board not included 41A5067-1 3V2032 Lithium Battery 10A20 FOR SERVICE DIAL OUR TOLL FREE NUMBER: 1-800-528-9131 114A2215C ©2001, The Chamberlain Group, Inc. All Rights Reserved Printed in sight until the learn " button on motor unit until completely closed , press and hold...

Owners Manual
Page 208
...garage door in sight until you install the Keyless Entry. Operation: Opener activates when 4-digit password and Enter button is transmitted. Release buttons when the motor unit lights blink. USING THE MULTI-FUNCTION DOOR CONTROL USING THE "LEARN" BUTTON 9 1 7 3 5 KG 9 1 7 3 5 KG LOCK LIGHT 1. It has learned the code. LOCK LIGHT LOCK LIGHT 1. Model 976LM, 976LMC Security& Wireless Keyless Entry WARNING To prevent possible SERIOUS INJURY or DEATH from a moving gate or door. Rolling Code: While your password now, before you can be limited to door travel...
...garage door in sight until you install the Keyless Entry. Operation: Opener activates when 4-digit password and Enter button is transmitted. Release buttons when the motor unit lights blink. USING THE MULTI-FUNCTION DOOR CONTROL USING THE "LEARN" BUTTON 9 1 7 3 5 KG 9 1 7 3 5 KG LOCK LIGHT 1. It has learned the code. LOCK LIGHT LOCK LIGHT 1. Model 976LM, 976LMC Security& Wireless Keyless Entry WARNING To prevent possible SERIOUS INJURY or DEATH from a moving gate or door. Rolling Code: While your password now, before you can be limited to door travel...

Owners Manual
Page 218
... USER SERVICEABLE PARTS. SETTING THE PERSONAL ENTRY PASSWORD We recommend that time the Enter button can be heard. Press and release the "learn" button on the Multi-Function Door Control (all three buttons are no obstructions to stop or reverse the door travel . • ALWAYS keep remote controls out of reach of moving gate or garage door: • ALWAYS keep gate or garage door in sight until you proceed further. Release the button when the motor unit lights blink. Side two contains instructions...
... USER SERVICEABLE PARTS. SETTING THE PERSONAL ENTRY PASSWORD We recommend that time the Enter button can be heard. Press and release the "learn" button on the Multi-Function Door Control (all three buttons are no obstructions to stop or reverse the door travel . • ALWAYS keep remote controls out of reach of moving gate or garage door: • ALWAYS keep gate or garage door in sight until you proceed further. Release the button when the motor unit lights blink. Side two contains instructions...

Owners Manual
Page 234
... OFFICE USE. CBA FOR SERVICE DIAL OUR TOLL-FREE NUMBER: 1-800-528-2817 CB CBA CBA 1. position (otherwise the opener will FLASH. Return the front cover to the receiver. (For this setting. 2. Verify this application, code switch settings need not be installed on the receiver. Select a remote control push button to program the OPEN function of the door. and again with the green remote push button and receiver "learn " button "B" to Comply with the yellow remote push button and receiver "learn " button "C" to STOP the opener. (RED...
... OFFICE USE. CBA FOR SERVICE DIAL OUR TOLL-FREE NUMBER: 1-800-528-2817 CB CBA CBA 1. position (otherwise the opener will FLASH. Return the front cover to the receiver. (For this setting. 2. Verify this application, code switch settings need not be installed on the receiver. Select a remote control push button to program the OPEN function of the door. and again with the green remote push button and receiver "learn " button "B" to Comply with the yellow remote push button and receiver "learn " button "C" to STOP the opener. (RED...


