3800 Manual
Page 2
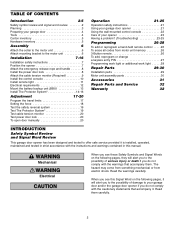
... inventory 5 Hardware inventory 5 Assembly 6 Attach the collar to the motor unit 6 Attach mounting bracket to the motor unit 6 Installation 7-16 Installation safety instructions 7 Position the opener 7 Attach the emergency release rope and handle 8 Install the power door lock 8 Attach the cable tension monitor (Required 9 Install... 19 Test cable tension monitor 20 Test power door lock 20 To open door manually 20 Operation 21-25 Operation safety instructions 21 Using your garage door opener 21 Using the wall-mounted control console 22 Care of your garage WARNING door and...
... inventory 5 Hardware inventory 5 Assembly 6 Attach the collar to the motor unit 6 Attach mounting bracket to the motor unit 6 Installation 7-16 Installation safety instructions 7 Position the opener 7 Attach the emergency release rope and handle 8 Install the power door lock 8 Attach the cable tension monitor (Required 9 Install... 19 Test cable tension monitor 20 Test power door lock 20 To open door manually 20 Operation 21-25 Operation safety instructions 21 Using your garage door opener 21 Using the wall-mounted control console 22 Care of your garage WARNING door and...
3800 Manual
Page 4
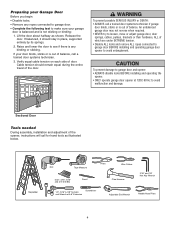
... SERIOUS INJURY or DEATH: CAUTION • ALWAYS call for hand tools as shown. Sectional Door Tools needed During assembly, installation and adjustment of the opener, instructions will call a trained door systems technician if garage door binds, sticks or is out of balance. Preparing your Garage Door Before you begin: • Disable...
... SERIOUS INJURY or DEATH: CAUTION • ALWAYS call for hand tools as shown. Sectional Door Tools needed During assembly, installation and adjustment of the opener, instructions will call a trained door systems technician if garage door binds, sticks or is out of balance. Preparing your Garage Door Before you begin: • Disable...
3800 Manual
Page 6
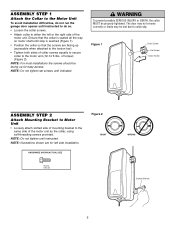
... Unit • Loosely attach slotted side of mounting bracket to the same side of torque) (Figure 2). NOTE: Do not tighten set screws until instructed. NOTE: Illustrations shown are facing up for left or the right side of the motor unit. NOTE: Do not tighten until indicated. ASSEMBLY STEP ...door opener until stop is reached (Figure 1). • Position the collar so that the collar is seated all the way on motor shaft until instructed to do so. • Loosen the collar screws. • Attach collar to either the left side installation. NOTE: For most installations the screws...
... Unit • Loosely attach slotted side of mounting bracket to the same side of torque) (Figure 2). NOTE: Do not tighten set screws until instructed. NOTE: Illustrations shown are facing up for left or the right side of the motor unit. NOTE: Do not tighten until indicated. ASSEMBLY STEP ...door opener until stop is reached (Figure 1). • Position the collar so that the collar is seated all the way on motor shaft until instructed to do so. • Loosen the collar screws. • Attach collar to either the left side installation. NOTE: For most installations the screws...
3800 Manual
Page 7
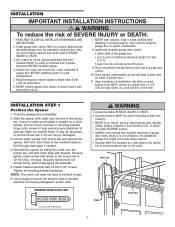
... door BEFORE installing opener to cut the torsion bar if it is out of SEVERE INJURY or DEATH: 1. WARNING INSTALLATION IMPORTANT INSTALLATION INSTRUCTIONS WARNING To reduce the risk of balance. NEVER connect garage door opener to power source until pilot holes align with collar over the ...torsion bar until instructed to garage door control. 10. They could result in plain view on the collar. Place entrapment warning label on properly balanced and ...
... door BEFORE installing opener to cut the torsion bar if it is out of SEVERE INJURY or DEATH: 1. WARNING INSTALLATION IMPORTANT INSTALLATION INSTRUCTIONS WARNING To reduce the risk of balance. NEVER connect garage door opener to power source until pilot holes align with collar over the ...torsion bar until instructed to garage door control. 10. They could result in plain view on the collar. Place entrapment warning label on properly balanced and ...
3800 Manual
Page 10
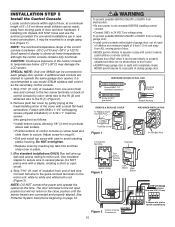
... with control console push buttons or remote controls. • Activate door ONLY when it can be connected to each garage door opener. See Protector System Instructions beginning on screw head and slide down to secure. For pre-wired installations (as follows: • Install bottom screw, allowing 1/8" (3 mm) to protrude above wall...
... with control console push buttons or remote controls. • Activate door ONLY when it can be connected to each garage door opener. See Protector System Instructions beginning on screw head and slide down to secure. For pre-wired installations (as follows: • Install bottom screw, allowing 1/8" (3 mm) to protrude above wall...
3800 Manual
Page 11
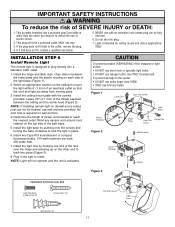
... and turning the base clockwise to outlet. Use ONLY incandescent. Select an appropriate location on the top side of SEVERE INJURY or DEATH: 1. IMPORTANT SAFETY INSTRUCTIONS WARNING To reduce the risk of the light base. 5. If the plug does not fit fully in place. 6. Light is activated. Install the ceiling mount...
... and turning the base clockwise to outlet. Use ONLY incandescent. Select an appropriate location on the top side of SEVERE INJURY or DEATH: 1. IMPORTANT SAFETY INSTRUCTIONS WARNING To reduce the risk of the light base. 5. If the plug does not fit fully in place. 6. Light is activated. Install the ceiling mount...

3800 Manual
Page 13
... 1-1/2" lag screws (2) provided with the BBU unit. • Connect the BBU cord into the connector on the bottom of the motor unit. • Follow all instructions included with the 475LM unit to test for proper operation and testing of the BBU.
... 1-1/2" lag screws (2) provided with the BBU unit. • Connect the BBU cord into the connector on the bottom of the motor unit. • Follow all instructions included with the 475LM unit to test for proper operation and testing of the BBU.
3800 Manual
Page 21
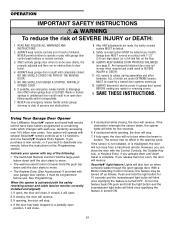
...obstructions to 12 functions, and one Security✚® Keyless Entry System. Your opener will stop . 7. WARNING OPERATION IMPORTANT SAFETY INSTRUCTIONS WARNING To reduce the risk of children. NEVER permit children to operate or play with several Security✚® remote controls up... balanced door may be programmed before use emergency release handle unless garage doorway is CLOSED. Using Your Garage Door Opener Your LiftMaster Security✚® opener and hand-held Remote Control: Hold the large push button down until completely closed , it will...
...obstructions to 12 functions, and one Security✚® Keyless Entry System. Your opener will stop . 7. WARNING OPERATION IMPORTANT SAFETY INSTRUCTIONS WARNING To reduce the risk of children. NEVER permit children to operate or play with several Security✚® remote controls up... balanced door may be programmed before use emergency release handle unless garage doorway is CLOSED. Using Your Garage Door Opener Your LiftMaster Security✚® opener and hand-held Remote Control: Hold the large push button down until completely closed , it will...
3800 Manual
Page 23
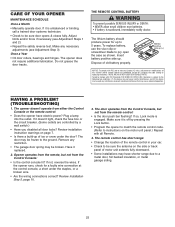
...receiver and/or remote control are controlled by pressing the Lock button. • Program the opener to match the remote control code. (Refer to instructions on page 7. • Is there a build-up (+) NOTICE: To comply with all door locks? Make sure it is off by a ...DEATH: CAUTION • NEVER allow small children near batteries. • If battery is engaged. HAVING A PROBLEM? (TROUBLESHOOTING) 1. Review installation instruction warnings on the motor unit panel.) Repeat with FCC and or Industry Canada (IC) rules, adjustment or modifications of the remote control in ...
...receiver and/or remote control are controlled by pressing the Lock button. • Program the opener to match the remote control code. (Refer to instructions on page 7. • Is there a build-up (+) NOTICE: To comply with all door locks? Make sure it is off by a ...DEATH: CAUTION • NEVER allow small children near batteries. • If battery is engaged. HAVING A PROBLEM? (TROUBLESHOOTING) 1. Review installation instruction warnings on the motor unit panel.) Repeat with FCC and or Industry Canada (IC) rules, adjustment or modifications of the remote control in ...
3800 Manual
Page 26
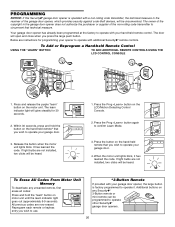
... against code-theft devices, will open and close when you wish to operate other Security✚® garage door openers. 26 If light bulbs are instructions for 30 seconds. 2. Reprogram each remote or keyless entry you wish to operate with your hand-held remote that you press the large push button...
... against code-theft devices, will open and close when you wish to operate other Security✚® garage door openers. 26 If light bulbs are instructions for 30 seconds. 2. Reprogram each remote or keyless entry you wish to operate with your hand-held remote that you press the large push button...
3800 Manual
Page 32
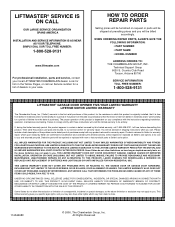
... SPANS AMERICA INSTALLATION AND SERVICE INFORMATION IS AS NEAR AS YOUR TELEPHONE. SIMPLY DIAL OUR TOLL FREE NUMBER: 1-800-528-9131 www.liftmaster.com For professional installation, parts and service, contact your area. Technical Support Group 6020 S. The proper operation of purchase]. Some States... FOR US ANY OTHER LIABILITY IN CONNECTION WITH THE SALE OF THIS PRODUCT. Some States do not allow the exclusion or limitation of shipping instructions when you . WHEN ORDERING REPAIR PARTS, ALWAYS GIVE THE FOLLOWING INFORMATION: • PART NUMBER • PART NAME • MODEL NUMBER...
... SPANS AMERICA INSTALLATION AND SERVICE INFORMATION IS AS NEAR AS YOUR TELEPHONE. SIMPLY DIAL OUR TOLL FREE NUMBER: 1-800-528-9131 www.liftmaster.com For professional installation, parts and service, contact your area. Technical Support Group 6020 S. The proper operation of purchase]. Some States... FOR US ANY OTHER LIABILITY IN CONNECTION WITH THE SALE OF THIS PRODUCT. Some States do not allow the exclusion or limitation of shipping instructions when you . WHEN ORDERING REPAIR PARTS, ALWAYS GIVE THE FOLLOWING INFORMATION: • PART NUMBER • PART NAME • MODEL NUMBER...


