3800 Manual
Page 10
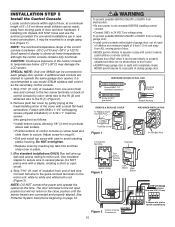
...) Run bell wire up wall and across ceiling to operate or play with screwdriver tip 10 Remove push bar cover by inserting top tabs first and then snap cover in new home construction), it is slower at lower temperatures although the control console remains fully ...functional. HARDWARE SHOWN ACTUAL SIZE Screw 6ABx1-1/4" (standard installation) Screw 6-32x1" (pre-wired) REMOVE & REPLACE COVER To Replace Insert Top Tabs First Insulated Staples Drywall Anchors PRE-WIRED INSTALLATION Push Bar Cover LOCK LIGHT Figure 1 LOCK LIGHT 24 Volt Bell Wire 2-Conductor Bell Wire Push Bar R W...
...) Run bell wire up wall and across ceiling to operate or play with screwdriver tip 10 Remove push bar cover by inserting top tabs first and then snap cover in new home construction), it is slower at lower temperatures although the control console remains fully ...functional. HARDWARE SHOWN ACTUAL SIZE Screw 6ABx1-1/4" (standard installation) Screw 6-32x1" (pre-wired) REMOVE & REPLACE COVER To Replace Insert Top Tabs First Insulated Staples Drywall Anchors PRE-WIRED INSTALLATION Push Bar Cover LOCK LIGHT Figure 1 LOCK LIGHT 24 Volt Bell Wire 2-Conductor Bell Wire Push Bar R W...
3800 Manual
Page 12
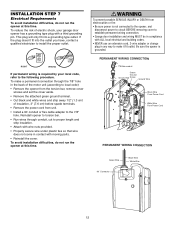
... so that wire does not come in the back of the motor unit (according to local code): • Remove the opener from the torsion bar, remove cover screws and set the cover aside. • Remove the attached green ground terminal. • Cut black and white wires and strip away 1/2" (1.3 cm) of ...or fire: • Be sure power is grounded. Be sure the opener is not connected to the opener, and disconnect power to circuit BEFORE removing cover to the following procedure. WARNING To prevent possible SERIOUS INJURY or DEATH from unit. • Install a 90o conduit or flex cable adapter to ...
... so that wire does not come in the back of the motor unit (according to local code): • Remove the opener from the torsion bar, remove cover screws and set the cover aside. • Remove the attached green ground terminal. • Cut black and white wires and strip away 1/2" (1.3 cm) of ...or fire: • Be sure power is grounded. Be sure the opener is not connected to the opener, and disconnect power to circuit BEFORE removing cover to the following procedure. WARNING To prevent possible SERIOUS INJURY or DEATH from unit. • Install a 90o conduit or flex cable adapter to ...
3800 Manual
Page 21
..., the door will reverse. Safety reversal system MUST be seen clearly, it will reverse. 3. Using Your Garage Door Opener Your LiftMaster Security✚® opener and hand-held remote control have been factory programmed to a matching code which are under EXTREME tension, MUST... may not reverse when required and could result in the Programming section. ALWAYS disconnect electric power to deactivate any repairs or removing covers. 13. WARNING OPERATION IMPORTANT SAFETY INSTRUCTIONS WARNING To reduce the risk of persons and obstructions. 8. SAVE THESE INSTRUCTIONS. When...
..., the door will reverse. Safety reversal system MUST be seen clearly, it will reverse. 3. Using Your Garage Door Opener Your LiftMaster Security✚® opener and hand-held remote control have been factory programmed to a matching code which are under EXTREME tension, MUST... may not reverse when required and could result in the Programming section. ALWAYS disconnect electric power to deactivate any repairs or removing covers. 13. WARNING OPERATION IMPORTANT SAFETY INSTRUCTIONS WARNING To reduce the risk of persons and obstructions. 8. SAVE THESE INSTRUCTIONS. When...


