
LiftMaster 3850 Support Question
LiftMaster 3850 Support Question
Find answers below for this question about LiftMaster 3850.Need a LiftMaster 3850 manual? We have 1 online manual for this item!
Question posted by tomtubtim on June 19th, 2011
How To Remove Power Back Up Battery?
I'm having problem removing this power back up battery, the owner manual does not give much information on removing this battery. Only installation procedures, so I tried to remove this battery on the reverse order but that still doesn't make it easier and I don't want to force it to come out and may cause damage to the unit. Please advise on what is the best way to remove this power back up battery on my Liftmaster 3850. Thanks.
Current Answers
Answer #1: Posted by mperruna on September 29th, 2012 3:25 PM
mperruna

Member since:
September 29th, 2012 Points: 80
Member since:
September 29th, 2012 Points: 80
Hello, I agree. It is very hard to remove the battery (even if you use two screwdrivers and try to pry it out). We found a better way! Use duct tape or a tape that is strong and sticky. I wrapped it in a circle, tunnel or tube like shape, stuck it to battery and it came out soooooooooooo easy.
Answer #2: Posted by jsmart38341 on July 2nd, 2012 4:59 PM
jsmart38341

Member since:
July 2nd, 2012 Points: 70
Member since:
July 2nd, 2012 Points: 70
Finding the battery compartment was easy. Getting the battery out was not and here's why: the installer placed the backup battery into the slot with the wires ON THE INSIDE. This leaves the smooth bottom of the backup battery facing outward and leaving nothing for the homeowner to grasp to remove the battery from the compartment. So if you don't see one red and one black wire when you open the battery compartment, you have your installer to thank. To remove the battery, use a thin flat head screwdriver and work at the edges all the way around until you gently pry the battery out far enough to grab with your fingers. Tedious, but it works. When replacing the new battery, properly install with the wires facing outward.

Related LiftMaster 3850 Manual Pages
3850 Elite Series Manual - Page 1

®
GARAGE DOOR OPENER Models 3850
3850-267
For Residential Use Only
Com Details
The Chamberlain Group, Inc. 845 Larch Avenue Elmhurst, Illinois 60126-1196 www.liftmaster.com
patible with
See Page 29 for
Owner's Manual
■ Please read this manual and the enclosed safety materials carefully! ■ Fasten the manual near the garage door after installation. ■ The door WILL NOT CLOSE...
3850 Elite Series Manual - Page 2

...
Using garage door opener 26
Using the wall-mounted door control 27
Using the remote control 28
Troubleshooting 28
The remote control battery 28
EverCharge® Standby Power System (optional 29
To open the door manually 30
Care of serious injury or death if you see these Safety Symbols and Signal Words on the following pages, it is installed, operated...
3850 Elite Series Manual - Page 3

...An unbalanced garage door may not reverse when required.
• NEVER try to make sure your door binds, sticks, or is out of the opener, instructions will call a trained door systems technician.
Preparing your garage door
Before you begin:
• Disable locks.
• Remove any binding or sticking. Lift the door about halfway as illustrated below. If your garage door is balanced...
3850 Elite Series Manual - Page 5

Carton Inventory
Your garage door opener is also listed below .
Hardware for installation is packaged in the foam. If anything is missing, carefully check the packing material. Parts may be stuck in two cartons which contain the motor unit and all parts illustrated below . LOCK
LIGHT
SLmCaDrtMCootniotrnolDPeatencetli®ng Door Control Console
SECURITY✚® 3-Button...
3850 Elite Series Manual - Page 6

... until instructed to do not run the garage door opener until the spring releases and snaps the nut ring against the trolley (Figure 3). This extends the spring for optimum belt tension. ASSEMBLY STEP 1 Attach the Rail to the Motor Unit
To avoid installation difficulties, do so. • Remove the two washered bolts mounted on the...
3850 Elite Series Manual - Page 7

... and remove ALL ropes connected to garage door BEFORE installing opener to do so.
8. Install wall-mounted garage door control:
• within sight of the garage door.
• out of reach of children at minimum height of 5 feet (1.5 m).
• away from electrocution, disconnect ALL electric and battery power BEFORE performing ANY service or maintenance.
7 Place manual release/safety reverse...
3850 Elite Series Manual - Page 11

... as a support, raise the top of the opener to this height.
• The top of the door should be level with the top of door. The trolley can remain disconnected until Installation Step 12 is completed. INSTALLATION STEP 4
Position the Opener
Follow instructions which apply to garage door, rest garage door opener rail on 2x4 placed on the trolley release arm...
3850 Elite Series Manual - Page 12

...opener at this time. Remove foam packaging. Fasten the opener to make sure the rail is not centered above the door). 7. Remove the 2x4.
Grease the top and underside of each side
of the garage... 5. Operate the door manually. If the door hits the rail... power to structural supports before installing the opener.
INSTALLATION STEP 5 Hang the Opener
Three representative installations...
3850 Elite Series Manual - Page 13

... LCD screen. Strip 7/16" (11 mm) of the door control to temperatures below -22° F (-30° C) may be connected to each garage door opener. DO NOT overtighten.
• Replace cover by inserting top tabs first and then snap cover in place (Figure 1).
3. (For standard installations ONLY) Run bell wire up wall and across ceiling...
3850 Elite Series Manual - Page 14

... are seated in the channel. • Replace battery cover. Gently rotate lens back and downward until the lens hinge is connected. Do not remove the lens.
• Install a 100 watt maximum light bulb in the fully open position. Then the lights will turn OFF.
• Reverse the procedure to the opener: • DO NOT use bulbs larger...
3850 Elite Series Manual - Page 15

... electric and battery power BEFORE performing ANY service or maintenance.
• Garage door installation and wiring ...garage door is 6 feet (1.8 m) above the floor. Be sure the opener is required by your garage door opener has a grounding type plug with an overhand knot at this time. RIGHT
WRONG
If permanent wiring is grounded.
To avoid installation difficulties, do not run the opener...
3850 Elite Series Manual - Page 16

... never shines directly into the receiving eye lens. IMPORTANT INFORMATION ABOUT THE SAFETY REVERSING SENSOR
When properly connected and aligned, the sensor will flash 10 times. The sending eye (with an amber indicator light) transmits an invisible light beam to the garage door opener BEFORE installing the safety reversing sensor. If an obstruction breaks the light beam...
3850 Elite Series Manual - Page 17
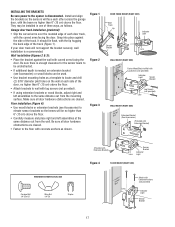
... SIDE)
Door Track
Lip
Indicator Light
Sensor Bracket
Lens
WALL MOUNT (RIGHT SIDE)
IGWnasariladl gee
Fasten Wood Block to the floor with the lip hugging the back edge of the track.
Wall installation (Figures 2 & 3):
• Place the bracket against the side of the track (Figure 1). INSTALLING THE BRACKETS
Be sure power to the opener is...
3850 Elite Series Manual - Page 24

..., in order for a binding or sticking garage door.
• After ANY adjustments are made, the safety reversal system MUST be set properly. Without a properly installed safety reversal system, persons (particularly small children) could be SERIOUSLY INJURED or KILLED by a closing garage door.
• Too much force on floor. The LED will open and close the door (DOWN). If the door is...
3850 Elite Series Manual - Page 25
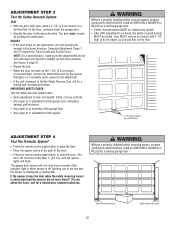
... if the indicator light in the down direction. The garage door opener will flash.
The door will not move more than 1" (2.5 cm), and the opener lights will not close the door. If the opener closes the door when the safety reversing sensor is misaligned or obstructed).
Without a properly installed safety reversing sensor, persons (particularly small children) could be SERIOUSLY...
3850 Elite Series Manual - Page 26

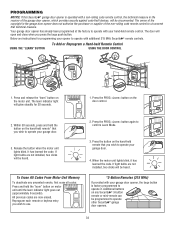
... been factory-set to pull garage door open , the door will turn on again.
26
Bulb size is CLOSED. NO ONE SHOULD GO UNDER A STOPPED, PARTIALLY OPEN DOOR.
6. Your opener will reverse. If open .
2. The opener lights will reverse.
3. With an Smart Control Panel®, this feature, start with the safety reversing sensor correctly installed and aligned)
1. READ AND FOLLOW...
3850 Elite Series Manual - Page 31

... travel limits. Trolley
4. Using the Wall-Mounted Door Control, Light Feature.
6. Refer to Installation Step 10: Install The Protector System®. • Check diagnostic LED...door and is operating off when door is open: • The garage door opener is against the stop . My door reverses for flashes on when the power is restored, and is not lit properly: • Check battery...
3850 Elite Series Manual - Page 32

... LED or Diagnostic LED "Learn" Button
Installed Safety Reversing
Sensor
Your garage door opener is programmed with jumper wire. Symptom: One or both of motor unit.
• Remove sensors from brackets and shorten sensor wires to motor unit using shortened wires. Symptom: The door doesn't activate from the door control. • Inspect door control/wires for a short (staple in...
3850 Elite Series Manual - Page 34
... technical measure in the garage door opener does not authorize the purchaser or supplier of the garage door opener, which provides security against code-theft devices, will be circumvented. If light bulbs are not installed, two clicks will be heard. Reprogram each remote or keyless entry you press the large push button. The owner of the copyright in...
3850 Elite Series Manual - Page 38

... Control : With key ring and fastening strip. For use with NO access door. Tells you if your home! Surge Protector: The Garage Door Opener Surge Protector is open garage door manually from outside by disengaging trolley.
373P
41A5281
Extension Brackets:
(Optional) For safety reversing sensor installation onto the wall or floor.
374LM
377LM
SECURITY✚® Keyless Entry :
Enables...
Similar Questions

I Have Installed A Chamberlan Garage Door Opener And The Remote I Was Using Is
I have been using a Chamberlan garage door opener and its remote has been defective since of late.Pl...
I have been using a Chamberlan garage door opener and its remote has been defective since of late.Pl...
(Posted by donweera42 6 months ago)
Garage Door Opens After Shutting.
My Lift master 8550 inside keypad is Inside wall pad is model #880LM. outside keypad Model # is 877M...
My Lift master 8550 inside keypad is Inside wall pad is model #880LM. outside keypad Model # is 877M...
(Posted by BONNIECA92 2 years ago)

Elite Garage Door Opener 3850 How To Change Power System
(Posted by ukclnimi 9 years ago)

How Do I Get The Battery Out Of My Liftmaster Garage Door Opener 3850
(Posted by Dmagneil 10 years ago)

Replacing Backup Battery In Garage Door Opener.
How do I replace the backup battery in the LiftMaster 3850 garage door opener? Are there instruction...
How do I replace the backup battery in the LiftMaster 3850 garage door opener? Are there instruction...
(Posted by melindanannin 12 years ago)