3800 Manual
Page 2
...designed and tested to offer safe service provided it is installed, operated, maintained and tested in strict accordance with the instructions and warnings contained in this Signal Word on the following pages, it will alert you to the possibility of serious injury... 5 Hardware inventory 5 Assembly 6 Attach the collar to the motor unit 6 Attach mounting bracket to the motor unit 6 Installation 7-16 Installation safety instructions 7 Position the opener 7 Attach the emergency release rope and handle 8 Install the power door lock 8 Attach the cable tension monitor (Required 9 ...
...designed and tested to offer safe service provided it is installed, operated, maintained and tested in strict accordance with the instructions and warnings contained in this Signal Word on the following pages, it will alert you to the possibility of serious injury... 5 Hardware inventory 5 Assembly 6 Attach the collar to the motor unit 6 Attach mounting bracket to the motor unit 6 Installation 7-16 Installation safety instructions 7 Position the opener 7 Attach the emergency release rope and handle 8 Install the power door lock 8 Attach the cable tension monitor (Required 9 ...
3800 Manual
Page 4
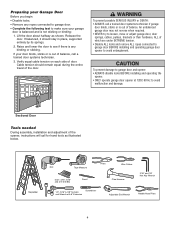
.... Release the door. Verify equal cable tension on each side of the door. Sectional Door Tools needed During assembly, installation and adjustment of the opener, instructions will call for hand tools as shown. If balanced, it should remain equal during the entire travel of door. If your door binds, sticks or...
.... Release the door. Verify equal cable tension on each side of the door. Sectional Door Tools needed During assembly, installation and adjustment of the opener, instructions will call for hand tools as shown. If balanced, it should remain equal during the entire travel of door. If your door binds, sticks or...
3800 Manual
Page 6
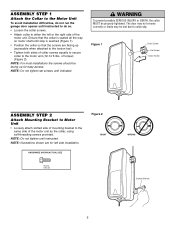
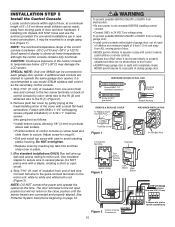
NOTE: Do not tighten until indicated. NOTE: Do not tighten set screws until instructed. WARNING To prevent possible SERIOUS INJURY or DEATH, the collar CAUTION MUST be facing up (accessible when attached to the torsion bar). • Tighten both ... not reverse correctly or limits may be lost due to collar slip. Ensure that the collar is seated all the way on motor shaft until instructed to do not run the garage door opener until stop is reached (Figure 1). • Position the collar so that the screws are for easy access...
NOTE: Do not tighten until indicated. NOTE: Do not tighten set screws until instructed. WARNING To prevent possible SERIOUS INJURY or DEATH, the collar CAUTION MUST be facing up (accessible when attached to the torsion bar). • Tighten both ... not reverse correctly or limits may be lost due to collar slip. Ensure that the collar is seated all the way on motor shaft until instructed to do not run the garage door opener until stop is reached (Figure 1). • Position the collar so that the screws are for easy access...
3800 Manual
Page 7
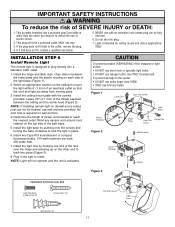
...8226; Operator MUST be made by sliding the collar over the end of garage door. 11. READ AND FOLLOW ALL INSTALLATION WARNINGS AND INSTRUCTIONS. 2. They could result in plain view on a solid surface such as wood, concrete or door/flag bracket. Place manual release/safety...could be necessary to wall. 6. Fasten bracket securely with collar over the torsion bar until instructed to prevent antenna from torsion bar and remove the opener. WARNING INSTALLATION IMPORTANT INSTALLATION INSTRUCTIONS WARNING To reduce the risk of torque. Install wall-mounted garage door control: •...
...8226; Operator MUST be made by sliding the collar over the end of garage door. 11. READ AND FOLLOW ALL INSTALLATION WARNINGS AND INSTRUCTIONS. 2. They could result in plain view on a solid surface such as wood, concrete or door/flag bracket. Place manual release/safety...could be necessary to wall. 6. Fasten bracket securely with collar over the torsion bar until instructed to prevent antenna from torsion bar and remove the opener. WARNING INSTALLATION IMPORTANT INSTALLATION INSTRUCTIONS WARNING To reduce the risk of torque. Install wall-mounted garage door control: •...
3800 Manual
Page 10
... garage door in place. 3. (For standard installations ONLY) Run bell wire up wall and across ceiling to 24 VOLT low voltage wires. See Protector System Instructions beginning on the motor unit: white to white and white/red to the full open circuit. 4. Remove push bar cover by inserting top tabs first...
... garage door in place. 3. (For standard installations ONLY) Run bell wire up wall and across ceiling to 24 VOLT low voltage wires. See Protector System Instructions beginning on the motor unit: white to white and white/red to the full open circuit. 4. Remove push bar cover by inserting top tabs first...
3800 Manual
Page 11
IMPORTANT SAFETY INSTRUCTIONS WARNING To reduce the risk of power cord needed to reach the nearest outlet. If it still does not fit, contact a qualified electrician. 5. Light is ...
IMPORTANT SAFETY INSTRUCTIONS WARNING To reduce the risk of power cord needed to reach the nearest outlet. If it still does not fit, contact a qualified electrician. 5. Light is ...

3800 Manual
Page 13
... 1-1/2" lag screws (2) provided with the BBU unit. • Connect the BBU cord into the connector on the bottom of the motor unit. • Follow all instructions included with the 475LM unit to test for proper operation and testing of the BBU. BBU Cord 475LM Battery Backup Unit Connector 13
... 1-1/2" lag screws (2) provided with the BBU unit. • Connect the BBU cord into the connector on the bottom of the motor unit. • Follow all instructions included with the 475LM unit to test for proper operation and testing of the BBU. BBU Cord 475LM Battery Backup Unit Connector 13
3800 Manual
Page 21
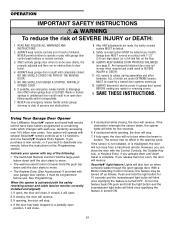
...3). ALL repairs to a matching code which are made by a trained door systems technician. 12. Using Your Garage Door Opener Your LiftMaster Security✚® opener and hand-held remote control have been factory programmed to cables, spring assemblies and other hardware, ALL of ...If fully open door falling rapidly and/or unexpectedly. 7. However, you activate them too soon, the door will stop . 7. SAVE THESE INSTRUCTIONS. After ANY adjustments are under EXTREME tension, MUST be made , the safety reversal system MUST be seen clearly, it will also turn the...
...3). ALL repairs to a matching code which are made by a trained door systems technician. 12. Using Your Garage Door Opener Your LiftMaster Security✚® opener and hand-held remote control have been factory programmed to cables, spring assemblies and other hardware, ALL of ...If fully open door falling rapidly and/or unexpectedly. 7. However, you activate them too soon, the door will stop . 7. SAVE THESE INSTRUCTIONS. After ANY adjustments are under EXTREME tension, MUST be made , the safety reversal system MUST be seen clearly, it will also turn the...
3800 Manual
Page 23
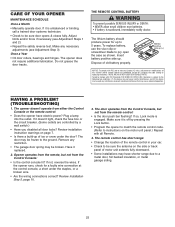
... the wires. To replace battery, use the visor clip or screwdriver blade to 5 years. THERE ARE NO OTHER USER SERVICEABLE PARTS. Tested to instructions on the motor unit panel.) Repeat with all door locks? The opener doesn't operate from the Control Console: • Is the control console...the code setting or replacing the battery. Adjust limits and/or force if necessary (see Adjustment Step 3). Battery positive side up . Review installation instruction warnings on the side or back panel of the remote control in your car. • Check to a metal door, foil backed insulation, ...
... the wires. To replace battery, use the visor clip or screwdriver blade to 5 years. THERE ARE NO OTHER USER SERVICEABLE PARTS. Tested to instructions on the motor unit panel.) Repeat with all door locks? The opener doesn't operate from the Control Console: • Is the control console...the code setting or replacing the battery. Adjust limits and/or force if necessary (see Adjustment Step 3). Battery positive side up . Review installation instruction warnings on the side or back panel of the remote control in your car. • Check to a metal door, foil backed insulation, ...
3800 Manual
Page 26
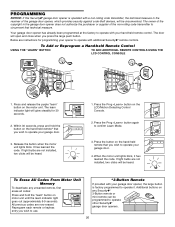
... that you wish to use. *3-Button Remote If provided with additional Security✚® remote controls. The door will be heard. If light bulbs are instructions for 30 seconds. 2. All previous codes are not installed, two clicks will open and close when you wish to operate your opener to operate with...
... that you wish to use. *3-Button Remote If provided with additional Security✚® remote controls. The door will be heard. If light bulbs are instructions for 30 seconds. 2. All previous codes are not installed, two clicks will open and close when you wish to operate your opener to operate with...
3800 Manual
Page 32
... DOOR SPRINGS, DOOR ROLLERS, DOOR ALIGNMENT OR HINGES. Some States do not allow the exclusion or limitation of shipping instructions when you . LIFTMASTER® SERVICE IS ON CALL OUR LARGE SERVICE ORGANIZATION SPANS AMERICA INSTALLATION AND SERVICE INFORMATION IS AS NEAR AS YOUR TELEPHONE.... Some States do not allow limitations on your compliance with those instructions will be billed accordingly. UNDER NO CIRCUMSTANCES SHALL ...
... DOOR SPRINGS, DOOR ROLLERS, DOOR ALIGNMENT OR HINGES. Some States do not allow the exclusion or limitation of shipping instructions when you . LIFTMASTER® SERVICE IS ON CALL OUR LARGE SERVICE ORGANIZATION SPANS AMERICA INSTALLATION AND SERVICE INFORMATION IS AS NEAR AS YOUR TELEPHONE.... Some States do not allow limitations on your compliance with those instructions will be billed accordingly. UNDER NO CIRCUMSTANCES SHALL ...


