

3280 Manual
Page 2
...garage door opener 28 Having a problem 29 Diagnostic chart 30 Programming 31-32 To add or reprogram a hand-held remote control .....31 To erase all codes 31 3-Button remotes 31 To add, reprogram or change a Keyless Entry PIN 32 Repair Parts 33-34 Rail assembly parts 33 Installation... the header bracket 9 Attach the rail to the header bracket 10 Position the opener 11 Hang the opener 12 Install the door control 13 Install the light 14 Attach the emergency release rope and handle .......14 Electrical requirements 15 Install the Protector System 16-18 Fasten...
...garage door opener 28 Having a problem 29 Diagnostic chart 30 Programming 31-32 To add or reprogram a hand-held remote control .....31 To erase all codes 31 3-Button remotes 31 To add, reprogram or change a Keyless Entry PIN 32 Repair Parts 33-34 Rail assembly parts 33 Installation... the header bracket 9 Attach the rail to the header bracket 10 Position the opener 11 Hang the opener 12 Install the door control 13 Install the light 14 Attach the emergency release rope and handle .......14 Electrical requirements 15 Install the Protector System 16-18 Fasten...
3280 Manual
Page 5
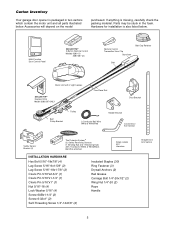
... contain the motor unit and all parts illustrated below . Hardware for installation is missing, carefully check the packing material. LOCK LIGHT Multi-Function Door Control Panel SECURITY✚® 3-Button Remote Control Models 3280 (1) 3280-267 (2) Remote Control Transmitter Visor Clip Styrofoam Belt Cap Retainer Belt Motor Unit with 2 Light Lenses SECURITY✚® Keyless Entry Model...
... contain the motor unit and all parts illustrated below . Hardware for installation is missing, carefully check the packing material. LOCK LIGHT Multi-Function Door Control Panel SECURITY✚® 3-Button Remote Control Models 3280 (1) 3280-267 (2) Remote Control Transmitter Visor Clip Styrofoam Belt Cap Retainer Belt Motor Unit with 2 Light Lenses SECURITY✚® Keyless Entry Model...
3280 Manual
Page 13
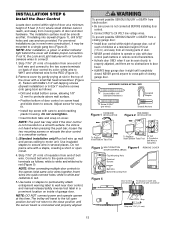
... door: • Install door control within sight of door at a minimum height of 5 feet (1.5 m) where small children cannot reach, and away from moving parts of door. • NEVER permit children to operate or play with door control push buttons or remote control transmitters. • Activate door ...ONLY when it may stick if the door control is not mounted on cover. Insert wires into drywall (Figure 1), drill 5/32" holes and...
... door: • Install door control within sight of door at a minimum height of 5 feet (1.5 m) where small children cannot reach, and away from moving parts of door. • NEVER permit children to operate or play with door control push buttons or remote control transmitters. • Activate door ...ONLY when it may stick if the door control is not mounted on cover. Insert wires into drywall (Figure 1), drill 5/32" holes and...
3280 Manual
Page 25
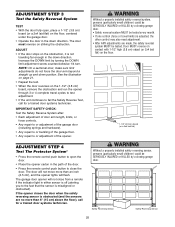
...object (or 2x4 laid flat) on the floor. 1-1/2" (3.8 cm) board (or a 2x4 laid flat) ADJUSTMENT STEP 4 Test The Protector System® • Press the remote control push button to open , place a 1-1/2" (3.8 cm) board (or a 2x4 laid flat) on the 1-1/2" (3.8 cm) board, remove the obstruction and run the opener through... to or buckling of the garage floor. • Any repair to or adjustment of the door. • Press the remote control push button to close from a remote if the indicator light in either sensor is off (alerting you to fail the Safety Reverse Test, call for a trained door...
...object (or 2x4 laid flat) on the floor. 1-1/2" (3.8 cm) board (or a 2x4 laid flat) ADJUSTMENT STEP 4 Test The Protector System® • Press the remote control push button to open , place a 1-1/2" (3.8 cm) board (or a 2x4 laid flat) on the 1-1/2" (3.8 cm) board, remove the obstruction and run the opener through... to or buckling of the garage floor. • Any repair to or adjustment of the door. • Press the remote control push button to close from a remote if the indicator light in either sensor is off (alerting you to fail the Safety Reverse Test, call for a trained door...
3280 Manual
Page 26
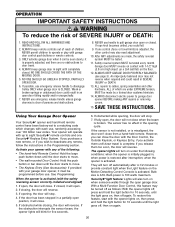
... is initially plugged in an open . 2. If opening cycle. After ANY adjustments are under the following : • The hand-held remote control have been factory-set to deactivate any of persons and obstructions. 8. Bulb size is activated. READ AND FOLLOW ALL WARNINGS AND INSTRUCTIONS. ...2. ONLY activate garage door when it will reverse. 3. ALWAYS keep remote controls out of reach of SEVERE INJURY or DEATH: 1. ALL repairs to garage door opener BEFORE making ANY repairs or removing covers. 15....
... is initially plugged in an open . 2. If opening cycle. After ANY adjustments are under the following : • The hand-held remote control have been factory-set to deactivate any of persons and obstructions. 8. Bulb size is activated. READ AND FOLLOW ALL WARNINGS AND INSTRUCTIONS. ...2. ONLY activate garage door when it will reverse. 3. ALWAYS keep remote controls out of reach of SEVERE INJURY or DEATH: 1. ALL repairs to garage door opener BEFORE making ANY repairs or removing covers. 15....
3280 Manual
Page 27
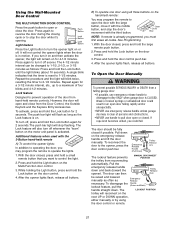
... activate the opener, the light will also turn it off . Lock feature Designed to prevent operation of the door from hand-held remote A) To control the opener lights: In addition to operating the door, you turn off , press and hold the Light button on the motor unit..., release all buttons. To reconnect the door to the opener, press the door control push bar. The LOCKOUT POSITION trolley will stop the door's movement with the 3-Button hand-held remote controls. If you may program the remote to open or closed , press and hold the Lock button for a 3-1/2 minute...
... activate the opener, the light will also turn it off . Lock feature Designed to prevent operation of the door from hand-held remote A) To control the opener lights: In addition to operating the door, you turn off , press and hold the Light button on the motor unit..., release all buttons. To reconnect the door to the opener, press the door control push bar. The LOCKOUT POSITION trolley will stop the door's movement with the 3-Button hand-held remote controls. If you may program the remote to open or closed , press and hold the Lock button for a 3-1/2 minute...
3280 Manual
Page 28
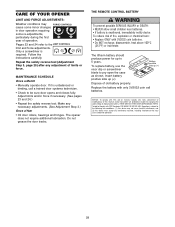
... for up to pry open the case as shown. To replace battery, use the visor clip or screwdriver blade to 5 years. THE REMOTE CONTROL BATTERY To prevent possible SERIOUS INJURY or DEATH: • NEVER allow small children near batteries. • If battery is unbalanced or binding..., disassemble, heat above 100°C (212°F) or incinerate. THERE ARE NO OTHER USER SERVICEABLE PARTS. Tested to the LIMIT CONTROLS limit and force adjustments. The opener does not require additional lubrication. Do not grease the door tracks. Replace the battery with FCC Standards...
... for up to pry open the case as shown. To replace battery, use the visor clip or screwdriver blade to 5 years. THE REMOTE CONTROL BATTERY To prevent possible SERIOUS INJURY or DEATH: • NEVER allow small children near batteries. • If battery is unbalanced or binding..., disassemble, heat above 100°C (212°F) or incinerate. THERE ARE NO OTHER USER SERVICEABLE PARTS. Tested to the LIMIT CONTROLS limit and force adjustments. The opener does not require additional lubrication. Do not grease the door tracks. Replace the battery with FCC Standards...
3280 Manual
Page 29
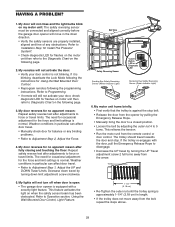
Refer to Programming. • If remote will still not activate your door control is equipped with the door, pull the Emergency Release Rope to force or travel . • Refer to Operation section; Decrease down travel towards... . Weather conditions in the down limit adjustment screw clockwise. 5. My door will move away from the remote control or door control. My door reverses for Using the Wall Mounted Door Control. • Reprogram remotes following the instructions for no apparent reason: Repeat safety reverse test after adjustments to force or travel by ...
Refer to Programming. • If remote will still not activate your door control is equipped with the door, pull the Emergency Release Rope to force or travel . • Refer to Operation section; Decrease down travel towards... . Weather conditions in the down limit adjustment screw clockwise. 5. My door will move away from the remote control or door control. My door reverses for Using the Wall Mounted Door Control. • Reprogram remotes following the instructions for no apparent reason: Repeat safety reverse test after adjustments to force or travel by ...

3280 Manual
Page 31
... codes: Press and hold the "learn" button on motor unit until the learn " button on the hand-held Remote Control USING THE "LEARN" BUTTON USING THE MULTI-FUNCTION DOOR CONTROL 9 1 7 3 5 KG 9 1 7 3 5 KG LOCK LIGHT 1. It has learned the code. LOCK LIGHT LOCK LIGHT To ...door opener, the large button is operated with additional Security✚® remote controls. Within 30 seconds, press and hold the LIGHT button on any unwanted remote, first erase all three buttons are held remote control. The door will open and close when you wish to operate your garage...
... codes: Press and hold the "learn" button on motor unit until the learn " button on the hand-held Remote Control USING THE "LEARN" BUTTON USING THE MULTI-FUNCTION DOOR CONTROL 9 1 7 3 5 KG 9 1 7 3 5 KG LOCK LIGHT 1. It has learned the code. LOCK LIGHT LOCK LIGHT To ...door opener, the large button is operated with additional Security✚® remote controls. Within 30 seconds, press and hold the LIGHT button on any unwanted remote, first erase all three buttons are held remote control. The door will open and close when you wish to operate your garage...
3280 Manual
Page 33
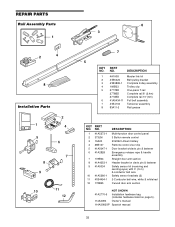
... PART NO. NO. 1 41A5273-1 2 373LM 3 10A20 4 29B137 5 41A5047-1 6 41A2828 7 178B34 8 41A4353-1 9 41A5034 10 41A5266-1 11 41B4494-1 12 178B35 DESCRIPTION Multi-function door control panel 3 Button remote control 3V2032 Lithium battery Remote control visor clip Door bracket w/clevis pin & fastener Emergency release rope & handle assembly Straight door arm section Header bracket w clevis pin & fastener Safety sensor...
... PART NO. NO. 1 41A5273-1 2 373LM 3 10A20 4 29B137 5 41A5047-1 6 41A2828 7 178B34 8 41A4353-1 9 41A5034 10 41A5266-1 11 41B4494-1 12 178B35 DESCRIPTION Multi-function door control panel 3 Button remote control 3V2032 Lithium battery Remote control visor clip Door bracket w/clevis pin & fastener Emergency release rope & handle assembly Straight door arm section Header bracket w clevis pin & fastener Safety sensor...
3280 Manual
Page 35
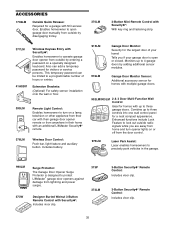
...from home and turn on a lamp, television or other appliance from their car with their home with an additional LiftMaster Security✚® remote. 378LM Wireless Door Control: Push bar, light feature and auxiliary button. Monitors up to three garage doors. Also can be limited to a... programmable number of your garage door is designed to protect LiftMaster® garage door openers against damage from lightning and power ...
...from home and turn on a lamp, television or other appliance from their car with their home with an additional LiftMaster Security✚® remote. 378LM Wireless Door Control: Push bar, light feature and auxiliary button. Monitors up to three garage doors. Also can be limited to a... programmable number of your garage door is designed to protect LiftMaster® garage door openers against damage from lightning and power ...


