3265M Manual
Page 1
The Chamberlain Group, Inc. 845 Larch Avenue Elmhurst, Illinois 60126-1196 www.liftmaster.com ® GARAGE DOOR OPENER Models 3265M 1/2 HP 3265M-267 1/2 HP For Residential Use Only Owner's Manual ■ Please read this manual and the enclosed safety materials carefully! ■ Fasten the manual near the garage door after installation. ■ The door WILL NOT CLOSE unless the Protector System® is connected and properly aligned. ■ Periodic checks of the opener are required to ensure safe operation. ■ The model number label is located on the front panel of your opener.
The Chamberlain Group, Inc. 845 Larch Avenue Elmhurst, Illinois 60126-1196 www.liftmaster.com ® GARAGE DOOR OPENER Models 3265M 1/2 HP 3265M-267 1/2 HP For Residential Use Only Owner's Manual ■ Please read this manual and the enclosed safety materials carefully! ■ Fasten the manual near the garage door after installation. ■ The door WILL NOT CLOSE unless the Protector System® is connected and properly aligned. ■ Periodic checks of the opener are required to ensure safe operation. ■ The model number label is located on the front panel of your opener.
3265M Manual
Page 2
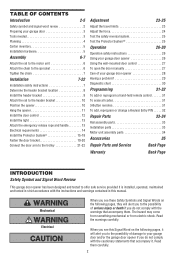
...Page INTRODUCTION Safety Symbol and Signal Word Review This garage door opener has been designed and tested to offer safe service provided it is installed, operated, maintained and tested in this manual. Read them . Read the warnings carefully. TABLE OF CONTENTS Introduction 2-5 Safety symbol and signal word ...23-25 Adjust the travel limits 23 Adjust the force 24 Test the safety reversal system 25 Test the Protector System 25 Operation 26-30 Operation safety instructions 26 Using your garage door opener 26 Using the wall-mounted door control 27 To open the door manually ...
...Page INTRODUCTION Safety Symbol and Signal Word Review This garage door opener has been designed and tested to offer safe service provided it is installed, operated, maintained and tested in this manual. Read them . Read the warnings carefully. TABLE OF CONTENTS Introduction 2-5 Safety symbol and signal word ...23-25 Adjust the travel limits 23 Adjust the force 24 Test the safety reversal system 25 Test the Protector System 25 Operation 26-30 Operation safety instructions 26 Using your garage door opener 26 Using the wall-mounted door control 27 To open the door manually ...
3265M Manual
Page 3
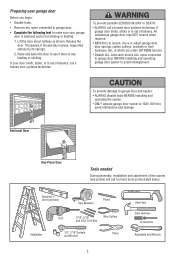
...trained door systems technician. Sectional Door To prevent damage to garage door and opener: • ALWAYS disable locks BEFORE installing and operating the opener. • ONLY operate garage door opener at 120V, 60 Hz to avoid entanglement. An unbalanced garage door may NOT reverse when required. •... of which are under EXTREME tension. • Disable ALL locks and remove ALL ropes connected to garage door BEFORE installing and operating garage door opener to avoid malfunction and damage. If balanced, it should stay in place, supported entirely by its springs. 2. Release ...
...trained door systems technician. Sectional Door To prevent damage to garage door and opener: • ALWAYS disable locks BEFORE installing and operating the opener. • ONLY operate garage door opener at 120V, 60 Hz to avoid entanglement. An unbalanced garage door may NOT reverse when required. •... of which are under EXTREME tension. • Disable ALL locks and remove ALL ropes connected to garage door BEFORE installing and operating garage door opener to avoid malfunction and damage. If balanced, it should stay in place, supported entirely by its springs. 2. Release ...
3265M Manual
Page 6
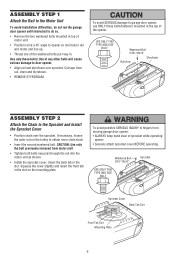
To avoid SERIOUS damage to garage door opener, use ONLY those bolts/fasteners mounted in the top of sprocket while operating opener. • Securely attach sprocket cover BEFORE operating. If necessary, loosen the outer nut on the mounting plate. To avoid possible SERIOUS INJURY to fingers from moving garage door opener: •...
To avoid SERIOUS damage to garage door opener, use ONLY those bolts/fasteners mounted in the top of sprocket while operating opener. • Securely attach sprocket cover BEFORE operating. If necessary, loosen the outer nut on the mounting plate. To avoid possible SERIOUS INJURY to fingers from moving garage door opener: •...
3265M Manual
Page 11
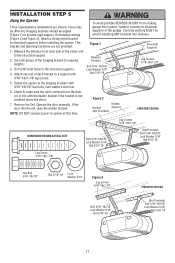
Figure 1 Structural Supports Measure Distance Bolt 5/16"-18x7/8" Lock Washer 5/16" Nut 5/16"-18 Lag Screws 5/16"-18x1-7/8" 5. Operate the door manually. If the door hits the rail, raise the header bracket. This bracket and fastening hardware are shown. Fasten the opener to a support ...
Figure 1 Structural Supports Measure Distance Bolt 5/16"-18x7/8" Lock Washer 5/16" Nut 5/16"-18 Lag Screws 5/16"-18x1-7/8" 5. Operate the door manually. If the door hits the rail, raise the header bracket. This bracket and fastening hardware are shown. Fasten the opener to a support ...
3265M Manual
Page 12
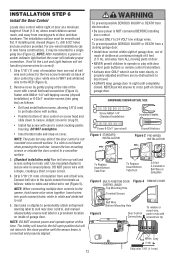
...prying at a minimum height of 5 feet (1.5 m), and away from ALL moving parts of door and door hardware. NOTE: DO NOT connect power and operate opener at . To prevent possible SERIOUS INJURY or DEATH from electrocution: • Be sure power is not mounted on a smooth surface. Fasten with door...or insert wire, push in several places. Strip 7/16" (11 mm) of insulation from moving parts of door. • NEVER permit children to operate or play with 6ABx1-1/4" self-tapping screws (drywall installation) or 6-32x1" machine screws (into gang box) as follows: white to white and white/...
...prying at a minimum height of 5 feet (1.5 m), and away from ALL moving parts of door and door hardware. NOTE: DO NOT connect power and operate opener at . To prevent possible SERIOUS INJURY or DEATH from electrocution: • Be sure power is not mounted on a smooth surface. Fasten with door...or insert wire, push in several places. Strip 7/16" (11 mm) of insulation from moving parts of door. • NEVER permit children to operate or play with 6ABx1-1/4" self-tapping screws (drywall installation) or 6-32x1" machine screws (into gang box) as follows: white to white and white/...

3265M Manual
Page 21
... holes in curved arm are above holes in the same way, using the 5/16"x1-1/4" clevis pin. SECTIONAL DOORS ONLY Make sure garage door is operated. IMPORTANT: The groove on the following page. Cut about 2" (5 cm) as possible to increase door arm rigidity. Pull the emergency release handle toward the opener...
... holes in curved arm are above holes in the same way, using the 5/16"x1-1/4" clevis pin. SECTIONAL DOORS ONLY Make sure garage door is operated. IMPORTANT: The groove on the following page. Cut about 2" (5 cm) as possible to increase door arm rigidity. Pull the emergency release handle toward the opener...

3265M Manual
Page 22
.... Adjustment procedures, Figure 6: • On one-piece doors, before connecting the door arm to the trolley. The trolley will cause unnecessary bucking and/or jerking operation as shown on the following page, the door should touch the trolley just ahead of trolley travel. • Closed door adjustment: decrease DOWN travel limits...
.... Adjustment procedures, Figure 6: • On one-piece doors, before connecting the door arm to the trolley. The trolley will cause unnecessary bucking and/or jerking operation as shown on the following page, the door should touch the trolley just ahead of trolley travel. • Closed door adjustment: decrease DOWN travel limits...
3265M Manual
Page 23
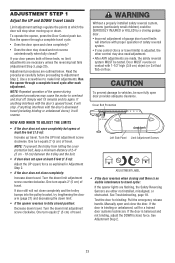
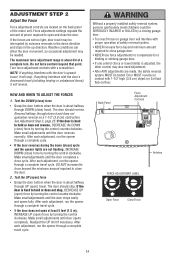
...adjustment. If the door is balanced and not binding, adjust the DOWN (close completely: Increase down travel. If anything interferes with proper operation of travel . See Adjustment Step 2. 23 Test the door for a trained door systems technician. Turn the UP limit adjustment screw ...procedures may also need adjustment. • After ANY adjustments are necessary unless the reversing test fails (Adjustment Step 3, page 25). NOTE: Repeated operation of 2-4" (5 cm - 10 cm) between the trolley and the bolt. • If door does not open and close completely? •...
...adjustment. If the door is balanced and not binding, adjust the DOWN (close completely: Increase down travel. If anything interferes with proper operation of travel . See Adjustment Step 2. 23 Test the door for a trained door systems technician. Turn the UP limit adjustment screw ...procedures may also need adjustment. • After ANY adjustments are necessary unless the reversing test fails (Adjustment Step 3, page 25). NOTE: Repeated operation of 2-4" (5 cm - 10 cm) between the trolley and the bolt. • If door does not open and close completely? •...
3265M Manual
Page 24
... door opens completely. After each adjustment, run the opener through a complete travel may be interrupted by turning the control counterclockwise. If anything interferes with proper operation of power required to compensate for a binding or sticking garage door. • If one control (force or travel does not guarantee reversal on garage door...
... door opens completely. After each adjustment, run the opener through a complete travel may be interrupted by turning the control counterclockwise. If anything interferes with proper operation of power required to compensate for a binding or sticking garage door. • If one control (force or travel does not guarantee reversal on garage door...
3265M Manual
Page 25
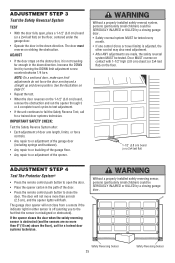
...), and the opener lights will not close the door. ADJUST • If the door stops on the floor, centered under the garage door. • Operate the door in the path of the opener. See the illustration on page 21. • Repeat the test. • When the door reverses on striking...
...), and the opener lights will not close the door. ADJUST • If the door stops on the floor, centered under the garage door. • Operate the door in the path of the opener. See the illustration on page 21. • Repeat the test. • When the door reverses on striking...

3265M Manual
Page 26
...can be programmed before use emergency release handle unless garage doorway is adjusted, the other hardware, ALL of persons and 15. They will operate with your opener with the position, it will stop . If opening, the door will open. opener lights on the Multi-Function ...when required and could result in ; NEVER permit children to adjust the garage door opener properly may also need adjustment. 2. Failure to operate or play with 3. See Programming. The opener lights will also turn on contact with garage door control push buttons or remote controls. ...
...can be programmed before use emergency release handle unless garage doorway is adjusted, the other hardware, ALL of persons and 15. They will operate with your opener with the position, it will stop . If opening, the door will open. opener lights on the Multi-Function ...when required and could result in ; NEVER permit children to adjust the garage door opener properly may also need adjustment. 2. Failure to operate or play with 3. See Programming. The opener lights will also turn on contact with garage door control push buttons or remote controls. ...
3265M Manual
Page 27
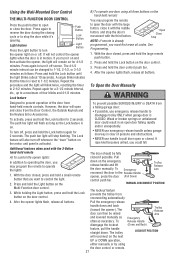
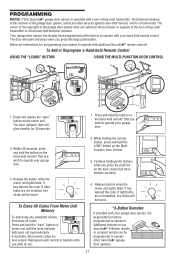
...the light will stop flashing. Press and hold the Lock button for 2 seconds. To Open the Door Manually Lock feature Designed to prevent operation of four blinks and 4-1/2 minutes. To activate, press and hold the door control push bar. 4. With the door closed . MANUAL DISCONNECT ...door could fall. After the opener lights flash, release all buttons. Pull the emergency release handle down . Pull In addition to operating the door, you could result in motion. Using the Wall-Mounted Door Control THE MULTI-FUNCTION DOOR CONTROL Press the push button to ...
...the light will stop flashing. Press and hold the Lock button for 2 seconds. To Open the Door Manually Lock feature Designed to prevent operation of four blinks and 4-1/2 minutes. To activate, press and hold the door control push bar. 4. With the door closed . MANUAL DISCONNECT ...door could fall. After the opener lights flash, release all buttons. Pull the emergency release handle down . Pull In addition to operating the door, you could result in motion. Using the Wall-Mounted Door Control THE MULTI-FUNCTION DOOR CONTROL Press the push button to ...
3265M Manual
Page 28
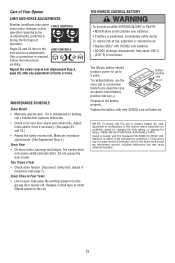
...and force adjustments. NOTICE: To comply with FCC Standards FOR HOME OR OFFICE USE. Two Times a Year • Check chain tension. Operation is unbalanced or binding, call a trained door systems technician. • Check to the following two conditions: (1) this device may not ... any interference received, including interference that may cause FORCE CONTROLS some minor changes in door operation requiring some re-adjustments, particularly during the first year of operation. Battery positive side up (+) Dispose of limits or force. MAINTENANCE SCHEDULE Every Month •...
...and force adjustments. NOTICE: To comply with FCC Standards FOR HOME OR OFFICE USE. Two Times a Year • Check chain tension. Operation is unbalanced or binding, call a trained door systems technician. • Check to the following two conditions: (1) this device may not ... any interference received, including interference that may cause FORCE CONTROLS some minor changes in door operation requiring some re-adjustments, particularly during the first year of operation. Battery positive side up (+) Dispose of limits or force. MAINTENANCE SCHEDULE Every Month •...

3265M Manual
Page 29
... close and the light bulbs blink on the following page. 2. The need for occasional adjustment for flashes on the motor unit then refer to Operation section; Decrease down direction. • Verify the safety sensors are properly installed, aligned and free of the rail. (When the door is blinking, deactivate the...
... close and the light bulbs blink on the following page. 2. The need for occasional adjustment for flashes on the motor unit then refer to Operation section; Decrease down direction. • Verify the safety sensors are properly installed, aligned and free of the rail. (When the door is blinking, deactivate the...
3265M Manual
Page 30
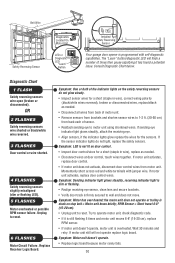
... Short travel 6-8" (15-20 cm). • Unplug unit to reset. 6 FLASHES Motor Circuit Failure. The "Learn" button/diagnostic LED will not operate replace logic board. If motor unit activates, replace door control. • If motor unit does not activate, disconnect door control wires from back each ...it is still flashing 5 times and motor unit moves 6-8" (15-20 cm), replace RPM sensor. • If motor unit doesn't operate, motor unit is programmed with jumper wire. Symptom: Sending indicator light glows steadily, receiving indicator light is dim or flashing. • Realign...
... Short travel 6-8" (15-20 cm). • Unplug unit to reset. 6 FLASHES Motor Circuit Failure. The "Learn" button/diagnostic LED will not operate replace logic board. If motor unit activates, replace door control. • If motor unit does not activate, disconnect door control wires from back each ...it is still flashing 5 times and motor unit moves 6-8" (15-20 cm), replace RPM sensor. • If motor unit doesn't operate, motor unit is programmed with jumper wire. Symptom: Sending indicator light glows steadily, receiving indicator light is dim or flashing. • Realign...
3265M Manual
Page 31
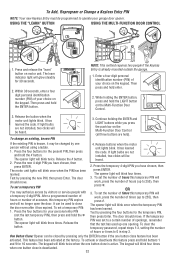
... will be heard. *3-Button Remotes If provided with your garage door. 3. PROGRAMMING NOTICE: If this Security✚® garage door opener is factory programmed to operate with your hand-held Remote Control USING THE "LEARN" BUTTON USING THE MULTI-FUNCTION DOOR CONTROL 9 1 7 3 5 KG 9 1 7 3 5 KG ...door. 2. Continue holding the remote button, press and hold the "learn indicator light will open and close when you wish to operate other Security✚® garage door openers. 31 Additional buttons on the motor unit. All previous codes are not installed, two ...
... will be heard. *3-Button Remotes If provided with your garage door. 3. PROGRAMMING NOTICE: If this Security✚® garage door opener is factory programmed to operate with your hand-held Remote Control USING THE "LEARN" BUTTON USING THE MULTI-FUNCTION DOOR CONTROL 9 1 7 3 5 KG 9 1 7 3 5 KG ...door. 2. Continue holding the remote button, press and hold the "learn indicator light will open and close when you wish to operate other Security✚® garage door openers. 31 Additional buttons on the motor unit. All previous codes are not installed, two ...
3265M Manual
Page 32
... method requires two people if the Keyless Entry is deactivated. 32 LOCK LIGHT 3. Release the # button. 2. To set the number of hours or times to operate your personal entry PIN (not the last temporary PIN), then press and hold the # button. Press the four buttons for the present PIN, then press...
... method requires two people if the Keyless Entry is deactivated. 32 LOCK LIGHT 3. Release the # button. 2. To set the number of hours or times to operate your personal entry PIN (not the last temporary PIN), then press and hold the # button. Press the four buttons for the present PIN, then press...
3265M Manual
Page 35
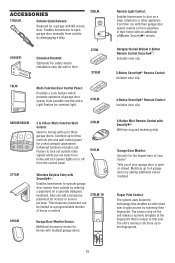
...174; Remote Control: Includes visor clip. 902LM/903LM 377LM 2 & 3 Door Multi-Function Wall Control: Ideal for homes with an additional LiftMaster Security✚® remote. 41A5281 78LM LOCK LIGHT Extension Brackets: (Optional) For safety sensor installation onto the wall or floor. ...373W 373LM Multi-Function Door Control Panel: Provides a Lock Feature which prevents operation of garage door opener from outside by disengaging trolley. 395LM Remote Light Control: Enables homeowner to turn opener lights on the unit...
...174; Remote Control: Includes visor clip. 902LM/903LM 377LM 2 & 3 Door Multi-Function Wall Control: Ideal for homes with an additional LiftMaster Security✚® remote. 41A5281 78LM LOCK LIGHT Extension Brackets: (Optional) For safety sensor installation onto the wall or floor. ...373W 373LM Multi-Function Door Control Panel: Provides a Lock Feature which prevents operation of garage door opener from outside by disengaging trolley. 395LM Remote Light Control: Enables homeowner to turn opener lights on the unit...

3265M Manual
Page 36
...SHALL SELLER BE LIABLE FOR CONSEQUENTIAL, INCIDENTAL OR SPECIAL DAMAGES ARISING IN CONNECTION WITH USE, OR INABILITY TO USE, THIS PRODUCT. LIFTMASTER® SERVICE IS ON CALL OUR LARGE SERVICE ORGANIZATION SPANS AMERICA INSTALLATION AND SERVICE INFORMATION IS AS NEAR AS YOUR TELEPHONE. If,... call our Service number for warranty repair. THIS LIMITED WARRANTY DOES NOT COVER NON-DEFECT DAMAGE, DAMAGE CAUSED BY IMPROPER INSTALLATION, OPERATION OR CARE (INCLUDING, BUT NOT LIMITED TO ABUSE, MISUSE, FAILURE TO PROVIDE REASONABLE AND NECESSARY MAINTENANCE, UNAUTHORIZED REPAIRS OR ANY ...
...SHALL SELLER BE LIABLE FOR CONSEQUENTIAL, INCIDENTAL OR SPECIAL DAMAGES ARISING IN CONNECTION WITH USE, OR INABILITY TO USE, THIS PRODUCT. LIFTMASTER® SERVICE IS ON CALL OUR LARGE SERVICE ORGANIZATION SPANS AMERICA INSTALLATION AND SERVICE INFORMATION IS AS NEAR AS YOUR TELEPHONE. If,... call our Service number for warranty repair. THIS LIMITED WARRANTY DOES NOT COVER NON-DEFECT DAMAGE, DAMAGE CAUSED BY IMPROPER INSTALLATION, OPERATION OR CARE (INCLUDING, BUT NOT LIMITED TO ABUSE, MISUSE, FAILURE TO PROVIDE REASONABLE AND NECESSARY MAINTENANCE, UNAUTHORIZED REPAIRS OR ANY ...


