
Service Manual
Page 3
... Aids 3-1 Test Page 3-1 Repair Information 4-1 Handling ESD-Sensitive Parts 4-1 Adjustments 4-2 Removal Procedures 4-2 Releasing Plastic Latches 4-2 Access Cover Removal 4-3 Front Cover Removal 4-3 Base Cover Assembly Removal 4-3 Ink Pad Removal 4-3 Buttons and Lenses Removal 4-3 Sheet Feeder Assembly Removal 4-4 Printhead Carrier Assembly Removal 4-5 Maintenance Station Removal 4-5 End-of-Forms Flag Removal 4-6 Mid Frame / Star...
... Aids 3-1 Test Page 3-1 Repair Information 4-1 Handling ESD-Sensitive Parts 4-1 Adjustments 4-2 Removal Procedures 4-2 Releasing Plastic Latches 4-2 Access Cover Removal 4-3 Front Cover Removal 4-3 Base Cover Assembly Removal 4-3 Ink Pad Removal 4-3 Buttons and Lenses Removal 4-3 Sheet Feeder Assembly Removal 4-4 Printhead Carrier Assembly Removal 4-5 Maintenance Station Removal 4-5 End-of-Forms Flag Removal 4-6 Mid Frame / Star...
Service Manual
Page 18
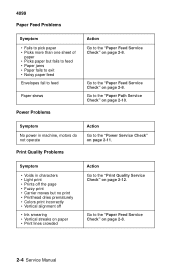
... pick paper • Picks more than one sheet of paper • Picks paper but no print • Printhead dries prematurely • Colors print incorrectly • Vertical alignment off • Ink smearing • Vertical streaks on paper • Print lines crowded Action Go to the "Print Quality Service Check" on page 2-11. Go...
... pick paper • Picks more than one sheet of paper • Picks paper but no print • Printhead dries prematurely • Colors print incorrectly • Vertical alignment off • Ink smearing • Vertical streaks on paper • Print lines crowded Action Go to the "Print Quality Service Check" on page 2-11. Go...
Service Manual
Page 26
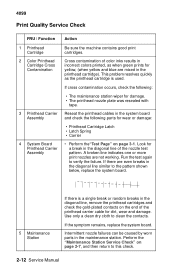
... Perform the "Maintenance Station Service Check" on page 3-1. 4099 Print Quality Service Check FRU / Function 1 Printhead Cartridge 2 Color Printhead Cartridge Cross Contamination 3 Printhead Carrier Assembly 4 System Board Printhead Carrier Assembly Action Be sure the machine contains good print cartridges... the failure. If cross contamination occurs, check the following parts for dirt, wear and damage. Cross contamination of color inks results in incorrect colors printed, as the printhead cartridge is a single break or random breaks in the printhead cartridge). Look for a ...
... Perform the "Maintenance Station Service Check" on page 3-1. 4099 Print Quality Service Check FRU / Function 1 Printhead Cartridge 2 Color Printhead Cartridge Cross Contamination 3 Printhead Carrier Assembly 4 System Board Printhead Carrier Assembly Action Be sure the machine contains good print cartridges... the failure. If cross contamination occurs, check the following parts for dirt, wear and damage. Cross contamination of color inks results in incorrect colors printed, as the printhead cartridge is a single break or random breaks in the printhead cartridge). Look for a ...

Service Manual
Page 27
... the following : • Carrier transport belt for wear. • Carrier guide rod for wear or dirt. 4099 FRU / Function 6 Paper Feed 7 Carrier Transport 8 Alignment Action Ink smudging and smearing can be caused by problems in the paper feed area. If dirty, clean and lubricate. • Carrier to perform the printhead alignment...
... the following : • Carrier transport belt for wear. • Carrier guide rod for wear or dirt. 4099 FRU / Function 6 Paper Feed 7 Carrier Transport 8 Alignment Action Ink smudging and smearing can be caused by problems in the paper feed area. If dirty, clean and lubricate. • Carrier to perform the printhead alignment...

Service Manual
Page 33
...forward and remove. Remove the two screws holding the carrier frame assembly to the rear of the carrier frame assembly to the base cover. 4. Ink Pad Removal 1. Pull up on the two cover latches located on its base. Remove the two cover mounting screws from the upper rear corners of... the base cover assembly. Remove the four screws holding the front of the base cover. 3. Pry the ink pad off the front cover. 3. Lift and remove the lenses. Open the access cover. 2. Front Cover Removal 1. Warning: When reassembling, do not overtighten ...
...forward and remove. Remove the two screws holding the carrier frame assembly to the rear of the carrier frame assembly to the base cover. 4. Ink Pad Removal 1. Pull up on the two cover latches located on its base. Remove the two cover mounting screws from the upper rear corners of... the base cover assembly. Remove the four screws holding the front of the base cover. 3. Pry the ink pad off the front cover. 3. Lift and remove the lenses. Open the access cover. 2. Front Cover Removal 1. Warning: When reassembling, do not overtighten ...

Service Manual
Page 45
4099 AsmIndex 1 -1 2 3 4 5 NS Part Number 12G0190 12G0193 12G0192 12G0191 12G0195 7350512 Units 1 1 1 1 1 1 Description Base Cover with Feet, Exit Tray and Banner Support Felt Ink Pad Access Cover Front Cover Power Button and Lens Field Packaging B/M Parts Catalog 7-3
4099 AsmIndex 1 -1 2 3 4 5 NS Part Number 12G0190 12G0193 12G0192 12G0191 12G0195 7350512 Units 1 1 1 1 1 1 Description Base Cover with Feet, Exit Tray and Banner Support Felt Ink Pad Access Cover Front Cover Power Button and Lens Field Packaging B/M Parts Catalog 7-3

Service Manual
Page 59
... 2-4 Power 2-4 Print Quality 2-4 R Removals Access Cover 4-3 Base Cover 4-3 Buttons / Lenses 4-3 Carrier Belt 4-7 End-of-Forms Flag 4-6 Exit Roller 4-5 Front Cover 4-3, 4-5 Gear Plate Asm. 4-7 Idler Pulley 4-7 Ink Pad 4-3 X-1
... 2-4 Power 2-4 Print Quality 2-4 R Removals Access Cover 4-3 Base Cover 4-3 Buttons / Lenses 4-3 Carrier Belt 4-7 End-of-Forms Flag 4-6 Exit Roller 4-5 Front Cover 4-3, 4-5 Gear Plate Asm. 4-7 Idler Pulley 4-7 Ink Pad 4-3 X-1


