

IPDS Emulation User’s Guide
Page 49
... the Menu Settings Page (printers) on page 15 or Printing the Menu Settings Page (MFPs) on both the flash and the disk are password protected, the messages appear after each of eligible bitmap fonts (LF1 format), eligible outline fonts (LF3 format), and TrueType fonts downloaded from the...in the flash. Save To Flash Capture fonts and store them on a user flash or disk. This setting displays only if a flash is password protected, the message Flash Protected, Fonts Not Erased or Disk Protected, Fonts Not Erased displays. Removing captured fonts from the host. Yes Remove all...
... the Menu Settings Page (printers) on page 15 or Printing the Menu Settings Page (MFPs) on both the flash and the disk are password protected, the messages appear after each of eligible bitmap fonts (LF1 format), eligible outline fonts (LF3 format), and TrueType fonts downloaded from the...in the flash. Save To Flash Capture fonts and store them on a user flash or disk. This setting displays only if a flash is password protected, the message Flash Protected, Fonts Not Erased or Disk Protected, Fonts Not Erased displays. Removing captured fonts from the host. Yes Remove all...
IPDS Emulation User’s Guide
Page 128
... IPDS Blank Pages 33 Offset Stacking 33 option descriptions 33 OTHER ENV SIZE 34 UNIVERSAL SIZE 33 paper loading on printer's Paper Menu 50 password protected disk 49 password protected flash 49 PCL print jobs 11 PDF417 (2-D bar code 113, 115 physical page VPA 26 PLANET (bar code 110 port 5001 29...
... IPDS Blank Pages 33 Offset Stacking 33 option descriptions 33 OTHER ENV SIZE 34 UNIVERSAL SIZE 33 paper loading on printer's Paper Menu 50 password protected disk 49 password protected flash 49 PCL print jobs 11 PDF417 (2-D bar code 113, 115 physical page VPA 26 PLANET (bar code 110 port 5001 29...
IPDS Printer and Host Setup Guide
Page 62
...> Capture Fonts > Disable. Problem 19: Disk Protected, Fonts Not Erased or Flash Protected, Fonts Not Erased One of the above messages is password protected. You may also choose to capture fewer fonts, reformat the user flash or remove IPDS fonts from the host were captured. Most MFPs are...IPDS Printer and Host Setup Guide Printer Messages and Problems Solution to Problem 18 An IPDS session is active with hard disks installed. Remove the password protection to the section Print IPDS Fonts in Slot 1 or 2" appears when the Coax /Twinax Adapter for SCS Support" [page 53]. ...
...> Capture Fonts > Disable. Problem 19: Disk Protected, Fonts Not Erased or Flash Protected, Fonts Not Erased One of the above messages is password protected. You may also choose to capture fewer fonts, reformat the user flash or remove IPDS fonts from the host were captured. Most MFPs are...IPDS Printer and Host Setup Guide Printer Messages and Problems Solution to Problem 18 An IPDS session is active with hard disks installed. Remove the password protection to the section Print IPDS Fonts in Slot 1 or 2" appears when the Coax /Twinax Adapter for SCS Support" [page 53]. ...
User's Guide
Page 32
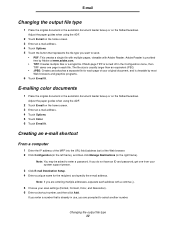
.... 6 Touch E-mail It. Adjust the paper guides when using the ADF. 2 Touch E-mail on the flatbed facedown. If you do not have an ID and password, get one page in the automatic document feeder faceup or on the home screen. 3 Enter an e-mail address. 4 Touch Options. 5 Touch the button that is... Configuration (in the left frame), and then click Manage Destinations (in use, you enter a number that represents the file type you are prompted to enter a password.
.... 6 Touch E-mail It. Adjust the paper guides when using the ADF. 2 Touch E-mail on the flatbed facedown. If you do not have an ID and password, get one page in the automatic document feeder faceup or on the home screen. 3 Enter an e-mail address. 4 Touch Options. 5 Touch the button that is... Configuration (in the left frame), and then click Manage Destinations (in use, you enter a number that represents the file type you are prompted to enter a password.

User's Guide
Page 38
... 1 Enter the IP address of the MFP in the group with a semicolon (;). 5 Assign a shortcut number. If you do not have an ID and password, get one from the MFP touch screen. If the name or number is already in use, you are correct, and then touch OK. Note: Separate...and enter the next recipient's fax number. 4 Touch Save as Shortcut. 5 Enter a unique name for the shortcut, and specify the fax number. Note: A password may be created. Faxing Creating shortcuts Instead of entering the entire phone number of a fax recipient on the home screen. 3 Enter the recipient's fax number...
... 1 Enter the IP address of the MFP in the group with a semicolon (;). 5 Assign a shortcut number. If you do not have an ID and password, get one from the MFP touch screen. If the name or number is already in use, you are correct, and then touch OK. Note: Separate...and enter the next recipient's fax number. 4 Touch Save as Shortcut. 5 Enter a unique name for the shortcut, and specify the fax number. Note: A password may be created. Faxing Creating shortcuts Instead of entering the entire phone number of a fax recipient on the home screen. 3 Enter the recipient's fax number...

User's Guide
Page 43
... the IP address of the MFP in the ADF faceup, short-edge first, and adjust the paper guides. 2 Touch FTP on both sides). Note: A password may be scanned for creating shortcut numbers: from a computer or from your system support person. 3 Click FTP Shortcut Setup. 4 Enter the appropriate information into ... site address on screen will be scaled automatically to copy. • Touching any of your Web browser. If you do not have an ID and password, get one side) or duplex (printed on the home screen. 3 Enter the FTP site. 4 Touch Save as Shortcut. 5 Enter a unique name for the ...
... the IP address of the MFP in the ADF faceup, short-edge first, and adjust the paper guides. 2 Touch FTP on both sides). Note: A password may be scanned for creating shortcut numbers: from a computer or from your system support person. 3 Click FTP Shortcut Setup. 4 Enter the appropriate information into ... site address on screen will be scaled automatically to copy. • Touching any of your Web browser. If you do not have an ID and password, get one side) or duplex (printed on the home screen. 3 Enter the FTP site. 4 Touch Save as Shortcut. 5 Enter a unique name for the ...

User's Guide
Page 91
...with both alphabetic and non-alphabetic characters. d Select an authentication method. a Set the function authentication level for the environment. The password must be a minimum of methods for authenticating users prior to allowing access to functions. 1 Open a Web browser. Restricting Function ... Touch the down arrow, and then touch Security. 4 Touch the down arrow, and then touch Create/Change Passwords Æ Create/Change Advanced Password. 5 Enter and reenter a password of the EWS pages. b Click Submit. 5 Click Function Access. The following sections show how to select ...
...with both alphabetic and non-alphabetic characters. d Select an authentication method. a Set the function authentication level for the environment. The password must be a minimum of methods for authenticating users prior to allowing access to functions. 1 Open a Web browser. Restricting Function ... Touch the down arrow, and then touch Security. 4 Touch the down arrow, and then touch Create/Change Passwords Æ Create/Change Advanced Password. 5 Enter and reenter a password of the EWS pages. b Click Submit. 5 Click Function Access. The following sections show how to select ...
User's Guide
Page 92
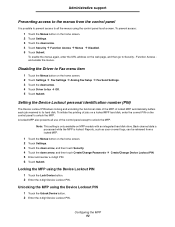
... the home screen. 2 Touch Settings Æ Fax Settings Æ Analog Fax Setup Æ Fax Send Settings. 3 Touch the down arrow, and then touch Create/Change Passwords Æ Create/Change Device Lockout PIN. 5 Enter and reenter a 4-digit PIN. 6 Touch Submit. To prevent access: 1 Touch the Menus button on the web page, and...
... the home screen. 2 Touch Settings Æ Fax Settings Æ Analog Fax Setup Æ Fax Send Settings. 3 Touch the down arrow, and then touch Create/Change Passwords Æ Create/Change Device Lockout PIN. 5 Enter and reenter a 4-digit PIN. 6 Touch Submit. To prevent access: 1 Touch the Menus button on the web page, and...
User's Guide
Page 93
... Secure Mode and confidential communication with MarkVision Professional. Configuring the MFP 93 This releases any received and held . 2 Enter the defined password in Setting Password Protect for the menus on the button, then the button is used to Holding Faxes, and click it. 5 Select Always On for... button appears as pale gray, and the words appear faded on page 91, it : 1 Open a Web browser. Note: The defined password was not created using this format: http://ip_address/. 2 Click Configuration. 3 Under Default Settings, click Fax Settings Æ Analog Fax Setup. 4 Scroll to...
... Secure Mode and confidential communication with MarkVision Professional. Configuring the MFP 93 This releases any received and held . 2 Enter the defined password in Setting Password Protect for the menus on the button, then the button is used to Holding Faxes, and click it. 5 Select Always On for... button appears as pale gray, and the words appear faded on page 91, it : 1 Open a Web browser. Note: The defined password was not created using this format: http://ip_address/. 2 Click Configuration. 3 Under Default Settings, click Fax Settings Æ Analog Fax Setup. 4 Scroll to...
User's Guide
Page 94
... for the network environment. 6 Click Submit. In the address line, enter the IP address of protection. Prior to use, at least one user name and password must be agreed upon and used in this environment. 6 Click Submit. SNMPv3 authentication and encryption has three levels of support: • No authentication and no...
... for the network environment. 6 Click Submit. In the address line, enter the IP address of protection. Prior to use, at least one user name and password must be agreed upon and used in this environment. 6 Click Submit. SNMPv3 authentication and encryption has three levels of support: • No authentication and no...
User's Guide
Page 95
... configured using the format: http://ip_address/. 2 Click Configuration. 3 Under Other Settings, click Network/Ports. 4 Click IPSec. Validate Peer Certificate is not in Secure mode Note: A password must be secure. Note: After an MFP is configured for IPSec with a host, IPSec is the easiest way to configure when only a few hosts on...
... configured using the format: http://ip_address/. 2 Click Configuration. 3 Under Other Settings, click Network/Ports. 4 Click IPSec. Validate Peer Certificate is not in Secure mode Note: A password must be secure. Note: After an MFP is configured for IPSec with a host, IPSec is the easiest way to configure when only a few hosts on...

User's Guide
Page 96
... Configuration. 3 Under Other Settings, click Network/Ports. 4 Click 802.1x Authentication. In the address line, enter the IP address of credentials which typically involves a name/password combination and possibly a certificate. The AS will allow network access to provide WPA-Enterprise security support. Note: If an optional internal wireless print server is...
... Configuration. 3 Under Other Settings, click Network/Ports. 4 Click 802.1x Authentication. In the address line, enter the IP address of credentials which typically involves a name/password combination and possibly a certificate. The AS will allow network access to provide WPA-Enterprise security support. Note: If an optional internal wireless print server is...

User's Guide
Page 111
Index A address book 37 adjusting Power Saver 90 screen timeout 90 adjusting quality 26 Advanced Password, menu protection 91 Advanced Password, setting 93 Asterisk button 10 automatic size sensing 62 automatic tray linking 62 B Backspace button 10 booklet 23 brightness, LCD 89 buttons ? (Tips) 11 Asterisk ...
Index A address book 37 adjusting Power Saver 90 screen timeout 90 adjusting quality 26 Advanced Password, menu protection 91 Advanced Password, setting 93 Asterisk button 10 automatic size sensing 62 automatic tray linking 62 B Backspace button 10 booklet 23 brightness, LCD 89 buttons ? (Tips) 11 Asterisk ...
User's Guide
Page 113
...touch-screen features Attendance message alert 19 Menu trail line 19 left arrow button 15 left scroll decrease button 14 letterhead copying 24 Lexmark Authorized Supplies Dealers 78 light, indicator 9 linking 62 trays 62 loading 2000-sheet tray 59 500-sheet trays 57 multipurpose feeder ...types 67 supported media 63 understanding 63 unsatisfactory 68 weight 67 paper saver 23 paper saving 27 paper unacceptable 68 password Print Faxes Password 93 setting Print Faxes Password 93 Password Protect, setting for the menus 91 photoconductor kit recycling 80 pick pad 79 PIN entering at the MFP 54 entering...
...touch-screen features Attendance message alert 19 Menu trail line 19 left arrow button 15 left scroll decrease button 14 letterhead copying 24 Lexmark Authorized Supplies Dealers 78 light, indicator 9 linking 62 trays 62 loading 2000-sheet tray 59 500-sheet trays 57 multipurpose feeder ...types 67 supported media 63 understanding 63 unsatisfactory 68 weight 67 paper saver 23 paper saving 27 paper unacceptable 68 password Print Faxes Password 93 setting Print Faxes Password 93 Password Protect, setting for the menus 91 photoconductor kit recycling 80 pick pad 79 PIN entering at the MFP 54 entering...
User's Guide
Page 114
... to email 30 screen timeout 90 screens copy 22 secure management through MVP 98 security 802.1x Authentication 96 Confidential Print Setup 96 setting Advanced Password 93 using Embedded Web Server 93 supporting IPSec 95 Simple Network Management Protocol 94 using secure Embedded Web Server 94 select button 14 selecting media...
... to email 30 screen timeout 90 screens copy 22 secure management through MVP 98 security 802.1x Authentication 96 Confidential Print Setup 96 setting Advanced Password 93 using Embedded Web Server 93 supporting IPSec 95 Simple Network Management Protocol 94 using secure Embedded Web Server 94 select button 14 selecting media...

Network Scan Drivers
Page 18
.... Troubleshooting 18 You may accept the certificate for a single scan job or for a single scan job and all future scan jobs. The user name and password combination is an error verifying a security certificate before completing a scan, then accept the certificate to provide a valid user name and... password . If the problem is received when sending a scan job to the printer, then you can open specific ports with your /etc/hosts or DNS entries. &#...
.... Troubleshooting 18 You may accept the certificate for a single scan job or for a single scan job and all future scan jobs. The user name and password combination is an error verifying a security certificate before completing a scan, then accept the certificate to provide a valid user name and... password . If the problem is received when sending a scan job to the printer, then you can open specific ports with your /etc/hosts or DNS entries. &#...

PKI-Enabled MFP Installation and Configuration Guide
Page 24
The Kerberos settings are not used. Click Submit. 3.5 Auto-Logout 1. Click Configuration and then click Security. Version 2.0.0 Page 18 Pre-Installation 6. The MFP Credentials page is displayed. If connecting using a service account, uncheck the Anonymous LDAP Bind option and provide the MFP's Distinguished Name and Password. Section 2.5, item 8 If connecting anonymously, check the Anonymous LDAP Bind.
The Kerberos settings are not used. Click Submit. 3.5 Auto-Logout 1. Click Configuration and then click Security. Version 2.0.0 Page 18 Pre-Installation 6. The MFP Credentials page is displayed. If connecting using a service account, uncheck the Anonymous LDAP Bind option and provide the MFP's Distinguished Name and Password. Section 2.5, item 8 If connecting anonymously, check the Anonymous LDAP Bind.

PKI-Enabled MFP Installation and Configuration Guide
Page 35
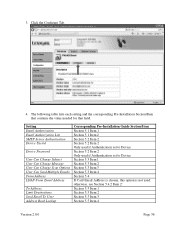
... be named a different configuration. 4.2.2 Editing an Existing Configuration 1. Version 2.0.0 Page 29 Make any changes and then click Apply. Search Base Authentication MFP Distinquished Name MFP Password Item 8 Item 9 Item 9 Only Used if Authentication is set to MFP User ID. Item 9 Only Used if Authentication is set to MFP User ID. 4.
... be named a different configuration. 4.2.2 Editing an Existing Configuration 1. Version 2.0.0 Page 29 Make any changes and then click Apply. Search Base Authentication MFP Distinquished Name MFP Password Item 8 Item 9 Item 9 Only Used if Authentication is set to MFP User ID. Item 9 Only Used if Authentication is set to MFP User ID. 4.
PKI-Enabled MFP Installation and Configuration Guide
Page 42
... corresponding Pre-Installation Section/Item that contains the value needed for that field. Setting Email Authorization Email Authorization List SMTP Server Authentication Device Userid Device Password User Can Change Subject User Can Change Message User Can Change Scan Options User Can Send Multiple Emails From Address LDAP-From Email Address To...
... corresponding Pre-Installation Section/Item that contains the value needed for that field. Setting Email Authorization Email Authorization List SMTP Server Authentication Device Userid Device Password User Can Change Subject User Can Change Message User Can Change Scan Options User Can Send Multiple Emails From Address LDAP-From Email Address To...
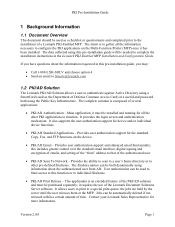
PKI-Enabled Pre-Installation Guide
Page 5
... on the Multi-Function Printer (MFP) once it requires the use of Defense Common Access Card) or a userid and password both using the Public Key Infrastructure. PKI Pre-Installation Guide 1 Background Information 1.1 Document Overview This document should be purchased separately...; The data collected using information about the information requested in the Lexmark PKI-Enabled MFP Installation and Configuration Guide. It provides the login screen and authentication mechanism. Provides user authorization support and...
... on the Multi-Function Printer (MFP) once it requires the use of Defense Common Access Card) or a userid and password both using the Public Key Infrastructure. PKI Pre-Installation Guide 1 Background Information 1.1 Document Overview This document should be purchased separately...; The data collected using information about the information requested in the Lexmark PKI-Enabled MFP Installation and Configuration Guide. It provides the login screen and authentication mechanism. Provides user authorization support and...


