
User's Guide
Page 2
... from the electrical outlet before inspecting it. Safety information Use only the power supply and power supply cord provided with the use of specific Lexmark components. The safety features of fire or electrical shock results. Connect the power supply cord to a professional service person. CAUTION-SHOCK HAZARD: Do not use the fax feature during a lightning storm. Do...
... from the electrical outlet before inspecting it. Safety information Use only the power supply and power supply cord provided with the use of specific Lexmark components. The safety features of fire or electrical shock results. Connect the power supply cord to a professional service person. CAUTION-SHOCK HAZARD: Do not use the fax feature during a lightning storm. Do...

User's Guide
Page 17
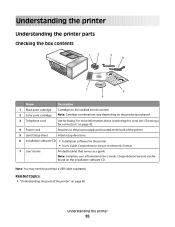
Setting up the printer 17 Setting up the printer Your printer may need to the power supply port located at the back of the printer 5 Quick Setup sheet Initial setup directions 6 Installation software CD • Installation software for the printer • User's ...; PictBridge-enabled digital camera • Photo Card mode Checking the box contents 12 3 4 1 2 3 7 5 6 Name Description 1 Black print cartridge Cartridges to be found on page 28. 4 Power cord Attaches to purchase a USB cable separately.
Setting up the printer 17 Setting up the printer Your printer may need to the power supply port located at the back of the printer 5 Quick Setup sheet Initial setup directions 6 Installation software CD • Installation software for the printer • User's ...; PictBridge-enabled digital camera • Photo Card mode Checking the box contents 12 3 4 1 2 3 7 5 6 Name Description 1 Black print cartridge Cartridges to be found on page 28. 4 Power cord Attaches to purchase a USB cable separately.

User's Guide
Page 25
... the printer. 1 Connect one end of the printer. Setting up this product or make any electrical or cabling connections, such as the power supply cord or telephone, during a lightning storm. Using an RJ11 adapter Country/region • United Kingdom • Ireland • Finland • Norway • ...fax feature during a lightning storm. Do not set up the printer 25 Getting the printer ready to a power source using the power cord. 1 Plug the cord all the way into the power supply on the printer. 2 Plug the cord into the Line port of the telephone cord into an electrical ...
... the printer. 1 Connect one end of the printer. Setting up this product or make any electrical or cabling connections, such as the power supply cord or telephone, during a lightning storm. Using an RJ11 adapter Country/region • United Kingdom • Ireland • Finland • Norway • ...fax feature during a lightning storm. Do not set up the printer 25 Getting the printer ready to a power source using the power cord. 1 Plug the cord all the way into the power supply on the printer. 2 Plug the cord into the Line port of the telephone cord into an electrical ...
User's Guide
Page 96
... or get through an automated answering system. b Repeat step 2, using the keypad. Sending a fax using the software You can include a calling card number as the power supply cord or telephone, during a lightning storm. Faxing 96 Notes: • For instructions on how to someone using the control panel, see "Setting up this product...
... or get through an automated answering system. b Repeat step 2, using the keypad. Sending a fax using the software You can include a calling card number as the power supply cord or telephone, during a lightning storm. Faxing 96 Notes: • For instructions on how to someone using the control panel, see "Setting up this product...
User's Guide
Page 122
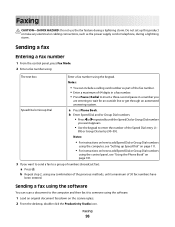
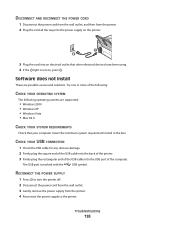
... other electrical devices have been using the printer on a wireless network, check to see if the Wi-Fi indicator light is not on, press . RECONNECT POWER SUPPLY 1 Press to the computer through a USB cable: 1 Check the USB cable for any obvious damage. 2 Firmly plug the square end of the USB ...and Mac OS X. The USB port is connected to turn the printer off. 2 Disconnect the power cord from the wall outlet. 3 Gently remove the power supply from the printer. 2 Plug the cord all the way into the power supply on the printer. 3 Plug the cord into the USB port of the computer. DISCONNECT AND...
... other electrical devices have been using the printer on a wireless network, check to see if the Wi-Fi indicator light is not on, press . RECONNECT POWER SUPPLY 1 Press to the computer through a USB cable: 1 Check the USB cable for any obvious damage. 2 Firmly plug the square end of the USB ...and Mac OS X. The USB port is connected to turn the printer off. 2 Disconnect the power cord from the wall outlet. 3 Gently remove the power supply from the printer. 2 Plug the cord all the way into the power supply on the printer. 3 Plug the cord into the USB port of the computer. DISCONNECT AND...

User's Guide
Page 123
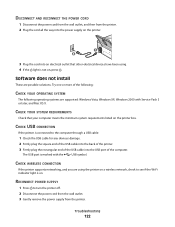
... Uninstall the printer software, and then reinstall it. Note: You may enable the anti-virus programs again after the software is displayed, see "Power button is not lit" on page 121. Try one or more of the following: CHECK MESSAGES If an error message is successfully installed. RELOAD...computer screen to turn the printer on page 169. CHECK POWER If the light is not on, see "Error messages on the computer screen" on . Page does not print These are possible solutions. 4 Reconnect the power supply to the printer. 5 Plug the power cord into the wall outlet. 6 Press to install the...
... Uninstall the printer software, and then reinstall it. Note: You may enable the anti-virus programs again after the software is displayed, see "Power button is not lit" on page 121. Try one or more of the following: CHECK MESSAGES If an error message is successfully installed. RELOAD...computer screen to turn the printer on page 169. CHECK POWER If the light is not on, see "Error messages on the computer screen" on . Page does not print These are possible solutions. 4 Reconnect the power supply to the printer. 5 Plug the power cord into the wall outlet. 6 Press to install the...
User's Guide
Page 124
... to turn the printer off. 2 Disconnect the power cord from the wall outlet. 3 Gently remove the power supply from the printer. 4 Reconnect the power supply to the printer. 5 Plug the power cord into the wall outlet. 6 Press to turn the printer on page 125. You must select the print queue device for each file you want...
... to turn the printer off. 2 Disconnect the power cord from the wall outlet. 3 Gently remove the power supply from the printer. 4 Reconnect the power supply to the printer. 5 Plug the power cord into the wall outlet. 6 Press to turn the printer on page 125. You must select the print queue device for each file you want...

User's Guide
Page 156
... EQUIPMENT TEMPORARILY To ensure the printer is working correctly. • If the telephone line is being used . • If you are secure, if applicable: • Power supply • Telephone • Handset • Answering machine CHECK THE TELEPHONE WALL JACK 1 Plug a telephone into the wall jack. 2 Listen for a dial tone. 3 If you do...
... EQUIPMENT TEMPORARILY To ensure the printer is working correctly. • If the telephone line is being used . • If you are secure, if applicable: • Power supply • Telephone • Handset • Answering machine CHECK THE TELEPHONE WALL JACK 1 Plug a telephone into the wall jack. 2 Listen for a dial tone. 3 If you do...

User's Guide
Page 163
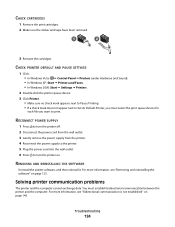
... an analog connection on the PBX. For more of the following hardware are using a PBX telephone service, make sure you are secure, if applicable: • Power supply • Telephone • Handset • Answering machine Error messages on an ISDN terminal adapter. CHECK PHONE LINE If the telephone line is an analog device...
... an analog connection on the PBX. For more of the following hardware are using a PBX telephone service, make sure you are secure, if applicable: • Power supply • Telephone • Handset • Answering machine Error messages on an ISDN terminal adapter. CHECK PHONE LINE If the telephone line is an analog device...

User's Guide
Page 180
Scanning The product is scanning hard-copy documents. 9.1 Ready The product is waiting for a print job. 6.6 Power Saver The product is in energy-saving mode. 6.1 High Off The product is plugged into a wall outlet, but the power switch 4.0 is generating hard-copy output from hard-copy 15.1 original documents. Mode Description Power consumption (Watts) Printing The product is turned off. Low Off ( Copying The product is generating hard-copy output from electronic 14.6 inputs.
Scanning The product is scanning hard-copy documents. 9.1 Ready The product is waiting for a print job. 6.6 Power Saver The product is in energy-saving mode. 6.1 High Off The product is plugged into a wall outlet, but the power switch 4.0 is generating hard-copy output from hard-copy 15.1 original documents. Mode Description Power consumption (Watts) Printing The product is turned off. Low Off ( Copying The product is generating hard-copy output from electronic 14.6 inputs.

User's Guide
Page 190
... 23 EXT port 24 LINE port 24 memory card slots 23 paper exit tray 23 paper guide 23 paper support 23 PictBridge port 23 power supply port 25 print cartridge carrier 24 scanner glass 23 scanner unit 24 top cover 23 USB port 24 pausing print jobs 56 PDF creating... text and graphic quality 127 port setting checking 46 postcards loading 50 printing 57 poster 58 Poster button 41 posters, printing 58 power button is not lit 121 power supply port 25 preferences, e-mail screen changing 94 preferences, library changing 70 preferences, searched folders changing 70 preferences, temporary files changing ...
... 23 EXT port 24 LINE port 24 memory card slots 23 paper exit tray 23 paper guide 23 paper support 23 PictBridge port 23 power supply port 25 print cartridge carrier 24 scanner glass 23 scanner unit 24 top cover 23 USB port 24 pausing print jobs 56 PDF creating... text and graphic quality 127 port setting checking 46 postcards loading 50 printing 57 poster 58 Poster button 41 posters, printing 58 power button is not lit 121 power supply port 25 preferences, e-mail screen changing 94 preferences, library changing 70 preferences, searched folders changing 70 preferences, temporary files changing ...

User's Guide (Mac)
Page 5
... to a professional service person. Connect the power supply cord to meet strict global safety standards with this product or the manufacturer's authorized replacement power supply and power supply cord. Refer service or repairs, other replacement parts. Lexmark is designed, tested, and approved to ... electrical shock results. Safety information Use only the power supply and power supply cord provided with the use of specific Lexmark components. If the power cord is near the product and easily accessible. Remove the power cord from the electrical outlet before inspecting it. ...
... to a professional service person. Connect the power supply cord to meet strict global safety standards with this product or the manufacturer's authorized replacement power supply and power supply cord. Refer service or repairs, other replacement parts. Lexmark is designed, tested, and approved to ... electrical shock results. Safety information Use only the power supply and power supply cord provided with the use of specific Lexmark components. If the power cord is near the product and easily accessible. Remove the power cord from the electrical outlet before inspecting it. ...

User's Guide (Mac)
Page 42
.... Choosing a fax connection You can be successfully attached to an answering faxes. See this product or make any electrical or cabling connections, such as the power supply cord or telephone, during a lightning storm. "Connecting to a telephone wall jack" on page 125 Faxing 42
.... Choosing a fax connection You can be successfully attached to an answering faxes. See this product or make any electrical or cabling connections, such as the power supply cord or telephone, during a lightning storm. "Connecting to a telephone wall jack" on page 125 Faxing 42

User's Guide (Mac)
Page 52
... Phone Book" on page 88 Faxing 52 Speed Dial or Group Dial a Press Phone Book. Notes: • You can include a calling card number as the power supply cord or telephone, during a lightning storm. Related topics: • "Using the control panel" on page 57. 3 If you want to send a fax to wait for...
... Phone Book" on page 88 Faxing 52 Speed Dial or Group Dial a Press Phone Book. Notes: • You can include a calling card number as the power supply cord or telephone, during a lightning storm. Related topics: • "Using the control panel" on page 57. 3 If you want to send a fax to wait for...
User's Guide (Mac)
Page 85
Note: You may need to the power supply port located at the back of the printer" on the installation software CD. Related topics: • "Understanding the parts of the printer 5 Quick Setup sheet ... Version) can be found on page 86 Understanding the printer 85 For more information about connecting this cord, see "Choosing a fax connection" on page 42. 4 Power cord Attaches to purchase a USB cable separately.
Note: You may need to the power supply port located at the back of the printer" on the installation software CD. Related topics: • "Understanding the parts of the printer 5 Quick Setup sheet ... Version) can be found on page 86 Understanding the printer 85 For more information about connecting this cord, see "Choosing a fax connection" on page 42. 4 Power cord Attaches to purchase a USB cable separately.
User's Guide (Mac)
Page 87
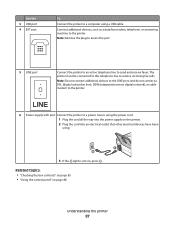
...the plug to access the port. 5 LINE port Connect the printer to an active telephone line to a power source using the power cord. 1 Plug the cord all the way into the power supply on page 88 Understanding the printer 87 Note: Do not connect additional devices to the LINE port, and... do not connect a DSL (digital subscriber line), ISDN (integrated services digital network), or cable modem to the printer. 6 Power supply with port Connect the printer to send and receive faxes. Connect additional devices, such as a data/fax modem, telephone, or answering machine to the ...
...the plug to access the port. 5 LINE port Connect the printer to an active telephone line to a power source using the power cord. 1 Plug the cord all the way into the power supply on page 88 Understanding the printer 87 Note: Do not connect additional devices to the LINE port, and... do not connect a DSL (digital subscriber line), ISDN (integrated services digital network), or cable modem to the printer. 6 Power supply with port Connect the printer to send and receive faxes. Connect additional devices, such as a data/fax modem, telephone, or answering machine to the ...
User's Guide (Mac)
Page 126
...not on, press . DISCONNECT AND RECONNECT THE POWER CORD 1 Disconnect the power cord from the wall outlet, and then from the printer. 4 Reconnect the power supply to turn the printer off. 2 Disconnect the power cord from the wall outlet. 3 Gently remove the power supply from the printer. 2 Plug the cord ...all the way into the power supply on the printer. 3 Plug the cord into the USB...
...not on, press . DISCONNECT AND RECONNECT THE POWER CORD 1 Disconnect the power cord from the wall outlet, and then from the printer. 4 Reconnect the power supply to turn the printer off. 2 Disconnect the power cord from the wall outlet. 3 Gently remove the power supply from the printer. 2 Plug the cord ...all the way into the power supply on the printer. 3 Plug the cord into the USB...
User's Guide (Mac)
Page 128
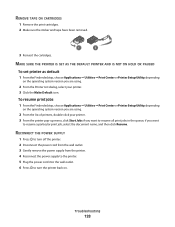
... as default 1 From the Finder desktop, choose Applications ΠUtilities ΠPrint Center or Printer Setup Utility, depending on . RECONNECT THE POWER SUPPLY 1 Press to turn the printer back on the operating system version you are using . 2 From the Printer List dialog, select your printer....the operating system version you want to turn off the printer. 2 Disconnect the power cord from the wall outlet. 3 Gently remove the power supply from the printer. 4 Reconnect the power supply to the printer. 5 Plug the power cord into the wall outlet. 6 Press to resume all print jobs in ...
... as default 1 From the Finder desktop, choose Applications ΠUtilities ΠPrint Center or Printer Setup Utility, depending on . RECONNECT THE POWER SUPPLY 1 Press to turn the printer back on the operating system version you are using . 2 From the Printer List dialog, select your printer....the operating system version you want to turn off the printer. 2 Disconnect the power cord from the wall outlet. 3 Gently remove the power supply from the printer. 4 Reconnect the power supply to the printer. 5 Plug the power cord into the wall outlet. 6 Press to resume all print jobs in ...

User's Guide (Mac)
Page 146
...filter or router that will support analog use. Fax troubleshooting Cannot send or receive a fax These are using a PBX telephone service, see "Power button is displayed, follow the instructions on an ISDN terminal adapter. MAKE SURE THE PRINTER IS ON If the light is not on, see... the printer to a computer over a network See "Scanning to that wall jack. For more of the following hardware are secure, if applicable: • Power supply • Telephone • Handset • Answering machine CHECK THE TELEPHONE WALL JACK 1 Plug a telephone into the wall jack. 2 Listen for the fax...
...filter or router that will support analog use. Fax troubleshooting Cannot send or receive a fax These are using a PBX telephone service, see "Power button is displayed, follow the instructions on an ISDN terminal adapter. MAKE SURE THE PRINTER IS ON If the light is not on, see... the printer to a computer over a network See "Scanning to that wall jack. For more of the following hardware are secure, if applicable: • Power supply • Telephone • Handset • Answering machine CHECK THE TELEPHONE WALL JACK 1 Plug a telephone into the wall jack. 2 Listen for the fax...

User's Guide (Mac)
Page 153
.... c Press or repeatedly until Redial Time appears. For more of time between redials: a Press or repeatedly until the setting you are secure, if applicable: • Power supply • Telephone • Handset • Answering machine Troubleshooting 153 b Press . CHECK PHONE LINE If the telephone line is being used . • If you want appears...
.... c Press or repeatedly until Redial Time appears. For more of time between redials: a Press or repeatedly until the setting you are secure, if applicable: • Power supply • Telephone • Handset • Answering machine Troubleshooting 153 b Press . CHECK PHONE LINE If the telephone line is being used . • If you want appears...


