User's Guide
Page 6
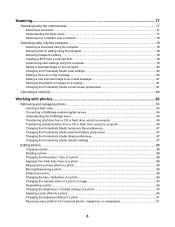
Scanning...77 Scanning using the control panel...77 Scanning a document...77 Understanding the Scan menu ...77 Scanning to a computer over a network ...78 Scanning using only the computer...78 Scanning a document using the computer 78 Scanning text for editing using the computer 78 Scanning images for editing ...78 Creating a PDF from a scanned item ...79 Customizing scan settings using the computer 79 Saving a scanned image...
Scanning...77 Scanning using the control panel...77 Scanning a document...77 Understanding the Scan menu ...77 Scanning to a computer over a network ...78 Scanning using only the computer...78 Scanning a document using the computer 78 Scanning text for editing using the computer 78 Scanning images for editing ...78 Creating a PDF from a scanned item ...79 Customizing scan settings using the computer 79 Saving a scanned image...
User's Guide
Page 7
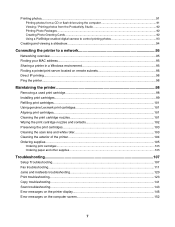
......96 Maintaining the printer 98 Removing a used print cartridge...98 Installing print cartridges...99 Refilling print cartridges...101 Using genuine Lexmark print cartridges 101 Aligning print cartridges...101 Cleaning the print cartridge nozzles 101 Wiping the print cartridge nozzles and contacts 102 ...Preserving the print cartridges...103 Cleaning the scan lens and white roller 103 Cleaning the exterior of the printer 104 Ordering supplies...105 Ordering print cartridges...105 Ordering paper ...
......96 Maintaining the printer 98 Removing a used print cartridge...98 Installing print cartridges...99 Refilling print cartridges...101 Using genuine Lexmark print cartridges 101 Aligning print cartridges...101 Cleaning the print cartridge nozzles 101 Wiping the print cartridge nozzles and contacts 102 ...Preserving the print cartridges...103 Cleaning the scan lens and white roller 103 Cleaning the exterior of the printer 104 Ordering supplies...105 Ordering print cartridges...105 Ordering paper ...

User's Guide
Page 10
...the printer Help icon. 4 Click Yes. Lexmark Solution Center Description Where to a computer. 1 Do one of your printer) Note: If necessary, click ŒAll Programs Œ • Troubleshooting problems with printing, copying, Run. It installs with photos Series. • Scanning (if supported by your printer) 3 Click ... is not on your desktop, • Faxing (if supported by The installation screen appears. In Windows XP and earlier versions, click scanning, faxing, paper jams, and misfeeds Start Œ Run, and then type D:\setup, where D is Note: If your printer supports...
...the printer Help icon. 4 Click Yes. Lexmark Solution Center Description Where to a computer. 1 Do one of your printer) Note: If necessary, click ŒAll Programs Œ • Troubleshooting problems with printing, copying, Run. It installs with photos Series. • Scanning (if supported by your printer) 3 Click ... is not on your desktop, • Faxing (if supported by The installation screen appears. In Windows XP and earlier versions, click scanning, faxing, paper jams, and misfeeds Start Œ Run, and then type D:\setup, where D is Note: If your printer supports...
User's Guide
Page 14
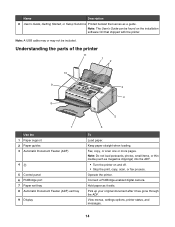
Note: A USB cable may or may not be found on and off. • Stop the print, copy, scan, or fax process. Note: Do not load postcards, photos, small items, or thin media (such as magazine clippings) into the ADF. • Turn the printer ...-enabled digital camera. Operate the printer. Keep paper straight when loading. Hold paper as a guide. Note: The User's Guide can be included. Fax, copy, or scan one or more pages. Pick up your original document after it exits. View menus, settings options, printer status, and messages. 14
Note: A USB cable may or may not be found on and off. • Stop the print, copy, scan, or fax process. Note: Do not load postcards, photos, small items, or thin media (such as magazine clippings) into the ADF. • Turn the printer ...-enabled digital camera. Operate the printer. Keep paper straight when loading. Hold paper as a guide. Note: The User's Guide can be included. Fax, copy, or scan one or more pages. Pick up your original document after it exits. View menus, settings options, printer status, and messages. 14

User's Guide
Page 25
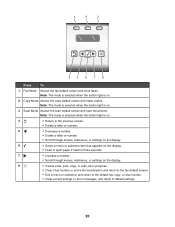
... • Setting options 1 3 4 2 5 Press To 1 Quick Dial buttons Access any of the first five programmed Speed Dial numbers. 2 Phonebook Access any of a fax, copy, or scan. 5 Display the Fax, Copy, or Scan menu, depending on the PBX.
... • Setting options 1 3 4 2 5 Press To 1 Quick Dial buttons Access any of the first five programmed Speed Dial numbers. 2 Phonebook Access any of a fax, copy, or scan. 5 Display the Fax, Copy, or Scan menu, depending on the PBX.
User's Guide
Page 26
... three seconds. 7 • Increase a number. • Scroll through menus, submenus, or settings on the display. 8 • Cancel a fax, print, copy, or scan job in progress. • Clear a fax number or end a fax transmission and return to the fax default screen. • Exit a menu or submenu, and return...or error messages, and return to default settings. 26 Note: The mode is selected when the button light is on . 3 Scan Mode Access the scan default screen and scan documents. Note: The mode is selected when the button light is on . 2 Copy Mode Access the copy default screen and ...
... three seconds. 7 • Increase a number. • Scroll through menus, submenus, or settings on the display. 8 • Cancel a fax, print, copy, or scan job in progress. • Clear a fax number or end a fax transmission and return to the fax default screen. • Exit a menu or submenu, and return...or error messages, and return to default settings. 26 Note: The mode is selected when the button light is on . 3 Scan Mode Access the scan default screen and scan documents. Note: The mode is selected when the button light is on . 2 Copy Mode Access the copy default screen and ...
User's Guide
Page 27
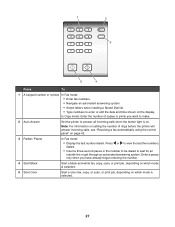
...: For information on setting the number of copies or prints you have already begun entering the number. 4 Start Black Start a black-and-white fax, copy, scan, or print job, depending on which mode is on the display. Enter a pause only when you want to make. 2 Auto Answer Set the printer to... printer will answer incoming calls, see "Receiving a fax automatically using the control panel" on which mode is selected. 5 Start Color Start a color fax, copy, or scan, or print job, depending on page 42. 3 Redial / Pause In Fax mode: • Display the last number dialed.
...: For information on setting the number of copies or prints you have already begun entering the number. 4 Start Black Start a black-and-white fax, copy, scan, or print job, depending on which mode is on the display. Enter a pause only when you want to make. 2 Auto Answer Set the printer to... printer will answer incoming calls, see "Receiving a fax automatically using the control panel" on which mode is selected. 5 Start Color Start a color fax, copy, or scan, or print job, depending on page 42. 3 Redial / Pause In Fax mode: • Display the last number dialed.
User's Guide
Page 28
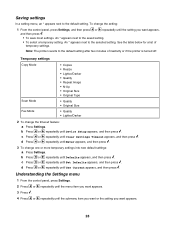
... you want appears. 3 Press . 4 Press or repeatedly until the setting you want appears, and then press : • To save most settings. Temporary settings Copy Mode Scan Mode Fax Mode • Copies • Resize • Lighter/Darker • Quality • Repeat Image • N-Up • Original Size • Original Type • Quality...
... you want appears. 3 Press . 4 Press or repeatedly until the setting you want appears, and then press : • To save most settings. Temporary settings Copy Mode Scan Mode Fax Mode • Copies • Resize • Lighter/Darker • Quality • Repeat Image • N-Up • Original Size • Original Type • Quality...

User's Guide
Page 31
... Fax Send a photo or document as an attachment to an e-mail message. 31 Using the World Wide Web 1 Go to the Lexmark Web site at www.lexmark.com. 2 From the home page, navigate through the menu selection, and then click Drivers & Downloads. 3 Choose the printer and ...XP and earlier, click Start. 2 Click Programs or All Programs Œ Lexmark 5000 Series. 3 Select Productivity Studio. Depending on the computer screen. Method 2 1 Do one of this software may not be applicable. Click To Scan Copy Details • Scan a photo or document. • Save, edit, or share a photo or...
... Fax Send a photo or document as an attachment to an e-mail message. 31 Using the World Wide Web 1 Go to the Lexmark Web site at www.lexmark.com. 2 From the home page, navigate through the menu selection, and then click Drivers & Downloads. 3 Choose the printer and ...XP and earlier, click Start. 2 Click Programs or All Programs Œ Lexmark 5000 Series. 3 Select Productivity Studio. Depending on the computer screen. Method 2 1 Do one of this software may not be applicable. Click To Scan Copy Details • Scan a photo or document. • Save, edit, or share a photo or...
User's Guide
Page 33
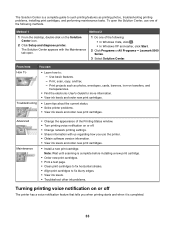
...: • In Windows Vista, click . • In Windows XP and earlier, click Start. 2 Click Programs or All Programs Œ Lexmark 5000 Series. 3 Select Solution Center. Troubleshooting • Learn tips about the current status. • Solve printer problems. • View ink levels... and order new print cartridges. From here You can: How To • Learn how to: - Print, scan, copy, and fax. - Print projects such as printing photos, troubleshooting printing problems, installing print cartridges, and performing maintenance tasks. The Solution Center...
...: • In Windows Vista, click . • In Windows XP and earlier, click Start. 2 Click Programs or All Programs Œ Lexmark 5000 Series. 3 Select Solution Center. Troubleshooting • Learn tips about the current status. • Solve printer problems. • View ink levels... and order new print cartridges. From here You can: How To • Learn how to: - Print, scan, copy, and fax. - Print projects such as printing photos, troubleshooting printing problems, installing print cartridges, and performing maintenance tasks. The Solution Center...

User's Guide
Page 38
Automatic Document Feeder (ADF) paper capacity Load up to 30 sheets of an original document into the Automatic Document Feeder (ADF) for scanning, copying, and faxing. 1 Load an original document facedown into the ADF. 2 Adjust the paper guides on the ADF to 30 sheets of: • Letter-size ...
Automatic Document Feeder (ADF) paper capacity Load up to 30 sheets of an original document into the Automatic Document Feeder (ADF) for scanning, copying, and faxing. 1 Load an original document facedown into the ADF. 2 Adjust the paper guides on the ADF to 30 sheets of: • Letter-size ...
User's Guide
Page 53
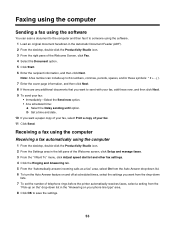
... a copy of your fax: • Immediately-Select the Send now option. • At a scheduled time: a Select the Delay sending until option. Note: A fax number can scan a document to the computer and then fax it to someone using the computer 1 From the desktop, double-click the Productivity Studio icon. 2 From the Settings...
... a copy of your fax: • Immediately-Select the Send now option. • At a scheduled time: a Select the Delay sending until option. Note: A fax number can scan a document to the computer and then fax it to someone using the computer 1 From the desktop, double-click the Productivity Studio icon. 2 From the Settings...
User's Guide
Page 57
... quality for outgoing faxes. • From the "Automatic fax conversion" line, select ON to match the resolution setting of times you want the machine to scan the entire document before dialing the number. Choose and customize your name and fax number.
... quality for outgoing faxes. • From the "Automatic fax conversion" line, select ON to match the resolution setting of times you want the machine to scan the entire document before dialing the number. Choose and customize your name and fax number.
User's Guide
Page 77
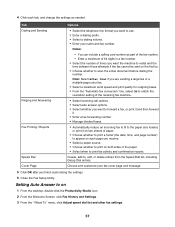
...the quality of the original document. * Temporary setting. Original Size* Specify the size of a scan. Understanding the Scan menu To understand and use the Scan menu: 1 From the control panel, press Scan Mode. An * appears next to the selected setting. 7 To go into additional submenus and ..., press repeatedly to return to the previous menus and make other settings, see the related topic, "Customizing Settings." 77 Scanning Scanning using the control panel Scanning a document Make sure the printer is connected to a computer, and both the printer and the computer are on saving ...
...the quality of the original document. * Temporary setting. Original Size* Specify the size of a scan. Understanding the Scan menu To understand and use the Scan menu: 1 From the control panel, press Scan Mode. An * appears next to the selected setting. 7 To go into additional submenus and ..., press repeatedly to return to the previous menus and make other settings, see the related topic, "Customizing Settings." 77 Scanning Scanning using the control panel Scanning a document Make sure the printer is connected to a computer, and both the printer and the computer are on saving ...
User's Guide
Page 78
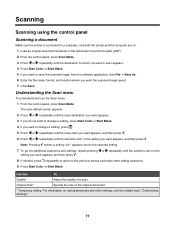
...(ADF). 3 From the desktop, double-click the Productivity Studio icon. 4 From the Welcome Screen, click Scan and Edit Text (OCR). 5 Select the Document option. 6 Click Start. Scanning images for editing using the computer 1 Load an original document facedown in Automatic Document Feeder (ADF). 3... From the desktop, double-click the Productivity Studio icon. 78 The scanned document is configured to scan over a network (Direct IP Printing). 1 Load an original document facedown in the Automatic Document Feeder (ADF). 2 From the ...
...(ADF). 3 From the desktop, double-click the Productivity Studio icon. 4 From the Welcome Screen, click Scan and Edit Text (OCR). 5 Select the Document option. 6 Click Start. Scanning images for editing using the computer 1 Load an original document facedown in Automatic Document Feeder (ADF). 3... From the desktop, double-click the Productivity Studio icon. 78 The scanned document is configured to scan over a network (Direct IP Printing). 1 Load an original document facedown in the Automatic Document Feeder (ADF). 2 From the ...

User's Guide
Page 79
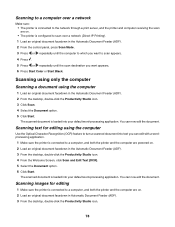
...Convert to PDF. 4 Select Photo, Several Photos, or Document. 5 Click to begin scanning. 6 Click Add Another to scan additional images, or to add an image from Photo Library to be scanned. Setting Color Depth Scan Resolution (Dots Per Inch) Size Options Select Color, Grey, or Black and White. 4...select a storage location. 12 Click Save. Creating a PDF from the drop-down list, select a paper source. 79 Select a scan resolution value from a scanned item 1 Load an original document facedown on them in the preview pane. Otherwise, click Cancel when the Photo Save options appear....
...Convert to PDF. 4 Select Photo, Several Photos, or Document. 5 Click to begin scanning. 6 Click Add Another to scan additional images, or to add an image from Photo Library to be scanned. Setting Color Depth Scan Resolution (Dots Per Inch) Size Options Select Color, Grey, or Black and White. 4...select a storage location. 12 Click Save. Creating a PDF from the drop-down list, select a paper source. 79 Select a scan resolution value from a scanned item 1 Load an original document facedown on them in the preview pane. Otherwise, click Cancel when the Photo Save options appear....

User's Guide
Page 80
...Click OK. 8 To rename the file, enter the name in the Automatic Document Feeder (ADF). 2 From the desktop, double-click the Productivity Studio icon. 3 Click Scan. 4 Select Photo or Several Photos. 5 Click Start. 6 From the Save or Edit screen menu bar, click Save. 7 To save the photo as another folder...select a date for the photo, click the drop-down list, and select a date from the drop-down list. • Click Auto-crop the scanned item to use these settings when Make your cropped value. • Click Select area to select your selections permanent by choosing a paper size from the...
...Click OK. 8 To rename the file, enter the name in the Automatic Document Feeder (ADF). 2 From the desktop, double-click the Productivity Studio icon. 3 Click Scan. 4 Select Photo or Several Photos. 5 Click Start. 6 From the Save or Edit screen menu bar, click Save. 7 To save the photo as another folder...select a date for the photo, click the drop-down list, and select a date from the drop-down list. • Click Auto-crop the scanned item to use these settings when Make your cropped value. • Click Select area to select your selections permanent by choosing a paper size from the...

User's Guide
Page 81
... to send photo attachments at 1024 x 768 pixels. • Click Reduced to: 640 x 480 (Good for e-mailing You can e-mail attached scanned images using your default e-mail application. 1 Load an original document facedown in Automatic Document Feeder (ADF). 2 From the desktop, double-click the ...Productivity Studio icon. 3 Click E-mail. 4 Select from the Photo, Several Photos, or Document options. 5 Click Start. 6 If you are scanning a photo, select the Photo Size from the Send Quality and Speed area. 7 Click Create E-mail to an e-mail message. 4 Open the folder where ...
... to send photo attachments at 1024 x 768 pixels. • Click Reduced to: 640 x 480 (Good for e-mailing You can e-mail attached scanned images using your default e-mail application. 1 Load an original document facedown in Automatic Document Feeder (ADF). 2 From the desktop, double-click the ...Productivity Studio icon. 3 Click E-mail. 4 Select from the Photo, Several Photos, or Document options. 5 Click Start. 6 If you are scanning a photo, select the Photo Size from the Send Quality and Speed area. 7 Click Create E-mail to an e-mail message. 4 Open the folder where ...

User's Guide
Page 82
Canceling a scan job • To cancel a scan job before your document is pulled down into the Automatic Document Feeder (ADF), press . • If you have loaded a document into the Automatic Document Feeder (ADF) and the printer roller has started pulling it into the printer, but you have not yet initiated your scan job: 1 Pull the control panel up. 2 Gently lift your original document out of the ADF. 3 Push the control panel down until it snaps into place. • To cancel a scan job started in Productivity Studio, click Scan, and then click Stop. 82
Canceling a scan job • To cancel a scan job before your document is pulled down into the Automatic Document Feeder (ADF), press . • If you have loaded a document into the Automatic Document Feeder (ADF) and the printer roller has started pulling it into the printer, but you have not yet initiated your scan job: 1 Pull the control panel up. 2 Gently lift your original document out of the ADF. 3 Push the control panel down until it snaps into place. • To cancel a scan job started in Productivity Studio, click Scan, and then click Stop. 82

User's Guide
Page 91
..., magazines, or newspapers Descreening helps to remove wavy (moire) patterns from images scanned from magazines or newspapers. 1 From the Productivity Studio Welcome Screen, click File ΠOpen to select the image you want to edit. 2 With an image ... and After preview panes at the top of exposure to correct uneven lighting in your image. You can preview the changes to your image by scanning from a CD or flash drive using the computer 1 Load photo paper with the paper.) 2 Insert a CD into the computer or a flash drive into the computer...
..., magazines, or newspapers Descreening helps to remove wavy (moire) patterns from images scanned from magazines or newspapers. 1 From the Productivity Studio Welcome Screen, click File ΠOpen to select the image you want to edit. 2 With an image ... and After preview panes at the top of exposure to correct uneven lighting in your image. You can preview the changes to your image by scanning from a CD or flash drive using the computer 1 Load photo paper with the paper.) 2 Insert a CD into the computer or a flash drive into the computer...


