User's Guide
Page 3
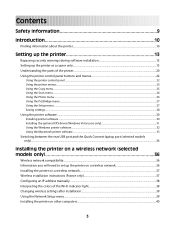
... Windows printer software...32 Using the Macintosh printer software...33 Switching between the rear USB port and the Quick Connect laptop port (selected models only)...34 Installing the printer on a wireless network (selected models only 36 Wireless network compatibility...36 Information you will need to set up the printer on a wireless network 36 Installing the printer on a wireless network...37 Wireless installation...
... Windows printer software...32 Using the Macintosh printer software...33 Switching between the rear USB port and the Quick Connect laptop port (selected models only)...34 Installing the printer on a wireless network (selected models only 36 Wireless network compatibility...36 Information you will need to set up the printer on a wireless network 36 Installing the printer on a wireless network...37 Wireless installation...
User's Guide
Page 5
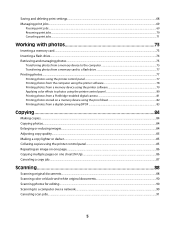
... drive 77 Printing photos...77 Printing photos using the printer control panel ...77 Printing photos from the computer using the printer software 78 Printing photos from a memory device using the printer software 79 Applying color effects to photos using the printer control panel 80 Printing photos from a PictBridge-enabled ... photos...84 Enlarging or reducing images...84 Adjusting copy quality...85 Making a copy lighter or darker...85 Collating copies using the printer control panel...85 Repeating an image on one page...86 Copying multiple pages on one sheet (N-Up)...86 Canceling a copy job...
... drive 77 Printing photos...77 Printing photos using the printer control panel ...77 Printing photos from the computer using the printer software 78 Printing photos from a memory device using the printer software 79 Applying color effects to photos using the printer control panel 80 Printing photos from a PictBridge-enabled ... photos...84 Enlarging or reducing images...84 Adjusting copy quality...85 Making a copy lighter or darker...85 Collating copies using the printer control panel...85 Repeating an image on one page...86 Copying multiple pages on one sheet (N-Up)...86 Canceling a copy job...

User's Guide
Page 6
...the computer...92 Receiving a fax...93 Maintaining the printer 95 Maintaining print cartridges...95 Installing print cartridges...95 Removing a used print cartridge ...96 Refilling print cartridges...97 Using genuine Lexmark print cartridges...97 Aligning print cartridges ...98 Cleaning the... Software did not install...105 Page does not print...106 Solving printer power problems ...109 Removing and reinstalling the software ...109 Enabling the USB port in Windows ...110 Wireless troubleshooting...111 Wireless troubleshooting checklist ...111 Printing a network setup page ...112 Wireless ...
...the computer...92 Receiving a fax...93 Maintaining the printer 95 Maintaining print cartridges...95 Installing print cartridges...95 Removing a used print cartridge ...96 Refilling print cartridges...97 Using genuine Lexmark print cartridges...97 Aligning print cartridges ...98 Cleaning the... Software did not install...105 Page does not print...106 Solving printer power problems ...109 Removing and reinstalling the software ...109 Enabling the USB port in Windows ...110 Wireless troubleshooting...111 Wireless troubleshooting checklist ...111 Printing a network setup page ...112 Wireless ...
User's Guide
Page 10
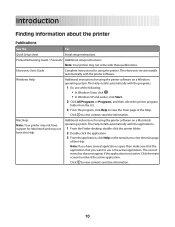
...list. 3 From the program, click Help to use is not active. Electronic User's Guide Complete instructions for using the printer software on the menu bar to make sure that the application that you have several applications open, then make it the active application...does not appear if the application is the active application. The Help installs automatically with the printer software. Note: Your printer may not come with the applications. 1 From the Finder desktop, double-click the printer folder. 2 Double-click the application. 3 From the application, click Help on a Macintosh ...
...list. 3 From the program, click Help to use is not active. Electronic User's Guide Complete instructions for using the printer software on the menu bar to make sure that the application that you have several applications open, then make it the active application...does not appear if the application is the active application. The Help installs automatically with the printer software. Note: Your printer may not come with the applications. 1 From the Finder desktop, double-click the printer folder. 2 Double-click the application. 3 From the application, click Help on a Macintosh ...
User's Guide
Page 13
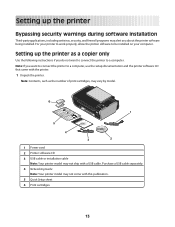
...4 3 2 1 Power cord 2 Printer software CD 3 USB cable or installation cable Note: Your printer model may not ship with the printer. 1 Unpack the printer. Note: If you want to connect the printer to a computer. Setting up the printer Bypassing security warnings during software installation Third-party applications, including antivirus,... this publication. 5 Quick Setup sheet 6 Print cartridges 13 For your printer to work properly, allow the printer software to a computer, use the setup documentation and the printer software CD that came with a USB cable. Purchase a USB cable separately....
...4 3 2 1 Power cord 2 Printer software CD 3 USB cable or installation cable Note: Your printer model may not ship with the printer. 1 Unpack the printer. Note: If you want to connect the printer to a computer. Setting up the printer Bypassing security warnings during software installation Third-party applications, including antivirus,... this publication. 5 Quick Setup sheet 6 Print cartridges 13 For your printer to work properly, allow the printer software to a computer, use the setup documentation and the printer software CD that came with a USB cable. Purchase a USB cable separately....
User's Guide
Page 27
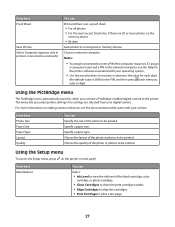
... there are selected from your camera. Using the Setup menu To access the Setup menu, press on the printer control panel. From here Maintenance You can Select: • Ink Level to view the ink level of the...8226; Print Test Page to be printed. Specify a paper type. Notes: • You may be prompted to the printer. Choose a network computer. Using the PictBridge menu The PictBridge menu automatically launches when you connect a PictBridge-enabled digital camera ...photo or photos to increase or decrease the value for the printer software associated with your digital camera.
... there are selected from your camera. Using the Setup menu To access the Setup menu, press on the printer control panel. From here Maintenance You can Select: • Ink Level to view the ink level of the...8226; Print Test Page to be printed. Specify a paper type. Notes: • You may be prompted to the printer. Choose a network computer. Using the PictBridge menu The PictBridge menu automatically launches when you connect a PictBridge-enabled digital camera ...photo or photos to increase or decrease the value for the printer software associated with your digital camera.

User's Guide
Page 30
... Saver timeout to turn the printer back on from the options. Using the printer software Installing printer software Using Windows 1 Close all open software programs. 2 Insert the printer software CD. 3 From the main installation screen, click Install. 4 Follow the instructions on your printer. 1 From the printer control panel, press . 2...buttons to be efficient on the screens. The Power Saver timeout is the time it takes for the printer to switch to the Lexmark Web site at www.lexmark.com. 2 From the home page, navigate through the menu selection, and then click Drivers & Downloads...
... Saver timeout to turn the printer back on from the options. Using the printer software Installing printer software Using Windows 1 Close all open software programs. 2 Insert the printer software CD. 3 From the main installation screen, click Install. 4 Follow the instructions on your printer. 1 From the printer control panel, press . 2...buttons to be efficient on the screens. The Power Saver timeout is the time it takes for the printer to switch to the Lexmark Web site at www.lexmark.com. 2 From the home page, navigate through the menu selection, and then click Drivers & Downloads...
User's Guide
Page 31
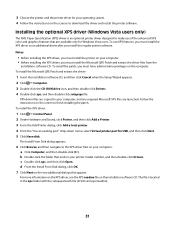
...on the screen to download the driver and install the printer software. b Double-click the folder that ends in the xps folder with the setupxps batch file (D:\Drivers\xps\readme). 31 3 Choose the printer and the printer driver for your printer model number, and then double-click Drivers. Notes:... XPS driver, you must install the XPS driver as an additional driver after you install the regular printer software. To install the Microsoft QFE Patch and extract the driver: 1 Insert the installation software CD, and then click Cancel when the Setup Wizard appears. 2 Click ΠComputer. 3...
...on the screen to download the driver and install the printer software. b Double-click the folder that ends in the xps folder with the setupxps batch file (D:\Drivers\xps\readme). 31 3 Choose the printer and the printer driver for your printer model number, and then double-click Drivers. Notes:... XPS driver, you must install the XPS driver as an additional driver after you install the regular printer software. To install the Microsoft QFE Patch and extract the driver: 1 Insert the installation software CD, and then click Cancel when the Setup Wizard appears. 2 Click ΠComputer. 3...
User's Guide
Page 32
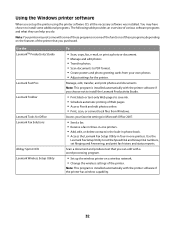
.... Note: This program is installed automatically with the printer software if the printer has wireless capability. 32 Use the LexmarkTM Productivity Studio Lexmark Fast Pics Lexmark Toolbar Lexmark Tools for the printer. You may not come with a word-processing program. • Set up the printer using the printer software CD, all the necessary software was installed. Access your own photos. • Adjust...
.... Note: This program is installed automatically with the printer software if the printer has wireless capability. 32 Use the LexmarkTM Productivity Studio Lexmark Fast Pics Lexmark Toolbar Lexmark Tools for the printer. You may not come with a word-processing program. • Set up the printer using the printer software CD, all the necessary software was installed. Access your own photos. • Adjust...
User's Guide
Page 33
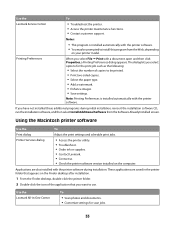
... type. • Add a watermark. • Enhance images. • Save settings. Applications are saved in the printer folder that you select File Œ Print with the printer software. Use the Lexmark Service Center To • Troubleshoot the printer. • Access the printer maintenance functions. • Contact customer support. Printing Preferences Notes: • This program is installed automatically...
... type. • Add a watermark. • Enhance images. • Save settings. Applications are saved in the printer folder that you select File Œ Print with the printer software. Use the Lexmark Service Center To • Troubleshoot the printer. • Access the printer maintenance functions. • Contact customer support. Printing Preferences Notes: • This program is installed automatically...
User's Guide
Page 34
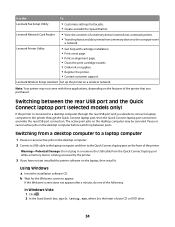
... then to appear. Using Windows a Insert the installation software CD. Lexmark Printer Utility • Get help with these applications, depending on the features of the printer that you purchased. Lexmark Wireless Setup Assistant Set up the printer on the desktop computer before switching between the rear USB... port and the Quick Connect laptop port (selected models only) If the printer is connected to a desktop computer...
... then to appear. Using Windows a Insert the installation software CD. Lexmark Printer Utility • Get help with these applications, depending on the features of the printer that you purchased. Lexmark Wireless Setup Assistant Set up the printer on the desktop computer before switching between the rear USB... port and the Quick Connect laptop port (selected models only) If the printer is connected to a desktop computer...

User's Guide
Page 35
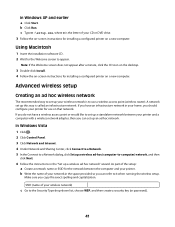
Using Macintosh a Insert the installation software CD. d Follow the instructions on the computer screen. c Follow the instructions on the computer screen. 35 c Double-click Install. b Wait for the Welcome screen to appear. In Windows XP and earlier 1 Click Start. 2 Click Run. 3 Type D:\setup.exe, where D is the letter of your CD or DVD drive. Note: If the Welcome screen does not appear after a minute, then click the CD icon on the desktop.
Using Macintosh a Insert the installation software CD. d Follow the instructions on the computer screen. c Follow the instructions on the computer screen. 35 c Double-click Install. b Wait for the Welcome screen to appear. In Windows XP and earlier 1 Click Start. 2 Click Run. 3 Type D:\setup.exe, where D is the letter of your CD or DVD drive. Note: If the Welcome screen does not appear after a minute, then click the CD icon on the desktop.
User's Guide
Page 37
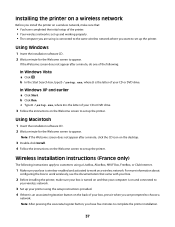
... apply to customers using is wireless-enabled and activated to appear. b In the Start Search box, type D:\setup.exe, where D is the letter of the printer. • Your wireless network is set up the printer. Using Macintosh 1 Insert the installation software CD. 2 Wait a minute... for the Welcome screen to work wirelessly, see the documentation that : • You have five minutes to ...
... apply to customers using is wireless-enabled and activated to appear. b In the Start Search box, type D:\setup.exe, where D is the letter of the printer. • Your wireless network is set up the printer. Using Macintosh 1 Insert the installation software CD. 2 Wait a minute... for the Welcome screen to work wirelessly, see the documentation that : • You have five minutes to ...

User's Guide
Page 39
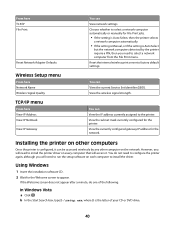
...wireless settings on your wireless network. • Blinking green indicates that the printer is connected to your wireless network. Using the Network Setup menu The Network Setup menu is available only if your printer model has an internal wireless print server, and if the printer is connected to reinstall the software... 2 Click All Programs or Programs, and then select the printer program folder from the list. 3 Click Tools Œ Lexmark Wireless Setup Utility. The printer is true if you want . The light should be in the printer will try to connect to a network. Using Macintosh 1 ...
...wireless settings on your wireless network. • Blinking green indicates that the printer is connected to your wireless network. Using the Network Setup menu The Network Setup menu is available only if your printer model has an internal wireless print server, and if the printer is connected to reinstall the software... 2 Click All Programs or Programs, and then select the printer program folder from the list. 3 Click Tools Œ Lexmark Wireless Setup Utility. The printer is true if you want . The light should be in the printer will try to connect to a network. Using Macintosh 1 ...
User's Guide
Page 40
... the Welcome screen to select a network computer from the File Print menu. View the wireless signal strength. Using Windows 1 Insert the installation software CD. 2 Wait for File Print jobs. • If the setting is Auto Select, then the printer selects a network computer automatically. • If the setting is Manual, or if the setting...
... the Welcome screen to select a network computer from the File Print menu. View the wireless signal strength. Using Windows 1 Insert the installation software CD. 2 Wait for File Print jobs. • If the setting is Auto Select, then the printer selects a network computer automatically. • If the setting is Manual, or if the setting...
User's Guide
Page 41
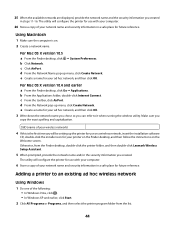
... spelling and capitalization. Advanced wireless setup Creating an ad hoc wireless network The recommended way to set up your printer. c Type D:\setup.exe, where D is called an infrastructure network. In Windows XP and earlier a Click Start. If you can set up an ad hoc network. Using Macintosh 1 Insert the installation software CD. 2 Wait for...
... spelling and capitalization. Advanced wireless setup Creating an ad hoc wireless network The recommended way to set up your printer. c Type D:\setup.exe, where D is called an infrastructure network. In Windows XP and earlier a Click Start. If you can set up an ad hoc network. Using Macintosh 1 Insert the installation software CD. 2 Wait for...

User's Guide
Page 42
... so you will connect to it without your knowledge. b Click All Programs. c Select the printer program folder, and then click Tools ΠLexmark Wireless Setup Utility. 9 When the available networks are displayed, provide the network name and the security information...network is already enabled. 7 Right-click the Wireless Network Connection icon. 8 Click Properties. 9 Click the Wireless Networks tab. ASCII characters are A-F, a-f, and 0-9. You must be setting up the printer for use on a wireless network, insert the installation software CD, and then follow the instructions on a...
... so you will connect to it without your knowledge. b Click All Programs. c Select the printer program folder, and then click Tools ΠLexmark Wireless Setup Utility. 9 When the available networks are displayed, provide the network name and the security information...network is already enabled. 7 Right-click the Wireless Network Connection icon. 8 Click Properties. 9 Click the Wireless Networks tab. ASCII characters are A-F, a-f, and 0-9. You must be setting up the printer for use on a wireless network, insert the installation software CD, and then follow the instructions on a...

User's Guide
Page 43
...Windows to delete the network from the list, and then click Tools ΠLexmark Wireless Setup Utility. 43 a Select the network to be setting up the printer for your security keys" in the "Wireless troubleshooting" section of an infrastructure network, making it less likely that intruders will ...two open windows. 23 It may take a few minutes for use on a wireless network, insert the installation software CD, and then follow the instructions on the status of your network: a Right-click the Wireless Network Connections icon. Otherwise: a Click Start. Make sure you copy the exact...
...Windows to delete the network from the list, and then click Tools ΠLexmark Wireless Setup Utility. 43 a Select the network to be setting up the printer for your security keys" in the "Wireless troubleshooting" section of an infrastructure network, making it less likely that intruders will ...two open windows. 23 It may take a few minutes for use on a wireless network, insert the installation software CD, and then follow the instructions on the status of your network: a Right-click the Wireless Network Connections icon. Otherwise: a Click Start. Make sure you copy the exact...
User's Guide
Page 44
...XP and earlier, click Start. 2 Click All Programs or Programs, and then select the printer program folder from the Finder desktop, double-click the printer folder, and then double-click Lexmark Wireless Setup Assistant. 5 When prompted, provide the network name and/or the security information you can... name you chose so you created. c Click AirPort. Make sure you will configure the printer for use on a wireless network, insert the installation software CD, double-click the installer icon for your wireless network) 4 If this is on the Welcome screen. For Mac OS X version 10.4...
...XP and earlier, click Start. 2 Click All Programs or Programs, and then select the printer program folder from the Finder desktop, double-click the printer folder, and then double-click Lexmark Wireless Setup Assistant. 5 When prompted, provide the network name and/or the security information you can... name you chose so you created. c Click AirPort. Make sure you will configure the printer for use on a wireless network, insert the installation software CD, double-click the installer icon for your wireless network) 4 If this is on the Welcome screen. For Mac OS X version 10.4...
User's Guide
Page 49
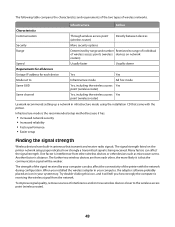
... Ad hoc mode Same SSID Same channel Yes, including the wireless access Yes point (wireless router) Yes, including the wireless access Yes point (wireless router) Lexmark recommends setting up a network in your system tray. To improve signal quality, remove sources of wireless access points (wireless devices on the printer network setup page indicates how strongly a transmitted signal is...
... Ad hoc mode Same SSID Same channel Yes, including the wireless access Yes point (wireless router) Yes, including the wireless access Yes point (wireless router) Lexmark recommends setting up a network in your system tray. To improve signal quality, remove sources of wireless access points (wireless devices on the printer network setup page indicates how strongly a transmitted signal is...


