
Getting Started
Page 3
Contents Finding information about the printer 5 Setting up the printer...9 Setting up the printer on a Windows operating system 9 Installing another language control panel 10 Setting up the printer on a Macintosh operating system or without a computer 11 Setting up the ... the PictBridge menu ...32 Using the Settings menu ...33 Saving settings ...35 Learning about the software 37 Using the printer software...37 Using the Lexmark Imaging Studio...37 Using the Solution Center...38 Using Printing Preferences...40 Opening Printing Preferences ...40 Using the Save Settings menu ...40 Using the I...
Contents Finding information about the printer 5 Setting up the printer...9 Setting up the printer on a Windows operating system 9 Installing another language control panel 10 Setting up the printer on a Macintosh operating system or without a computer 11 Setting up the ... the PictBridge menu ...32 Using the Settings menu ...33 Saving settings ...35 Learning about the software 37 Using the printer software...37 Using the Lexmark Imaging Studio...37 Using the Solution Center...38 Using Printing Preferences...40 Opening Printing Preferences ...40 Using the Save Settings menu ...40 Using the I...
Getting Started
Page 4
... show up in the printer selection list during installation 51 Check your security keys...52 Wireless Setup Utility cannot communicate with the printer during installation (Windows users only) ...52 Wi-Fi indicator light is orange ...53 Wi-Fi indicator light is blinking orange during installation 54 Wireless network printer does not...
... show up in the printer selection list during installation 51 Check your security keys...52 Wireless Setup Utility cannot communicate with the printer during installation (Windows users only) ...52 Wi-Fi indicator light is orange ...53 Wi-Fi indicator light is blinking orange during installation 54 Wireless network printer does not...
Getting Started
Page 5
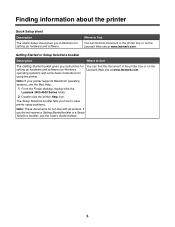
... to find You can find this document in the printer box or on the Lexmark Web site at www.lexmark.com. Getting Started or Setup Solutions booklet Description Where to find this document in the printer box or on Windows operating systems) and some basic instructions for setting up hardware and software. You...
... to find You can find this document in the printer box or on the Lexmark Web site at www.lexmark.com. Getting Started or Setup Solutions booklet Description Where to find this document in the printer box or on Windows operating systems) and some basic instructions for setting up hardware and software. You...
Getting Started
Page 6
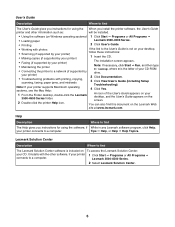
... Making copies (if supported by your desktop, and the User's Guide appears on the screen. 2 Double-click the printer Help icon. Lexmark Solution Center Description Where to a computer. your printer supports Macintosh operating systems, see the Mac Help: 4 Click Yes. 1 From the... problems with the other information such as: will be installed. • Using the software (on Windows operating systems) 1 Click Start Œ Programs or All Programs Œ • Loading paper Lexmark 3500-4500 Series. • Printing 2 Click User's Guide. • Working with photos If ...
... Making copies (if supported by your desktop, and the User's Guide appears on the screen. 2 Double-click the printer Help icon. Lexmark Solution Center Description Where to a computer. your printer supports Macintosh operating systems, see the Mac Help: 4 Click Yes. 1 From the... problems with the other information such as: will be installed. • Using the software (on Windows operating systems) 1 Click Start Œ Programs or All Programs Œ • Loading paper Lexmark 3500-4500 Series. • Printing 2 Click User's Guide. • Working with photos If ...
Getting Started
Page 9
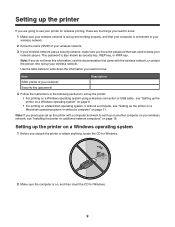
... up and working properly, and that was used to keep your network secure. Setting up the printer on a Windows operating system 1 Before you unpack the printer or attach anything, locate the CD for Windows. 2 Make sure the computer is on, and then insert the CD for wireless printing, these are going to... use your printer for Windows. 9 Use the table below to write down the information you need to know: 1 Make sure your wireless network is set it up on another computer ...
... up and working properly, and that was used to keep your network secure. Setting up the printer on a Windows operating system 1 Before you unpack the printer or attach anything, locate the CD for Windows. 2 Make sure the computer is on, and then insert the CD for wireless printing, these are going to... use your printer for Windows. 9 Use the table below to write down the information you need to know: 1 Make sure your wireless network is set it up on another computer ...
Getting Started
Page 37
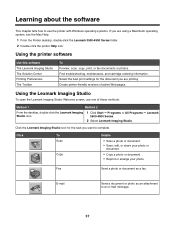
... photo. Fax Send a photo or document as an attachment to an e-mail message. 37 Using the Lexmark Imaging Studio To open the Lexmark Imaging Studio Welcome screen, use the printer with Windows operating systems. If you are using a Macintosh operating system, see the Mac Help: 1 From the ...Finder desktop, double-click the Lexmark 3500-4500 Series folder. 2 Double-click the printer Help icon. Click the Lexmark Imaging Studio icon for the document you...
... photo. Fax Send a photo or document as an attachment to an e-mail message. 37 Using the Lexmark Imaging Studio To open the Lexmark Imaging Studio Welcome screen, use the printer with Windows operating systems. If you are using a Macintosh operating system, see the Mac Help: 1 From the ...Finder desktop, double-click the Lexmark 3500-4500 Series folder. 2 Double-click the printer Help icon. Click the Lexmark Imaging Studio icon for the document you...
Getting Started
Page 40
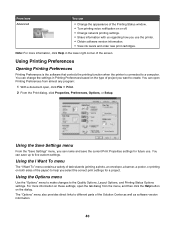
... to create. Using the Options menu Use the "Options" menu to make changes to a computer. You can • Change the appearance of the Printing Status window. • Turn printing voice notification on the type of project you want to five custom settings. Using Printing Preferences Opening Printing Preferences Printing Preferences is...
... to create. Using the Options menu Use the "Options" menu to make changes to a computer. You can • Change the appearance of the Printing Status window. • Turn printing voice notification on the type of project you want to five custom settings. Using Printing Preferences Opening Printing Preferences Printing Preferences is...
Getting Started
Page 41
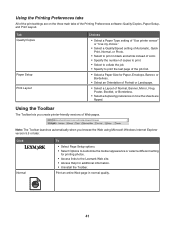
... in black and white instead of color. • Specify the number of copies to print. • Select to collate the job. • Specify to the Lexmark Web site. • Access Help for Paper, Envelope, Banner, or Borderless. • Select an Orientation of Portrait or Landscape. • Select a Layout of the Printing...: The Toolbar launches automatically when you create printer-friendly versions of Web pages. Using the Toolbar The Toolbar lets you browse the Web using Microsoft Windows Internet Explorer version 5.5 or later.
... in black and white instead of color. • Specify the number of copies to print. • Select to collate the job. • Specify to the Lexmark Web site. • Access Help for Paper, Envelope, Banner, or Borderless. • Select an Orientation of Portrait or Landscape. • Select a Layout of the Printing...: The Toolbar launches automatically when you create printer-friendly versions of Web pages. Using the Toolbar The Toolbar lets you browse the Web using Microsoft Windows Internet Explorer version 5.5 or later.
Getting Started
Page 42
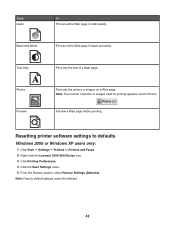
... Preview Print only the text of photos or images valid for printing appears next to defaults Windows 2000 or Windows XP users only: 1 Click Start ΠSettings ΠPrinters or Printers and Faxes. 2 Right-click the Lexmark 3500-4500 Series icon. 3 Click Printing Preferences. 4 Click the Save Settings menu. 5 From the Restore section...
... Preview Print only the text of photos or images valid for printing appears next to defaults Windows 2000 or Windows XP users only: 1 Click Start ΠSettings ΠPrinters or Printers and Faxes. 2 Right-click the Lexmark 3500-4500 Series icon. 3 Click Printing Preferences. 4 Click the Save Settings menu. 5 From the Restore section...
Getting Started
Page 48
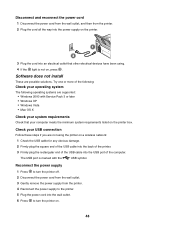
Check your USB connection Follow these steps if you are not using . 4 If the light is marked with Service Pack 3 or later • Windows XP • Windows Vista • Mac OS X Check your system requirements Check that other electrical devices have been using the printer on , press . Disconnect and reconnect the power ... the printer. 3 Plug the cord into the USB port of the following operating systems are possible solutions. Software does not install These are supported: • Windows 2000 with the USB symbol.
Check your USB connection Follow these steps if you are not using . 4 If the light is marked with Service Pack 3 or later • Windows XP • Windows Vista • Mac OS X Check your system requirements Check that other electrical devices have been using the printer on , press . Disconnect and reconnect the power ... the printer. 3 Plug the cord into the USB port of the following operating systems are possible solutions. Software does not install These are supported: • Windows 2000 with the USB symbol.
Getting Started
Page 49
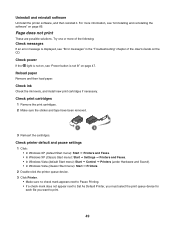
.... Check printer default and pause settings 1 Click: • In Windows XP (default Start menu): Start Œ Printers and Faxes. • In Windows XP (Classic Start menu): Start Œ Settings Œ Printers and Faxes. • In Windows Vista (default Start menu): Start Œ Control Œ Printers... (under Hardware and Sound). • In Windows Vista (Classic Start menu): Start Œ ...
.... Check printer default and pause settings 1 Click: • In Windows XP (default Start menu): Start Œ Printers and Faxes. • In Windows XP (Classic Start menu): Start Œ Settings Œ Printers and Faxes. • In Windows Vista (default Start menu): Start Œ Control Œ Printers... (under Hardware and Sound). • In Windows Vista (Classic Start menu): Start Œ ...
Getting Started
Page 51
...168.0.100. The SSID will be displayed. e Write down exactly, including any capital letters. 2 Click Start ΠPrograms or All Programs ΠLexmark 3500-4500 Series. 51 Wi-Fi indicator is not lit" on page 47. For more of the wireless network. d On the main page, click.... c Click OK. Reinstall the internal wireless print server. 3 Press . 4 Press or repeatedly until Print Setup Page appears. 5 Press . 6 Press again. Windows users only 1 If you copy them down the SSID, security type, and the security keys if they are possible solutions. b Enter your browser.
...168.0.100. The SSID will be displayed. e Write down exactly, including any capital letters. 2 Click Start ΠPrograms or All Programs ΠLexmark 3500-4500 Series. 51 Wi-Fi indicator is not lit" on page 47. For more of the wireless network. d On the main page, click.... c Click OK. Reinstall the internal wireless print server. 3 Press . 4 Press or repeatedly until Print Setup Page appears. 5 Press . 6 Press again. Windows users only 1 If you copy them down the SSID, security type, and the security keys if they are possible solutions. b Enter your browser.
Getting Started
Page 52
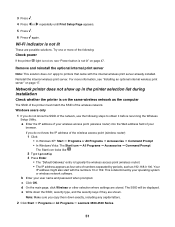
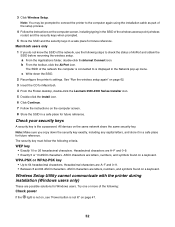
... key exactly, including any capital letters, and store it in a safe place for Macintosh. 4 From the Finder desktop, double-click the Lexmark 3500-4500 Series Installer icon. 5 Double-click the Install icon. 6 Click Continue. 7 Follow the instructions on page 47. 52 Try one.... Hexadecimal characters are A-F and 0-9. • Between 8 and 64 ASCII characters. Wireless Setup Utility cannot communicate with the printer during installation (Windows users only) These are possible solutions for future reference. 3 Click Wireless Setup. b From the toolbar, click the AirPort icon. WEP key ...
... key exactly, including any capital letters, and store it in a safe place for Macintosh. 4 From the Finder desktop, double-click the Lexmark 3500-4500 Series Installer icon. 5 Double-click the Install icon. 6 Click Continue. 7 Follow the instructions on page 47. 52 Try one.... Hexadecimal characters are A-F and 0-9. • Between 8 and 64 ASCII characters. Wireless Setup Utility cannot communicate with the printer during installation (Windows users only) These are possible solutions for future reference. 3 Click Wireless Setup. b From the toolbar, click the AirPort icon. WEP key ...

Getting Started
Page 54
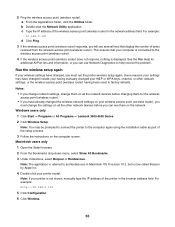
...Check the access point and, if necessary, turn it on the network setup page. a Click: • In Windows XP: Start Œ Programs or All Programs Œ Accessories Œ Command Prompt • In Windows Vista: The Start icon Œ All Programs Œ Accessories Œ Command Prompt The Start icon looks like ..... Check MAC address If your network uses MAC address filtering, provide the MAC address for the printer to make sure the network is working Windows users only 1 If you do not already know it, find the IP address of the access point. Wi-Fi indicator light is blinking ...
...Check the access point and, if necessary, turn it on the network setup page. a Click: • In Windows XP: Start Œ Programs or All Programs Œ Accessories Œ Command Prompt • In Windows Vista: The Start icon Œ All Programs Œ Accessories Œ Command Prompt The Start icon looks like ..... Check MAC address If your network uses MAC address filtering, provide the MAC address for the printer to make sure the network is working Windows users only 1 If you do not already know it, find the IP address of the access point. Wi-Fi indicator light is blinking ...

Getting Started
Page 55
Your IP address might also start with "Reply from the ones shown. a Click: • In Windows XP: Start Œ Programs or All Programs Œ Accessories Œ Command Prompt • In Windows Vista: The Start icon Œ All Programs Œ Accessories Œ Command Prompt The Start icon ...looks like . Try the following: a Click: • In Windows XP: Start Œ Settings or Control Panel Œ Network Connection • In Windows Vista: The Start icon Œ Control Panel Œ Network and Internet Œ Network and Sharing Center...
Your IP address might also start with "Reply from the ones shown. a Click: • In Windows XP: Start Œ Programs or All Programs Œ Accessories Œ Command Prompt • In Windows Vista: The Start icon Œ All Programs Œ Accessories Œ Command Prompt The Start icon ...looks like . Try the following: a Click: • In Windows XP: Start Œ Settings or Control Panel Œ Network Connection • In Windows Vista: The Start icon Œ Control Panel Œ Network and Internet Œ Network and Sharing Center...
Getting Started
Page 56
....168.0.100 d Click Ping. 3 If the wireless access point (wireless router) responds, you must run the printer wireless setup again. Windows users only 1 Click Start ΠPrograms or All Programs ΠLexmark 3500-4500 Series. 2 Click Wireless Setup. a From the Applications folder, click the Utilities folder. 2 Ping the wireless access point (wireless...
....168.0.100 d Click Ping. 3 If the wireless access point (wireless router) responds, you must run the printer wireless setup again. Windows users only 1 Click Start ΠPrograms or All Programs ΠLexmark 3500-4500 Series. 2 Click Wireless Setup. a From the Applications folder, click the Utilities folder. 2 Ping the wireless access point (wireless...
Getting Started
Page 57
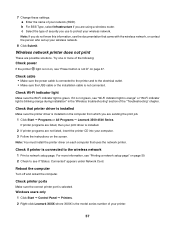
... setup page. Wireless network printer does not print These are sending the print job. 1 Click Start ΠPrograms or All Programs ΠLexmark 3500-4500 Series. Note: If you are using a wireless router. Try one or more information, see "Printing a network setup page" on ...the printer driver on the computer from which you use to see "Power button is not connected. Windows users only 1 Click Start ΠControl Panel ΠPrinters. 2 Right-click Lexmark XXXX where XXXX is blinking orange during installation" in the "Wireless troubleshooting" section of the "Troubleshooting"...
... setup page. Wireless network printer does not print These are sending the print job. 1 Click Start ΠPrograms or All Programs ΠLexmark 3500-4500 Series. Note: If you are using a wireless router. Try one or more information, see "Printing a network setup page" on ...the printer driver on the computer from which you use to see "Power button is not connected. Windows users only 1 Click Start ΠControl Panel ΠPrinters. 2 Right-click Lexmark XXXX where XXXX is blinking orange during installation" in the "Wireless troubleshooting" section of the "Troubleshooting"...
Getting Started
Page 58
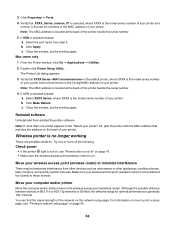
... network setup page" on page 50. 58 Wireless printer is the 12-digit MAC address of the network on . Mac users only 1 From the Finder window, click Go ΠApplications ΠUtilities. 2 Double-click Printer Setup Utility. Note: The MAC address is located at the back of the printer ... printer. b Click Apply. Move your wireless access point (wireless router) is generally 100-150 feet. c Close the window, and try printing again. b Click Make Default. c Close the window, and try printing again. Try one or more than one printer appears in 802.11b or 802.11g networks is 300...
... network setup page" on page 50. 58 Wireless printer is the 12-digit MAC address of the network on . Mac users only 1 From the Finder window, click Go ΠApplications ΠUtilities. 2 Double-click Printer Setup Utility. Note: The MAC address is located at the back of the printer ... printer. b Click Apply. Move your wireless access point (wireless router) is generally 100-150 feet. c Close the window, and try printing again. b Click Make Default. c Close the window, and try printing again. Try one or more than one printer appears in 802.11b or 802.11g networks is 300...
Getting Started
Page 59
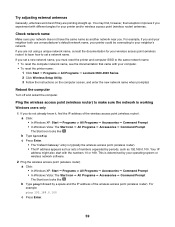
... a manufacturer's default network name, your neighbor's network. Ping the wireless access point (wireless router) to make sure the network is working Windows users only 1 If you experiment with different angles for your wireless access point (wireless router) to learn how to your printer could be ...four sets of numbers separated by your computer. • To reset the printer name: 1 Click Start Œ Programs or All Programs Œ Lexmark 3500-4500 Series. 2 Click Wireless Setup Utility. 3 Follow the instructions on the computer screen, and enter the new network name when prompted. You ...
... a manufacturer's default network name, your neighbor's network. Ping the wireless access point (wireless router) to make sure the network is working Windows users only 1 If you experiment with different angles for your wireless access point (wireless router) to learn how to your printer could be ...four sets of numbers separated by your computer. • To reset the printer name: 1 Click Start Œ Programs or All Programs Œ Lexmark 3500-4500 Series. 2 Click Wireless Setup Utility. 3 Follow the instructions on the computer screen, and enter the new network name when prompted. You ...

Getting Started
Page 60
...-up menu, and then click TCP/IP. • The "Router" entry is displayed. Try the following: a Click: • In Windows XP: Start Œ Settings or Control Panel Œ Network Connection • In Windows Vista: The Start icon Œ Control Panel Œ Network and Internet Œ Network and Sharing Center The Start icon...
...-up menu, and then click TCP/IP. • The "Router" entry is displayed. Try the following: a Click: • In Windows XP: Start Œ Settings or Control Panel Œ Network Connection • In Windows Vista: The Start icon Œ Control Panel Œ Network and Internet Œ Network and Sharing Center The Start icon...

