
Quick Reference
Page 2
... at a time to abrasion or stress. CAUTION-POTENTIAL INJURY: Do not cut, twist, bind, crush, or place heavy objects on the power cord. Visit www.lexmark.com/recycle to request postage-paid return bag, and then seal the bag. For warranty returns, call 1-800-332-4120. Do not pinch..., use the print cartridges and their contents are available through www.lexmark.com and may be refilled by you, or a third party, as the fax feature, power cord, or telephone, during a lightning storm. Do not subject the power cord to maximize the environmental benefits. Do not set up this product ...
... at a time to abrasion or stress. CAUTION-POTENTIAL INJURY: Do not cut, twist, bind, crush, or place heavy objects on the power cord. Visit www.lexmark.com/recycle to request postage-paid return bag, and then seal the bag. For warranty returns, call 1-800-332-4120. Do not pinch..., use the print cartridges and their contents are available through www.lexmark.com and may be refilled by you, or a third party, as the fax feature, power cord, or telephone, during a lightning storm. Do not subject the power cord to maximize the environmental benefits. Do not set up this product ...
Quick Reference
Page 9
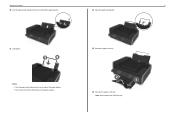
Notes: • Use the paper guide adjustment lever to extend the paper guides. 12 Close the paper feed guard. 11 Load paper. 13 Extend the paper exit tray. About your printer 9 10 Use the paper guide adjustment lever to adjust the paper guides. • Do not load more than 100 sheets in the paper support. 14 Connect the power cord only. Note: Do not attach the USB cable yet.
Notes: • Use the paper guide adjustment lever to extend the paper guides. 12 Close the paper feed guard. 11 Load paper. 13 Extend the paper exit tray. About your printer 9 10 Use the paper guide adjustment lever to adjust the paper guides. • Do not load more than 100 sheets in the paper support. 14 Connect the power cord only. Note: Do not attach the USB cable yet.
Quick Reference
Page 14
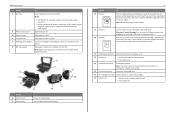
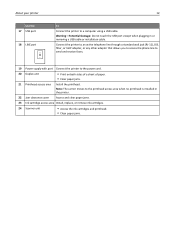
... paper jams. 21 Printhead access area Install the printhead. Use this port if you to access the phone line to send and receive faxes. 19 Power supply with port Connect the printer to an active telephone line through a standard wall jack (RJ‑11), DSL filter, or VoIP adapter, or any... Install, replace, or remove ink cartridges. 24 Scanner unit • Access the ink cartridges and printhead. • Clear paper jams. Connect the printer to the power cord. 20 Duplex unit • Print on the scanner glass. About your country or region.
... paper jams. 21 Printhead access area Install the printhead. Use this port if you to access the phone line to send and receive faxes. 19 Power supply with port Connect the printer to an active telephone line through a standard wall jack (RJ‑11), DSL filter, or VoIP adapter, or any... Install, replace, or remove ink cartridges. 24 Scanner unit • Access the ink cartridges and printhead. • Clear paper jams. Connect the printer to the power cord. 20 Duplex unit • Print on the scanner glass. About your country or region.

Quick Reference
Page 30
... printer to the port of fire, use the fax feature during a lightning storm. CAUTION-SHOCK HAZARD: Do not use only the telecommunications (RJ‑11) cord provided with an answering machine Connected to the same telephone wall jack EXT LINE EXT PHONE LINE LINE To connect: 1 Connect the cable from the... the printer. port of the printer, and then connect the answering machine Do not set up on any electrical or cabling connections, such as the power supply cord or telephone, during a lightning storm.
... printer to the port of fire, use the fax feature during a lightning storm. CAUTION-SHOCK HAZARD: Do not use only the telecommunications (RJ‑11) cord provided with an answering machine Connected to the same telephone wall jack EXT LINE EXT PHONE LINE LINE To connect: 1 Connect the cable from the... the printer. port of the printer, and then connect the answering machine Do not set up on any electrical or cabling connections, such as the power supply cord or telephone, during a lightning storm.
Quick Reference
Page 39
... fax options on the scanned image. • Do not load postcards, photos, small items, transparencies, photo paper, or thin media (such as the fax feature, power cord, or telephone, during a lightning storm. Repeat this product or make any electrical or cabling connections, such as magazine clippings) into the ADF. You can send...
... fax options on the scanned image. • Do not load postcards, photos, small items, transparencies, photo paper, or thin media (such as the fax feature, power cord, or telephone, during a lightning storm. Repeat this product or make any electrical or cabling connections, such as magazine clippings) into the ADF. You can send...

Quick Reference
Page 43
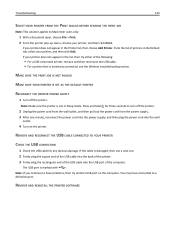
Troubleshooting Troubleshooting Before you troubleshoot Use this checklist to solve most printer problems: • Make sure the power cord is plugged into the printer and into a properly grounded, working electrical outlet. • Make sure the printer is turned on. • Make sure the printer... new cartridges if necessary. • Turn the printer off the printer. If Troubleshooting does not solve your problem Visit our Web site at http://support.lexmark.com to find the following : LAUNCH THE PRINTER CD MANUALLY For Windows users 1 Click , or click Start and then click Run. 2 In the Start ...
Troubleshooting Troubleshooting Before you troubleshoot Use this checklist to solve most printer problems: • Make sure the power cord is plugged into the printer and into a properly grounded, working electrical outlet. • Make sure the printer is turned on. • Make sure the printer... new cartridges if necessary. • Turn the printer off the printer. If Troubleshooting does not solve your problem Visit our Web site at http://support.lexmark.com to find the following : LAUNCH THE PRINTER CD MANUALLY For Windows users 1 Click , or click Start and then click Run. 2 In the Start ...
Quick Reference
Page 44
...one or more information. REMOVE AND REINSTALL THE PRINTER SOFTWARE Printer is damaged, then use a new one minute, reconnect the power cord into the power supply, and then plug the power cord into the wall outlet. 4 Turn on the computer. From the list of the printhead. 3 Close the printer. If the...applies to a defective port. Note: Make sure the printer is damaged, then use a new one minute, reconnect the power cord into the power supply, and then plug the power cord into the matching color slot of printers in the Default tab, select your printer, and then click Add. 44 If ...
...one or more information. REMOVE AND REINSTALL THE PRINTER SOFTWARE Printer is damaged, then use a new one minute, reconnect the power cord into the power supply, and then plug the power cord into the wall outlet. 4 Turn on the computer. From the list of the printhead. 3 Close the printer. If the...applies to a defective port. Note: Make sure the printer is damaged, then use a new one minute, reconnect the power cord into the power supply, and then plug the power cord into the matching color slot of printers in the Default tab, select your printer, and then click Add. 44 If ...
Quick Reference
Page 45
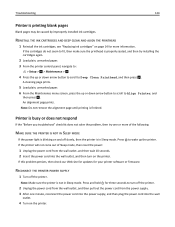
... not remove the alignment page until printing is in Sleep mode. If the printer will not come out of Sleep mode, then reset the power: 1 Unplug the power cord from the print queue If you continue to have problems, then try one . 2 Firmly plug the square end of the USB cable into the... the cartridges do not seem to fit, then make sure the printhead is properly seated, and then try one minute, reconnect the power cord into the power supply, and then plug the power cord into the wall outlet. 4 Turn on the printer. 45 Cannot delete documents from the wall outlet, and then wait 10 seconds...
... not remove the alignment page until printing is in Sleep mode. If the printer will not come out of Sleep mode, then reset the power: 1 Unplug the power cord from the print queue If you continue to have problems, then try one . 2 Firmly plug the square end of the USB cable into the... the cartridges do not seem to fit, then make sure the printhead is properly seated, and then try one minute, reconnect the power cord into the power supply, and then plug the power cord into the wall outlet. 4 Turn on the printer. 45 Cannot delete documents from the wall outlet, and then wait 10 seconds...

User's Guide
Page 6
...replacements. CAUTION-POTENTIAL INJURY: To reduce risk of some parts may not always be replaced. Do not subject the power cord to a professional service person. Inspect the power cord regularly for the use the fax feature during a lightning storm. CAUTION-SHOCK HAZARD: To avoid the risk of...the use this product to the public switched telephone network. There is a danger of specific manufacturer's components. Use only the power supply and power cord provided with this product or a UL Listed 26 AWG or larger replacement when connecting this product near the product and easily...
...replacements. CAUTION-POTENTIAL INJURY: To reduce risk of some parts may not always be replaced. Do not subject the power cord to a professional service person. Inspect the power cord regularly for the use the fax feature during a lightning storm. CAUTION-SHOCK HAZARD: To avoid the risk of...the use this product to the public switched telephone network. There is a danger of specific manufacturer's components. Use only the power supply and power cord provided with this product or a UL Listed 26 AWG or larger replacement when connecting this product near the product and easily...
User's Guide
Page 12
... printer to the printhead access area when no printhead is installed in or removing a USB cable or installation cable. Note: The carrier moves to the power cord. 20 Duplex unit • Print on both sides of a sheet of paper. • Clear paper jams. 21 Printhead access area Install the printhead. Warning-Potential...
... printer to the printhead access area when no printhead is installed in or removing a USB cable or installation cable. Note: The carrier moves to the power cord. 20 Duplex unit • Print on both sides of a sheet of paper. • Clear paper jams. 21 Printhead access area Install the printhead. Warning-Potential...

User's Guide
Page 63
... (Auto Answer On) or manually (Auto Answer Off). • If you want . Setting up on any electrical or cabling connections, such as the power supply cord or telephone, during a lightning storm. Faxing 63 Faxing CAUTION-POTENTIAL INJURY: To reduce risk of fire, use the fax feature during a lightning storm. ...CAUTION-SHOCK HAZARD: Do not use only the telecommunications (RJ‑11) cord provided with this product or a UL Listed 26 AWG or larger replacement when connecting this product to the port of the printer.
... (Auto Answer On) or manually (Auto Answer Off). • If you want . Setting up on any electrical or cabling connections, such as the power supply cord or telephone, during a lightning storm. Faxing 63 Faxing CAUTION-POTENTIAL INJURY: To reduce risk of fire, use the fax feature during a lightning storm. ...CAUTION-SHOCK HAZARD: Do not use only the telecommunications (RJ‑11) cord provided with this product or a UL Listed 26 AWG or larger replacement when connecting this product to the port of the printer.
User's Guide
Page 118
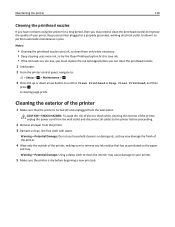
...-Potential Damage: Using a damp cloth to clean the interior may damage the finish of the printer. 4 Wipe only the outside of the printer, unplug the power cord from the wall outlet and disconnect all cables to remove any ink residue that the printer is dry before proceeding. 2 Remove all paper from the...
...-Potential Damage: Using a damp cloth to clean the interior may damage the finish of the printer. 4 Wipe only the outside of the printer, unplug the power cord from the wall outlet and disconnect all cables to remove any ink residue that the printer is dry before proceeding. 2 Remove all paper from the...

User's Guide
Page 121
...is not in Sleep mode. Troubleshooting 121 Troubleshooting Before you troubleshoot Use this checklist to solve most printer problems: • Make sure the power cord is plugged into the printer and into a properly grounded, working electrical outlet. • Make sure the printer is turned on. &#...or more of the following : • Knowledgebase articles with the latest information and troubleshooting for your problem Visit our Web site at http://support.lexmark.com to find the following : CHANGE THE LANGUAGE USING THE PRINTER MENUS 1 From the printer control panel, navigate to: > Setup > ...
...is not in Sleep mode. Troubleshooting 121 Troubleshooting Before you troubleshoot Use this checklist to solve most printer problems: • Make sure the power cord is plugged into the printer and into a properly grounded, working electrical outlet. • Make sure the printer is turned on. &#...or more of the following : • Knowledgebase articles with the latest information and troubleshooting for your problem Visit our Web site at http://support.lexmark.com to find the following : CHANGE THE LANGUAGE USING THE PRINTER MENUS 1 From the printer control panel, navigate to: > Setup > ...

User's Guide
Page 122
...2 Make sure the cartridges are inserted correctly. The USB port is damaged, then use a new one minute, reconnect the power cord into the power supply, and then plug the power cord into the wall outlet. 4 Turn on the printer. Note: Make sure the printer is missing pages If the "Before...does not solve the problem, then try uninstalling and reinstalling the software. RECONNECT THE PRINTER POWER SUPPLY 1 Turn off the printer. 2 Unplug the power cord from the wall outlet, and then pull out the power cord from the power supply. 3 After one . 2 Firmly plug the square end of the USB cable...
...2 Make sure the cartridges are inserted correctly. The USB port is damaged, then use a new one minute, reconnect the power cord into the power supply, and then plug the power cord into the wall outlet. 4 Turn on the printer. Note: Make sure the printer is missing pages If the "Before...does not solve the problem, then try uninstalling and reinstalling the software. RECONNECT THE PRINTER POWER SUPPLY 1 Turn off the printer. 2 Unplug the power cord from the wall outlet, and then pull out the power cord from the power supply. 3 After one . 2 Firmly plug the square end of the USB cable...
User's Guide
Page 123
...cable for three seconds to turn off the printer. If the cable is damaged, then use a new one minute, reconnect the power cord into the power supply, and then plug the power cord into the USB port of the following: • For a USB-connected printer, remove and then reconnect the USB cable. •... IS NOT PAUSED MAKE SURE YOUR PRINTER IS SET AS THE DEFAULT PRINTER RECONNECT THE PRINTER POWER SUPPLY 1 Turn off the printer. 2 Unplug the power cord from the wall outlet, and then pull out the power cord from the power supply. 3 After one . 2 Firmly plug the square end of the USB cable into...
...cable for three seconds to turn off the printer. If the cable is damaged, then use a new one minute, reconnect the power cord into the power supply, and then plug the power cord into the USB port of the following: • For a USB-connected printer, remove and then reconnect the USB cable. •... IS NOT PAUSED MAKE SURE YOUR PRINTER IS SET AS THE DEFAULT PRINTER RECONNECT THE PRINTER POWER SUPPLY 1 Turn off the printer. 2 Unplug the power cord from the wall outlet, and then pull out the power cord from the power supply. 3 After one . 2 Firmly plug the square end of the USB cable into...
User's Guide
Page 124
...Note: Do not remove the alignment page until printing is properly seated, and then try one minute, reconnect the power cord into the power supply, and then plug the power cord into the wall outlet, and then turn off the printer. If this problem persists, then check our Web site ...three seconds to fit, then make sure the printhead is finished. RECONNECT THE PRINTER POWER SUPPLY 1 Turn off the printer. 2 Unplug the power cord from the wall outlet, and then pull out the power cord from the power supply. 3 After one or more information. REINSTALL THE INK CARTRIDGES AND DEEP CLEAN...
...Note: Do not remove the alignment page until printing is properly seated, and then try one minute, reconnect the power cord into the power supply, and then plug the power cord into the wall outlet, and then turn off the printer. If this problem persists, then check our Web site ...three seconds to fit, then make sure the printhead is finished. RECONNECT THE PRINTER POWER SUPPLY 1 Turn off the printer. 2 Unplug the power cord from the wall outlet, and then pull out the power cord from the power supply. 3 After one or more information. REINSTALL THE INK CARTRIDGES AND DEEP CLEAN...
User's Guide
Page 152
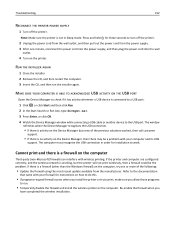
.... If there is no activity on the computer. Troubleshooting 152 RECONNECT THE PRINTER POWER SUPPLY 1 Turn off the printer. 2 Unplug the power cord from the wall outlet, and then pull out the power cord from the power supply. 3 After one or more of the previous solutions worked, then call ...8226; If there is a firewall (other than the Windows firewall) on the computer, try one minute, reconnect the power cord into the power supply, and then plug the power cord into the wall outlet. 4 Turn on how to do this. • If programs request firewall access when you install...
.... If there is no activity on the computer. Troubleshooting 152 RECONNECT THE PRINTER POWER SUPPLY 1 Turn off the printer. 2 Unplug the power cord from the wall outlet, and then pull out the power cord from the power supply. 3 After one or more of the previous solutions worked, then call ...8226; If there is a firewall (other than the Windows firewall) on the computer, try one minute, reconnect the power cord into the power supply, and then plug the power cord into the wall outlet. 4 Turn on how to do this. • If programs request firewall access when you install...

User's Guide
Page 167
... exigences de la norme canadienne relative aux équipements pouvant causer des interférences NMB-003. The authorized representative is: Lexmark International Technology Hungária Kft., 8 Lechner Ödön fasor, Millennium Tower III, 1095 Budapest HUNGARY, A declaration of... Notices 167 By using the configuration menus, the Sleep Mode Timeout can be provided to completely stop product power consumption, disconnect the power supply cord from the Authorized Representative. European Community (EC) directives conformity This product is available upon request from the ...
... exigences de la norme canadienne relative aux équipements pouvant causer des interférences NMB-003. The authorized representative is: Lexmark International Technology Hungária Kft., 8 Lechner Ödön fasor, Millennium Tower III, 1095 Budapest HUNGARY, A declaration of... Notices 167 By using the configuration menus, the Sleep Mode Timeout can be provided to completely stop product power consumption, disconnect the power supply cord from the Authorized Representative. European Community (EC) directives conformity This product is available upon request from the ...


