Quick Reference
Page 14
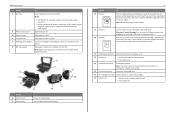
...24 Scanner unit • Access the ink cartridges and printhead. • Clear paper jams. Scan or copy photos and documents. Note: The carrier moves to the printer. Hold paper as it into the ADF. Keep paper straight when feeding it exits. Warning-Potential Damage: Do not touch the USB port...18 LINE port 14 To Connect additional devices (telephone or answering machine) to access the port. Connect the printer to the width of paper. • Clear paper jams. 21 Printhead access area Install the printhead. Notes: • Use the ADF for the printer, and if this port if you...
...24 Scanner unit • Access the ink cartridges and printhead. • Clear paper jams. Scan or copy photos and documents. Note: The carrier moves to the printer. Hold paper as it into the ADF. Keep paper straight when feeding it exits. Warning-Potential Damage: Do not touch the USB port...18 LINE port 14 To Connect additional devices (telephone or answering machine) to access the port. Connect the printer to the width of paper. • Clear paper jams. 21 Printhead access area Install the printhead. Notes: • Use the ADF for the printer, and if this port if you...

Quick Reference
Page 43
If Troubleshooting does not solve your problem Visit our Web site at http://support.lexmark.com to find the following: • Knowledgebase articles with the latest information and troubleshooting for your printer • Live online technical support • Contact ...to the computer, print server, or network access point. • Check the printer for error messages, and resolve any errors. • Check for paper jam messages, and clear any jams. • Check the ink cartridges, and install new cartridges if necessary. • Turn the printer off, wait about 10 seconds, and then turn...
If Troubleshooting does not solve your problem Visit our Web site at http://support.lexmark.com to find the following: • Knowledgebase articles with the latest information and troubleshooting for your printer • Live online technical support • Contact ...to the computer, print server, or network access point. • Check the printer for error messages, and resolve any errors. • Check for paper jam messages, and clear any jams. • Check the ink cartridges, and install new cartridges if necessary. • Turn the printer off, wait about 10 seconds, and then turn...
Quick Reference
Page 53
... 38 aligning the printhead 18 answering machine setting up 30 Automatic Document Feeder (ADF) 13 exit tray 13 exit tray extension 13 paper guide 14 tray 14 B bidirectional communication enabling 50 broadcast fax, sending immediately 39 buttons, printer control panel Address Book 15 arrow buttons ... did not appear automatically 43 installing printer on wireless network (Macintosh) 41 on wireless network (Windows) 41 installing printer software 20 J jam clearance cover 14 L language changing 43 LexPrint 24 line filter 32 LINE port 14 M Macintosh installing printer on wireless network 41 Macintosh...
... 38 aligning the printhead 18 answering machine setting up 30 Automatic Document Feeder (ADF) 13 exit tray 13 exit tray extension 13 paper guide 14 tray 14 B bidirectional communication enabling 50 broadcast fax, sending immediately 39 buttons, printer control panel Address Book 15 arrow buttons ... did not appear automatically 43 installing printer on wireless network (Macintosh) 41 on wireless network (Windows) 41 installing printer software 20 J jam clearance cover 14 L language changing 43 LexPrint 24 line filter 32 LINE port 14 M Macintosh installing printer on wireless network 41 Macintosh...
User's Guide
Page 12
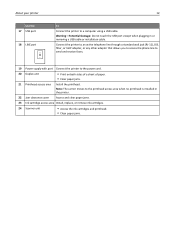
...LINE port 12 To Connect the printer to the power cord. 20 Duplex unit • Print on both sides of a sheet of paper. • Clear paper jams. 21 Printhead access area Install the printhead. Connect the printer to an active telephone line through a standard wall jack (RJ‑11...a USB cable or installation cable. Warning-Potential Damage: Do not touch the USB port except when plugging in the printer. 22 Jam clearance cover Access and clear paper jams. 23 Ink cartridge access area Install, replace, or remove ink cartridges. 24 Scanner unit • Access the ink cartridges and ...
...LINE port 12 To Connect the printer to the power cord. 20 Duplex unit • Print on both sides of a sheet of paper. • Clear paper jams. 21 Printhead access area Install the printhead. Connect the printer to an active telephone line through a standard wall jack (RJ‑11...a USB cable or installation cable. Warning-Potential Damage: Do not touch the USB port except when plugging in the printer. 22 Jam clearance cover Access and clear paper jams. 23 Ink cartridge access area Install, replace, or remove ink cartridges. 24 Scanner unit • Access the ink cartridges and ...

User's Guide
Page 37
...paper size. For Macintosh users 1 With a document open , click File > Print. 2 Click Properties, Preferences, Options, or Setup. 3 Navigate to: Paper...Navigate to: Paper type list .... If no paper size matches the...Paper Type pop‑up menu, choose your printer. 3 From the Paper... Size pop‑up menu, choose Labels. 9 From the Print Quality menu, choose a print quality other than Quick Print or Draft. 10 Click Print. Partial sheets (with areas exposed by missing labels) may cause labels to within 1 mm of the edge of the label sheet. • Make sure the paper... guide or paper...
...paper size. For Macintosh users 1 With a document open , click File > Print. 2 Click Properties, Preferences, Options, or Setup. 3 Navigate to: Paper...Navigate to: Paper type list .... If no paper size matches the...Paper Type pop‑up menu, choose your printer. 3 From the Paper... Size pop‑up menu, choose Labels. 9 From the Print Quality menu, choose a print quality other than Quick Print or Draft. 10 Click Print. Partial sheets (with areas exposed by missing labels) may cause labels to within 1 mm of the edge of the label sheet. • Make sure the paper... guide or paper...

User's Guide
Page 121
OK Press and hold for paper jam messages, and clear any jams. • Check the ink cartridges, and install new cartridges if necessary. • Turn the printer off the printer. Note: Make sure the printer is securely ... turned on . Troubleshooting 121 Troubleshooting Before you want, and then press . If Troubleshooting does not solve your problem Visit our Web site at http://support.lexmark.com to find the following: • Knowledgebase articles with the latest information and troubleshooting for your printer • Live online technical support • Contact numbers...
OK Press and hold for paper jam messages, and clear any jams. • Check the ink cartridges, and install new cartridges if necessary. • Turn the printer off the printer. Note: Make sure the printer is securely ... turned on . Troubleshooting 121 Troubleshooting Before you want, and then press . If Troubleshooting does not solve your problem Visit our Web site at http://support.lexmark.com to find the following: • Knowledgebase articles with the latest information and troubleshooting for your printer • Live online technical support • Contact numbers...

User's Guide
Page 133
...: • Touch OK or press OK , depending on your printer firmware. Jams and misfeeds troubleshooting • "Paper jam in the printer" on page 134 • "Paper jam in the tray or on the paper support. • Cancel the current print job. Troubleshooting 133 Scanned Document Too .... • Update your printer model. • Make sure the paper size is properly loaded in the paper support" on the paper support. • Check the paper guides, and then make sure the paper is correctly set. • Load paper with a supported device. Scanner Disabled Try one or more of the...
...: • Touch OK or press OK , depending on your printer firmware. Jams and misfeeds troubleshooting • "Paper jam in the printer" on page 134 • "Paper jam in the tray or on the paper support. • Cancel the current print job. Troubleshooting 133 Scanned Document Too .... • Update your printer model. • Make sure the paper size is properly loaded in the paper support" on the paper support. • Check the paper guides, and then make sure the paper is correctly set. • Load paper with a supported device. Scanner Disabled Try one or more of the...

User's Guide
Page 134
Troubleshooting 134 • "Paper jam in the duplex unit" on page 137 • "Paper jam in the ADF (select models only)" on page 138 • "Paper or specialty media misfeeds" on page 140 Paper jam in the printer Note: The parts inside the printer are sensitive. Avoid unnecessarily touching these parts while clearing jams. Check the jam clearance area 1 Lift the scanner unit. 2 Remove the jam clearance cover. 1 2 3 Notes: • Squeeze the snap to lift the jam clearance cover. • Make sure that the printhead is moved to the side and away from the jammed paper.
Troubleshooting 134 • "Paper jam in the duplex unit" on page 137 • "Paper jam in the ADF (select models only)" on page 138 • "Paper or specialty media misfeeds" on page 140 Paper jam in the printer Note: The parts inside the printer are sensitive. Avoid unnecessarily touching these parts while clearing jams. Check the jam clearance area 1 Lift the scanner unit. 2 Remove the jam clearance cover. 1 2 3 Notes: • Squeeze the snap to lift the jam clearance cover. • Make sure that the printhead is moved to the side and away from the jammed paper.

User's Guide
Page 135
Troubleshooting 135 3 Firmly grasp the paper on both sides, and then gently pull it out. Paper jam in the exit tray 1 Firmly grasp the paper, and then gently pull it out. Note: Make sure all paper fragments are removed. 2 Touch OK or press OK , depending on your printer model. Note: Make sure all paper fragments are removed. 4 Reattach the jam clearance cover until it clicks into place. 1 2 5 Close the printer. 6 Touch OK or press OK , depending on your printer model.
Troubleshooting 135 3 Firmly grasp the paper on both sides, and then gently pull it out. Paper jam in the exit tray 1 Firmly grasp the paper, and then gently pull it out. Note: Make sure all paper fragments are removed. 2 Touch OK or press OK , depending on your printer model. Note: Make sure all paper fragments are removed. 4 Reattach the jam clearance cover until it clicks into place. 1 2 5 Close the printer. 6 Touch OK or press OK , depending on your printer model.

User's Guide
Page 136
Note: Make sure all paper fragments are sensitive. Avoid unnecessarily touching these parts while clearing jams. 1 Remove the paper support. 2 Firmly grasp the paper, and then gently pull it out. Troubleshooting 136 Paper jam in the paper support Note: The parts inside the printer are removed.
Note: Make sure all paper fragments are sensitive. Avoid unnecessarily touching these parts while clearing jams. 1 Remove the paper support. 2 Firmly grasp the paper, and then gently pull it out. Troubleshooting 136 Paper jam in the paper support Note: The parts inside the printer are removed.

User's Guide
Page 137
Troubleshooting 137 3 Reattach the paper support until it out. Avoid unnecessarily touching these parts while clearing jams. 1 Push down the duplex latch, and then remove the duplex unit. 2 Firmly grasp the paper, and then gently pull it clicks into place. 4 Touch OK or press OK , depending on your printer model. Paper jam in the duplex unit Note: The parts inside the printer are sensitive. Note: Be careful not to tear the paper while removing it.
Troubleshooting 137 3 Reattach the paper support until it out. Avoid unnecessarily touching these parts while clearing jams. 1 Push down the duplex latch, and then remove the duplex unit. 2 Firmly grasp the paper, and then gently pull it clicks into place. 4 Touch OK or press OK , depending on your printer model. Paper jam in the duplex unit Note: The parts inside the printer are sensitive. Note: Be careful not to tear the paper while removing it.

User's Guide
Page 138
Troubleshooting 138 3 Reinsert the duplex unit until it clicks into place to clear the message. 4 If necessary, touch OK or press OK , depending on your printer model. Avoid unnecessarily touching these parts while clearing jams. Check the ADF 1 Press the ADF button, and then open the ADF cover. Scenario 1 Scenario 2 2 2 1 1 Paper jam in the ADF (select models only) Note: The parts inside the printer are sensitive.
Troubleshooting 138 3 Reinsert the duplex unit until it clicks into place to clear the message. 4 If necessary, touch OK or press OK , depending on your printer model. Avoid unnecessarily touching these parts while clearing jams. Check the ADF 1 Press the ADF button, and then open the ADF cover. Scenario 1 Scenario 2 2 2 1 1 Paper jam in the ADF (select models only) Note: The parts inside the printer are sensitive.

User's Guide
Page 176
...802.1X 104 Auto Answer when to turn on 82 Automatic Document Feeder (ADF) 10 clearing a paper jam in 138 exit tray 11 exit tray extension 11 loading documents 32 paper capacity 32 paper guide 11 tray 11 automatic fax conversion setting 74 B background, removing 51 backing material cleaning 119 ... scan to computer over a network 145 cannot send faxes 146 cartridges, ink ordering 13 using genuine Lexmark 14 certificate request 104 Change to [Size] [Type] Paper 126 Change to [Size] Paper 126 changing default printing mode 45 changing page order 34 changing print order 34 changing Sleep timeout 20...
...802.1X 104 Auto Answer when to turn on 82 Automatic Document Feeder (ADF) 10 clearing a paper jam in 138 exit tray 11 exit tray extension 11 loading documents 32 paper capacity 32 paper guide 11 tray 11 automatic fax conversion setting 74 B background, removing 51 backing material cleaning 119 ... scan to computer over a network 145 cannot send faxes 146 cartridges, ink ordering 13 using genuine Lexmark 14 certificate request 104 Change to [Size] [Type] Paper 126 Change to [Size] Paper 126 changing default printing mode 45 changing page order 34 changing print order 34 changing Sleep timeout 20...
User's Guide
Page 178
... cartridge access area 12 Ink Cartridge Error 127 Ink Cartridge Missing 127 ink cartridges installing 14 ordering 13 removing 14 replacing 14 using genuine Lexmark 14 ink levels checking 117 Ink Low 128 inserting a flash drive 39 installation cable 108 installing network printer 115 installing optional software 25 ...configuring 93 IP address of computer finding 115 IP address of printer finding 115 IP address, assigning 115 iron‑on transfers 31 J jam clearance cover 12 jams and misfeeds troubleshooting paper jam in the ADF 138 paper jam in the duplex unit 137 paper jam in the exit tray 135
... cartridge access area 12 Ink Cartridge Error 127 Ink Cartridge Missing 127 ink cartridges installing 14 ordering 13 removing 14 replacing 14 using genuine Lexmark 14 ink levels checking 117 Ink Low 128 inserting a flash drive 39 installation cable 108 installing network printer 115 installing optional software 25 ...configuring 93 IP address of computer finding 115 IP address of printer finding 115 IP address, assigning 115 iron‑on transfers 31 J jam clearance cover 12 jams and misfeeds troubleshooting paper jam in the ADF 138 paper jam in the duplex unit 137 paper jam in the exit tray 135

User's Guide
Page 179
... photo/glossy paper 31 plain paper 29 postcards 30 transparencies 31 paper and other supplies ordering 15 179 paper default settings saving 31 paper exit tray 11 paper feed guard 10 paper guide adjustment lever 11 paper guides 11 paper jam in the ADF 138 paper jam in the duplex unit 137 paper jam in the exit tray 135 paper jam in the paper support 136 paper jam in...
... photo/glossy paper 31 plain paper 29 postcards 30 transparencies 31 paper and other supplies ordering 15 179 paper default settings saving 31 paper exit tray 11 paper feed guard 10 paper guide adjustment lever 11 paper guides 11 paper jam in the ADF 138 paper jam in the duplex unit 137 paper jam in the exit tray 135 paper jam in the paper support 136 paper jam in...
User's Guide
Page 181
... not respond 124 printer printing blank pages 124 printhead error 129 software did not install 122 shared printing 102 sharing printer in Windows 101 Short Paper 133 signal strength finding 110 Sleep timeout changing 20 software did not install 122 software updates checking 26 software, optional finding, installing 25 speaker volume... the computer 145 troubleshooting, fax cannot receive faxes 147 cannot run fax software 148 cannot send faxes 146 error messages, printer control panel 149 troubleshooting, jams and misfeeds paper jam in the ADF 138
... not respond 124 printer printing blank pages 124 printhead error 129 software did not install 122 shared printing 102 sharing printer in Windows 101 Short Paper 133 signal strength finding 110 Sleep timeout changing 20 software did not install 122 software updates checking 26 software, optional finding, installing 25 speaker volume... the computer 145 troubleshooting, fax cannot receive faxes 147 cannot run fax software 148 cannot send faxes 146 error messages, printer control panel 149 troubleshooting, jams and misfeeds paper jam in the ADF 138
User's Guide
Page 182
Index 182 paper jam in the duplex unit 137 paper jam in the exit tray 135 paper jam in the paper support 136 paper jam in the printer 134 paper or specialty media 140 troubleshooting, print cannot delete documents from print queue 125 computer slows down when printing 143 poor quality at the edges of ...
Index 182 paper jam in the duplex unit 137 paper jam in the exit tray 135 paper jam in the paper support 136 paper jam in the printer 134 paper or specialty media 140 troubleshooting, print cannot delete documents from print queue 125 computer slows down when printing 143 poor quality at the edges of ...


