
User Guide
Page 4
Contents 4 Troubleshooting 61 Checking an unresponsive printer...61 Testing the printer...61 Checking the printer status...62 Adjusting character (bidirectional) alignment 64 Solving printing problems...65 Printer test works, but the printer does not print when attached to the computer 65 Printer is noisy ...66 Printer sounds like it is printing, ...quality is poor...72 Characters are wrong or missing ...73 Forms are smudged or print is too dark ...73 Incorrect number of lines on , but does not print 66 Printer alarm sounds ...66 Printer goes to the Tear Off position before the print job ...
Contents 4 Troubleshooting 61 Checking an unresponsive printer...61 Testing the printer...61 Checking the printer status...62 Adjusting character (bidirectional) alignment 64 Solving printing problems...65 Printer test works, but the printer does not print when attached to the computer 65 Printer is noisy ...66 Printer sounds like it is printing, ...quality is poor...72 Characters are wrong or missing ...73 Forms are smudged or print is too dark ...73 Incorrect number of lines on , but does not print 66 Printer alarm sounds ...66 Printer goes to the Tear Off position before the print job ...

User Guide
Page 61
... on . 4 Release LineFeed when printing starts. Note: You can run a printer test page with or without a computer connected to continue printing a printer test page. Interrupting or stopping a printer test page To interrupt a printer test page: 1 Press Start/Stop. Troubleshooting 61 Troubleshooting Checking an unresponsive printer If your printer is not responding, make sure: • The power cord is...
... on . 4 Release LineFeed when printing starts. Note: You can run a printer test page with or without a computer connected to continue printing a printer test page. Interrupting or stopping a printer test page To interrupt a printer test page: 1 Press Start/Stop. Troubleshooting 61 Troubleshooting Checking an unresponsive printer If your printer is not responding, make sure: • The power cord is...
User Guide
Page 62
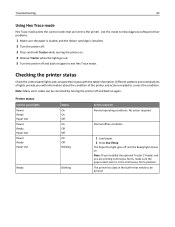
...control panel lights and compare their status with information about the condition of lights provide you are sent to the printer. No action required. The printer has data in the continuous forms position. Normal offline condition 1 Load paper. 2 Press Start/Stop. The Paper Out light goes off and ...If you installed the optional Tractor 2 Feeder and you with the table information. Troubleshooting 62 Using Hex Trace mode Hex Trace mode prints the control codes that needs to be corrected by turning the printer off and the Ready light comes on again to exit Hex Trace mode. ...
...control panel lights and compare their status with information about the condition of lights provide you are sent to the printer. No action required. The printer has data in the continuous forms position. Normal offline condition 1 Load paper. 2 Press Start/Stop. The Paper Out light goes off and ...If you installed the optional Tractor 2 Feeder and you with the table information. Troubleshooting 62 Using Hex Trace mode Hex Trace mode prints the control codes that needs to be corrected by turning the printer off and the Ready light comes on again to exit Hex Trace mode. ...
User Guide
Page 63
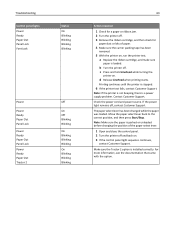
Troubleshooting Control panel lights Power Ready Paper Out Panel Lock Font Lock Status On ... then check for paper dust or bits of the paper select lever. 1 Open and close the control panel. 2 Turn the printer off and back on. 3 If the control panel light sequence continues, contact Customer Support. a Replace the ribbon cartridge, and ...make sure paper is installed correctly. c Press and hold LineFeed while turning the printer on , run the printer test. If the power light remains off . The paper select lever has been changed while the paper was loaded....
Troubleshooting Control panel lights Power Ready Paper Out Panel Lock Font Lock Status On ... then check for paper dust or bits of the paper select lever. 1 Open and close the control panel. 2 Turn the printer off and back on. 3 If the control panel light sequence continues, contact Customer Support. a Replace the ribbon cartridge, and ...make sure paper is installed correctly. c Press and hold LineFeed while turning the printer on , run the printer test. If the power light remains off . The paper select lever has been changed while the paper was loaded....

User Guide
Page 64
... locating the nearest service representative, visit the Lexmark Web site at www.lexmark.com. For more information, see "Forms Macro options" on . The following steps illustrate how to access layer 2. 3 Press and hold Pitch while turning the printer on page 50. 1 Turn the printer off . 2 Turn the printer on your printer. Note: If you may want to...
... locating the nearest service representative, visit the Lexmark Web site at www.lexmark.com. For more information, see "Forms Macro options" on . The following steps illustrate how to access layer 2. 3 Press and hold Pitch while turning the printer on page 50. 1 Turn the printer off . 2 Turn the printer on your printer. Note: If you may want to...

User Guide
Page 65
... value. After you make your selection. The current value is correctly connected at both ends. b Press Set TOF to save your selection, the printer prints a single row showing the current alignment setting. Try one or more of the following: • Turn the... bars. 4 To set Draft, select the best row of alignment bars from the 01-07 printout. c The printer automatically starts printing the alignment bars for Near‑Letter‑Quality (NLQ). Troubleshooting 65 The draft alignment bars print. a Press Micro or Micro to the computer These are possible solutions. Note: ...
... value. After you make your selection. The current value is correctly connected at both ends. b Press Set TOF to save your selection, the printer prints a single row showing the current alignment setting. Try one or more of the following: • Turn the... bars. 4 To set Draft, select the best row of alignment bars from the 01-07 printout. c The printer automatically starts printing the alignment bars for Near‑Letter‑Quality (NLQ). Troubleshooting 65 The draft alignment bars print. a Press Micro or Micro to the computer These are possible solutions. Note: ...

User Guide
Page 66
... the front cover. The paper remains at www.lexmark.com. • If you are using Windows, use the Windows Forms Printer 2500 Series driver available from the Lexmark Web site at the new Top‑Of‑Form position until the printer beeps and the light blinks. 3 Open the ...control panel to access layer 2. 4 Press Micro or Micro to move the paper to the desired position. 5 Close the control panel. Troubleshooting...
... the front cover. The paper remains at www.lexmark.com. • If you are using Windows, use the Windows Forms Printer 2500 Series driver available from the Lexmark Web site at the new Top‑Of‑Form position until the printer beeps and the light blinks. 3 Open the ...control panel to access layer 2. 4 Press Micro or Micro to move the paper to the desired position. 5 Close the control panel. Troubleshooting...
User Guide
Page 67
...possible solutions. Try one of more of the following : • Make sure the forms thickness lever setting is blocking the carrier movement. • If a paper jam has recently occurred, turn the printer off These are possible solutions. Try one or more of graphics being printed. Printing ...; Select resident fonts. Incorrect line length; This operation is normal and is selected. • Adjust the left margin These are possible solutions. Troubleshooting 67 Buttons do not start at the left margin by the print type being used . Try one of more of the following : •...
...possible solutions. Try one of more of the following : • Make sure the forms thickness lever setting is blocking the carrier movement. • If a paper jam has recently occurred, turn the printer off These are possible solutions. Try one or more of graphics being printed. Printing ...; Select resident fonts. Incorrect line length; This operation is normal and is selected. • Adjust the left margin These are possible solutions. Troubleshooting 67 Buttons do not start at the left margin by the print type being used . Try one of more of the following : •...
User Guide
Page 68
Troubleshooting 68 Incorrect characters print, left and right tractor doors, and then remove the paper. 7 Remove the ribbon access cover to clear any paper jam. • Turn the printer off at www.lexmark.com. - Try one or more of the continuous forms These are using graphic fonts. ...actual paper size. • Adjust tractors or paper guides to position 7. 4 Tear the continuous forms off and then back on. If you are possible solutions. If possible, use the Windows Forms Printer 2500 Series driver available from the paper path. Otherwise, try the following : • Make...
Troubleshooting 68 Incorrect characters print, left and right tractor doors, and then remove the paper. 7 Remove the ribbon access cover to clear any paper jam. • Turn the printer off at www.lexmark.com. - Try one or more of the continuous forms These are using graphic fonts. ...actual paper size. • Adjust tractors or paper guides to position 7. 4 Tear the continuous forms off and then back on. If you are possible solutions. If possible, use the Windows Forms Printer 2500 Series driver available from the paper path. Otherwise, try the following : • Make...

User Guide
Page 69
...lever to clear any foreign objects. 3 Reinstall the Auto Sheet Feeder. Printer does not feed paper These are possible solutions. Troubleshooting 69 To clear a cut form paper jam: 1 Turn the printer off the leading edge of the continuous form on one or more of the following: • Remove the Auto Sheet...; Align the edges of the paper, and then reload the paper. • Remove foreign objects from the continuous forms and remain in the Auto Sheet Feeder jams at the printer entrance These are using the Load/Unload button, and then reinstall the Auto Sheet Feeder. • Adjust the...
...lever to clear any foreign objects. 3 Reinstall the Auto Sheet Feeder. Printer does not feed paper These are possible solutions. Troubleshooting 69 To clear a cut form paper jam: 1 Turn the printer off the leading edge of the continuous form on one or more of the following: • Remove the Auto Sheet...; Align the edges of the paper, and then reload the paper. • Remove foreign objects from the continuous forms and remain in the Auto Sheet Feeder jams at the printer entrance These are using the Load/Unload button, and then reinstall the Auto Sheet Feeder. • Adjust the...
User Guide
Page 70
...ofForm" on a flat surface. 3 Clean the two paper guide wheels located inside the bottom of the following : • Remove all paper from the printer. 2 Turn the Auto Sheet Feeder upside down to the position. • Press Tractor to select the other roller. Try one or more of the ... locking lever to the back position. • Set the paper select lever to the position. • Enter Setup mode and set incorrectly. Troubleshooting 70 • Make sure the forms thickness lever is set correctly for the paper type being used . • Press Load/Unload to release the continuous...
...ofForm" on a flat surface. 3 Clean the two paper guide wheels located inside the bottom of the following : • Remove all paper from the printer. 2 Turn the Auto Sheet Feeder upside down to the position. • Press Tractor to select the other roller. Try one or more of the ... locking lever to the back position. • Set the paper select lever to the position. • Enter Setup mode and set incorrectly. Troubleshooting 70 • Make sure the forms thickness lever is set correctly for the paper type being used . • Press Load/Unload to release the continuous...

User Guide
Page 71
... Sheet Feeder feeds multiple sheets These are possible solutions. Try one of more paper to the paper bin. Troubleshooting 71 • Remove the Auto Sheet Feeder, move the continuous forms to the park position using the Load/Unload button, and then reinstall the Auto Sheet Feeder. • Adjust... the forms thickness lever to correspond with the Auto Sheet Feeder. • Make sure the paper being used. Try one roller while applying the cleaning cloth to the other roller. Paper fed from the printer. 2 Turn the Auto Sheet Feeder upside down,...
... Sheet Feeder feeds multiple sheets These are possible solutions. Try one of more paper to the paper bin. Troubleshooting 71 • Remove the Auto Sheet Feeder, move the continuous forms to the park position using the Load/Unload button, and then reinstall the Auto Sheet Feeder. • Adjust... the forms thickness lever to correspond with the Auto Sheet Feeder. • Make sure the paper being used. Try one roller while applying the cleaning cloth to the other roller. Paper fed from the printer. 2 Turn the Auto Sheet Feeder upside down,...
User Guide
Page 72
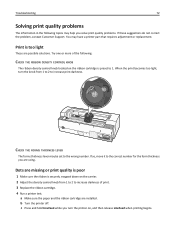
...the ribbon cartridge. 4 Run a printer test. Print is too light These are installed. You may help you solve print quality problems. If these suggestions do not correct the problem, contact Customer Support. Troubleshooting 72 Solving print quality problems The ...information in the following : CHECK THE RIBBON DENSITY CONTROL KNOB The ribbon density control knob located on the ribbon cartridge is preset to 1. CHECK THE FORMS THICKNESS LEVER The forms thickness lever may be set to the wrong number. b Turn the printer...
...the ribbon cartridge. 4 Run a printer test. Print is too light These are installed. You may help you solve print quality problems. If these suggestions do not correct the problem, contact Customer Support. Troubleshooting 72 Solving print quality problems The ...information in the following : CHECK THE RIBBON DENSITY CONTROL KNOB The ribbon density control knob located on the ribbon cartridge is preset to 1. CHECK THE FORMS THICKNESS LEVER The forms thickness lever may be set to the wrong number. b Turn the printer...

User Guide
Page 73
...ribbon is too dark These are installed. 3 Set the paper select lever to the position that came with the forms you are wrong or missing Run a printer test: 1 Make sure the forms thickness lever setting is nothing obstructing paper movement. • Readjust the Top‑Of‑... sure the correct printer driver is selected. For more information, see "Using Setup mode" on . 6 Release LineFeed when printing starts. e Press Start/Stop again if you are using . 4 Turn the printer off. 5 Press and hold LineFeed while you turn the printer on page 47. Troubleshooting 73 d Press ...
...ribbon is too dark These are installed. 3 Set the paper select lever to the position that came with the forms you are wrong or missing Run a printer test: 1 Make sure the forms thickness lever setting is nothing obstructing paper movement. • Readjust the Top‑Of‑... sure the correct printer driver is selected. For more information, see "Using Setup mode" on . 6 Release LineFeed when printing starts. e Press Start/Stop again if you are using . 4 Turn the printer off. 5 Press and hold LineFeed while you turn the printer on page 47. Troubleshooting 73 d Press ...

User Guide
Page 74
... top front cover of the following: • Reset the forms thickness lever. • For more information, see the documentation that came with your printer model type and serial number. In the U.S. Troubleshooting 74 Incorrect line spacing or overprinting occurs These are experiencing, the... message on the display, and the troubleshooting steps you are possible solutions. For other countries/regions, visit the Lexmark Web site at www.lexmark....
... top front cover of the following: • Reset the forms thickness lever. • For more information, see the documentation that came with your printer model type and serial number. In the U.S. Troubleshooting 74 Incorrect line spacing or overprinting occurs These are experiencing, the... message on the display, and the troubleshooting steps you are possible solutions. For other countries/regions, visit the Lexmark Web site at www.lexmark....
User Guide
Page 82
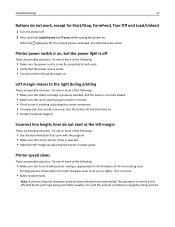
...20 selecting 20 font lock disabling 20 Forms Macro options Setup mode 50 forms thickness lever setting 22 H Hex Trace mode using 61 I IBM emulation mode using 13 Interface options 54 IPSec 59 J jams and misfeeds troubleshooting paper is jammed in the printer 68 L left margin aligning 38 lights... control panel 18 Load/Unload function using 19 loading continuous forms 25 cut form or envelope 36 locking control panel 19 M Main menu options 49 ...
...20 selecting 20 font lock disabling 20 Forms Macro options Setup mode 50 forms thickness lever setting 22 H Hex Trace mode using 61 I IBM emulation mode using 13 Interface options 54 IPSec 59 J jams and misfeeds troubleshooting paper is jammed in the printer 68 L left margin aligning 38 lights... control panel 18 Load/Unload function using 19 loading continuous forms 25 cut form or envelope 36 locking control panel 19 M Main menu options 49 ...
User Guide
Page 83
... converting 44 paper paths 24 R recycling Lexmark products 57 WEEE statement 78 ribbon cartridge removing 56 S safety information 6 security supporting IPSec 59 supporting SNMPv3 59 using 802.1x authentication 60 setting Top‑Of‑Form 39, 40, 41 Setup mode Control ...;Of‑Form setting 39, 40, 41 tractor pull position 43 push position 43 Tractor mode selecting 20 troubleshooting checking an unresponsive printer 61 contacting Customer Support 74 restoring factory default settings 58 troubleshooting, jams and misfeeds paper is jammed in the printer 68 troubleshooting, paper feed...
... converting 44 paper paths 24 R recycling Lexmark products 57 WEEE statement 78 ribbon cartridge removing 56 S safety information 6 security supporting IPSec 59 supporting SNMPv3 59 using 802.1x authentication 60 setting Top‑Of‑Form 39, 40, 41 Setup mode Control ...;Of‑Form setting 39, 40, 41 tractor pull position 43 push position 43 Tractor mode selecting 20 troubleshooting checking an unresponsive printer 61 contacting Customer Support 74 restoring factory default settings 58 troubleshooting, jams and misfeeds paper is jammed in the printer 68 troubleshooting, paper feed...
User Guide
Page 84
Index 84 paper fed in Auto Sheet Feeder jams at printer entrance 69 paper jammed in Auto Sheet Feeder 69 printer does not feed from Auto Sheet Feeder 70 printer does not feed paper 69 troubleshooting, print buttons do not work 67 incorrect characters print, left margin changes, or printing... to the computer 65 printer alarm sounds 66 printer is noisy 66 printer power switch is on, but the power light is off 67 printer sounds like it is printing, but does not print 66 printer speed slows 67 printing continues beyond edges of continuous forms 68 troubleshooting, print quality characters are...
Index 84 paper fed in Auto Sheet Feeder jams at printer entrance 69 paper jammed in Auto Sheet Feeder 69 printer does not feed from Auto Sheet Feeder 70 printer does not feed paper 69 troubleshooting, print buttons do not work 67 incorrect characters print, left margin changes, or printing... to the computer 65 printer alarm sounds 66 printer is noisy 66 printer power switch is on, but the power light is off 67 printer sounds like it is printing, but does not print 66 printer speed slows 67 printing continues beyond edges of continuous forms 68 troubleshooting, print quality characters are...
Card Stock & Label Guide
Page 3
...Troubleshooting...13 Card stock 15 Weight...15 Grain orientation...16 Coatings...17 Offset powders...18 Labels...19 Label characteristics...19 Printing on labels...19 Duplexing paper labels...19 Label components...21 Label design guidelines...23 Printer specifications 30 Lexmark C500n...30 Lexmark C510...31 Lexmark... C520, C522, and C524...32 Lexmark C530, C532, and C534...34 Lexmark C540, C543, C544, and C546dtn 36 Lexmark C720...38 Lexmark C734 and C736...40 Contents 3
...Troubleshooting...13 Card stock 15 Weight...15 Grain orientation...16 Coatings...17 Offset powders...18 Labels...19 Label characteristics...19 Printing on labels...19 Duplexing paper labels...19 Label components...21 Label design guidelines...23 Printer specifications 30 Lexmark C500n...30 Lexmark C510...31 Lexmark... C520, C522, and C524...32 Lexmark C530, C532, and C534...34 Lexmark C540, C543, C544, and C546dtn 36 Lexmark C720...38 Lexmark C734 and C736...40 Contents 3
Card Stock & Label Guide
Page 13
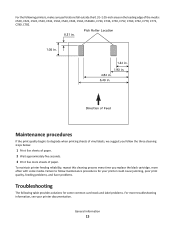
... the three cleaning steps below: 1 Print five sheets of paper. 2 Wait approximately five seconds. 3 Print five more troubleshooting information, see your printer could cause jamming, poor print quality, feeding problems, and fuser problems. Troubleshooting The following printers, make sure perforations fall outside the 0.31-1.05-inch area on the leading edge of paper. General...
... the three cleaning steps below: 1 Print five sheets of paper. 2 Wait approximately five seconds. 3 Print five more troubleshooting information, see your printer could cause jamming, poor print quality, feeding problems, and fuser problems. Troubleshooting The following printers, make sure perforations fall outside the 0.31-1.05-inch area on the leading edge of paper. General...


