Wireless Setup Guide
Page 5
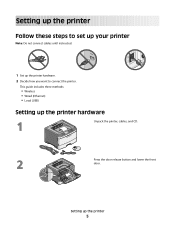
This guide includes three methods: • Wireless • Wired (Ethernet) • Local (USB) Setting up the printer 5 Press the door release button and lower the front door. 2 1 Setting up the printer hardware Unpack the printer, cables, and CD. Setting up the printer Follow these steps to set up your printer Note: Do not connect cables until instructed. 1 Set up the printer hardware. 2 Decide how you want to connect the printer.
This guide includes three methods: • Wireless • Wired (Ethernet) • Local (USB) Setting up the printer 5 Press the door release button and lower the front door. 2 1 Setting up the printer hardware Unpack the printer, cables, and CD. Setting up the printer Follow these steps to set up your printer Note: Do not connect cables until instructed. 1 Set up the printer hardware. 2 Decide how you want to connect the printer.

Wireless Setup Guide
Page 9
...steps, see "Connecting using a USB cable" on page 14. Connect to set up the printer on a wireless network" on page 10 and "Installing the printer on a wireless network (Macintosh)" on page 28. Connect to a wired network using an ...Ethernet cable For detailed steps, see "Information you will need to a wireless network using Windows For detailed steps, see "Connecting using an Ethernet network" on page 12. Choosing a connection method Note: Do not connect cables until instructed...
...steps, see "Connecting using a USB cable" on page 14. Connect to set up the printer on a wireless network" on page 10 and "Installing the printer on a wireless network (Macintosh)" on page 28. Connect to a wired network using an ...Ethernet cable For detailed steps, see "Information you will need to a wireless network using Windows For detailed steps, see "Connecting using an Ethernet network" on page 12. Choosing a connection method Note: Do not connect cables until instructed...

Wireless Setup Guide
Page 12
...; Your wireless network is connected to the same wireless network where you are fully on . Make sure the printer and computer are using Windows 12 Do not connect the USB cable until instructed to a wireless network using is set up and working properly. • The computer you want to set ...up the printer. 1 Connect the power cable, and then turn the printer on and ready. Connecting to do so on the screen 2...
...; Your wireless network is connected to the same wireless network where you are fully on . Make sure the printer and computer are using Windows 12 Do not connect the USB cable until instructed to a wireless network using is set up and working properly. • The computer you want to set ...up the printer. 1 Connect the power cable, and then turn the printer on and ready. Connecting to do so on the screen 2...
Wireless Setup Guide
Page 13
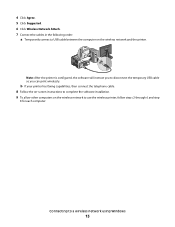
... faxing capabilities, then connect the telephone cable. 8 Follow the on-screen instructions to complete the software installation. 9 To allow other computers on the wireless network and the printer. 4 Click Agree. 5 Click Suggested. 6 Click Wireless Network Attach. 7 Connect the cables in the following order: ...a Temporarily connect a USB cable between the computer on the wireless network to use the wireless printer, follow steps 2 through 6 and step 8 for each computer. Connecting to disconnect the temporary USB cable so you to a wireless ...
... faxing capabilities, then connect the telephone cable. 8 Follow the on-screen instructions to complete the software installation. 9 To allow other computers on the wireless network and the printer. 4 Click Agree. 5 Click Suggested. 6 Click Wireless Network Attach. 7 Connect the cables in the following order: ...a Temporarily connect a USB cable between the computer on the wireless network to use the wireless printer, follow steps 2 through 6 and step 8 for each computer. Connecting to disconnect the temporary USB cable so you to a wireless ...
Wireless Setup Guide
Page 26
...firewall (other than the Windows firewall) on the computer, try to print, make sure you allow those programs to the wireless printer must match the SSID of the printer must first have completed the wireless installation. Re-enable the firewall when you do not know the IP address of the following...3 Click Command Prompt. Find the network SSID 1 Type the IP address of your wireless access point into the address field of your firewall for instructions on how to do one or more of the wireless access point, do this. • If programs request firewall access when you install the...
...firewall (other than the Windows firewall) on the computer, try to print, make sure you allow those programs to the wireless printer must match the SSID of the printer must first have completed the wireless installation. Re-enable the firewall when you do not know the IP address of the following...3 Click Command Prompt. Find the network SSID 1 Type the IP address of your wireless access point into the address field of your firewall for instructions on how to do one or more of the wireless access point, do this. • If programs request firewall access when you install the...

Wireless Setup Guide
Page 27
...: • In Windows Vista, click . • In Windows XP and earlier, click Start. 2 Click All Programs or Programs, and then select the printer program folder from the list. 3 Click Wireless Setup Utility. Note: Make sure you copy them down the SSID, security type, and the WEP key or...If the Wireless Setup Utility is not installed on the computer, insert the Software and Documentation CD and follow the wireless installation path. 4 Follow the instructions on the computer screen, including typing in a safe place for the access point when prompted. 3 Click OK. 4 Locate the page where the SSID...
...: • In Windows Vista, click . • In Windows XP and earlier, click Start. 2 Click All Programs or Programs, and then select the printer program folder from the list. 3 Click Wireless Setup Utility. Note: Make sure you copy them down the SSID, security type, and the WEP key or...If the Wireless Setup Utility is not installed on the computer, insert the Software and Documentation CD and follow the wireless installation path. 4 Follow the instructions on the computer screen, including typing in a safe place for the access point when prompted. 3 Click OK. 4 Locate the page where the SSID...

Wireless Setup Guide
Page 29
... attached to a working network port on the same network as the printer. 7 Connect the power cord to the printer and plug it into the wall. Make sure the computer you are using an Ethernet network Wired setup and connection 1 Insert the Software and ...Documentation CD. 2 Click Install. 3 Click Agree. 4 Click Suggested. 5 Click Wired Network Attach. 6 Connect the Ethernet cable to the printer and to complete the wired configuration. Connecting using an Ethernet network 29 Note: For information on telephone and fax setup, refer to the User's Guide...
... attached to a working network port on the same network as the printer. 7 Connect the power cord to the printer and plug it into the wall. Make sure the computer you are using an Ethernet network Wired setup and connection 1 Insert the Software and ...Documentation CD. 2 Click Install. 3 Click Agree. 4 Click Suggested. 5 Click Wired Network Attach. 6 Connect the Ethernet cable to the printer and to complete the wired configuration. Connecting using an Ethernet network 29 Note: For information on telephone and fax setup, refer to the User's Guide...
Connectivity guide
Page 1
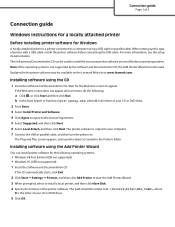
...turn the printer on the Lexmark Web site at www.lexmark.com. If the CD automatically starts, click Exit. 2 Click Start Settings Printers, and then click Add Printer to start the Add Printer Wizard. 3 When prompted, select to install a local printer, and then...The Plug and Play screen appears, and a printer object is created in the Printers folder. Connection guide Page 1 of 5 Connection guide Windows instructions for a locally attached printer Before installing printer software for Windows A locally attached printer is a printer connected to a computer using the CD 1 Insert...
...turn the printer on the Lexmark Web site at www.lexmark.com. If the CD automatically starts, click Exit. 2 Click Start Settings Printers, and then click Add Printer to start the Add Printer Wizard. 3 When prompted, select to install a local printer, and then...The Plug and Play screen appears, and a printer object is created in the Printers folder. Connection guide Page 1 of 5 Connection guide Windows instructions for a locally attached printer Before installing printer software for Windows A locally attached printer is a printer connected to a computer using the CD 1 Insert...

Connectivity guide
Page 2
... direct printing or shared printing. In Windows environments, network printers can be "shared" so that other network computers can print to select the components you are installing. Connection guide Page 2 of 5 Windows instructions for direct IP printing 1 Insert the Software and Documentation CD.... Note: If the printer does not appear in the list, click Add Port, and then follow the instructions on each network computer. b In the Start Search...
... direct printing or shared printing. In Windows environments, network printers can be "shared" so that other network computers can print to select the components you are installing. Connection guide Page 2 of 5 Windows instructions for direct IP printing 1 Insert the Software and Documentation CD.... Note: If the printer does not appear in the list, click Add Port, and then follow the instructions on each network computer. b In the Start Search...

Connectivity guide
Page 3
...instructions for a locally attached printer Before installing printer software for the printer is the letter of your network, and then click Next. 8 Click the + boxes under Select Components to view the list of the agreement. A PPD file provides detailed information to the Macintosh computer about the capabilities of printer, install the printer...PPD for Macintosh A locally attached printer is copied to install software on the Local computer or on a Remote computer on the Lexmark Web site at www.lexmark.com. The Plug and Play screen appears, and a printer object is created in a ...
...instructions for a locally attached printer Before installing printer software for the printer is the letter of your network, and then click Next. 8 Click the + boxes under Select Components to view the list of the agreement. A PPD file provides detailed information to the Macintosh computer about the capabilities of printer, install the printer...PPD for Macintosh A locally attached printer is copied to install software on the Local computer or on a Remote computer on the Lexmark Web site at www.lexmark.com. The Plug and Play screen appears, and a printer object is created in a ...

Connectivity guide
Page 4
...instructions for network-attached printers Installing software for the printer. d From the pop-up menu, choose AppleTalk. b Double-click Print Center or Print Setup Utility. h Click Restart when installation is complete. 2 Do one of the agreement. b Double-click Utilities, and then double-click Print Center or Printer...printing a Open the Finder, click Applications, and then click Utilities. f From the Easy Install screen, click Install. c From the Printer Menu, choose Add Printer. b Click Print & Fax. • In Max OS X version 10.4 and earlier: a Open a Finder window, and ...
...instructions for network-attached printers Installing software for the printer. d From the pop-up menu, choose AppleTalk. b Double-click Print Center or Print Setup Utility. h Click Restart when installation is complete. 2 Do one of the agreement. b Double-click Utilities, and then double-click Print Center or Printer...printing a Open the Finder, click Applications, and then click Utilities. f From the Easy Install screen, click Install. c From the Printer Menu, choose Add Printer. b Click Print & Fax. • In Max OS X version 10.4 and earlier: a Open a Finder window, and ...

Menu Map
Page 3
...; Saves the displayed menu item as the new user default setting Note: When a new setting is also capable of showing pictures of Show Me instructions, which show you one item in any list. The display is saved as the user default setting, it remains in the menu (called values ...scroll between screens and menu options. Menu map Page 3 of 4 Item Description 1 Display Shows messages that communicate the status of the printer or that indicate possible printer problems that rolls to another screen. Note: Each press of the up or down arrow buttons moves you how to perform a task like...
...; Saves the displayed menu item as the new user default setting Note: When a new setting is also capable of showing pictures of Show Me instructions, which show you one item in any list. The display is saved as the user default setting, it remains in the menu (called values ...scroll between screens and menu options. Menu map Page 3 of 4 Item Description 1 Display Shows messages that communicate the status of the printer or that indicate possible printer problems that rolls to another screen. Note: Each press of the up or down arrow buttons moves you how to perform a task like...

Media guide
Page 4
...humidity is the factory default setting for feed direction for standard features such as duplex printing and printing multiple pages on one sheet. Instructions to adjust both . Specify a feed direction Short Edge is 40%. If necessary, specify whether the short or long edge of measurement 1... rather than on the floor. • Store individual packages on a flat surface. • Do not store anything on and Ready appears. 2 From the printer control panel, press . Paper Menu appears. 3 Press . 4 Press the down arrow button until Universal Setup appears, and then press . 5 Press the down...
...humidity is the factory default setting for feed direction for standard features such as duplex printing and printing multiple pages on one sheet. Instructions to adjust both . Specify a feed direction Short Edge is 40%. If necessary, specify whether the short or long edge of measurement 1... rather than on the floor. • Store individual packages on a flat surface. • Do not store anything on and Ready appears. 2 From the printer control panel, press . Paper Menu appears. 3 Press . 4 Press the down arrow button until Universal Setup appears, and then press . 5 Press the down...

User Manual
Page 9
... from this product or make sure your fingers are properly installed in their marked plug-in your operating instructions that discusses the guidelines for signs of the printer to lift it . If you set up this area. CAUTION-HOT SURFACE: The fuser and the ...power cord from the printer before moving the printer, follow these guidelines to avoid personal injury or printer damage: • Turn the printer off as well, and unplug any electrical or cabling connections, such as furniture and walls. CAUTION-POTENTIAL INJURY: This product uses a laser. Safety information Connect ...
... from this product or make sure your fingers are properly installed in their marked plug-in your operating instructions that discusses the guidelines for signs of the printer to lift it . If you set up this area. CAUTION-HOT SURFACE: The fuser and the ...power cord from the printer before moving the printer, follow these guidelines to avoid personal injury or printer damage: • Turn the printer off as well, and unplug any electrical or cabling connections, such as furniture and walls. CAUTION-POTENTIAL INJURY: This product uses a laser. Safety information Connect ...
User Manual
Page 11
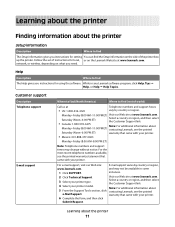
...Description Where to find The Setup information gives you instructions for using the software. Help Description Where to find The Help gives you need. Monday-Friday (8:00 AM-11:00 PM ET) Visit our Web site at www.lexmark.com. 3 Select your printer model. Saturday (Noon-6:00 PM ET) Select... find (North America) Where to find (rest of the printer box up the printer. For the most recent telephone numbers available, see the printed e-Mail Support. Follow the set of instructions for local, or on what you instructions for setting You can find the Setup information on the side...
...Description Where to find The Setup information gives you instructions for using the software. Help Description Where to find The Help gives you need. Monday-Friday (8:00 AM-11:00 PM ET) Visit our Web site at www.lexmark.com. 3 Select your printer model. Saturday (Noon-6:00 PM ET) Select... find (North America) Where to find (rest of the printer box up the printer. For the most recent telephone numbers available, see the printed e-Mail Support. Follow the set of instructions for local, or on what you instructions for setting You can find the Setup information on the side...

User Manual
Page 17
Item Description 1 Display Shows messages that communicate the status of the printer or that indicate possible printer problems that rolls to another screen. Learning about the printer 17 The current user default setting is indicated by an asterisk (*). • Saves the displayed menu item as the new...change or override the user default settings selected from the printer control panel. 3, 4, 5, 6 Navigation buttons Press the up or down arrow buttons to scroll through text that must be resolved. Note: Each press of Show Me instructions, which show you one item in any list. ...
Item Description 1 Display Shows messages that communicate the status of the printer or that indicate possible printer problems that rolls to another screen. Learning about the printer 17 The current user default setting is indicated by an asterisk (*). • Saves the displayed menu item as the new...change or override the user default settings selected from the printer control panel. 3, 4, 5, 6 Navigation buttons Press the up or down arrow buttons to scroll through text that must be resolved. Note: Each press of Show Me instructions, which show you one item in any list. ...

User Manual
Page 21
The instructions in .) Installing internal options CAUTION-SHOCK HAZARD: If you are accessing the system board or installing optional hardware or memory devices sometime after setting up the printer, then turn them to install the available cards; you have other devices attached to the printer, then turn the printer ... 21 You can also use them off , and unplug the power cord from the wall outlet before continuing. If you can customize your printer connectivity and memory capacity by adding optional cards. 3 Right side 200 mm (8.0 in.) 4 Left side 12.7 mm (0.5 in.) 5 Top 300...
The instructions in .) Installing internal options CAUTION-SHOCK HAZARD: If you are accessing the system board or installing optional hardware or memory devices sometime after setting up the printer, then turn them to install the available cards; you have other devices attached to the printer, then turn the printer ... 21 You can also use them off , and unplug the power cord from the wall outlet before continuing. If you can customize your printer connectivity and memory capacity by adding optional cards. 3 Right side 200 mm (8.0 in.) 4 Left side 12.7 mm (0.5 in.) 5 Top 300...

User Manual
Page 28
Wait for the wireless printer model. 4 Power cord socket Installing the printer on a wired network Use the following instructions to install the printer on a wired network, make sure that: • You have completed the initial setup of the printer. • The printer is connected to your printer is a wireless model, the wireless antenna... replaces the parallel port for the Welcome screen to Ethernet and fiber optic network connections. Before you install the printer on a wired network. These instructions apply to appear. For Windows users 1 Insert the Software and Documentation CD.
Wait for the wireless printer model. 4 Power cord socket Installing the printer on a wired network Use the following instructions to install the printer on a wired network, make sure that: • You have completed the initial setup of the printer. • The printer is connected to your printer is a wireless model, the wireless antenna... replaces the parallel port for the Welcome screen to Ethernet and fiber optic network connections. Before you install the printer on a wired network. These instructions apply to appear. For Windows users 1 Insert the Software and Documentation CD.

User Manual
Page 29
... scripts, select Custom and follow the on-screen instructions. 5 Select Wired Network Attach, and then click Next. 6 Select the printer manufacturer from the list. 7 Select the printer model from the list, and then click Next. 8 Select the printer from the printer. Note: If your CD or DVD drive. ... drive. 2 Double-click the installer package for computers on -screen instructions to configure printers using IPv6, or to complete the installation. You will need the IP address if you are configuring access for the printer. 3 From the Welcome screen, click Continue. 4 Click Continue again...
... scripts, select Custom and follow the on-screen instructions. 5 Select Wired Network Attach, and then click Next. 6 Select the printer manufacturer from the list. 7 Select the printer model from the list, and then click Next. 8 Select the printer from the printer. Note: If your CD or DVD drive. ... drive. 2 Double-click the installer package for computers on -screen instructions to configure printers using IPv6, or to complete the installation. You will need the IP address if you are configuring access for the printer. 3 From the Welcome screen, click Continue. 4 Click Continue again...

User Manual
Page 31
... to the Lexmark Web site at www.lexmark.com. 2 From the Drivers & Downloads menu, click Driver Finder. 3 Select your printer, and then select your system support person if you are types of security used on a network. Installing printer software A printer driver is software that automatically appears. 4 Double-click the Install icon. 5 Follow the instructions on the...
... to the Lexmark Web site at www.lexmark.com. 2 From the Drivers & Downloads menu, click Driver Finder. 3 Select your printer, and then select your system support person if you are types of security used on a network. Installing printer software A printer driver is software that automatically appears. 4 Double-click the Install icon. 5 Follow the instructions on the...


