Service Manual
Page 4
... sheets at once 2-22 Media skews 2-23 Media "trees," wrinkles, stacks poorly, or curls 2-23 Parallel or USB port service check 2-23 Print quality service checks 2-24 Blank page 2-24 Black page 2-25 Heavy background 2-25 Partial blank image/white spots (no repeating pattern 2-26...bin 3-19 BASE SENSOR TEST 3-20 PRINTER SETUP 3-21 Defaults 3-21 Page Count 3-21 Perm Page Count (permanent page count 3-21 Serial Number 3-21 Engine Setting 1 through 4 3-21 Model Name 3-21 Configuration ID 3-22 Edge to Edge 3-22 Parallel strobe adjustment (Par x Strobe Adj 3-22 iv Service Manual
... sheets at once 2-22 Media skews 2-23 Media "trees," wrinkles, stacks poorly, or curls 2-23 Parallel or USB port service check 2-23 Print quality service checks 2-24 Blank page 2-24 Black page 2-25 Heavy background 2-25 Partial blank image/white spots (no repeating pattern 2-26...bin 3-19 BASE SENSOR TEST 3-20 PRINTER SETUP 3-21 Defaults 3-21 Page Count 3-21 Perm Page Count (permanent page count 3-21 Serial Number 3-21 Engine Setting 1 through 4 3-21 Model Name 3-21 Configuration ID 3-22 Edge to Edge 3-22 Parallel strobe adjustment (Par x Strobe Adj 3-22 iv Service Manual

Service Manual
Page 6
... kits 6-1 Parts Catalog 7-1 How to use this parts catalog 7-1 Assembly 1: Covers 7-2 Assembly 2: Electronics 7-4 Assembly 3: Frame 7-6 Assembly 4: Options 7-8 Assembly 5: Power cords 7-8 Index I-1 Part number index I-5 vi Service Manual
... kits 6-1 Parts Catalog 7-1 How to use this parts catalog 7-1 Assembly 1: Covers 7-2 Assembly 2: Electronics 7-4 Assembly 3: Frame 7-6 Assembly 4: Options 7-8 Assembly 5: Power cords 7-8 Index I-1 Part number index I-5 vi Service Manual
Service Manual
Page 16
... and recommendations to perform the task. -xvi Service Manual Definitions Note: A note provides additional information. Unplug the product before you begin, or use caution if the product must receive power in the area of the printer and the maintenance approach used to identify the ...connector locations and test points on the printer. 6. 4512-630 Preface This manual contains maintenance procedures for making printer adjustments and removing and installing FRUs. 5. Special tools...
... and recommendations to perform the task. -xvi Service Manual Definitions Note: A note provides additional information. Unplug the product before you begin, or use caution if the product must receive power in the area of the printer and the maintenance approach used to identify the ...connector locations and test points on the printer. 6. 4512-630 Preface This manual contains maintenance procedures for making printer adjustments and removing and installing FRUs. 5. Special tools...
Service Manual
Page 17
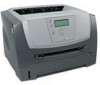
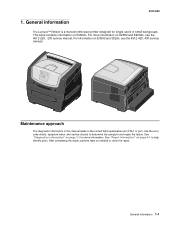
... approach The diagnostic information in this manual leads to determine the symptom and repair the failure. Use the error code charts, symptom index, and service checks to the correct field replaceable unit (FRU) or part. For more information. 4512-630 1. General information The Lexmark™ E450dn is a monochrome laser printer designed for more information on page...
... approach The diagnostic information in this manual leads to determine the symptom and repair the failure. Use the error code charts, symptom index, and service checks to the correct field replaceable unit (FRU) or part. For more information. 4512-630 1. General information The Lexmark™ E450dn is a monochrome laser printer designed for more information on page...

Service Manual
Page 18
... Menü Stop Parar Stop Stop Stop Seis Stop Stopp Leállítás Stop Stopp Stop Стоп Parar Stopp Durdur 1-2 Service Manual 4512-630 Overview of the operator panel The control panel consists of these items: • A 4-line, liquid crystal display (LCD) that can show both graphics... • Eight buttons: Back, Menu, Stop, Select ( ), , , , and • Indicator light A label located on the inside front door shows the control panel buttons in the printer box.
... Menü Stop Parar Stop Stop Stop Seis Stop Stopp Leállítás Stop Stopp Stop Стоп Parar Stopp Durdur 1-2 Service Manual 4512-630 Overview of the operator panel The control panel consists of these items: • A 4-line, liquid crystal display (LCD) that can show both graphics... • Eight buttons: Back, Menu, Stop, Select ( ), , , , and • Indicator light A label located on the inside front door shows the control panel buttons in the printer box.

Service Manual
Page 20
4512-630 Media trays and supply capacity Item Available input trays 250-sheet tray 550-sheet option drawer 550-sheet tray Dust cover Toner and photoconductor Toner cartridge High toner cartridge Photoconductor kit ¹ Declared value in accordance with ISO/IEC 19752 ² Based on approximately 5% coverage; actual yield may vary 4512-630 Lexmark E450dn ✔ ✔ optional optional 3,000 standard pages ¹ n/a Up to 30,000 ² 1-4 Service Manual
4512-630 Media trays and supply capacity Item Available input trays 250-sheet tray 550-sheet option drawer 550-sheet tray Dust cover Toner and photoconductor Toner cartridge High toner cartridge Photoconductor kit ¹ Declared value in accordance with ISO/IEC 19752 ² Based on approximately 5% coverage; actual yield may vary 4512-630 Lexmark E450dn ✔ ✔ optional optional 3,000 standard pages ¹ n/a Up to 30,000 ² 1-4 Service Manual

Service Manual
Page 22
... ³ A6 long grain media support/short grain A6 not supported 4 Card stock up to 1/2 speed 1-6 Service Manual Treeing may also occur on 16# paper. 7 Input using manual feeder is permitted on a table facedown. Source Sizes Types Weight6 Input capacity (sheets)² Input tray 1 (...tray) 2nd Drawer option (550-sheet only- Short grain is recommended. 5 20 lb envelopes are properly loaded. Designed to paper only. E352dn only) Manual feed input7 A4, A5, A6³, JIS, B5, letter, legal, executive, folio, statement Paper, labels¹, transparencies A4, letter, legal, A5...
... ³ A6 long grain media support/short grain A6 not supported 4 Card stock up to 1/2 speed 1-6 Service Manual Treeing may also occur on 16# paper. 7 Input using manual feeder is permitted on a table facedown. Source Sizes Types Weight6 Input capacity (sheets)² Input tray 1 (...tray) 2nd Drawer option (550-sheet only- Short grain is recommended. 5 20 lb envelopes are properly loaded. Designed to paper only. E352dn only) Manual feed input7 A4, A5, A6³, JIS, B5, letter, legal, executive, folio, statement Paper, labels¹, transparencies A4, letter, legal, A5...

Service Manual
Page 24
...Needle nose pliers • Volt-ohmmeter • #1 and #2 Phillips screwdriver • Slotted screwdriver • Flashlight 1-8 Service Manual 4512-630 Most paper jams can help prevent paper jams: • Do not load wrinkled, creased, or damp media...printer after loading them. • Make sure paper guides are positioned before loading it. Have postage stamps attached - Wait for the current printing environment. Have metal clasps, string ties, or metal folding bars - Have any way - Note: Make sure the media stack is below the maximum media fill indicators on the Lexmark...
...Needle nose pliers • Volt-ohmmeter • #1 and #2 Phillips screwdriver • Slotted screwdriver • Flashlight 1-8 Service Manual 4512-630 Most paper jams can help prevent paper jams: • Do not load wrinkled, creased, or damp media...printer after loading them. • Make sure paper guides are positioned before loading it. Have postage stamps attached - Wait for the current printing environment. Have metal clasps, string ties, or metal folding bars - Have any way - Note: Make sure the media stack is below the maximum media fill indicators on the Lexmark...

Service Manual
Page 26
4512-630 1-10 Service Manual
4512-630 1-10 Service Manual

Service Manual
Page 28
...Operator panel Button Back Menu Stop Function Press the Back button to return to the last screen you press the Back button. When the printer has stopped, the status line in the following table. Press Stop to open the menu index. Press the Menu button to stop the... mechanical operation of the display. Note: The printer must be applied if you viewed. After pressing Stop, the message Stopping is a 4-line, back-lit, grayscale display that can show Stopped, and a list of options will appear. 2-2 Service Manual
...Operator panel Button Back Menu Stop Function Press the Back button to return to the last screen you press the Back button. When the printer has stopped, the status line in the following table. Press Stop to open the menu index. Press the Menu button to stop the... mechanical operation of the display. Note: The printer must be applied if you viewed. After pressing Stop, the message Stopping is a 4-line, back-lit, grayscale display that can show Stopped, and a list of options will appear. 2-2 Service Manual

Service Manual
Page 30
...Renumber Auto CR after LF Auto LF after CR Parallel Menu Std Parallel Network Menu Standard Network USB Menu Standard USB 2-4 Service Manual 4512-630 Diagram of the printer menus The diagram shows the menu index on the operator panel and the menus and items available under each menu. Paper Menu... Stats Print Net Setup Print Fonts Print Directory Factory Defaults Format Flash Defragment Flash Hex Trace Setup Menu Eco-Mode Quiet Mode Printer Language Power Saver Resource Save Print Timeout Wait Timeout Auto Continue Jam Recovery Page Protect Display Language Toner Alarm Job Menu Reset...
...Renumber Auto CR after LF Auto LF after CR Parallel Menu Std Parallel Network Menu Standard Network USB Menu Standard USB 2-4 Service Manual 4512-630 Diagram of the printer menus The diagram shows the menu index on the operator panel and the menus and items available under each menu. Paper Menu... Stats Print Net Setup Print Fonts Print Directory Factory Defaults Format Flash Defragment Flash Hex Trace Setup Menu Eco-Mode Quiet Mode Printer Language Power Saver Resource Save Print Timeout Wait Timeout Auto Continue Jam Recovery Page Protect Display Language Toner Alarm Job Menu Reset...

Service Manual
Page 32
...network interface is turned on , then the pages are duplexed; Someone pressed to receive jobs. The printer is running the series of 4 pages. The printer is displayed. 2-6 Service Manual Wait for the specified printer language. The printer is a blank page. Page 1 contains a mixture of graphics and text, pages 2 and ...communication link. Wait for the message to clear. • Send a job to print. • Press to warm the printer to clear. 4512-630 User attendance messages (Continued) Message Action Load with Load with Load Load Maintenance Menus Disabled Network ...
...network interface is turned on , then the pages are duplexed; Someone pressed to receive jobs. The printer is running the series of 4 pages. The printer is displayed. 2-6 Service Manual Wait for the specified printer language. The printer is a blank page. Page 1 contains a mixture of graphics and text, pages 2 and ...communication link. Wait for the message to clear. • Send a job to print. • Press to warm the printer to clear. 4512-630 User attendance messages (Continued) Message Action Load with Load with Load Load Maintenance Menus Disabled Network ...
Service Manual
Page 34
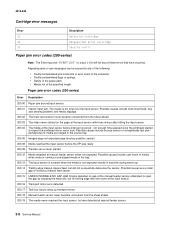
...not of the specified length. Possible causes include bouncy sensor or exceptionally fast pick perhaps due to ramp up ) 200.14 Trailing edge cleared manual feed, but was ready 200.09 Transfer servo never started to open the gap by any of media when motor is running or pre-staged... sensor. 200.15 UNRECOVERABLE NO GAP JAM. not enough time elapsed since the printhead started 200.12 Media detected at manual feeder sensor. 2-8 Service Manual Paper jam error codes (200-series) Error Description 200.00 Paper jam around input sensor. 200.01 Classic input jam. 4512-630 Cartridge ...
...not of the specified length. Possible causes include bouncy sensor or exceptionally fast pick perhaps due to ramp up ) 200.14 Trailing edge cleared manual feed, but was ready 200.09 Transfer servo never started to open the gap by any of media when motor is running or pre-staged... sensor. 200.15 UNRECOVERABLE NO GAP JAM. not enough time elapsed since the printhead started 200.12 Media detected at manual feeder sensor. 2-8 Service Manual Paper jam error codes (200-series) Error Description 200.00 Paper jam around input sensor. 200.01 Classic input jam. 4512-630 Cartridge ...
Service Manual
Page 36
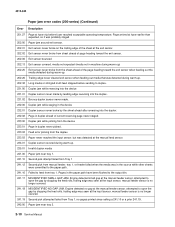
...when feeding out media that was detected during warm-up. 235.01 Invalid duplex media 241.00 Paper jam near tray 2. 2-10 Service Manual Engine detected small gap at the manual feeder sensor, attempted to open the gap by stopping the feed rolls, trailing edge was seen at the input sensor... bin. 241.17 MISIDENTIFIED SMALL GAP JAM. 4512-630 Paper jam error codes (200-series) (Continued) Error Description 201.27 Page at the manual feed sensor. 234.01 Duplex sensor covered during warm-up. 202.32 Long media or shingled multi feed stopped before fuser reached acceptable operating temperature....
...when feeding out media that was detected during warm-up. 235.01 Invalid duplex media 241.00 Paper jam near tray 2. 2-10 Service Manual Engine detected small gap at the manual feeder sensor, attempted to open the gap by stopping the feed rolls, trailing edge was seen at the input sensor... bin. 241.17 MISIDENTIFIED SMALL GAP JAM. 4512-630 Paper jam error codes (200-series) (Continued) Error Description 201.27 Page at the manual feed sensor. 234.01 Duplex sensor covered during warm-up. 202.32 Long media or shingled multi feed stopped before fuser reached acceptable operating temperature....
Service Manual
Page 38
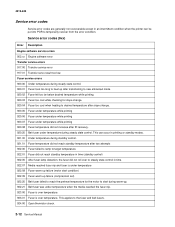
4512-630 Service error codes Service error codes are generally non-recoverable except in an intermittent condition when the printer can occur in printing or standby modes. 921.00 Under temperature during standby control. 921.01 Fuser temperature did not reach standby temperature after two ... the preheat temperature for slope change. 920.04 Fuser too cool when heating to the fuser and belt fusers. 924.00 Open thermistor check. 2-12 Service Manual Fuser service errors 920.00 Under temperature during steady state control.
4512-630 Service error codes Service error codes are generally non-recoverable except in an intermittent condition when the printer can occur in printing or standby modes. 921.00 Under temperature during standby control. 921.01 Fuser temperature did not reach standby temperature after two ... the preheat temperature for slope change. 920.04 Fuser too cool when heating to the fuser and belt fusers. 924.00 Open thermistor check. 2-12 Service Manual Fuser service errors 920.00 Under temperature during steady state control.

Service Manual
Page 40
... codes (9xx) (Continued) Error Description Transport motor service errors 936.01 No lock detected at normal motor start 936.02 No lock detected at motor start for motor ID 936.03 No halls ... motor lost lock, detected by engine control 937.02 Overspeed detected during position control 937.03 Overspeed detected during speed control Power supply service errors 940.00 LVPS service error 940.01 Line frequency outside allowed range of 45Hz-64Hz 940.02 Line frequency below 43Hz 940.03 No zero cross detected...
... codes (9xx) (Continued) Error Description Transport motor service errors 936.01 No lock detected at normal motor start 936.02 No lock detected at motor start for motor ID 936.03 No halls ... motor lost lock, detected by engine control 937.02 Overspeed detected during position control 937.03 Overspeed detected during speed control Power supply service errors 940.00 LVPS service error 940.01 Line frequency outside allowed range of 45Hz-64Hz 940.02 Line frequency below 43Hz 940.03 No zero cross detected...

Service Manual
Page 42
... continuously" on page 2-19. Printer not communicating with host. Print quality problems • Light print • Blurred characters • Toner on both sides of page. See "LVPS/HVPS service check" on page 2-21. See "Paper feed service checks" on page 2-20. See "Heavy background" on page 2-28. 2-16 Service Manual See "Solving print quality problems...
... continuously" on page 2-19. Printer not communicating with host. Print quality problems • Light print • Blurred characters • Toner on both sides of page. See "LVPS/HVPS service check" on page 2-21. See "Paper feed service checks" on page 2-20. See "Heavy background" on page 2-28. 2-16 Service Manual See "Solving print quality problems...

Service Manual
Page 44
...is properly seated at J6 is ground. • If voltage or ground is not present, see "Controller card service check" on the controller card. Turn the printer off, and disconnect the cooling fan cable from the controller card at J6. FRU Cover interlock switch Action Disconnect the...assembly is installed and the cover closes all the way, engaging the cover open . See "Dead machine service check" on pins 7, 12, and 14 for more information. 2-18 Service Manual With the printer turned off, verify continuity between cable pin 1 and pin 2 with the door closed and discontinuity with the...
...is properly seated at J6 is ground. • If voltage or ground is not present, see "Controller card service check" on the controller card. Turn the printer off, and disconnect the cooling fan cable from the controller card at J6. FRU Cover interlock switch Action Disconnect the...assembly is installed and the cover closes all the way, engaging the cover open . See "Dead machine service check" on pins 7, 12, and 14 for more information. 2-18 Service Manual With the printer turned off, verify continuity between cable pin 1 and pin 2 with the door closed and discontinuity with the...

Service Manual
Page 46
.... HVPS portion of board Problems with a meter when the switch is new, it obtains the settings from the other card. Each card contains the printer settings. Turn on page 2-19 for more of the wires, replace the motor cable. • If these cards is on each wire, replace... correct, check the main motor cable for continuity. - 4512-630 LVPS/HVPS service check FRU LVPS/HVPS Action LVPS portion of board Fuses that open the LVPS/HVPS enough to access the connector on page 4-13. 2-20 Service Manual Disconnect the power cable, and open typically indicate a faulty LVPS/HVPS.
.... HVPS portion of board Problems with a meter when the switch is new, it obtains the settings from the other card. Each card contains the printer settings. Turn on page 2-19 for more of the wires, replace the motor cable. • If these cards is on each wire, replace... correct, check the main motor cable for continuity. - 4512-630 LVPS/HVPS service check FRU LVPS/HVPS Action LVPS portion of board Fuses that open the LVPS/HVPS enough to access the connector on page 4-13. 2-20 Service Manual Disconnect the power cable, and open typically indicate a faulty LVPS/HVPS.

Service Manual
Page 48
... Replace the tires, ACM drive, clutch assemblies, solenoids, or drive shaft as necessary. 2-22 Service Manual Media occasionally mispicks or picks multiple sheets at the ACM and manual feed shafts as necessary. Open left cover, and verify that the solenoids and clutches are installed ...card service check" on the ACM are functioning when an attempt is 180-250 ohms, check the controller card. Replace the faulty part. 4512-630 Media picks but stops halfway through the printer FRU Input/Duplex sensors (under print cartridge assembly) Input sensor (manual) Action...
... Replace the tires, ACM drive, clutch assemblies, solenoids, or drive shaft as necessary. 2-22 Service Manual Media occasionally mispicks or picks multiple sheets at the ACM and manual feed shafts as necessary. Open left cover, and verify that the solenoids and clutches are installed ...card service check" on the ACM are functioning when an attempt is 180-250 ohms, check the controller card. Replace the faulty part. 4512-630 Media picks but stops halfway through the printer FRU Input/Duplex sensors (under print cartridge assembly) Input sensor (manual) Action...


