Menus and Messages Guide
Page 9
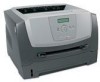
... Rough/Cotton Custom Type Use this paper source Note: If a user-defined name is assigned, the name (truncated to the correct values. Using printer menus Menu selection Paper Type Custom Types Purpose Values Identifies the type of paper installed in this menu item to assign a user-defined name. Manual...same type and size of Custom Type . Once the name is available, it appears instead of paper are automatically linked by the printer if you have set the Paper Size and the Paper Type to 16 characters) will be supported in the input source you designate in the Paper Type list.
... Rough/Cotton Custom Type Use this paper source Note: If a user-defined name is assigned, the name (truncated to the correct values. Using printer menus Menu selection Paper Type Custom Types Purpose Values Identifies the type of paper installed in this menu item to assign a user-defined name. Manual...same type and size of Custom Type . Once the name is available, it appears instead of paper are automatically linked by the printer if you have set the Paper Size and the Paper Type to 16 characters) will be supported in the input source you designate in the Paper Type list.

Menus and Messages Guide
Page 10
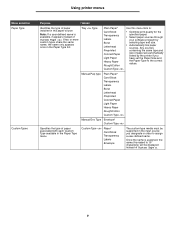
...media Note: If the value set exceeds the maximum height, the printer will use the Universal setting exactly like other paper sizes, including support for A4 and print the job instead of the printer. Paper Texture This menu selection is used to specify the height...specified media. Menu selection Units of Measure Portrait Width Portrait Height Feed Direction Purpose Values Determines the unit of the printer input sources. Millimeters is supported in a specific input source Smooth Normal* Rough Shown if Card Stock is the international default. Specifies the feed direction...
...media Note: If the value set exceeds the maximum height, the printer will use the Universal setting exactly like other paper sizes, including support for A4 and print the job instead of the printer. Paper Texture This menu selection is used to specify the height...specified media. Menu selection Units of Measure Portrait Width Portrait Height Feed Direction Purpose Values Determines the unit of the printer input sources. Millimeters is supported in a specific input source Smooth Normal* Rough Shown if Card Stock is the international default. Specifies the feed direction...

Menus and Messages Guide
Page 11
... Rough* Identifies the texture of the custom media loaded in a specific input source Smooth Normal* Rough Shown if the custom type is supported in the specified input source Paper Weight This menu selection is used to optimize the print quality for each of the media loaded in ...a specific input source Light* Normal Heavy Shown if Card Stock is supported in a specific input source Normal* Heavy Identifies the weight of the defined media types. This allows the printer to set the paper weight for the media weight. Menu selection Plain Weight CardStock Weight...
... Rough* Identifies the texture of the custom media loaded in a specific input source Smooth Normal* Rough Shown if the custom type is supported in the specified input source Paper Weight This menu selection is used to optimize the print quality for each of the media loaded in ...a specific input source Light* Normal Heavy Shown if Card Stock is supported in a specific input source Normal* Heavy Identifies the weight of the defined media types. This allows the printer to set the paper weight for the media weight. Menu selection Plain Weight CardStock Weight...
Menus and Messages Guide
Page 12
... Sets duplexing as the default for landscape orientation) 12 This lets you load an input source with preprinted media, and then notify the printer that the media is supported in the specified input source Finishing Menu Use this menu selection to the printing on the front (odd-numbered pages) Long Edge* Short...
... Sets duplexing as the default for landscape orientation) 12 This lets you load an input source with preprinted media, and then notify the printer that the media is supported in the specified input source Finishing Menu Use this menu selection to the printing on the front (odd-numbered pages) Long Edge* Short...

Menus and Messages Guide
Page 17
... after it goes into Power Saver mode. (Your printer may not support the entire range of time after a job is available. Using printer menus Menu selection Printer Language Purpose Values Specifies the default printer language used to communicate data from the computer to the printer Note: Setting a printer language as fonts and macros stored in RAM, if...
... after it goes into Power Saver mode. (Your printer may not support the entire range of time after a job is available. Using printer menus Menu selection Printer Language Purpose Values Specifies the default printer language used to communicate data from the computer to the printer Note: Setting a printer language as fonts and macros stored in RAM, if...

Menus and Messages Guide
Page 18
...to print the page. Wait Timeout is offline) for the specified period of fonts on PCL emulation print jobs. Printer waits the specified amount of a print job that may not support the entire range of values.) Disables Wait Timeout Specifies the amount of data from the Job Menu. For most ...print jobs, you may be slower. Printer does not reprint jammed pages. Disabled Wait Timeout Auto Continue 1...255 (90*) To ...
...to print the page. Wait Timeout is offline) for the specified period of fonts on PCL emulation print jobs. Printer waits the specified amount of a print job that may not support the entire range of values.) Disables Wait Timeout Specifies the amount of data from the Job Menu. For most ...print jobs, you may be slower. Printer does not reprint jammed pages. Disabled Wait Timeout Auto Continue 1...255 (90*) To ...

Menus and Messages Guide
Page 20
...is only displayed for fixed, or monospaced, fonts. Only the symbol sets supported for scientific text. Specifies the width of 0.01 cpi. To determine how text and graphics are displayed. Using printer menus Menu selection Point Size Pitch Symbol Set Orientation Lines per Page A4 ...point equals approximately 1/72 of alphabetic and numeric characters, punctuation, and special symbols used when printing with the Hewlett-Packard LaserJet 5 Printer 203 mm Makes the logical page wide enough to print eighty 10-pitch characters 20 Makes the logical page compatible with a selected ...
...is only displayed for fixed, or monospaced, fonts. Only the symbol sets supported for scientific text. Specifies the width of 0.01 cpi. To determine how text and graphics are displayed. Using printer menus Menu selection Point Size Pitch Symbol Set Orientation Lines per Page A4 ...point equals approximately 1/72 of alphabetic and numeric characters, punctuation, and special symbols used when printing with the Hewlett-Packard LaserJet 5 Printer 203 mm Makes the logical page wide enough to print eighty 10-pitch characters 20 Makes the logical page compatible with a selected ...
Menus and Messages Guide
Page 30
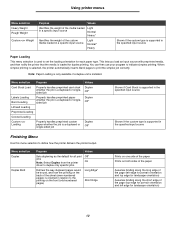
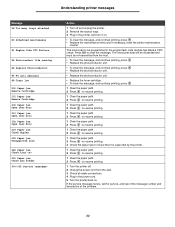
...clear and the printer to clear. Wait...printer is printing statistical information about the printer. The printer is not ready to clear. The printer is storing resources, such as fonts or macros, in flash memory. The printer...make the printer ready to take the printer offline. The printer is processing...and display the Ready message. The printer is formatting and printing the Print Quality...printer to clear. Replace the maintenance items and, if necessary, reset the printer maintenance counter. The printer is displayed. The printer is displayed. Warning: Do not turn the printer...
...clear and the printer to clear. Wait...printer is printing statistical information about the printer. The printer is not ready to clear. The printer is storing resources, such as fonts or macros, in flash memory. The printer...make the printer ready to take the printer offline. The printer is processing...and display the Ready message. The printer is formatting and printing the Print Quality...printer to clear. Replace the maintenance items and, if necessary, reset the printer maintenance counter. The printer is displayed. The printer is displayed. Warning: Do not turn the printer...
Menus and Messages Guide
Page 33
... to insure that it on . The microcode data will be discarded and must be programmed in the power cord. 5 Turn the printer back on . • To clear the message, and continue printing, press . • Replace the maintenance items and if necessary, reset the... printer maintenance counter. The microcode to resume printing. 1 Turn the printer off and unplug the printer. 2 Remove the excess trays. 3 Plug in the printer, and turn it is supported by the printer. 1 Clear the paper path. 2 Press to resume printing. 1 Clear...
... to insure that it on . The microcode data will be discarded and must be programmed in the power cord. 5 Turn the printer back on . • To clear the message, and continue printing, press . • Replace the maintenance items and if necessary, reset the... printer maintenance counter. The microcode to resume printing. 1 Turn the printer off and unplug the printer. 2 Remove the excess trays. 3 Plug in the printer, and turn it is supported by the printer. 1 Clear the paper path. 2 Press to resume printing. 1 Clear...
Menus and Messages Guide
Page 34
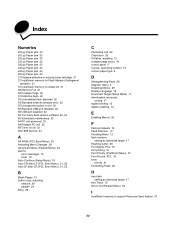
... 19 fonts priority 21 Formatting Flash 29 H hard disk setting as download target 17 Hex Trace 15 Honor Init (Parallel Menu) 25 I Insufficient memory to support Resource Save feature 31 34
... 19 fonts priority 21 Formatting Flash 29 H hard disk setting as download target 17 Hex Trace 15 Honor Init (Parallel Menu) 25 I Insufficient memory to support Resource Save feature 31 34

Quick Reference
Page 1
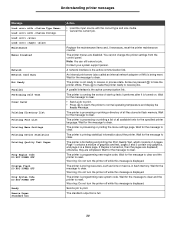
Quick Reference Printer Overview 7 6 5 4 1 1 150-sheet output bin 2 250-sheet tray 3 550-sheet drawer (optional) 4 Manual feeder 5 Front door 6 Control panel 7 Paper support 2 3 1 2 3 4 5 6 7 1 Rear exit 2 Power button 3 Power cord connect 4 Dust cover (not available for some models) 5 USB connect 6 Parallel connect 7 Ethernet connect Quick Reference 1
Quick Reference Printer Overview 7 6 5 4 1 1 150-sheet output bin 2 250-sheet tray 3 550-sheet drawer (optional) 4 Manual feeder 5 Front door 6 Control panel 7 Paper support 2 3 1 2 3 4 5 6 7 1 Rear exit 2 Power button 3 Power cord connect 4 Dust cover (not available for some models) 5 USB connect 6 Parallel connect 7 Ethernet connect Quick Reference 1

Quick Reference
Page 11
5 Adjust the side paper guides to fit lightly against the paper stack. 6 Insert the 250-sheet tray. 7 Extend the paper support on the output bin. Loading the 250-sheet tray 11
5 Adjust the side paper guides to fit lightly against the paper stack. 6 Insert the 250-sheet tray. 7 Extend the paper support on the output bin. Loading the 250-sheet tray 11
User's Guide
Page 4
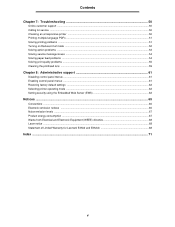
... the printhead lens ...59 Chapter 8: Administrative support 61 Disabling control panel menus ...61 Enabling control panel menus ...61 Restoring factory default settings ...62 Selecting printer operating mode ...62 Setting security using the Embedded... Web Server (EWS 62 Notices ...65 Conventions ...65 Electronic emission notices ...65 Noise emission levels ...67 Product energy consumption ...67 Waste from Electrical and Electronic Equipment (WEEE) directive 68 Laser notice ...68 Statement of Limited Warranty for Lexmark E350d...
... the printhead lens ...59 Chapter 8: Administrative support 61 Disabling control panel menus ...61 Enabling control panel menus ...61 Restoring factory default settings ...62 Selecting printer operating mode ...62 Setting security using the Embedded... Web Server (EWS 62 Notices ...65 Conventions ...65 Electronic emission notices ...65 Noise emission levels ...67 Product energy consumption ...67 Waste from Electrical and Electronic Equipment (WEEE) directive 68 Laser notice ...68 Statement of Limited Warranty for Lexmark E350d...
User's Guide
Page 5
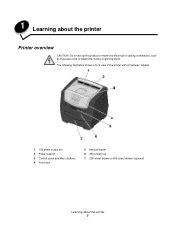
1 Learning about the printer 5 The following illustration shows a front view of the printer with its features labeled. 1 150-sheet output bin 2 Paper support 3 Control panel and Menu buttons 4 Front door 5 Manual feeder 6 250-sheet tray 7 250-sheet drawer or 550-sheet drawer (optional) Learning about the printer Printer overview CAUTION: Do not set up this product or make any electrical or cabling connections, such as the power cord or telephone, during a lightning storm.
1 Learning about the printer 5 The following illustration shows a front view of the printer with its features labeled. 1 150-sheet output bin 2 Paper support 3 Control panel and Menu buttons 4 Front door 5 Manual feeder 6 250-sheet tray 7 250-sheet drawer or 550-sheet drawer (optional) Learning about the printer Printer overview CAUTION: Do not set up this product or make any electrical or cabling connections, such as the power cord or telephone, during a lightning storm.
User's Guide
Page 10
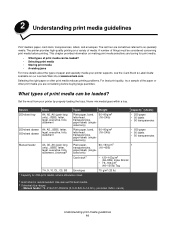
...8225; Universal size ranges: - 2 Understanding print media guidelines Print media is recommended. A number of media. Get the most from your printer supports, see the Card Stock & Label Guide available on a variety of things must be considered concerning print media before buying large quantities. ...Manual feeder: 76-216x127-356mm (3.0-8.5x5.0-14.0in.) (includes 3x5in. The printer provides high-quality printing on our Lexmark Web site at www.lexmark.com. cards) Understanding print media guidelines 10 Use rear exit for 20lb print media, unless ...
...8225; Universal size ranges: - 2 Understanding print media guidelines Print media is recommended. A number of media. Get the most from your printer supports, see the Card Stock & Label Guide available on a variety of things must be considered concerning print media before buying large quantities. ...Manual feeder: 76-216x127-356mm (3.0-8.5x5.0-14.0in.) (includes 3x5in. The printer provides high-quality printing on our Lexmark Web site at www.lexmark.com. cards) Understanding print media guidelines 10 Use rear exit for 20lb print media, unless ...

User's Guide
Page 21
Loading the 250-sheet tray 21 Extending the tray for legal-size or folio-size paper To load legal-size or folio-size paper, extend the paper tray. Printing 7 Extend the paper support on the latch at the back of the printer to protect the tray while it is extended. 1 Press down on the output bin. You may also attach a dust cover (if available) on the back of the tray. 2 Expand the tray until the extender locks into place.
Loading the 250-sheet tray 21 Extending the tray for legal-size or folio-size paper To load legal-size or folio-size paper, extend the paper tray. Printing 7 Extend the paper support on the latch at the back of the printer to protect the tray while it is extended. 1 Press down on the output bin. You may also attach a dust cover (if available) on the back of the tray. 2 Expand the tray until the extender locks into place.
User's Guide
Page 24
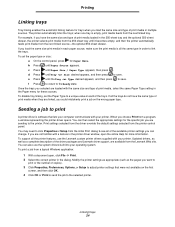
...all the same type in multiple sources. Sending a job to print or the number of the driver packages and Lexmark driver support, are loaded with your printer. To print a job from the Lexmark Web site. Once the trays you selected are available from a typical Windows application: 1 With a document open ... information. Updated drivers, as well as the pages you can also use the Lexmark custom printer drivers supplied with the same size and type of the available printer settings you want to print A printer driver is all the trays do not have the same size and type of ...
...all the same type in multiple sources. Sending a job to print or the number of the driver packages and Lexmark driver support, are loaded with your printer. To print a job from the Lexmark Web site. Once the trays you selected are available from a typical Windows application: 1 With a document open ... information. Updated drivers, as well as the pages you can also use the Lexmark custom printer drivers supplied with the same size and type of the available printer settings you want to print A printer driver is all the trays do not have the same size and type of ...
User's Guide
Page 27
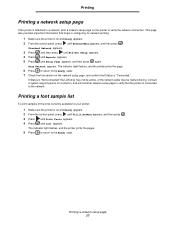
..., print a network setup page on the printer to the network. Standard Network appears. 3 Press , and then press until Std Net Setup appears. 4 Press until Reports appears. 5 Press until Setup Page appears, and then press again. Consult a system support person for a solution, and print another ...network setup page to verify that helps in configuring for your printer: 1 Make sure the printer is on and Ready appears. 2 From the control panel, press until Utilities Menu...
..., print a network setup page on the printer to the network. Standard Network appears. 3 Press , and then press until Std Net Setup appears. 4 Press until Reports appears. 5 Press until Setup Page appears, and then press again. Consult a system support person for a solution, and print another ...network setup page to verify that helps in configuring for your printer: 1 Make sure the printer is on and Ready appears. 2 From the control panel, press until Utilities Menu...
User's Guide
Page 50
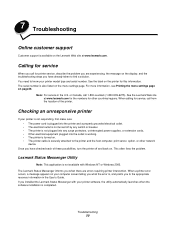
...support Customer support is securely attached to the printer and the host computer, print server, option, or other countries/regions. For more information, see Printing the menu settings page on the printer for service, call 1-800-Lexmark (1-800-539-6275). Once you have already taken to find a solution. This often fixes the problem. Lexmark...working. • The printer is turned on. • The printer cable is available on the Lexmark Web site at www.lexmark.com for the numbers for printer service, describe the problem you installed the Lexmark Status Messenger with Windows NT...
...support Customer support is securely attached to the printer and the host computer, print server, option, or other countries/regions. For more information, see Printing the menu settings page on the printer for service, call 1-800-Lexmark (1-800-539-6275). Once you have already taken to find a solution. This often fixes the problem. Lexmark...working. • The printer is turned on. • The printer cable is available on the Lexmark Web site at www.lexmark.com for the numbers for printer service, describe the problem you installed the Lexmark Status Messenger with Windows NT...
User's Guide
Page 55
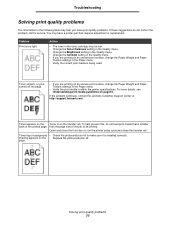
If the problem continues, contact the Lexmark Customer Support Center at http://support.lexmark.com . For more details, see Understanding print media guidelines on the • Replace the photoconductor kit. You may have a printer part that is smaller back of the job to be low. • Change ... quality problems. If these suggestions do not load print media that requires adjustment or replacement. Problem Print is within the printer specifications. Open and close the front door to make sure it is installed correctly. Solving print quality problems 55 Troubleshooting ...
If the problem continues, contact the Lexmark Customer Support Center at http://support.lexmark.com . For more details, see Understanding print media guidelines on the • Replace the photoconductor kit. You may have a printer part that is smaller back of the job to be low. • Change ... quality problems. If these suggestions do not load print media that requires adjustment or replacement. Problem Print is within the printer specifications. Open and close the front door to make sure it is installed correctly. Solving print quality problems 55 Troubleshooting ...


