User's Guide
Page 69
...limited to present the feature or option with Lexmark user's guides, manuals, instructions or guidance • Unsuitable physical or operating environment • Maintenance by anyone other than Lexmark or a Lexmark authorized servicer • Operation of a product beyond repair,...Lexmark E350d and E352dn 69 Extent of limited warranty Lexmark does not warrant uninterrupted or error-free operation of any Suppliers and Remarketers of Limited Warranty for which it was intended. Statement of Lexmark. You should transfer proof of prints produced by Lexmark). To obtain warranty service...
...limited to present the feature or option with Lexmark user's guides, manuals, instructions or guidance • Unsuitable physical or operating environment • Maintenance by anyone other than Lexmark or a Lexmark authorized servicer • Operation of a product beyond repair,...Lexmark E350d and E352dn 69 Extent of limited warranty Lexmark does not warrant uninterrupted or error-free operation of any Suppliers and Remarketers of Limited Warranty for which it was intended. Statement of Lexmark. You should transfer proof of prints produced by Lexmark). To obtain warranty service...

Service Manual
Page 12
...symbol, there is divided into the following chapters: 1. Repair information provides instructions for service personnel. Appendix A contains service tips and information. Definitions Note: A note provides additional information. 4512-420, -430 Preface This manual contains maintenance procedures for making printer adjustments and removing and installing FRUs. 5. It is a danger from hazardous voltage in... might damage the product hardware or software. Unplug the product before you are , as well as general environmental and safety instructions. 2. xii Lexmark™ E350d, E352dn
...symbol, there is divided into the following chapters: 1. Repair information provides instructions for service personnel. Appendix A contains service tips and information. Definitions Note: A note provides additional information. 4512-420, -430 Preface This manual contains maintenance procedures for making printer adjustments and removing and installing FRUs. 5. It is a danger from hazardous voltage in... might damage the product hardware or software. Unplug the product before you are , as well as general environmental and safety instructions. 2. xii Lexmark™ E350d, E352dn
Service Manual
Page 13
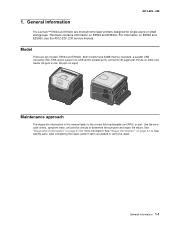
... unit (FRU) or part. Model There are monochrome laser printers designed for more information. For information on page 4-1 to determine the symptom and repair the failure. See "Repair information" on E250d and E250dn, see the 4512-220,-230 service manual. 4512-420, -430 1. Both models have 32MB ... letter-size media (34 ppm on A4, 29 ppm on E350d and E352dn. General information 1-1 This book contains information on legal). Use the error code charts, symptom index, and service checks to help identify parts. General information The Lexmark™ E350d and E352dn are two models...
... unit (FRU) or part. Model There are monochrome laser printers designed for more information. For information on page 4-1 to determine the symptom and repair the failure. See "Repair information" on E250d and E250dn, see the 4512-220,-230 service manual. 4512-420, -430 1. Both models have 32MB ... letter-size media (34 ppm on A4, 29 ppm on E350d and E352dn. General information 1-1 This book contains information on legal). Use the error code charts, symptom index, and service checks to help identify parts. General information The Lexmark™ E350d and E352dn are two models...
Service Manual
Page 43
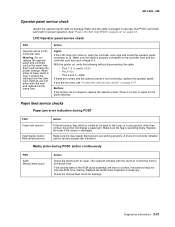
...is plugged in any are correct and the operator panel is in securely. Each card contains the printer settings. If any position other card. There is new, it . LCD Operator panel service check FRU Operator panel (LCD) Controller card Warning: Do not replace the operator panel and ...connector at the same time. A stuck or incorrectly installed sensor causes a paper jam indication. Paper feed service checks Paper jam error indication during POST and/or continuously FRU ACM Manual feed clutch Action Check the ACM clutch for wear. If the ratchet teeth of the pick tires. ...
...is plugged in any are correct and the operator panel is in securely. Each card contains the printer settings. If any position other card. There is new, it . LCD Operator panel service check FRU Operator panel (LCD) Controller card Warning: Do not replace the operator panel and ...connector at the same time. A stuck or incorrectly installed sensor causes a paper jam indication. Paper feed service checks Paper jam error indication during POST and/or continuously FRU ACM Manual feed clutch Action Check the ACM clutch for wear. If the ratchet teeth of the pick tires. ...

Service Manual
Page 44
...the tires in one tray. See "Controller card service check" on the ACM are working properly. 4512-420, -430 Media picks but stops halfway through the printer FRU Input/duplex sensors (under print cartridge assembly) Input sensor (manual) Action Make sure the input sensors are installed...J23 (Input/duplex sensor) and pin 3 at J23 (Tray 1 input) and J20 (manual input). Media occasionally mispicks or picks multiple sheets at the ACM and manual feed shafts as necessary. 2-22 Lexmark™ E350d, E352dn Open left cover, and verify that the solenoids and clutches are functioning when an ...
...the tires in one tray. See "Controller card service check" on the ACM are working properly. 4512-420, -430 Media picks but stops halfway through the printer FRU Input/duplex sensors (under print cartridge assembly) Input sensor (manual) Action Make sure the input sensors are installed...J23 (Input/duplex sensor) and pin 3 at J23 (Tray 1 input) and J20 (manual input). Media occasionally mispicks or picks multiple sheets at the ACM and manual feed shafts as necessary. 2-22 Lexmark™ E350d, E352dn Open left cover, and verify that the solenoids and clutches are functioning when an ...

Service Manual
Page 46
...it to Exit Config Menu and press . A gap in printer service errors unless there is blockage of the beam or dust on page 3-28. 2-24 Lexmark™ E350d, E352dn The message CONFIG MENU displays. See "POST symptom table" on the printer while pressing and holding and . Note: Refer to the ...the next level of the manual for solutions to help isolate print quality problems, like streaking, print test pages using the print quality test pages. c. Unplug the printer, and check the cable continuity between the LVPS/HVPS connector marked OPC (at the end of service. Turn off . Release ...
...it to Exit Config Menu and press . A gap in printer service errors unless there is blockage of the beam or dust on page 3-28. 2-24 Lexmark™ E350d, E352dn The message CONFIG MENU displays. See "POST symptom table" on the printer while pressing and holding and . Note: Refer to the ...the next level of the manual for solutions to help isolate print quality problems, like streaking, print test pages using the print quality test pages. c. Unplug the printer, and check the cable continuity between the LVPS/HVPS connector marked OPC (at the end of service. Turn off . Release ...

Service Manual
Page 132
4512-420, -430 Assembly 1: Covers 7-2 Service Manual
4512-420, -430 Assembly 1: Covers 7-2 Service Manual

Service Manual
Page 134
4512-420, -430 Assembly 2: Electronics 15 3 14 13 1 3 6 4 5 2 3 7 12 3 11 8 9 3 10 7-4 Service Manual
4512-420, -430 Assembly 2: Electronics 15 3 14 13 1 3 6 4 5 2 3 7 12 3 11 8 9 3 10 7-4 Service Manual

Service Manual
Page 136
4512-420, -430 Assembly 3: Frame 7-6 Service Manual
4512-420, -430 Assembly 3: Frame 7-6 Service Manual

Service Manual
Page 138
4512-420, -430 Assembly 4: Options AsmIndex NS NS NS NS NS NS NS NS NS NS Part number 40X1512 40X1513 40X1514 40X1515 40X1364 40X1365 40X1366 40X1454 40X1367 40X1368 Units/ mach Units/ FRU Description 1 Japanese font card assembly 1 Simplified Chinese font card assembly 1 Traditional Chinese font card assembly 1 Korean font card assembly 1 32MB SDR DIMM 1 64MB SDR DIMM 1 128 MB SDR DIMM 1 32 MB flash card assembly 1 Parallel cable, packaged (3 m) 1 USB cable, packaged (2 m) 7-8 Service Manual
4512-420, -430 Assembly 4: Options AsmIndex NS NS NS NS NS NS NS NS NS NS Part number 40X1512 40X1513 40X1514 40X1515 40X1364 40X1365 40X1366 40X1454 40X1367 40X1368 Units/ mach Units/ FRU Description 1 Japanese font card assembly 1 Simplified Chinese font card assembly 1 Traditional Chinese font card assembly 1 Korean font card assembly 1 32MB SDR DIMM 1 64MB SDR DIMM 1 128 MB SDR DIMM 1 32 MB flash card assembly 1 Parallel cable, packaged (3 m) 1 USB cable, packaged (2 m) 7-8 Service Manual

Service Manual
Page 140
4512-420, -430 7-10 Service Manual
4512-420, -430 7-10 Service Manual

Service Manual
Page 142
4512-420, -430 I -2 Lexmark™ E350d, E352dn print quality pages 3-3, 3-14 using 2-24 print quality problems print media 1-7 service check 2-24 solving 2-28 printer symptom table 2-16 printhead removal 4-40 service check 2-31 Q Quick Test 3-7, 3-14 R registration 3-7 removals controller card ...front views 5-1 rear views 5-1 lubrication specifications 6-1 LVPS/HVPS parts catalog 7-5 removal 4-26 service check 2-20 M maintenance kits 6-1 manual feed print media types and sizes 1-6 messages service error codes 2-12 user attendance messages 2-5 Model Name 3-20 models comparison 1-1 diagrams 5-1...
4512-420, -430 I -2 Lexmark™ E350d, E352dn print quality pages 3-3, 3-14 using 2-24 print quality problems print media 1-7 service check 2-24 solving 2-28 printer symptom table 2-16 printhead removal 4-40 service check 2-31 Q Quick Test 3-7, 3-14 R registration 3-7 removals controller card ...front views 5-1 rear views 5-1 lubrication specifications 6-1 LVPS/HVPS parts catalog 7-5 removal 4-26 service check 2-20 M maintenance kits 6-1 manual feed print media types and sizes 1-6 messages service error codes 2-12 user attendance messages 2-5 Model Name 3-20 models comparison 1-1 diagrams 5-1...

Service Manual
Page 146
...) drive assembly 7-7 Rear upper and lower cover assembly 7-3 Front access cover assembly 7-3 Complete duplex assembly 7-7 Main tray 7-3 Optional media drawer assembly 7-3 Tray 2 assembly 7-3 Pickup and manual feed solenoids 7-5 Reversing solenoid 7-5 110 V maintenance kit 6-1, 7-7 220 V maintenance kit 6-1, 7-7 100 V maintenance kit 6-1, 7-7 Screws, miscellaneous 7-7 ACM drive shaft assembly 7-7 Tray 1 wear strips 7-3 Tray 2 wear strips...
...) drive assembly 7-7 Rear upper and lower cover assembly 7-3 Front access cover assembly 7-3 Complete duplex assembly 7-7 Main tray 7-3 Optional media drawer assembly 7-3 Tray 2 assembly 7-3 Pickup and manual feed solenoids 7-5 Reversing solenoid 7-5 110 V maintenance kit 6-1, 7-7 220 V maintenance kit 6-1, 7-7 100 V maintenance kit 6-1, 7-7 Screws, miscellaneous 7-7 ACM drive shaft assembly 7-7 Tray 1 wear strips 7-3 Tray 2 wear strips...


