User's Guide
Page 3
Contents Safety information 9 Introduction 10 Finding information about the printer...10 Setting up the printer 13 Bypassing security warnings during software installation 13 Setting up the printer as a copier only...13 Understanding the parts of the printer...20 Using the ...Using the Setup menu ...27 Saving settings...28 Using the printer software...30 Installing printer software ...30 Installing the optional XPS driver (Windows Vista users only 31 Using the Windows printer software...32 Using the Macintosh printer software...33 Switching between the rear USB port and the Quick Connect ...
Contents Safety information 9 Introduction 10 Finding information about the printer...10 Setting up the printer 13 Bypassing security warnings during software installation 13 Setting up the printer as a copier only...13 Understanding the parts of the printer...20 Using the ...Using the Setup menu ...27 Saving settings...28 Using the printer software...30 Installing printer software ...30 Installing the optional XPS driver (Windows Vista users only 31 Using the Windows printer software...32 Using the Macintosh printer software...33 Switching between the rear USB port and the Quick Connect ...
User's Guide
Page 5
... drive 77 Printing photos...77 Printing photos using the printer control panel ...77 Printing photos from the computer using the printer software 78 Printing photos from a memory device using the printer software 79 Applying color effects to photos using the printer control panel 80 Printing photos from a PictBridge-enabled digital camera 81...
... drive 77 Printing photos...77 Printing photos using the printer control panel ...77 Printing photos from the computer using the printer software 78 Printing photos from a memory device using the printer software 79 Applying color effects to photos using the printer control panel 80 Printing photos from a PictBridge-enabled digital camera 81...

User's Guide
Page 6
... printer 95 Maintaining print cartridges...95 Installing print cartridges...95 Removing a used print cartridge ...96 Refilling print cartridges...97 Using genuine Lexmark print cartridges...97 Aligning print cartridges ...98 Cleaning the print cartridge nozzles...98 Checking ink levels...99 Wiping the print cartridge nozzles and...102 Ordering paper and other supplies...103 Resetting to factory settings...103 Troubleshooting 104 Using the printer troubleshooting software (Windows only 104 Setup troubleshooting...104 Incorrect language appears on the display...104 Power button is not lit ...105...
... printer 95 Maintaining print cartridges...95 Installing print cartridges...95 Removing a used print cartridge ...96 Refilling print cartridges...97 Using genuine Lexmark print cartridges...97 Aligning print cartridges ...98 Cleaning the print cartridge nozzles...98 Checking ink levels...99 Wiping the print cartridge nozzles and...102 Ordering paper and other supplies...103 Resetting to factory settings...103 Troubleshooting 104 Using the printer troubleshooting software (Windows only 104 Setup troubleshooting...104 Incorrect language appears on the display...104 Power button is not lit ...105...
User's Guide
Page 10
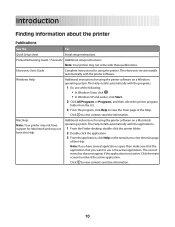
...the main screen to make sure that the application that you have this Help. Note: Your printer may not have support for using the printer software on a Windows operating system. The Help installs automatically with the programs. 1 Do one of the following: • In Windows Vista, ...you want to use is not active. Electronic User's Guide Complete instructions for using the printer. Additional instructions for using the printer software on the menu bar to view context-sensitive information. 10 Click to view the main page of the Help. Windows Help Additional ...
...the main screen to make sure that the application that you have this Help. Note: Your printer may not have support for using the printer software on a Windows operating system. The Help installs automatically with the programs. 1 Do one of the following: • In Windows Vista, ...you want to use is not active. Electronic User's Guide Complete instructions for using the printer. Additional instructions for using the printer software on the menu bar to view context-sensitive information. 10 Click to view the main page of the Help. Windows Help Additional ...
User's Guide
Page 13
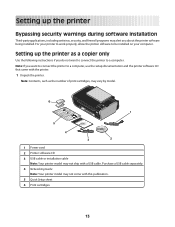
... model. 6 1 2 3 WI F I PRINTING 1 5 4 3 2 1 Power cord 2 Printer software CD 3 USB cable or installation cable Note: Your printer model may alert you about the printer software being installed. Purchase a USB cable separately. 4 Networking Guide Note: Your printer model may not come with ...the printer. 1 Unpack the printer. Setting up the printer Bypassing security warnings during software installation Third-party applications, including antivirus, security, and firewall programs may not ship with a USB cable. Note: Contents, such as...
... model. 6 1 2 3 WI F I PRINTING 1 5 4 3 2 1 Power cord 2 Printer software CD 3 USB cable or installation cable Note: Your printer model may alert you about the printer software being installed. Purchase a USB cable separately. 4 Networking Guide Note: Your printer model may not come with ...the printer. 1 Unpack the printer. Setting up the printer Bypassing security warnings during software installation Third-party applications, including antivirus, security, and firewall programs may not ship with a USB cable. Note: Contents, such as...
User's Guide
Page 27
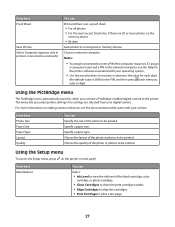
... press each time you select printer settings if no settings are 20 or more information on making camera selections, see the Help for the printer software associated with your digital camera. For more photos on the memory device • By date Save photos to a computer or memory device. Choose the quality...
... press each time you select printer settings if no settings are 20 or more information on making camera selections, see the Help for the printer software associated with your digital camera. For more photos on the memory device • By date Save photos to a computer or memory device. Choose the quality...

User's Guide
Page 30
...lexmark.com. 2 From the home page, navigate through the menu selection, and then click Drivers & Downloads. 30 Changing the Power Saver timeout You can customize the Power Saver timeout of the printer. Using Macintosh 1 Close all open software applications. 2 Insert the printer software...4 Double-click the Install icon. 5 Follow the instructions on the screens. Using the printer software Installing printer software Using Windows 1 Close all open software programs. 2 Insert the printer software CD. 3 From the main installation screen, click Install. 4 Follow the instructions on the ...
...lexmark.com. 2 From the home page, navigate through the menu selection, and then click Drivers & Downloads. 30 Changing the Power Saver timeout You can customize the Power Saver timeout of the printer. Using Macintosh 1 Close all open software applications. 2 Insert the printer software...4 Double-click the Install icon. 5 Follow the instructions on the screens. Using the printer software Installing printer software Using Windows 1 Close all open software programs. 2 Insert the printer software CD. 3 From the main installation screen, click Install. 4 Follow the instructions on the ...
User's Guide
Page 31
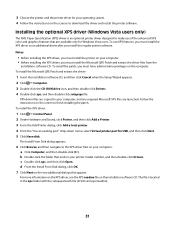
...double-click Drivers. The Install From Disk dialog appears. 6 Click Browse, and then navigate to download the driver and install the printer software. The file is an optional printer driver designed to finish installing the patch. 3 Choose the printer and the printer driver for USB, ... in your computer: a Click Computer, and then double-click (C:). To install the Microsoft QFE Patch and extract the driver: 1 Insert the installation software CD, and then click Cancel when the Setup Wizard appears. 2 Click ΠComputer. 3 Double-click the CD-ROM drive icon, and then...
...double-click Drivers. The Install From Disk dialog appears. 6 Click Browse, and then navigate to download the driver and install the printer software. The file is an optional printer driver designed to finish installing the patch. 3 Choose the printer and the printer driver for USB, ... in your computer: a Click Computer, and then double-click (C:). To install the Microsoft QFE Patch and extract the driver: 1 Insert the installation software CD, and then click Cancel when the Setup Wizard appears. 2 Click ΠComputer. 3 Double-click the CD-ROM drive icon, and then...
User's Guide
Page 32
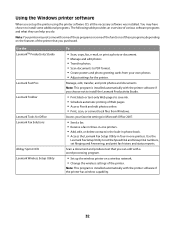
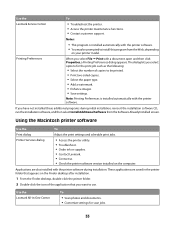
...to PDF format. • Create posters and photo greeting cards from Windows. Use the LexmarkTM Productivity Studio Lexmark Fast Pics Lexmark Toolbar Lexmark Tools for Office Lexmark Fax Solutions Abbyy Sprint OCR Lexmark Wireless Setup Utility To • Scan, copy, fax, e-mail, or print a photo or document... automatically with a word-processing program. • Set up the printer using the printer software CD, all the necessary software was installed. You may not come with the printer software if you can help you set Ringing and Answering, and print fax history and status ...
...to PDF format. • Create posters and photo greeting cards from Windows. Use the LexmarkTM Productivity Studio Lexmark Fast Pics Lexmark Toolbar Lexmark Tools for Office Lexmark Fax Solutions Abbyy Sprint OCR Lexmark Wireless Setup Utility To • Scan, copy, fax, e-mail, or print a photo or document... automatically with a word-processing program. • Set up the printer using the printer software CD, all the necessary software was installed. You may not come with the printer software if you can help you set Ringing and Answering, and print fax history and status ...
User's Guide
Page 33
... on the computer. Using the Macintosh printer software Use the Print dialog Printer Services dialog To Adjust the print settings and schedule print jobs. • Access the printer utility. • Troubleshoot. • Order ink or supplies. • Contact Lexmark. • Contact us. • Check the printer software version installed on your printer model.
... on the computer. Using the Macintosh printer software Use the Print dialog Printer Services dialog To Adjust the print settings and schedule print jobs. • Access the printer utility. • Troubleshoot. • Order ink or supplies. • Contact Lexmark. • Contact us. • Check the printer software version installed on your printer model.
User's Guide
Page 34
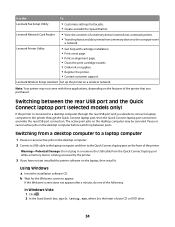
... to the computer over a network. b Wait for fax jobs. • Create and edit the Speed Dial list. Use the To Lexmark Fax Setup Utility • Customize settings for the Welcome screen to appear. Lexmark Wireless Setup Assistant Set up the printer on the features of the printer that you purchased... port (selected models only) If the printer is connected to a desktop computer through the rear USB port and you have not yet installed the printer software on the front of the following: In Windows Vista 1 Click . 2 In the Start Search box, type D:\setup.exe, where D is being accessed ...
... to the computer over a network. b Wait for fax jobs. • Create and edit the Speed Dial list. Use the To Lexmark Fax Setup Utility • Customize settings for the Welcome screen to appear. Lexmark Wireless Setup Assistant Set up the printer on the features of the printer that you purchased... port (selected models only) If the printer is connected to a desktop computer through the rear USB port and you have not yet installed the printer software on the front of the following: In Windows Vista 1 Click . 2 In the Start Search box, type D:\setup.exe, where D is being accessed ...

User's Guide
Page 35
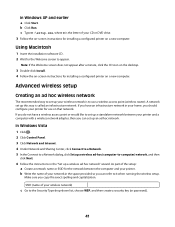
In Windows XP and earlier 1 Click Start. 2 Click Run. 3 Type D:\setup.exe, where D is the letter of your CD or DVD drive. c Follow the instructions on the computer screen. 35 d Follow the instructions on the computer screen. Note: If the Welcome screen does not appear after a minute, then click the CD icon on the desktop. Using Macintosh a Insert the installation software CD. b Wait for the Welcome screen to appear. c Double-click Install.
In Windows XP and earlier 1 Click Start. 2 Click Run. 3 Type D:\setup.exe, where D is the letter of your CD or DVD drive. c Follow the instructions on the computer screen. 35 d Follow the instructions on the computer screen. Note: If the Welcome screen does not appear after a minute, then click the CD icon on the desktop. Using Macintosh a Insert the installation software CD. b Wait for the Welcome screen to appear. c Double-click Install.
User's Guide
Page 37
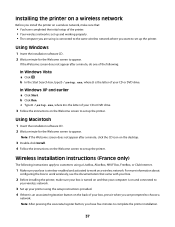
...1 Make sure your CD or DVD drive. 3 Follow the instructions on the Welcome screen to choose a network. Using Macintosh 1 Insert the installation software CD. 2 Wait a minute for the Welcome screen to complete the printer installation. 37 For more information about configuring the box to work wirelessly, ... Vista a Click . b In the Start Search box, type D:\setup.exe, where D is set up the printer. Using Windows 1 Insert the installation software CD. 2 Wait a minute for the Welcome screen to set up the printer. If the Welcome screen does not appear after a minute, click the CD...
...1 Make sure your CD or DVD drive. 3 Follow the instructions on the Welcome screen to choose a network. Using Macintosh 1 Insert the installation software CD. 2 Wait a minute for the Welcome screen to complete the printer installation. 37 For more information about configuring the box to work wirelessly, ... Vista a Click . b In the Start Search box, type D:\setup.exe, where D is set up the printer. Using Windows 1 Insert the installation software CD. 2 Wait a minute for the Welcome screen to set up the printer. If the Welcome screen does not appear after a minute, click the CD...

User's Guide
Page 39
..., and then select the printer program folder from the list. 3 Click Tools Œ Lexmark Wireless Setup Utility. Using Macintosh 1 From the Finder desktop, double-click the printer folder. 2 Double-click Lexmark Wireless Setup Assistant. 3 Follow the instructions on , the internal print server in this menu...Note: If the cable is not already connected, you have already configured the printer for use on the computer screen to reinstall the software, and then make the changes that is trying to your wireless network. • Blinking green indicates that the printer is available only ...
..., and then select the printer program folder from the list. 3 Click Tools Œ Lexmark Wireless Setup Utility. Using Macintosh 1 From the Finder desktop, double-click the printer folder. 2 Double-click Lexmark Wireless Setup Assistant. 3 Follow the instructions on , the internal print server in this menu...Note: If the cable is not already connected, you have already configured the printer for use on the computer screen to reinstall the software, and then make the changes that is trying to your wireless network. • Blinking green indicates that the printer is available only ...
User's Guide
Page 40
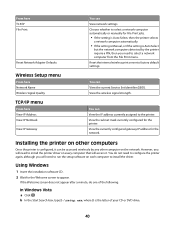
... require a PIN, then you will need to install the printer driver on every computer that will need to run the setup software on the network. Using Windows 1 Insert the installation software CD. 2 Wait for File Print jobs. • If the setting is Auto Select, then the printer selects a network computer automatically. •...
... require a PIN, then you will need to install the printer driver on every computer that will need to run the setup software on the network. Using Windows 1 Insert the installation software CD. 2 Wait for File Print jobs. • If the setting is Auto Select, then the printer selects a network computer automatically. •...
User's Guide
Page 41
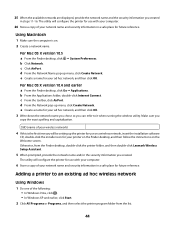
Using Macintosh 1 Insert the installation software CD. 2 Wait for the Welcome screen to use on a new computer. Advanced wireless setup Creating an ad hoc wireless network The recommended way to set ...
Using Macintosh 1 Insert the installation software CD. 2 Wait for the Welcome screen to use on a new computer. Advanced wireless setup Creating an ad hoc wireless network The recommended way to set ...

User's Guide
Page 42
...range of an ad hoc network is the first time you will enable the ad hoc network for use on a wireless network, insert the installation software CD, and then follow the instructions on a keyboard. Make sure you . b Click All Programs. c Select the printer program folder, and then ...click Tools ΠLexmark Wireless Setup Utility. 9 When the available networks are displayed, provide the network name and the security information you can refer to it when running the...
...range of an ad hoc network is the first time you will enable the ad hoc network for use on a wireless network, insert the installation software CD, and then follow the instructions on a keyboard. Make sure you . b Click All Programs. c Select the printer program folder, and then ...click Tools ΠLexmark Wireless Setup Utility. 9 When the available networks are displayed, provide the network name and the security information you can refer to it when running the...

User's Guide
Page 43
... first time you can refer to it when running the wireless setup. Note: Security is provided for use on a wireless network, insert the installation software CD, and then follow the instructions on the status of an infrastructure network, making it when running the wireless utility. b Click All Programs or ...hoc networks. wireless access points are not used.. 22 Click OK twice to delete the network from the list, and then click Tools ΠLexmark Wireless Setup Utility. 43 To check on the Welcome screen. The range of an ad hoc network is much less than the range of your...
... first time you can refer to it when running the wireless setup. Note: Security is provided for use on a wireless network, insert the installation software CD, and then follow the instructions on the status of an infrastructure network, making it when running the wireless utility. b Click All Programs or ...hoc networks. wireless access points are not used.. 22 Click OK twice to delete the network from the list, and then click Tools ΠLexmark Wireless Setup Utility. 43 To check on the Welcome screen. The range of an ad hoc network is much less than the range of your...
User's Guide
Page 44
... Click All Programs or Programs, and then select the printer program folder from the Finder desktop, double-click the printer folder, and then double-click Lexmark Wireless Setup Assistant. 5 When prompted, provide the network name and/or the security information you copy the exact spelling and capitalization. The utility will .... Using Macintosh 1 Make sure the computer is the first time you will configure the printer for use on a wireless network, insert the installation software CD, double-click the installer icon for your wireless network) 4 If this is on the Welcome screen.
... Click All Programs or Programs, and then select the printer program folder from the Finder desktop, double-click the printer folder, and then double-click Lexmark Wireless Setup Assistant. 5 When prompted, provide the network name and/or the security information you copy the exact spelling and capitalization. The utility will .... Using Macintosh 1 Make sure the computer is the first time you will configure the printer for use on a wireless network, insert the installation software CD, double-click the installer icon for your wireless network) 4 If this is on the Welcome screen.
User's Guide
Page 49
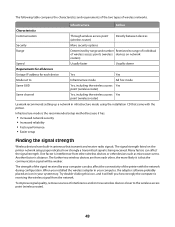
...SSID Same channel Yes, including the wireless access Yes point (wireless router) Yes, including the wireless access Yes point (wireless router) Lexmark recommends setting up a network in your computer can affect the signal strength. The strength of the signal received by range and number ...Wireless devices have built-in antennas that the communication signal will tell you installed the wireless adapter in your computer, the adapter software probably placed an icon in infrastructure mode using the installation CD that came with the network during configuration. Try double-clicking this...
...SSID Same channel Yes, including the wireless access Yes point (wireless router) Yes, including the wireless access Yes point (wireless router) Lexmark recommends setting up a network in your computer can affect the signal strength. The strength of the signal received by range and number ...Wireless devices have built-in antennas that the communication signal will tell you installed the wireless adapter in your computer, the adapter software probably placed an icon in infrastructure mode using the installation CD that came with the network during configuration. Try double-clicking this...


