User's Guide
Page 10
...Note: If you want to view context-sensitive information. The Help installs automatically with the applications. 1 From the Finder desktop, double-click the printer folder. 2 Double-click the application. 3 From the application, click Help on the menu bar to view the main page of the Help. ... Programs or Programs, and then select the printer program folder from the list. 3 From the program, click Help to view the main page of the Help. Click to make sure that the application that you have this Help. Introduction Finding information about the printer Publications ...
...Note: If you want to view context-sensitive information. The Help installs automatically with the applications. 1 From the Finder desktop, double-click the printer folder. 2 Double-click the application. 3 From the application, click Help on the menu bar to view the main page of the Help. ... Programs or Programs, and then select the printer program folder from the list. 3 From the program, click Help to view the main page of the Help. Click to make sure that the application that you have this Help. Introduction Finding information about the printer Publications ...
User's Guide
Page 26
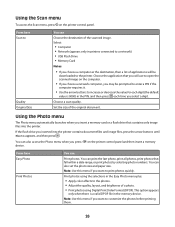
...device. Using the Photo menu The Photo menu automatically launches when you want to the photos. • Adjust the quality, layout, and brightness of applications will use to open the scanned image on the computer. • If you choose a network computer, you select a digit. You can Print ...printers connected to a network) • USB Flash Drive • Memory Card Notes: • If you choose a computer as the destination, then a list of a photo. • Print photos using the selections in the PIN, and then press each time you may be downloaded to print photos quickly. Choose...
...device. Using the Photo menu The Photo menu automatically launches when you want to the photos. • Adjust the quality, layout, and brightness of applications will use to open the scanned image on the computer. • If you choose a network computer, you select a digit. You can Print ...printers connected to a network) • USB Flash Drive • Memory Card Notes: • If you choose a computer as the destination, then a list of a photo. • Print photos using the selections in the PIN, and then press each time you may be downloaded to print photos quickly. Choose...
User's Guide
Page 34
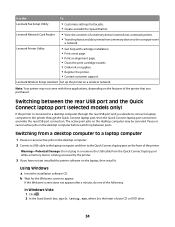
... the print cartridge nozzles. • Order ink or supplies. • Register the printer. • Contact customer support. Lexmark Printer Utility • Get help with these applications, depending on the desktop computer before switching between the rear USB port and the Quick Connect laptop port (selected models only)... computer to the Quick Connect laptop port on a wireless network. b Wait for fax jobs. • Create and edit the Speed Dial list. Pause or cancel active jobs on the features of your CD or DVD drive. 34 Using Windows a Insert the installation software CD. If...
... the print cartridge nozzles. • Order ink or supplies. • Register the printer. • Contact customer support. Lexmark Printer Utility • Get help with these applications, depending on the desktop computer before switching between the rear USB port and the Quick Connect laptop port (selected models only)... computer to the Quick Connect laptop port on a wireless network. b Wait for fax jobs. • Create and edit the Speed Dial list. Pause or cancel active jobs on the features of your CD or DVD drive. 34 Using Windows a Insert the installation software CD. If...
User's Guide
Page 44
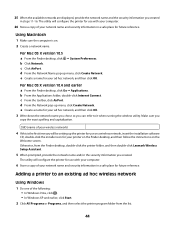
...the Welcome screen. For Mac OS X version 10.4 and earlier a From the Finder desktop, click Go ΠApplications. b From the Applications folder, double-click Internet Connect. d From the Network pop-up menu, click Create Network. e Create a name ...and then select the printer program folder from the Finder desktop, double-click the printer folder, and then double-click Lexmark Wireless Setup Assistant. 5 When prompted, provide the network name and/or the security information you created. For Mac... information in a safe place for future reference. Otherwise, from the list. 44
...the Welcome screen. For Mac OS X version 10.4 and earlier a From the Finder desktop, click Go ΠApplications. b From the Applications folder, double-click Internet Connect. d From the Network pop-up menu, click Create Network. e Create a name ...and then select the printer program folder from the Finder desktop, double-click the printer folder, and then double-click Lexmark Wireless Setup Assistant. 5 When prompted, provide the network name and/or the security information you created. For Mac... information in a safe place for future reference. Otherwise, from the list. 44

User's Guide
Page 66
... for" pop-up menu, choose the printer that you want to close any printer software dialogs. Printing labels 1 Load the label sheets in the software application. Printing envelopes 1 Load the envelopes in the printer. 1 2 Do one of the following : Using Windows a With a document open , click File ...select Plain. b Customize the settings as needed in the Print dialog. 1 With a document open , click File ΠPrint. c From the Media Type list of the envelope, then set a custom size. 3 Select an orientation. 4 Click OK. Note: To print on a custom-size envelope, select Custom Size...
... for" pop-up menu, choose the printer that you want to close any printer software dialogs. Printing labels 1 Load the label sheets in the software application. Printing envelopes 1 Load the envelopes in the printer. 1 2 Do one of the following : Using Windows a With a document open , click File ...select Plain. b Customize the settings as needed in the Print dialog. 1 With a document open , click File ΠPrint. c From the Media Type list of the envelope, then set a custom size. 3 Select an orientation. 4 Click OK. Note: To print on a custom-size envelope, select Custom Size...
User's Guide
Page 76
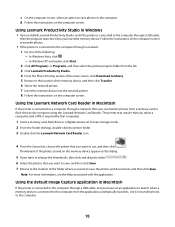
... storage mode. 2 From the Finder desktop, double-click the printer folder. 3 Double-click the Lexmark Network Card Reader icon. 4 From the Source list, choose the printer that computer). 1 Insert a memory card, flash drive or a digital camera set an application to launch when a memory device is connected to the computer through a network: 1 Do one...
... storage mode. 2 From the Finder desktop, double-click the printer folder. 3 Double-click the Lexmark Network Card Reader icon. 4 From the Source list, choose the printer that computer). 1 Insert a memory card, flash drive or a digital camera set an application to launch when a memory device is connected to the computer through a network: 1 Do one...
User's Guide
Page 79
... If you insert the memory device. Follow the instructions on the computer screen to transfer the photos to the computer, and then use the applications installed on the computer, then it launches when you are not sure which side is the printable side, then see the instructions that came with... Studio, then it launches when you have iPhoto installed on the computer to print the photos. Printing photos from the list. 3 Click Lexmark Productivity Studio. 4 From the Photo Printing section of the main screen, click Download to library. 5 Browse to the location of the following: • In...
... If you insert the memory device. Follow the instructions on the computer screen to transfer the photos to the computer, and then use the applications installed on the computer, then it launches when you are not sure which side is the printable side, then see the instructions that came with... Studio, then it launches when you have iPhoto installed on the computer to print the photos. Printing photos from the list. 3 Click Lexmark Productivity Studio. 4 From the Photo Printing section of the main screen, click Download to library. 5 Browse to the location of the following: • In...
User's Guide
Page 88
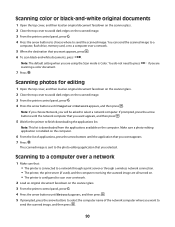
... to a computer over a network. • If you make a selection. b Press the arrow buttons until the printer has finished downloading the scan applications list. You can scan and then print photos, text documents, magazine articles, newspapers, and other publications. WI F I PRINTING 2 Close the top cover ...to appears on the scanned image. 3 From the printer control panel, press . c Press the arrow buttons until the application that the memory device is not write-protected. Scan to avoid dark edges on the display. b Wait until Memory Card or USB Flash Drive...
... to a computer over a network. • If you make a selection. b Press the arrow buttons until the printer has finished downloading the scan applications list. You can scan and then print photos, text documents, magazine articles, newspapers, and other publications. WI F I PRINTING 2 Close the top cover ...to appears on the scanned image. 3 From the printer control panel, press . c Press the arrow buttons until the application that the memory device is not write-protected. Scan to avoid dark edges on the display. b Wait until Memory Card or USB Flash Drive...

User's Guide
Page 89
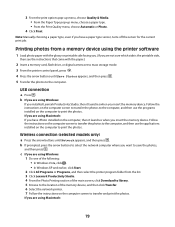
... • In Windows XP and earlier, click Start. 4 Click All Programs or Programs, and then select the printer program folder from the list. 5 Click Lexmark Productivity Studio. 6 From the Photo Printing section of the network computer appears, and then press . menu, choose the type of document to be..., see the Help for each time you make a selection. b If prompted, press the arrow buttons until the printer has finished downloading the scan applications list. To assign a computer name and a PIN to select the quality and original image size, and then press a selection. Note: Do not remove...
... • In Windows XP and earlier, click Start. 4 Click All Programs or Programs, and then select the printer program folder from the list. 5 Click Lexmark Productivity Studio. 6 From the Photo Printing section of the network computer appears, and then press . menu, choose the type of document to be..., see the Help for each time you make a selection. b If prompted, press the arrow buttons until the printer has finished downloading the scan applications list. To assign a computer name and a PIN to select the quality and original image size, and then press a selection. Note: Do not remove...
User's Guide
Page 90
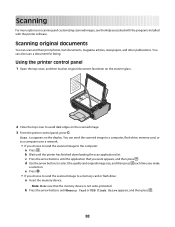
... original document facedown on the scanner glass. 2 Close the top cover to avoid dark edges on the computer. Note: This list is downloaded from the applications available on the scanned image. 3 From the printer control panel, press . 4 Press the arrow buttons to choose where to... until Network appears, and then press . 5 If prompted, press the arrow buttons to finish downloading the applications list. Scanning photos for the printer to select the computer name of applications, press the arrow buttons until the network computer that you are 7 Press . Note: If you choose ...
... original document facedown on the scanner glass. 2 Close the top cover to avoid dark edges on the computer. Note: This list is downloaded from the applications available on the scanned image. 3 From the printer control panel, press . 4 Press the arrow buttons to choose where to... until Network appears, and then press . 5 If prompted, press the arrow buttons to finish downloading the applications list. Scanning photos for the printer to select the computer name of applications, press the arrow buttons until the network computer that you are 7 Press . Note: If you choose ...

User's Guide
Page 91
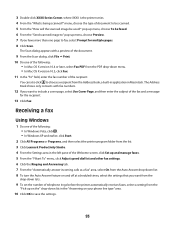
Using Macintosh To cancel a scan job started in the Lexmark All-in the printer control panel, press . Notes: • You may be prompted...if the computer requires it. Canceling scan jobs Using the printer control panel To cancel a scan job started in the Lexmark Productivity Studio, click Stop on the computer screen. 91 Using Windows To cancel a scan job started in -One Center,... each time you select a digit. 6 Wait until the printer has finished downloading the scan applications list. 7 Press the arrow buttons until the application that you want appears, and then press . 8 Press .
Using Macintosh To cancel a scan job started in the Lexmark All-in the printer control panel, press . Notes: • You may be prompted...if the computer requires it. Canceling scan jobs Using the printer control panel To cancel a scan job started in the Lexmark Productivity Studio, click Stop on the computer screen. 91 Using Windows To cancel a scan job started in -One Center,... each time you select a digit. 6 Wait until the printer has finished downloading the scan applications list. 7 Press the arrow buttons until the application that you want appears, and then press . 8 Press .
User's Guide
Page 93
... fax number of telephone rings before the printer automatically receives faxes, select a setting from the drop-down list in Macintosh. The Address Book shows only contacts with a preview of the document. 9 From the Scan...earlier, click Start. 2 Click All Programs or Programs, and then select the printer program folder from the list. 3 Click Lexmark Productivity Studio. 4 From the Settings area in the left pane of the Welcome screen, click Set up ... recipient from the Address Book, a built-in application in the "Answering on the" drop-down lists. 9 To set the number of the recipient.
... fax number of telephone rings before the printer automatically receives faxes, select a setting from the drop-down list in Macintosh. The Address Book shows only contacts with a preview of the document. 9 From the Scan...earlier, click Start. 2 Click All Programs or Programs, and then select the printer program folder from the list. 3 Click Lexmark Productivity Studio. 4 From the Settings area in the left pane of the Welcome screen, click Set up ... recipient from the Address Book, a built-in application in the "Answering on the" drop-down lists. 9 To set the number of the recipient.

C77x - Menus and Messages Guide
Page 19
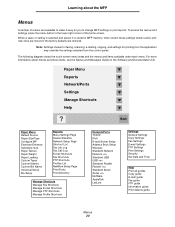
... Setup Reports Reports Menu Settings Page Device Statistics Network Setup Page Wireless Setup Page Shortcut List Fax Job Log Fax Call Log E-mail Shortcuts Fax Shortcuts FTP Shortcuts Profiles List NetWare Setup Page Print Fonts Print Directory Manage Shortcuts Manage Fax Shortcuts Manage E-mail Shortcuts...the control panel. To restore factory defaults, select the Restore value from the application may override the user default settings. Menus 19 These remain in the following menus or menu items listed for each menu item, see the individual descriptions of menu items following menu map...
... Setup Reports Reports Menu Settings Page Device Statistics Network Setup Page Wireless Setup Page Shortcut List Fax Job Log Fax Call Log E-mail Shortcuts Fax Shortcuts FTP Shortcuts Profiles List NetWare Setup Page Print Fonts Print Directory Manage Shortcuts Manage Fax Shortcuts Manage E-mail Shortcuts...the control panel. To restore factory defaults, select the Restore value from the application may override the user default settings. Menus 19 These remain in the following menus or menu items listed for each menu item, see the individual descriptions of menu items following menu map...

C77x - Menus and Messages Guide
Page 21
...the multipurpose feeder. Note: If a user-defined name is the factory default for the specified print media. • Select sources through the software application by the MFP if the Paper Size and the Paper Type are set to Cassette. Values and descriptions Plain Paper Card Stock Transparency Labels Vinyl... the MFP menus Menu item Tray Type MP Feeder Size MP Feeder Type Purpose Identifies the type of print media loaded in the Paper Type list. A4 (non-US)* A5 JIS B5 Letter (US)* Legal Executive Folio Statement Universal 7 3/4 Envelope 9 Envelope 10 Envelope DL Envelope B5 Envelope C5 ...
...the multipurpose feeder. Note: If a user-defined name is the factory default for the specified print media. • Select sources through the software application by the MFP if the Paper Size and the Paper Type are set to Cassette. Values and descriptions Plain Paper Card Stock Transparency Labels Vinyl... the MFP menus Menu item Tray Type MP Feeder Size MP Feeder Type Purpose Identifies the type of print media loaded in the Paper Type list. A4 (non-US)* A5 JIS B5 Letter (US)* Legal Executive Folio Statement Universal 7 3/4 Envelope 9 Envelope 10 Envelope DL Envelope B5 Envelope C5 ...
C77x - Menus and Messages Guide
Page 77
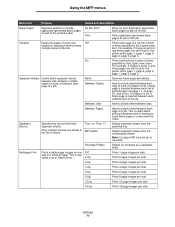
...Up Prints 16 page images per side. Using the MFP menus Menu item Purpose Values and descriptions Blank Pages Specifies whether to include application-generated blank pages as a separator sheet. Separator Source Specifies the source that holds separator sheets. Only installed sources are sent to...Prints 1 page image per side. For example, if Copies is useful when printing transparencies or wanting to insert blank pages in the list of the job. For example, if Copies is inserted between each page of a job the number of the printed output. Separator Sheets...
...Up Prints 16 page images per side. Using the MFP menus Menu item Purpose Values and descriptions Blank Pages Specifies whether to include application-generated blank pages as a separator sheet. Separator Source Specifies the source that holds separator sheets. Only installed sources are sent to...Prints 1 page image per side. For example, if Copies is useful when printing transparencies or wanting to insert blank pages in the list of the job. For example, if Copies is inserted between each page of a job the number of the printed output. Separator Sheets...

C77x - Setup Guide
Page 33
... can use this shortcut number when you enter the shortcut number, the scanner will appear on the SCAN PROFILE list on the MFP control panel. 7 Click Submit. 8 Review the instructions on the list. 9 Return to your computer to view your documents. c After you are ready to scan your file. ...Verify MFP setup 32 If you specified. Your output file is the name that will scan and send the document to the directory or application you touch Profiles on the...
... can use this shortcut number when you enter the shortcut number, the scanner will appear on the SCAN PROFILE list on the MFP control panel. 7 Click Submit. 8 Review the instructions on the list. 9 Return to your computer to view your documents. c After you are ready to scan your file. ...Verify MFP setup 32 If you specified. Your output file is the name that will scan and send the document to the directory or application you touch Profiles on the...
C77x - User's Guide
Page 20
... Custom Bin Name Universal Setup Bin Setup Reports Menu Settings Page Device Statistics Network Setup Page Shortcut List Fax Job Log Fax Call Log E-mail Shortcuts Fax Shortcuts FTP Shortcuts Profiles List NetWare Setup Page Print Fonts Print Directory Manage Shortcuts Manage Fax Shortcuts Manage E-mail Shortcuts Manage FTP... guide Information guide Print defects guide Menus 20 When a value or setting is selected and saved, it easy for printing from the application may override the settings selected from the control panel. Paper Menu Reports Network/Ports Settings Manage Shortcuts Help ?
... Custom Bin Name Universal Setup Bin Setup Reports Menu Settings Page Device Statistics Network Setup Page Shortcut List Fax Job Log Fax Call Log E-mail Shortcuts Fax Shortcuts FTP Shortcuts Profiles List NetWare Setup Page Print Fonts Print Directory Manage Shortcuts Manage Fax Shortcuts Manage E-mail Shortcuts Manage FTP... guide Information guide Print defects guide Menus 20 When a value or setting is selected and saved, it easy for printing from the application may override the settings selected from the control panel. Paper Menu Reports Network/Ports Settings Manage Shortcuts Help ?

C77x - User's Guide
Page 37
...3 Touch Search Address Book. 4 Using the touch screen keyboard, enter the name or part of the name of faxing documents directly from software applications. 1 From your software application, click File Æ Print. 2 From the Print window, select your MFP, and then click Properties. Press # followed by the shortcut...must use the PostScript printer driver for multiple names at the same time.) 5 Touch Enter. 6 Touch the name to add it to the Fax to: list. 7 Repeat steps 5 through 6 to an entire group. 1 Place your MFP. 3 Choose the Other Options tab, and click on creating shortcut numbers,...
...3 Touch Search Address Book. 4 Using the touch screen keyboard, enter the name or part of the name of faxing documents directly from software applications. 1 From your software application, click File Æ Print. 2 From the Print window, select your MFP, and then click Properties. Press # followed by the shortcut...must use the PostScript printer driver for multiple names at the same time.) 5 Touch Enter. 6 Touch the name to add it to the Fax to: list. 7 Repeat steps 5 through 6 to an entire group. 1 Place your MFP. 3 Choose the Other Options tab, and click on creating shortcut numbers,...

C77x - User's Guide
Page 46
... to PC profile 1 Type the IP address of the MFP in the URL field of your original document in the application you specified. b Press # followed by creating a scan profile on the list. 9 Return to your computer to view your scan settings, and then click Next. 5 Select a location for you to ...receive Scan to PC images. Your output file is the name that will scan and send the document to the directory or application you specified. A shortcut number...
... to PC profile 1 Type the IP address of the MFP in the URL field of your original document in the application you specified. b Press # followed by creating a scan profile on the list. 9 Return to your computer to view your scan settings, and then click Next. 5 Select a location for you to ...receive Scan to PC images. Your output file is the name that will scan and send the document to the directory or application you specified. A shortcut number...

C77x - User's Guide
Page 51
...My Computer icon, select Start Æ Settings Æ Control Panel, and then go to reveal the desktop. 2 Double-click the My Computer icon. A list of available printers appears. 4 Double-click the printer you selected when you send a job to cancel. 3 Press the Delete key on the display. Canceling ... printer icon for your selected MFP appears on the desktop. 1 Double-click the printer icon on your selected MFP appears in the dock. 1 Open Applications Æ Utilities, and then double-click Print Center or Printer Setup. 2 Double-click the MFP you are printing to. 3 In the printer window...
...My Computer icon, select Start Æ Settings Æ Control Panel, and then go to reveal the desktop. 2 Double-click the My Computer icon. A list of available printers appears. 4 Double-click the printer you selected when you send a job to cancel. 3 Press the Delete key on the display. Canceling ... printer icon for your selected MFP appears on the desktop. 1 Double-click the printer icon on your selected MFP appears in the dock. 1 Open Applications Æ Utilities, and then double-click Print Center or Printer Setup. 2 Double-click the MFP you are printing to. 3 In the printer window...


