User's Guide
Page 5
... Sleep Mode. The total printer energy usage is available are substantially used for loss of each mode in order to the Remarketer or Lexmark, or ship it was originally purchased for your area contact Lexmark on the date of original purchase as fuser units, transfer belts, and...came with the printer shall end earlier if it was intended. You may be required to the Remarketer or the Lexmark designated location. For further explanation of time, called Power Saver. If you present for the Lexmark E240/240n. For products no longer covered by a Lexmark warranty, technical ...
... Sleep Mode. The total printer energy usage is available are substantially used for loss of each mode in order to the Remarketer or Lexmark, or ship it was originally purchased for your area contact Lexmark on the date of original purchase as fuser units, transfer belts, and...came with the printer shall end earlier if it was intended. You may be required to the Remarketer or the Lexmark designated location. For further explanation of time, called Power Saver. If you present for the Lexmark E240/240n. For products no longer covered by a Lexmark warranty, technical ...
User's Guide
Page 35
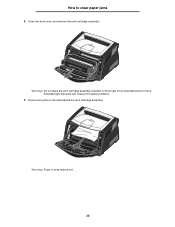
Extended light exposure can cause print quality problems. 3 Remove any jams in the area behind the print cartridge assembly. Warning: Fuser or area may be hot. 35 Warning: Do not leave the print cartridge assembly exposed to clear paper jams 2 Open the front cover, and remove the print cartridge assembly. How to direct light for an extended period of time.
Extended light exposure can cause print quality problems. 3 Remove any jams in the area behind the print cartridge assembly. Warning: Fuser or area may be hot. 35 Warning: Do not leave the print cartridge assembly exposed to clear paper jams 2 Open the front cover, and remove the print cartridge assembly. How to direct light for an extended period of time.

User's Guide
Page 36
... another use. Therefore, a jammed page may or may not be hot. 6 After you have cleared the jams, reinstall the print cartridge assembly, make sure all printer covers and trays are closed, and then press Continue to resume printing. How to clear paper jams 4 Lift the flap at the front of a page... may be re-used after the page is printed but before it has successfully exited the printer if that holds the image of the printer, and remove any jams beneath the flap. 5 Open the rear exit, and remove any jams. Warning...
... another use. Therefore, a jammed page may or may not be hot. 6 After you have cleared the jams, reinstall the print cartridge assembly, make sure all printer covers and trays are closed, and then press Continue to resume printing. How to clear paper jams 4 Lift the flap at the front of a page... may be re-used after the page is printed but before it has successfully exited the printer if that holds the image of the printer, and remove any jams beneath the flap. 5 Open the rear exit, and remove any jams. Warning...
User's Guide
Page 101
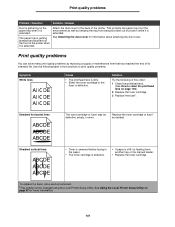
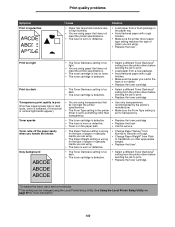
... printhead lens. (See How to the back of the printer when it is getting bumped and pushed out the front of the printer. Streaked horizontal lines ABCDE ABCDE ABCDE The toner cartridge or fuser may be changed using the Local Printer Setup Utility. Streaked vertical lines ABCDE ABCDE ABCDE •...as well as needed. See Attaching the dust cover for more information. 101 See Using the Local Printer Setup Utility on page 105.) 2 Replace the toner cartridge. 3 Replace the fuser*. This protects the paper tray from being knocked out of its intended life. The paper tray is...
... printhead lens. (See How to the back of the printer when it is getting bumped and pushed out the front of the printer. Streaked horizontal lines ABCDE ABCDE ABCDE The toner cartridge or fuser may be changed using the Local Printer Setup Utility. Streaked vertical lines ABCDE ABCDE ABCDE •...as well as needed. See Attaching the dust cover for more information. 101 See Using the Local Printer Setup Utility on page 105.) 2 Replace the toner cartridge. 3 Replace the fuser*. This protects the paper tray from being knocked out of its intended life. The paper tray is...
User's Guide
Page 102
...has absorbed moisture due to high humidity. • You are using paper that does not meet the printer specifications. • The fuser is defective. • Replace the toner cartridge. • Replace the fuser*. • Call for service. • Change Paper Texture† from Normal to Smooth or Rough....sure the Form Type setting is set to print. • Replace the toner cartridge. *To replace the fuser, call a service technician. †This setting can be changed using the Local Printer Setup Utility. Solution • Load paper from a fresh package in the paper tray. • Avoid ...
...has absorbed moisture due to high humidity. • You are using paper that does not meet the printer specifications. • The fuser is defective. • Replace the toner cartridge. • Replace the fuser*. • Call for service. • Change Paper Texture† from Normal to Smooth or Rough....sure the Form Type setting is set to print. • Replace the toner cartridge. *To replace the fuser, call a service technician. †This setting can be changed using the Local Printer Setup Utility. Solution • Load paper from a fresh package in the paper tray. • Avoid ...
User's Guide
Page 103
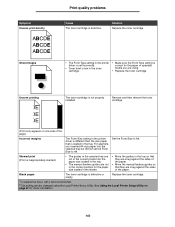
...Images Print quality problems Cause The toner cartridge is defective or empty. Solution Replace the toner cartridge. • The Form Type setting in the printer driver is loaded in the tray so that they are snug against the sides of the paper. For example, you are snug against the ... of the paper. • Move the manual feeders guides so that is set the Form Size to A4. Replace the toner cartridge. *To replace the fuser, call a service technician. †This setting can be changed using . • Replace the toner cartridge. Uneven printing DE DE DE The toner cartridge...
...Images Print quality problems Cause The toner cartridge is defective or empty. Solution Replace the toner cartridge. • The Form Type setting in the printer driver is loaded in the tray so that they are snug against the sides of the paper. For example, you are snug against the ... of the paper. • Move the manual feeders guides so that is set the Form Size to A4. Replace the toner cartridge. *To replace the fuser, call a service technician. †This setting can be changed using . • Replace the toner cartridge. Uneven printing DE DE DE The toner cartridge...
User's Guide
Page 104
... for Change Paper Weight† to the bin the type of paper or specialty media you are using. *To replace the fuser, call a service technician. †This setting can be changed using the Local Printer Setup Utility. Paper curls badly once it prints and The Paper Weight setting is defective. • Your...
... for Change Paper Weight† to the bin the type of paper or specialty media you are using. *To replace the fuser, call a service technician. †This setting can be changed using the Local Printer Setup Utility. Paper curls badly once it prints and The Paper Weight setting is defective. • Your...


