
User's Guide (7.1 MB)
Page 4
... Support in Various Environments 37 MarkVision Online Help 46 Toolkit 46 Network Printer Utility 47 Getting Updated Drivers and Utilities 47 Online Services 47 Automated FAX System 48 Using Your Printer Using the Operator Panel and Menus 51 Power Indicator Light 52 Operator Panel Buttons 53 Printer ...Messages 54 Using the Operator Panel to Change Printer Settings 55 Example of Printing the Menu Settings 57 Operator...
... Support in Various Environments 37 MarkVision Online Help 46 Toolkit 46 Network Printer Utility 47 Getting Updated Drivers and Utilities 47 Online Services 47 Automated FAX System 48 Using Your Printer Using the Operator Panel and Menus 51 Power Indicator Light 52 Operator Panel Buttons 53 Printer ...Messages 54 Using the Operator Panel to Change Printer Settings 55 Example of Printing the Menu Settings 57 Operator...
User's Guide (7.1 MB)
Page 17
...colored circle labels • Left front corner on top of the support unit • Left rear corner on top of the feeder • Left front corner on top of the unit • Left front face of options and the printer. The illustrations also aid you look at these pages, see ..."Unpacking the Printer" on page 5 to start the setup of your printer. See the table below for the location of the Optra™ S 1255, Optra S 1625, Optra S 1855, and Optra S 2455. The options are labeled with a ...
...colored circle labels • Left front corner on top of the support unit • Left rear corner on top of the feeder • Left front corner on top of the unit • Left front face of options and the printer. The illustrations also aid you look at these pages, see ..."Unpacking the Printer" on page 5 to start the setup of your printer. See the table below for the location of the Optra™ S 1255, Optra S 1625, Optra S 1855, and Optra S 2455. The options are labeled with a ...
User's Guide (7.1 MB)
Page 23
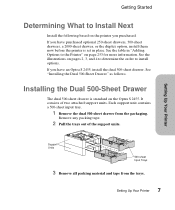
... purchased. If you have an Optra S 2455, install the dual 500-sheet drawer. If you have purchased optional 250-sheet drawers, 500-sheet drawers, a 2000-sheet drawer, or the duplex option, install them now before the printer is standard on page 253 for more information. Each support unit contains a 500-sheet input tray...
... purchased. If you have an Optra S 2455, install the dual 500-sheet drawer. If you have purchased optional 250-sheet drawers, 500-sheet drawers, a 2000-sheet drawer, or the duplex option, install them now before the printer is standard on page 253 for more information. Each support unit contains a 500-sheet input tray...
User's Guide (7.1 MB)
Page 25
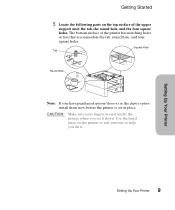
... matching holes or feet that accommodate the tab, round hole, and four square holes. Getting Started 5 Locate the following parts on the printer or ask someone to help you lift it down. Square Hole Tab Round Hole Note: If you set in place. CAUTION: Make sure your fingers ...are not under the printer when you have purchased optional drawers or the duplex option, install them now before the printer is set it . The bottom surface of the upper support unit: the tab, the round hole, and the four square holes. Setting Up...
... matching holes or feet that accommodate the tab, round hole, and four square holes. Getting Started 5 Locate the following parts on the printer or ask someone to help you lift it down. Square Hole Tab Round Hole Note: If you set in place. CAUTION: Make sure your fingers ...are not under the printer when you have purchased optional drawers or the duplex option, install them now before the printer is set it . The bottom surface of the upper support unit: the tab, the round hole, and the four square holes. Setting Up...

User's Guide (7.1 MB)
Page 26
Hand Grip Support Unit 10 Setting Up Your Printer Setting Up Your Printer Getting Started 6 Lift and place the printer on top of the printer and the support unit are aligned so all the parts fit. Be sure the edges of the support unit. The right side of the printer is aligned with the option.
Hand Grip Support Unit 10 Setting Up Your Printer Setting Up Your Printer Getting Started 6 Lift and place the printer on top of the printer and the support unit are aligned so all the parts fit. Be sure the edges of the support unit. The right side of the printer is aligned with the option.
User's Guide (7.1 MB)
Page 27
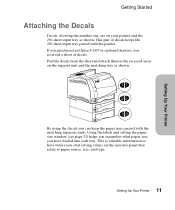
... from the sheet and attach them to paper source, size, and type. 11 Setting Up Your Printer Setting Up Your Printer Getting Started Attaching the Decals Decals, showing the number one, are on the support unit and the matching tray as shown. Using the labels and setting the paper size window (see... 23) helps you remember what paper size you can keep the paper trays paired with the printer. This pair of decals. This is valuable information to have loaded into each tray. If you purchased an Optra S 2455 or optional drawers, you start setting values on the operator panel that relate to...
... from the sheet and attach them to paper source, size, and type. 11 Setting Up Your Printer Setting Up Your Printer Getting Started Attaching the Decals Decals, showing the number one, are on the support unit and the matching tray as shown. Using the labels and setting the paper size window (see... 23) helps you remember what paper size you can keep the paper trays paired with the printer. This pair of decals. This is valuable information to have loaded into each tray. If you purchased an Optra S 2455 or optional drawers, you start setting values on the operator panel that relate to...
User's Guide (7.1 MB)
Page 40
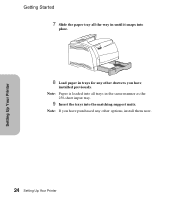
Setting Up Your Printer Getting Started 7 Slide the paper tray all trays in trays for any other options, install them now. 24 Setting Up Your Printer Note: Paper is loaded into all the way in until it snaps into place. 8 Load paper in the same manner as the 250-sheet input tray. 9 Insert the trays into the matching support units. Note: If you have purchased any other drawers you have installed previously.
Setting Up Your Printer Getting Started 7 Slide the paper tray all trays in trays for any other options, install them now. 24 Setting Up Your Printer Note: Paper is loaded into all the way in until it snaps into place. 8 Load paper in the same manner as the 250-sheet input tray. 9 Insert the trays into the matching support units. Note: If you have purchased any other drawers you have installed previously.

User's Guide (7.1 MB)
Page 49
... table defines which workstation operating systems can support MarkVision in various network environments. Depending on the CD. Using the Printer Utilities Getting Started MarkVision for network support. See page 47 for more information about the Network Printer Utility. system 95 NT 4.0 3.1x Warp2...included on your network configuration, all of the utilities necessary to support clients using Windows operating systems, select "Server and Workstation Utilities" from the Install window when running the Network Printer Utility. 4 Requires a 32-bit Requester from Novell. 5 ...
... table defines which workstation operating systems can support MarkVision in various network environments. Depending on the CD. Using the Printer Utilities Getting Started MarkVision for network support. See page 47 for more information about the Network Printer Utility. system 95 NT 4.0 3.1x Warp2...included on your network configuration, all of the utilities necessary to support clients using Windows operating systems, select "Server and Workstation Utilities" from the Install window when running the Network Printer Utility. 4 Requires a 32-bit Requester from Novell. 5 ...
User's Guide (7.1 MB)
Page 51
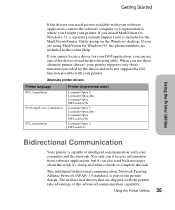
... for Windows 3.1, a separate Lexmark Support icon is part of intelligent communication with your printer. When you use one of this advanced communication capability. 35 Using the Printer Utilities If you install MarkVision for Windows 95, the phone numbers are included in preferred order) Lexmark Optra S Lexmark Optra plus Lexmark Optra HP LaserJet 5Si Lexmark Optra S Lexmark Optra plus Lexmark Optra HP LaserJet 5Si Lexmark Optra S HP LaserJet 5 Bidirectional...
... for Windows 3.1, a separate Lexmark Support icon is part of intelligent communication with your printer. When you use one of this advanced communication capability. 35 Using the Printer Utilities If you install MarkVision for Windows 95, the phone numbers are included in preferred order) Lexmark Optra S Lexmark Optra plus Lexmark Optra HP LaserJet 5Si Lexmark Optra S Lexmark Optra plus Lexmark Optra HP LaserJet 5Si Lexmark Optra S HP LaserJet 5 Bidirectional...

User's Guide (7.1 MB)
Page 53
... Utilities" on page 47. 37 Using the Printer Utilities Scroll through the online Help included with your printer. Lexmark is continually updating printer utilities to determine the features available in Various Environments Refer to the following MarkVision support table to provide you bought the printer for UNIX Networks from Lexmark. To get information about its various features...
... Utilities" on page 47. 37 Using the Printer Utilities Scroll through the online Help included with your printer. Lexmark is continually updating printer utilities to determine the features available in Various Environments Refer to the following MarkVision support table to provide you bought the printer for UNIX Networks from Lexmark. To get information about its various features...

User's Guide (7.1 MB)
Page 54
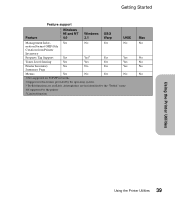
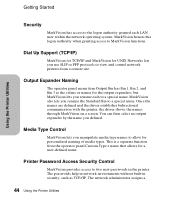
... Yes Drag-and-drop printing No through MarkVision Yes Yes No Yes5 No No Dynamic Data Exchange No (DDE) Printer Access Security Yes Yes No No Yes5 Yes Yes Dial up support Yes Yes No Yes (TCP/IP) Output Expander Yes Naming Yes Yes No Media Type Control Yes Yes Yes...this feature provided by the operating system. 3 Toolkit functions are available, although they are not identified by the "Toolkit" name. 4 If supported by the printer 5 Limited function 38 Using the Printer Utilities Mac Yes Yes Yes No Yes 3 Yes Yes No Yes Yes No Yes No No No No No No No Yes
... Yes Drag-and-drop printing No through MarkVision Yes Yes No Yes5 No No Dynamic Data Exchange No (DDE) Printer Access Security Yes Yes No No Yes5 Yes Yes Dial up support Yes Yes No Yes (TCP/IP) Output Expander Yes Naming Yes Yes No Media Type Control Yes Yes Yes...this feature provided by the operating system. 3 Toolkit functions are available, although they are not identified by the "Toolkit" name. 4 If supported by the printer 5 Limited function 38 Using the Printer Utilities Mac Yes Yes Yes No Yes 3 Yes Yes No Yes Yes No Yes No No No No No No No Yes
User's Guide (7.1 MB)
Page 55
... No Yes No Yes5 Yes Yes Toner Level Sensing Yes Yes Yes Yes Printer Inventory Yes Summary Page No Yes Yes Menus Yes No Yes No 1 Not supported for TCP/IP networks. 2 Support for this feature provided by the operating system. 3 Toolkit functions are available..., although they are not identified by the "Toolkit" name. 4 If supported by the printer 5 Limited function Mac No No No No No Using the Printer Utilities 39 Using the Printer Utilities Getting Started Feature support Feature Windows 95 and NT 4.0 Windows OS/2 3.1 Warp UNIX Management Infor-
... No Yes No Yes5 Yes Yes Toner Level Sensing Yes Yes Yes Yes Printer Inventory Yes Summary Page No Yes Yes Menus Yes No Yes No 1 Not supported for TCP/IP networks. 2 Support for this feature provided by the operating system. 3 Toolkit functions are available..., although they are not identified by the "Toolkit" name. 4 If supported by the printer 5 Limited function Mac No No No No No Using the Printer Utilities 39 Using the Printer Utilities Getting Started Feature support Feature Windows 95 and NT 4.0 Windows OS/2 3.1 Warp UNIX Management Infor-
User's Guide (7.1 MB)
Page 60
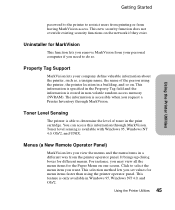
...output expanders, but MarkVision lets you rename each LAN user within the network operating system. MarkVision also lets you defined. Dial Up Support (TCP/IP) MarkVision for TCP/IP and MarkVision for UNIX Networks lets you manipulate media type names to allow for a user-defined... name. The network administrator assigns a 44 Using the Printer Utilities Using the Printer Utilities Getting Started Security MarkVision has access to the logon authority granted each to a special name. This is a separate function from...
...output expanders, but MarkVision lets you rename each LAN user within the network operating system. MarkVision also lets you defined. Dial Up Support (TCP/IP) MarkVision for TCP/IP and MarkVision for UNIX Networks lets you manipulate media type names to allow for a user-defined... name. The network administrator assigns a 44 Using the Printer Utilities Using the Printer Utilities Getting Started Security MarkVision has access to the logon authority granted each to a special name. This is a separate function from...
User's Guide (7.1 MB)
Page 61
...volatile random access memory (NVRAM). Click to restrict users from printing or from the printer operator panel. This feature is available with Windows 95, Windows NT 4.0, OS/2, and UNIX. Property Tag Support MarkVision lets your personal computer if you need to determine the level of the ...person using the printer operator panel. For instance, you set values for MarkVision This function lets you remove ...
...volatile random access memory (NVRAM). Click to restrict users from printing or from the printer operator panel. This feature is available with Windows 95, Windows NT 4.0, OS/2, and UNIX. Property Tag Support MarkVision lets your personal computer if you need to determine the level of the ...person using the printer operator panel. For instance, you set values for MarkVision This function lets you remove ...

User's Guide (7.1 MB)
Page 63
... (driver files are a number of technical support resources. Getting Updated Drivers and Utilities There are located at /pub/driver) • World Wide Web (WWW): http://www.lexmark.com • CompuServe: go lexmark 47 Using the Printer Utilities MarkVision for a listing of ways you can download printer drivers from Lexmark 24 hours a day, 7 days a week. Online Services...
... (driver files are a number of technical support resources. Getting Updated Drivers and Utilities There are located at /pub/driver) • World Wide Web (WWW): http://www.lexmark.com • CompuServe: go lexmark 47 Using the Printer Utilities MarkVision for a listing of ways you can download printer drivers from Lexmark 24 hours a day, 7 days a week. Online Services...
User's Guide (7.1 MB)
Page 85
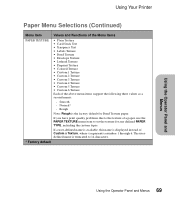
... TYPE, including the custom types. If a user-defined name is available, this name is truncated to set the texture for Bond Texture paper. Using Your Printer Paper Menu Selections (Continued) Menu Item Values and Functions of the Menu Items PAPER TEXTURE • Plain Texture • Card Stock Text • Trnsprncy Text... Using the Operator Panel and Menus 69 Using the Operator Panel and Menus Normal* - The userdefined name is displayed instead of the above menu items support the following three values as a second menu: -
... TYPE, including the custom types. If a user-defined name is available, this name is truncated to set the texture for Bond Texture paper. Using Your Printer Paper Menu Selections (Continued) Menu Item Values and Functions of the Menu Items PAPER TEXTURE • Plain Texture • Card Stock Text • Trnsprncy Text... Using the Operator Panel and Menus 69 Using the Operator Panel and Menus Normal* - The userdefined name is displayed instead of the above menu items support the following three values as a second menu: -

User's Guide (7.1 MB)
Page 86
Heavy Use the PAPER WEIGHT menu item to 14 characters. Using Your Printer Paper Menu Selections (Continued) Menu Item Values and Functions of the Menu Items PAPER WEIGHT • Plain Weight • CardStock Weight • Trnsprncy Weight • ... default Using the Operator Panel and Menus 70 Using the Operator Panel and Menus The userdefined name is displayed instead of the above menu items support the following three values as a second menu: - Normal* - Light -
Heavy Use the PAPER WEIGHT menu item to 14 characters. Using Your Printer Paper Menu Selections (Continued) Menu Item Values and Functions of the Menu Items PAPER WEIGHT • Plain Weight • CardStock Weight • Trnsprncy Weight • ... default Using the Operator Panel and Menus 70 Using the Operator Panel and Menus The userdefined name is displayed instead of the above menu items support the following three values as a second menu: - Normal* - Light -
User's Guide (7.1 MB)
Page 112
... lines of the operator panel. The printer displays the symbol set ID and symbol set name. 10U PC-8* (Country specific) 12U PC-850* (Country specific) A symbol set is PORTRAIT orientation. The printer displays only the symbol sets supported for scientific text. This is Landscape... means the printing is parallel to the short edge of the paper. Symbol sets support the different requirements for languages or specific applications, such as...
... lines of the operator panel. The printer displays the symbol set ID and symbol set name. 10U PC-8* (Country specific) 12U PC-850* (Country specific) A symbol set is PORTRAIT orientation. The printer displays only the symbol sets supported for scientific text. This is Landscape... means the printing is parallel to the short edge of the paper. Symbol sets support the different requirements for languages or specific applications, such as...

User's Guide (7.1 MB)
Page 114
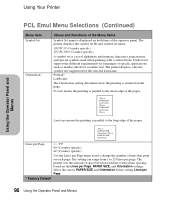
... or applications that use the factory default paper source assignments. Using the Operator Panel and Menus Using Your Printer PCL Emul Menu Selections (Continued) Menu Item Values and Functions of the above menu items supports the following three values: - None Only installed paper sources are displayed on available paper sources for more...
... or applications that use the factory default paper source assignments. Using the Operator Panel and Menus Using Your Printer PCL Emul Menu Selections (Continued) Menu Item Values and Functions of the above menu items supports the following three values: - None Only installed paper sources are displayed on available paper sources for more...

User's Guide (7.1 MB)
Page 124
... more data. Refer to the serial port if the handshaking protocol uses XON/XOFF pacing. Using the Operator Panel and Menus Using Your Printer Serial Menu Selections (Continued) Menu Item Values and Functions of the Menu Items Serial Protocol DTR* (hardware handshaking) DTR/DSR (hardware ... If you use a serial interface, you can select the rate at which data is being sent to or from your computer. The printer supports hardware handshaking, software handshaking, and combined hardware and software handshaking as no data is received across the serial port in the preceding list...
... more data. Refer to the serial port if the handshaking protocol uses XON/XOFF pacing. Using the Operator Panel and Menus Using Your Printer Serial Menu Selections (Continued) Menu Item Values and Functions of the Menu Items Serial Protocol DTR* (hardware handshaking) DTR/DSR (hardware ... If you use a serial interface, you can select the rate at which data is being sent to or from your computer. The printer supports hardware handshaking, software handshaking, and combined hardware and software handshaking as no data is received across the serial port in the preceding list...


