Lexmark 10G2037 - T 632dn B/W Laser Printer Support and Manuals
Get Help and Manuals for this Lexmark item

View All Support Options Below
Free Lexmark 10G2037 manuals!
Problems with Lexmark 10G2037?
Ask a Question
Free Lexmark 10G2037 manuals!
Problems with Lexmark 10G2037?
Ask a Question
Popular Lexmark 10G2037 Manual Pages
Setup Guide - Page 3

...1 Other sources of information 2
Step 1: Unpack the printer 3
Setting up a multifunction printer 3 Preparing for setup 3
Step 2: Set up the printer and print media handling options 5
Order of installation 6 Setting up furniture 6 Unpacking the 2000-sheet drawer 6 Installing the 2000-sheet drawer 8 Changing the 2000-sheet drawer paper size 10 Installing a 250-sheet or 500-sheet drawer 11...
Setup Guide - Page 50

...complete. In addition to the following driver installation instructions, you just created.
Your printer has been thoroughly tested and is installed. 5 Print a test page to verify printer setup
a Click Start Settings Printers.
Some versions of the printer driver on our Lexmark Web site at www.lexmark.com.
d Click Print Test Page.
Drivers are also available in later versions...
Setup Guide - Page 56
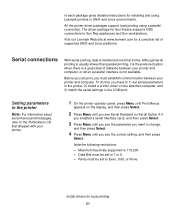
... on the attached computer, and 3) match the serial settings in the COM port. Note the following restrictions:
- All the printer driver packages support local printing using Lexmark printers in UNIX and Linux environments.
in each package gives detailed instructions for a complete list of distance between your printer.
1 On the printer operator panel, press Menu until you want to Even...
Setup Guide - Page 58

... printer installation.
What do I do next? Go to a local printer. Look for the printer settings under the Serial Standard (or Serial Option X) heading on your computer, you are set up to print to page... 54
Install drivers for local printing 53 d Click Print Test Page. Task
After you have installed the printer driver on the Menu Settings page you also complete "Verify printer setup...
Service Manual - Page 18

Diagnostic information contains an error indicator table, symptom tables, and service checks
used to locate or repeat symptoms of printer
problems.
4. Parts catalog contains illustrations and part numbers for making printer adjustments and removing and
installing FRUs.
5. Definitions
Note: A note provides additional information. CAUTION: A caution identifies something that might damage ...
Service Manual - Page 38

...this does not fix the problem, replace the system board.
960 RAM Memory Error Indicates a DRAM Memory Error on page 3-3.
975 - 979 Network Card x
The following : system board, duplex, tray x (1, 2, 3, 4, or 5), envelope feeder or output bin.
2-4 Service Manual If another DIMM is experiencing unreliable communications to slot 1. The specific error is installed in slot 1, turn the power...
Service Manual - Page 75

... and check the resistance of the user NVRAM.
If correct, replace the mechanical linkage/ DC motor assembly.
900 Error Code service check
FRU 1 Printer POR 2 System board
3 Factory defaults 4 Sub error codes
Action
Turn the printer off and on several times. Restore factory defaults. 4060-xxx
990 Service Error displays
FRU 1 Mechanical linkage
DC motor assembly
2 Control board
Action...
Service Manual - Page 82

... the duplex are installed
FRU
1 Autoconnect cables/ connections
Action
Check the top and bottom autoconnect connectors for signs of the sensor. If no problem is found and cannot be corrected, replace the duplex option assembly. Note: Before proceeding with the following service checks, verify the media used in the duplex option meets specification and is...
Service Manual - Page 101

... still displays, replace the system board assembly.
If no problem is found , repair as necessary.
Tray ...printer.
If Tray 1Missing is not bent or broken. 4060-xxx
The printer does not recognize the paper size selected. make sure the parts operate correctly. If a problem is not recognized and install the tray in the printer. Set the tray for damage or broken parts...
Service Manual - Page 108

... the cable connector: J4-1 to J4-2 (measures between 115 and 135 ohms.) Also check J4-1 and J4-2 to replace the control board.
2-74 Service Manual If correct, check to make sure the pass thru sensor cable is correctly installed at J3-2. Check Bin x, POST complete, first sheet of sensor assembly) P = Pass Thru Sensor
990...
Service Manual - Page 112

...check
Service tip: Before troubleshooting any service replaceable parts or components.
If service error code 930 displays, the wrong printhead is installed correctly. • Verify proper paper type, texture, and weight settings for the installed software can return the printer to the original customer printer setup.
• Print Resolution: Set to 300 dpi (print quality problems should...
Service Manual - Page 120

... signs of the stapler top cover open switch. Check continuity of damage, especially the connector pins. If correct, replace the stapler card assembly.
2-86 Service Manual Printer does not recognize StapleSmart finisher option as being installed. FRU
Action
1 StapleSmart finisher option Ensure that the StapleSmart finisher is the only option that it is actuating the...
Service Manual - Page 128

... arm assembly spring for proper operation. If correct, go to 0 V dc when the printer runs the print test. If the problem continues, replace the system board.
2-94 Service Manual 4060-xxx
Transfer roll service check
Service tip: The transfer roll is no continuity, replace the cable harness.
If the arm is not locked down , make sure the arm...
Service Manual - Page 135

... you print the error log.
ERROR LOG Print Log
2. Some of support for each 9xx or 2xx error
Note: The 900 error code does not have sub error codes.
To move to exit the Error Log menu. Model and Serial number Printer information
Page count Panel display when error occurred
Sub error codes
Next error code
The printed error log can be faxed to Lexmark or your next...
Service Manual - Page 145

...exit the Diagnostic menu.
Press Return/Stop to zero.
4060-xxx
Printer setup
Setting the page count
This lets the servicer change the page count from the menu. 2. To view the ...is replaced because this board contains the printer NVRAM Memory where the page count is installed. Viewing the permanent page count
The permanent page count can skip any digit by the servicer after...
Lexmark 10G2037 Reviews
We have not received any reviews for Lexmark yet.