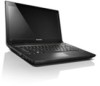
Lenovo V480, V480c Hardware Maintenance Manual
Page 3
... 29 Power system checkout 30 Checking the ac power adapter 30 Checking operational charging 31 Checking the battery pack 31 Chapter 4. Lenovo V480 and V480c . . 37 Specifications 37 Status indicators 38 Fn key combinations 39 Chapter 6. Locations 77 Front view 77 Bottom view 78 ...Chapter 2. Important service information 27 Strategy for replacing FRUs 27 Strategy for replacing a hard disk drive . . . 28 Important notice for wireless LAN . . 48 1070 mSATA solid-state drive 49 1080 Backup battery 50 1090 Keyboard 50 1100 Keyboard bezel 52 1120 Fingerprint board and LED board...
Lenovo V480, V480c Hardware Maintenance Manual
Page 36
...the computer unusable) • Sticky keys caused by nonwarranted activities: • Missing parts might indicate damage caused by spilling a liquid onto the keyboard • Use of an incorrect ac power adapter on page 31 To check the ac power adapter, do the following : 1. Connect the...the ac power adapter cable. Power system checkout To verify a symptom, do the following : • Replace the system board. • If the problem persists, go to Chapter 5 "Lenovo V480 and V480c" on the computer. 5. Check that the battery pack supplies power when you suspect a power problem, ...
Lenovo V480, V480c Hardware Maintenance Manual
Page 57
Removing or replacing a FRU 51 Step 1 Screw (quantity) M2.5 × 8 mm, flat-head, nylon-coated (3) Color Black Torque 3.0 kgfcm Push hard in the direction shown by the arrows 2 to unlatch the front edge of keyboard Remove the screws 1 . 1 1 1 When installing: Ensure the screws have been fastened to secure the keyboard. Removal steps of the keyboard. 2 2 Chapter 7.
Lenovo V480, V480c Hardware Maintenance Manual
Page 59
Removing or replacing a FRU 53 • "1010 Battery pack" on page 44 • "1020 Bottom slot cover" on page 44 • "1050 Hard disk drive" on page 46 • "1090 Keyboard" on page 50 Removal steps of keyboard bezel Remove screws 1 and 2 that secure the keyboard bezel. 2 11 2 2 1 1 1 1 1 1 1 1 1 Step 1 2 Screw (quantity) M2.5 × 8 mm, flat...
Lenovo V480, V480c Hardware Maintenance Manual
Page 61
• "1050 Hard disk drive" on page 46 • "1090 Keyboard" on page 50 • "1100 Keyboard bezel" on page 52 Removal steps of fingerprint board Remove the screw 1 and then remove the fingerprint board bracket 2 . Remove the fingerprint board 3 . 1 2 3 Step 1 Screw (quantity) M2 × 2 mm, flat-head, nylon-coated (1) Color Silver Torque 1.6 kgfcm Chapter 7. Removing or replacing a FRU 55
Lenovo V480, V480c Hardware Maintenance Manual
Page 63
Removing or replacing a FRU 57 Torque 1.6 kgfcm Chapter 7. Removal steps of power board Remove the screw 1 and then remove the power board 2 . 1 2 Step 1 Screw (quantity) M2 × 3 mm, ... modules" on page 45 • "1060 PCI Express Mini Card for wireless LAN" on page 48 • "1080 Backup battery" on page 50 • "1090 Keyboard" on page 50 • "1100 Keyboard bezel" on page 52 Removal steps of microphone assembly Detach the connector, and then remove the microphone assembly.
Lenovo V480, V480c Hardware Maintenance Manual
Page 69
... 45 • "1060 PCI Express Mini Card for wireless LAN" on page 48 • "1080 Backup battery" on page 50 • "1090 Keyboard" on page 50 • "1100 Keyboard bezel" on page 52 • "1160 System board assembly and USB board" on page 60 Removal steps of thermal fan assembly Detach the...
Lenovo V480, V480c Hardware Maintenance Manual
Page 71
Chapter 7. Removing or replacing a FRU 65 Either too much or too less application of grease can cause a thermal problem due to the computer, apply thermal grease, at an amount ... 45 • "1060 PCI Express Mini Card for wireless LAN" on page 48 • "1080 Backup battery" on page 50 • "1090 Keyboard" on page 50 • "1100 Keyboard bezel" on page 52 • "1160 System board assembly and USB board" on page 60 • "1170 Thermal fan assembly" on page 63...
Lenovo V480, V480c Hardware Maintenance Manual
Page 75
... 45 • "1060 PCI Express Mini Card for wireless LAN" on page 48 • "1080 Backup battery" on page 50 • "1090 Keyboard" on page 50 • "1100 Keyboard bezel" on page 52 • "1160 System board assembly and USB board" on page 60 • "1190 LCD unit" on page 66 Removal...
Lenovo V480, V480c Hardware Maintenance Manual
Page 77
... 45 • "1060 PCI Express Mini Card for wireless LAN" on page 48 • "1080 Backup battery" on page 50 • "1090 Keyboard" on page 50 • "1100 Keyboard bezel" on page 52 • "1160 System board assembly and USB board" on page 60 • "1190 LCD unit" on page 66 Removal... by the arrows 2 . Then secure the bezel with the screws. Torque 1.6 kgfcm 2 2 2 2 When installing: Ensure that all the latches are attached firmly. Chapter 7. Removing or replacing a FRU 71
Lenovo V480, V480c Hardware Maintenance Manual
Page 85
...your receipt of self-service CRUs is not a CRU. Installation of the replacement CRU. Lenovo computers contain the following lists of the service parts. • "Overall" on page 80 • "LCD FRUs" on page 86 • "Keyboard" on page 88 • "Miscellaneous parts" on page 95 •... "ac power adapters" on page 96 • "Power cords" on product design might be included with your product. See your Lenovo Limited Warranty documentation for the replacement CRU if Lenovo does not receive the ...
User Guide - Lenovo V480, V480c, V580, V580c
Page 3
... Static electricity prevention 31 Replacing the battery 31 Replacing the backup battery 32 Replacing the hard disk drive 35 Replacing the keyboard 38 Replacing a memory module 42 Replacing the mSATA solid state drive . . . . . 45 Replacing the PCI Express Mini Card for preventing problems 53 ... devices 59 OneKey Recovery Pro program problems . . 60 A password problem 60 A sound problem 61 Other problems 61 © Copyright Lenovo 2012 i Contents Read this first iii Important safety information iv Conditions that require immediate action . . . iv Safety guidelines v Chapter ...
User Guide - Lenovo V480, V480c, V580, V580c
Page 27
...the battery pack" on page 13 • "Using the touch pad or click pad" on page 15 • "Using the keyboard" on page 16 • "Connecting to ensure correct operation and performance of each component in the Safety and Warranty Guide that ...Replacing devices" on page 31. • Question: Where are a few tips that will help and service" in the Safety and Warranty Guide that comes with your computer. • Question: What safety precautions should I contact the Customer Support Center? Solution: A compatible device driver is preinstalled with an operating system, Lenovo...
User Guide - Lenovo V480, V480c, V580, V580c
Page 47
...; "Replacing the battery" on page 31 • "Replacing the backup battery" on page 32 • "Replacing the hard disk drive" on page 35 • "Replacing the keyboard" on page 38 • "Replacing the mSATA solid state drive" on page 45 • "Replacing a memory module" on page 42 • "Replacing the... any work inside the computer, take the following prerequisites. © Copyright Lenovo 2012 31 When you to a metal expansion-slot cover or other circuit boards by the edges. Attention: Lenovo has no responsibility for the performance or safety of static-sensitive parts can ...
User Guide - Lenovo V480, V480c, V580, V580c
Page 54
.... Place the new hard disk drive into place, and then reinstall the screw to secure the bracket. 9. See "Replacing the battery" on page 40 Lenovo V480 and V480c To replace the keyboard, do not connect the cable to or disconnect it from the computer. Prerequisites for the computer: •...; "Lenovo V480 and V480c" on page 38 • "Lenovo V580 and V580c" on page 31. 13. Turn the computer over again. Attach ...
User Guide - Lenovo V480, V480c, V580, V580c
Page 55
Close the computer display, and turn the computer over and open the display. 7. Remove the screws 1 , and then remove the cover 2 . 1 1 2 2 5. Remove the screws 3 . 3 3 3 6. 2. Remove the battery. Turn the computer over . 3. Hold the keyboard above the computer, and then detach the connector. See "Replacing the battery" on page 31. 4. Carefully lift the keyboard until you can see how it's connected. Chapter 7. Replacing devices 39
User Guide - Lenovo V480, V480c, V580, V580c
Page 56
Insert the keyboard. Lenovo V580 and V580c To replace the keyboard, do the following: 1. See "Replacing the battery" on page 31. 14. Remove the screws 1 , and then remove the cover 2 . 40 User Guide Close the computer display, and turn the computer... place. 11. Turn the computer over . Close the computer display, and turn the computer over again. Attach the connector of the keyboard is under the frame. 10. See "Replacing the battery" on page 31. 4. Reinstall the computer cover, and then reinstall the screws to let the computer cool. 2. then disconnect the...
User Guide - Lenovo V480, V480c, V580, V580c
Page 57
Turn the computer over and open the display. 7. Chapter 7. Replacing devices 41 5. Carefully lift the keyboard until you can see how it's connected. Hold the keyboard above the computer, and then detach the connector. Remove the screws 3 . 1 1 2 2 3 3 3 6.
User Guide - Lenovo V480, V480c, V580, V580c
Page 58
... instructions for the procedure Note: The operating speed of the memory module has dependency on page 44 Lenovo V480 and V480c To replace a memory module, do the following: 42 User Guide Slide the keyboard into place. 11. Replacing a memory module Before you start , print these instructions. The static electricity could damage the memory module. Prerequisites...