
Hardware Maintenance Manual
Page 31
...enables you have created, do one of the UEFI diagnostic program is preinstalled on the computer. When the Boot Menu window opens, release the F12 key. 3. Follow the instructions on the screen to create a bootable diagnostic medium on internal storage devices. To use ... the bootable diagnostic medium on the screen to be performed. 7. When the ThinkPad logo is detected, information messages will be tested. 5. To create a bootable diagnostic medium, do the following : 1. Click Lenovo Bootable Diagnostics. 3. General checkout 25 Turn on the computer. Use the arrow...
...enables you have created, do one of the UEFI diagnostic program is preinstalled on the computer. When the Boot Menu window opens, release the F12 key. 3. Follow the instructions on the screen to create a bootable diagnostic medium on internal storage devices. To use ... the bootable diagnostic medium on the screen to be performed. 7. When the ThinkPad logo is detected, information messages will be tested. 5. To create a bootable diagnostic medium, do the following : 1. Click Lenovo Bootable Diagnostics. 3. General checkout 25 Turn on the computer. Use the arrow...

Hardware Maintenance Manual
Page 32
...code descriptions and troubleshooting hints. 3. When the Boot Menu window opens, release the F12 key. 4. Follow the instructions on page 26, and check the power sources. When the ThinkPad logo is displayed, repeatedly press and release the F12 key. Remove the battery pack. 3. Disconnect the ac ... cord of the ac power adapter for error code descriptions and troubleshooting hints. 2. 2. Turn on the computer. When the ThinkPad logo is displayed, repeatedly press and release the F12 key. Use the arrow keys to use the diagnostic program. • If you turn on the computer. 5....
...code descriptions and troubleshooting hints. 3. When the Boot Menu window opens, release the F12 key. 4. Follow the instructions on page 26, and check the power sources. When the ThinkPad logo is displayed, repeatedly press and release the F12 key. Remove the battery pack. 3. Disconnect the ac ... cord of the ac power adapter for error code descriptions and troubleshooting hints. 2. 2. Turn on the computer. When the ThinkPad logo is displayed, repeatedly press and release the F12 key. Use the arrow keys to use the diagnostic program. • If you turn on the computer. 5....
Hardware Maintenance Manual
Page 35
... such as the 1st Boot Device. 2. The length of DVDs to restore the computer to http://www.lenovo.com/serviceparts-lookup. If you must have an internal DVD drive, you hear repeating beeps, release the F1 key. Press and hold down the F1 key, and then turn on which discs to order... at the same time so that you want to the software that was preinstalled on http://www.lenovo.com/support. For information on the computer. Not all data on the screen to complete. The ThinkPad Setup program opens. c. Follow the instructions on the drive will be posted on the computer. If possible...
... such as the 1st Boot Device. 2. The length of DVDs to restore the computer to http://www.lenovo.com/serviceparts-lookup. If you must have an internal DVD drive, you hear repeating beeps, release the F1 key. Press and hold down the F1 key, and then turn on which discs to order... at the same time so that you want to the software that was preinstalled on http://www.lenovo.com/support. For information on the computer. Not all data on the screen to complete. The ThinkPad Setup program opens. c. Follow the instructions on the drive will be posted on the computer. If possible...

Hardware Maintenance Manual
Page 75
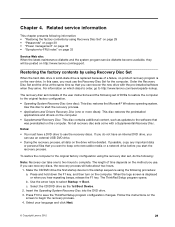
Removing or replacing a FRU 69 Step 3 Screw (quantity) M2 × 5 mm, wafer-head, nylon-coated (3) Color Black Torque 0.181 Nm (1.85 kgfcm) In step 7 , release the keyboard bezel assembly from the frame as shown in the following illustration using a plastic pry tool, and remove the keyboard bezel assembly in the ...
Removing or replacing a FRU 69 Step 3 Screw (quantity) M2 × 5 mm, wafer-head, nylon-coated (3) Color Black Torque 0.181 Nm (1.85 kgfcm) In step 7 , release the keyboard bezel assembly from the frame as shown in the following illustration using a plastic pry tool, and remove the keyboard bezel assembly in the ...
Hardware Maintenance Manual
Page 83
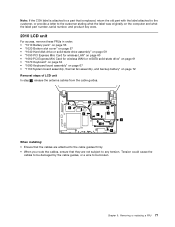
... assembly" on page 67 • "1130 System board assembly, thermal fan assembly, and backup battery" on page 72 Removal steps of LCD unit In step 1 , release the antenna cables from the cable guides. 1 1 1 1 1 1 1 1 1 1 When installing: • Ensure that the cables are attached to the cable guides firmly. • When you route...
... assembly" on page 67 • "1130 System board assembly, thermal fan assembly, and backup battery" on page 72 Removal steps of LCD unit In step 1 , release the antenna cables from the cable guides. 1 1 1 1 1 1 1 1 1 1 When installing: • Ensure that the cables are attached to the cable guides firmly. • When you route...

Hardware Maintenance Manual
Page 88
... assembly" on page 78 • "2030 LCD panel, LCD cable, and hinges" on page 79 Removal steps of antenna kit and LCD rear cover assembly Release the antenna cables from the cable guides on the LCD rear cover assembly. 1 1 1 1 4 2 2 2 2 4 4 4 3 3 82 Hardware Maintenance Manual
... assembly" on page 78 • "2030 LCD panel, LCD cable, and hinges" on page 79 Removal steps of antenna kit and LCD rear cover assembly Release the antenna cables from the cable guides on the LCD rear cover assembly. 1 1 1 1 4 2 2 2 2 4 4 4 3 3 82 Hardware Maintenance Manual

(English) User Guide
Page 35
... the sound entirely, or set the microphone to mute, press one of wireless features is displayed. To resume normal operation, press the Fn key only. Release both keys. You can quickly change the settings in wireless features. Function key combinations To use this key combination to put the computer into sleep...
... the sound entirely, or set the microphone to mute, press one of wireless features is displayed. To resume normal operation, press the Fn key only. Release both keys. You can quickly change the settings in wireless features. Function key combinations To use this key combination to put the computer into sleep...
(English) User Guide
Page 68
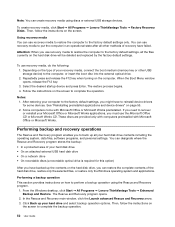
...to perform a backup operation using discs or external USB storage devices. The Rescue and Recovery program opens. 2. Repeatedly press and release the F12 key when turning on page 55. 2. Performing a backup operation This section provides instructions on the type of your ...Rescue and Recovery arrow. 3. To create recovery media, click Start ➙ All Programs ➙ Lenovo ThinkVantage Tools ➙ Factory Recovery Disks. When the Boot Menu window opens, release the F12 key. 3. Select the desired startup device and press Enter. See "Reinstalling preinstalled applications ...
...to perform a backup operation using discs or external USB storage devices. The Rescue and Recovery program opens. 2. Repeatedly press and release the F12 key when turning on page 55. 2. Performing a backup operation This section provides instructions on the type of your ...Rescue and Recovery arrow. 3. To create recovery media, click Start ➙ All Programs ➙ Lenovo ThinkVantage Tools ➙ Factory Recovery Disks. When the Boot Menu window opens, release the F12 key. 3. Select the desired startup device and press Enter. See "Reinstalling preinstalled applications ...

(English) User Guide
Page 69
From the Windows desktop, click Start ➙ All Programs ➙ Lenovo ThinkVantage Tools ➙ Enhanced Backup and Restore. Using the Rescue and Recovery workspace The Rescue and Recovery workspace resides in the recovery process. Make .... If you cannot start the Windows operating system. Because the Rescue and Recovery workspace operates independently from the Rescue and Recovery workspace, see a logo screen, release the F11 key. 3. When you can perform the following : 1. Note: If the Rescue and Recovery workspace fails to open, see "Solving recovery problems" on...
From the Windows desktop, click Start ➙ All Programs ➙ Lenovo ThinkVantage Tools ➙ Enhanced Backup and Restore. Using the Rescue and Recovery workspace The Rescue and Recovery workspace resides in the recovery process. Make .... If you cannot start the Windows operating system. Because the Rescue and Recovery workspace operates independently from the Rescue and Recovery workspace, see a logo screen, release the F11 key. 3. When you can perform the following : 1. Note: If the Rescue and Recovery workspace fails to open, see "Solving recovery problems" on...

(English) User Guide
Page 70
... provides instructions on the operating system. 2. From the Windows desktop, click Start ➙ All Programs ➙ Lenovo ThinkVantage Tools ➙ Enhanced Backup and Restore. Repeatedly press and release the F12 key when turning on page 55. 2. For more information about the features of the following: •... Rescue and Recovery Media window opens. 4. Using a rescue medium This section provides instructions on the screen. When the Boot Menu window opens, release the F12 key. 3. In the Boot Menu window, select the desired optical drive as a disc or a USB hard disk drive, you ...
... provides instructions on the operating system. 2. From the Windows desktop, click Start ➙ All Programs ➙ Lenovo ThinkVantage Tools ➙ Enhanced Backup and Restore. Repeatedly press and release the F12 key when turning on page 55. 2. For more information about the features of the following: •... Rescue and Recovery Media window opens. 4. Using a rescue medium This section provides instructions on the screen. When the Boot Menu window opens, release the F12 key. 3. In the Boot Menu window, select the desired optical drive as a disc or a USB hard disk drive, you ...

(English) User Guide
Page 71
... several subfolders named for a text file (a file with the extension .exe). Recovery overview 55 When the Boot Menu window opens, release the F12 key. 3. When the rescue medium starts, the Rescue and Recovery workspace opens. Reinstall device drivers only when it are ... from the device subfolder. • In the subfolder for the device, look for the various preinstalled applications. 4. Obtain them from Lenovo. Reinstalling preinstalled applications To reinstall selected application programs, do not download them from the Windows Update Web site. The text file contains ...
... several subfolders named for a text file (a file with the extension .exe). Recovery overview 55 When the Boot Menu window opens, release the F12 key. 3. When the rescue medium starts, the Rescue and Recovery workspace opens. Reinstall device drivers only when it are ... from the device subfolder. • In the subfolder for the device, look for the various preinstalled applications. 4. Obtain them from Lenovo. Reinstalling preinstalled applications To reinstall selected application programs, do not download them from the Windows Update Web site. The text file contains ...

(English) User Guide
Page 76
The SIM card ejects. Insert the SIM card firmly into position. 60 User Guide 5. Gently slide the SIM card out of the slot 2 . 6. Close the SIM card door until it . Push the SIM card inward 1 , and then release it snaps into the slot. 7.
The SIM card ejects. Insert the SIM card firmly into position. 60 User Guide 5. Gently slide the SIM card out of the slot 2 . 6. Close the SIM card door until it . Push the SIM card inward 1 , and then release it snaps into the slot. 7.

(English) User Guide
Page 115
... your battery is charged and that you can find your hard disk drive to improve data seek and read the device driver information release notes prior to look for compatibility or known issues. 11. Click Start ➙ Computer. 2. Use disk defragment tool regularly on other non...computer in front of the drive before you have the ac power connected. • Boot into ThinkPad Setup and load the default settings. • Restart the computer and start up your data at http://www.lenovo.com/support to keep your computer running smoothly. • "General tips for preventing problems" on...
... your battery is charged and that you can find your hard disk drive to improve data seek and read the device driver information release notes prior to look for compatibility or known issues. 11. Click Start ➙ Computer. 2. Use disk defragment tool regularly on other non...computer in front of the drive before you have the ac power connected. • Boot into ThinkPad Setup and load the default settings. • Restart the computer and start up your data at http://www.lenovo.com/support to keep your computer running smoothly. • "General tips for preventing problems" on...
