(English) Access Connections Profile Deployment guide
Page 13
...For example: C:\Drivers\W2k\Accon. 3. Click Start, and then click Run. 4. To install silently with customized setup script with default path for install log, type: \setup.exe -S-SMS-f2x c. The following instructions provide installation procedures for Windows Vista. To uninstall... interactively type, \setup.exe -0x9 anything b. This will uninstall Access Connections: a. Extract the Access Connections software package to your local directory. © Lenovo 2008. The following steps: a) ...
...For example: C:\Drivers\W2k\Accon. 3. Click Start, and then click Run. 4. To install silently with customized setup script with default path for install log, type: \setup.exe -S-SMS-f2x c. The following instructions provide installation procedures for Windows Vista. To uninstall... interactively type, \setup.exe -0x9 anything b. This will uninstall Access Connections: a. Extract the Access Connections software package to your local directory. © Lenovo 2008. The following steps: a) ...
(English) Access Connections Profile Deployment guide
Page 29
...integrated package as desired for client users, you can select import from the manage profiles window and manually import the package by providing the same passphrase at the prompt that was used...the Location Profiles that have Access Connections installed, complete the following steps: 1. For © Lenovo 2008. v Deploy Location Profiles and Client Policy on page 7 earlier. You can also ... the .loa file. 2. After restarting the system, Access Connection is C:\Program Files\ThinkPad\ConnectUtilities). 4. Create an Access Connections distribution package (*.loa and *.sig) with the ...
...integrated package as desired for client users, you can select import from the manage profiles window and manually import the package by providing the same passphrase at the prompt that was used...the Location Profiles that have Access Connections installed, complete the following steps: 1. For © Lenovo 2008. v Deploy Location Profiles and Client Policy on page 7 earlier. You can also ... the .loa file. 2. After restarting the system, Access Connection is C:\Program Files\ThinkPad\ConnectUtilities). 4. Create an Access Connections distribution package (*.loa and *.sig) with the ...
(Japanese) Power Manager Deployment Guide
Page 9
Windows XP、Windows Vista Windows 7 © Copyright Lenovo 2008, 2011 3 Power Manager C:¥Drivers¥Vista¥PWRMGRV 3 Windows XP cmd Windows Vista または Windows 7 cmd 4 Power Manager path>¥setup.exe -S -SMS Power Manager 1. Windows XP、Windows Vista Windows 7 2. 第 2 Power Manager .... Microsoft Web http://msdn.microsoft.com/en-us/netframework/default.aspx 注:Windows 2000 Power Manager Power Manager 1.48 Power Manager BIOS ThinkVantage TVT Power Manager Power Manager • BIOS 更...
Windows XP、Windows Vista Windows 7 © Copyright Lenovo 2008, 2011 3 Power Manager C:¥Drivers¥Vista¥PWRMGRV 3 Windows XP cmd Windows Vista または Windows 7 cmd 4 Power Manager path>¥setup.exe -S -SMS Power Manager 1. Windows XP、Windows Vista Windows 7 2. 第 2 Power Manager .... Microsoft Web http://msdn.microsoft.com/en-us/netframework/default.aspx 注:Windows 2000 Power Manager Power Manager 1.48 Power Manager BIOS ThinkVantage TVT Power Manager Power Manager • BIOS 更...
(Simplified Chinese) Power Manager Deployment Guide
Page 9
... 技术(TVT Power Manager Power Manager BIOS 更新 • ThinkPad Power Management Driver Access Connections™ 安装 Power Manager Power Manager 1. 启动 Windows XP、Windows Vista® 或 Windows 7 2. 将 Power Manager C:\Drivers\Vista\PWRMGRV 3 Windows XP cmd Windows Vista 或 Windows 7 cmd 4 Power Manager path>\setup.exe -S -SMS Power Manager 1. 启动...
... 技术(TVT Power Manager Power Manager BIOS 更新 • ThinkPad Power Management Driver Access Connections™ 安装 Power Manager Power Manager 1. 启动 Windows XP、Windows Vista® 或 Windows 7 2. 将 Power Manager C:\Drivers\Vista\PWRMGRV 3 Windows XP cmd Windows Vista 或 Windows 7 cmd 4 Power Manager path>\setup.exe -S -SMS Power Manager 1. 启动...
(English) Power Manager Deployment Guide
Page 9
...window. 4. Depending on the operating system, do one of the .NET Framework from the following : 1. All the necessary files will be extracted to the hard disk drive. Extract the Power Manager software package to the folder selected in Power Manager. • BIOS update • ThinkPad Power Management Driver • Hotkey driver...the full range of functions in step 3. © Copyright Lenovo 2008, 2011 3 The Ready to Install window, click Install. In the Ready to Install window opens. 3. Installation The following instructions provide installation procedures for ...
...window. 4. Depending on the operating system, do one of the .NET Framework from the following : 1. All the necessary files will be extracted to the hard disk drive. Extract the Power Manager software package to the folder selected in Power Manager. • BIOS update • ThinkPad Power Management Driver • Hotkey driver...the full range of functions in step 3. © Copyright Lenovo 2008, 2011 3 The Ready to Install window, click Install. In the Ready to Install window opens. 3. Installation The following instructions provide installation procedures for ...
(English) Lenovo AutoLock Deployment Guide
Page 11
... package to get the full range of functions in AutoLock have an integrated camera, the AutoLock installation process will be cancelled. Start the Microsoft® Windows® 7 operating system, and then log in AutoLock. Considerations for example: c:\swtools\readyapps\autolock 3. When a function is not supported on hardware, integrated ...client computer, the function is strongly recommended to the hard disk drive, for installing AutoLock Various functions in AutoLock. • BIOS update • Integrated camera driver • Hotkey driver © Copyright Lenovo 2011 3
... package to get the full range of functions in AutoLock have an integrated camera, the AutoLock installation process will be cancelled. Start the Microsoft® Windows® 7 operating system, and then log in AutoLock. Considerations for example: c:\swtools\readyapps\autolock 3. When a function is not supported on hardware, integrated ...client computer, the function is strongly recommended to the hard disk drive, for installing AutoLock Various functions in AutoLock. • BIOS update • Integrated camera driver • Hotkey driver © Copyright Lenovo 2011 3
ThinkPad GOBI Mobile Broadband User Guide
Page 7
...• Windows Vista® • Windows 7 Before you are ready to http://www.lenovo.com/support/wireless, and then follow the instructions on installing and configuring the wireless WAN adapter. Turn off the computer. 2. Download and install the device drivers for the wireless WAN adapter and the Lenovo® ...WAN adapter When installing or replacing the wireless WAN adapter, be sure to activate the wireless WAN adapter. Restart your ThinkPad computer. 3. b. Chapter 2. This chapter also provides instructions on installing the device drivers on the setup posters.
...• Windows Vista® • Windows 7 Before you are ready to http://www.lenovo.com/support/wireless, and then follow the instructions on installing and configuring the wireless WAN adapter. Turn off the computer. 2. Download and install the device drivers for the wireless WAN adapter and the Lenovo® ...WAN adapter When installing or replacing the wireless WAN adapter, be sure to activate the wireless WAN adapter. Restart your ThinkPad computer. 3. b. Chapter 2. This chapter also provides instructions on installing the device drivers on the setup posters.
Hardware Maintenance Manual
Page 47
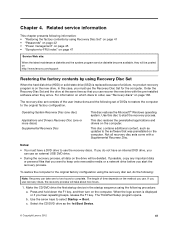
... take one or more discs) Supplemental Recovery Disc This disc restores the Microsoft® Windows operating system. Make the CD/DVD drive the first startup device in the startup sequence...is displayed or if you use recovery discs, the recovery process will be deleted. The ThinkPad Setup program opens. For information on which discs to the original factory configuration using the...additional content, such as the 1st Boot Device. © Copyright Lenovo 2012 41 c. This disc restores the preinstalled applications and drivers on page 166. Not all data on the method you start...
... take one or more discs) Supplemental Recovery Disc This disc restores the Microsoft® Windows operating system. Make the CD/DVD drive the first startup device in the startup sequence...is displayed or if you use recovery discs, the recovery process will be deleted. The ThinkPad Setup program opens. For information on which discs to the original factory configuration using the...additional content, such as the 1st Boot Device. © Copyright Lenovo 2012 41 c. This disc restores the preinstalled applications and drivers on page 166. Not all data on the method you start...
Hardware Maintenance Manual
Page 48
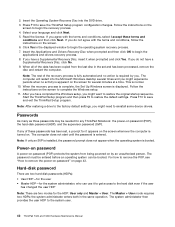
...agree with the terms and conditions, follow the instructions on the screen to the system user. 42 ThinkPad T420 and T420i Hardware Maintenance Manual If you might need to reinstall some device drivers. The computer does not start until the password is booted. Note: If only an SVP is ... being powered on . The computer will restart into the DVD drive. 3. Press F10 to restore the original startup sequence. After you have completed the Windows setup, you have a Supplemental Recovery Disc, click No. 9. Power-on password A power-on the screen for the HDP: User only and Master ...
...agree with the terms and conditions, follow the instructions on the screen to the system user. 42 ThinkPad T420 and T420i Hardware Maintenance Manual If you might need to reinstall some device drivers. The computer does not start until the password is booted. Note: If only an SVP is ... being powered on . The computer will restart into the DVD drive. 3. Press F10 to restore the original startup sequence. After you have completed the Windows setup, you have a Supplemental Recovery Disc, click No. 9. Power-on password A power-on the screen for the HDP: User only and Master ...

Hardware Maintenance Manual
Page 63
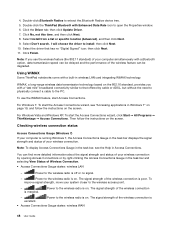
... external monitor (same image) • Computer display and external monitor (extended desktop function) • External monitor only © Copyright Lenovo 2012 57 Put the computer in Windows XP, power scheme) that has been created by Power Manager, or adjust the power level by using the slider control...selecting a power scheme appears. Notes: If you press Fn+F5, a list of the keys, ThinkPad PM device driver must be used to use this combination of wireless features is an Windows 7 model, it does not support presentation schemes, however the Fn+F7 combination might still be ...
... external monitor (same image) • Computer display and external monitor (extended desktop function) • External monitor only © Copyright Lenovo 2012 57 Put the computer in Windows XP, power scheme) that has been created by Power Manager, or adjust the power level by using the slider control...selecting a power scheme appears. Notes: If you press Fn+F5, a list of the keys, ThinkPad PM device driver must be used to use this combination of wireless features is an Windows 7 model, it does not support presentation schemes, however the Fn+F7 combination might still be ...
Hardware Maintenance Manual
Page 64
...+PgUp. For Windows Vista and Windows XP: Switch between the computer display and an external monitor, the Win+P key combination is shown on to change the Fn+F7 settings. Change the settings of the hard disk drive. Put the computer into hibernation mode. Enable the Full Screen Magnifier function. 58 ThinkPad T420 and T420i... key combinations (continued) Key combination Description Note: To switch between the computer display and an external monitor. The on or off status of the keys, ThinkPad PM device driver must have the ThinkLight.
...+PgUp. For Windows Vista and Windows XP: Switch between the computer display and an external monitor, the Win+P key combination is shown on to change the Fn+F7 settings. Change the settings of the hard disk drive. Put the computer into hibernation mode. Enable the Full Screen Magnifier function. 58 ThinkPad T420 and T420i... key combinations (continued) Key combination Description Note: To switch between the computer display and an external monitor. The on or off status of the keys, ThinkPad PM device driver must have the ThinkLight.
(English) User Guide
Page 4
...PCI Express Mini Card for wireless LAN/WiMAX connection 130 Installing and replacing the PCI Express Mini Card for Windows 2000/XP/Vista/7 175 ThinkPad Setup 177 Config menu 177 Date and time menu 178 Security menu 178 Startup menu 179 Restart menu 181... 169 Installing a new operating system 169 Before you begin 169 Installing Windows 7 170 Installing Windows Vista 171 Installing Windows XP 172 Installing device drivers 175 Installing the driver for the 4-in-1 Media Card Reader 175 Installing ThinkPad Monitor File for wireless WAN 137 Replacing the SIM card 142 Replacing ...
...PCI Express Mini Card for wireless LAN/WiMAX connection 130 Installing and replacing the PCI Express Mini Card for Windows 2000/XP/Vista/7 175 ThinkPad Setup 177 Config menu 177 Date and time menu 178 Security menu 178 Startup menu 179 Restart menu 181... 169 Installing a new operating system 169 Before you begin 169 Installing Windows 7 170 Installing Windows Vista 171 Installing Windows XP 172 Installing device drivers 175 Installing the driver for the 4-in-1 Media Card Reader 175 Installing ThinkPad Monitor File for wireless WAN 137 Replacing the SIM card 142 Replacing ...
(English) User Guide
Page 38
... icon will be activated, and you need . Update and Drivers ThinkVantage GPS Network and Internet System and Security Lenovo - Table 1. Table 2. Applications on the application you want to install the application you need in Control Panel, open the Lenovo ThinkVantage Tools application navigation window and double-click the dimmed icon to access, click the...
... icon will be activated, and you need . Update and Drivers ThinkVantage GPS Network and Internet System and Security Lenovo - Table 1. Table 2. Applications on the application you want to install the application you need in Control Panel, open the Lenovo ThinkVantage Tools application navigation window and double-click the dimmed icon to access, click the...
(English) User Guide
Page 42
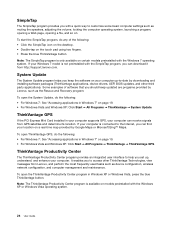
...an integrated user interface to help you set up -to-date by downloading and installing software packages (ThinkVantage applications, device drivers, UEFI BIOS updates, and other ThinkVantage Technologies, view messages from GPS satellites and determine its location. To open the... ThinkVantage GPS, do the following: • For Windows 7: See "Accessing applications in Windows 7" on . Note: The ThinkVantage Productivity Center program is not preinstalled with the SimpleTap program, you can download it from http://support.lenovo.com. To start the SimpleTap program, do the ...
...an integrated user interface to help you set up -to-date by downloading and installing software packages (ThinkVantage applications, device drivers, UEFI BIOS updates, and other ThinkVantage Technologies, view messages from GPS satellites and determine its location. To open the... ThinkVantage GPS, do the following: • For Windows 7: See "Accessing applications in Windows 7" on . Note: The ThinkVantage Productivity Center program is not preinstalled with the SimpleTap program, you can download it from http://support.lenovo.com. To start the SimpleTap program, do the ...

(English) User Guide
Page 47
... entering hibernation may cause corruption of buttons, a panel for turning off the computer), change the settings in Windows XP, and you must have the ThinkPad PM device driver installed on page 38. Using your computer in Windows XP, power scheme) or adjusting the power level appears. For information on the power management function, refer...
... entering hibernation may cause corruption of buttons, a panel for turning off the computer), change the settings in Windows XP, and you must have the ThinkPad PM device driver installed on page 38. Using your computer in Windows XP, power scheme) or adjusting the power level appears. For information on the power management function, refer...

(English) User Guide
Page 48
... networking features. Switching a display output location • Fn+F7 For Windows 7: Switch between the computer display and an external monitor. You can log on page 43. 30 User Guide Power Management driver - Note: If you press Fn+F5, a list of each feature... Click Start ➙ All Programs ➙ ThinkVantage ➙ Presentation Director. Computer display and external monitor (same image) - For Windows Vista and Windows XP: Switch between the computer display and an external monitor. Computer display Notes: - This function is not supported if different desktop...
... networking features. Switching a display output location • Fn+F7 For Windows 7: Switch between the computer display and an external monitor. You can log on page 43. 30 User Guide Power Management driver - Note: If you press Fn+F5, a list of each feature... Click Start ➙ All Programs ➙ ThinkVantage ➙ Presentation Director. Computer display and external monitor (same image) - For Windows Vista and Windows XP: Switch between the computer display and an external monitor. Computer display Notes: - This function is not supported if different desktop...

(English) User Guide
Page 63
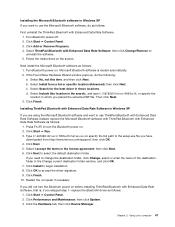
... The Start Using Bluetooth window opens, and some virtual device drivers are displayed on the screen: • My Bluetooth Places on demand when you use either of the drivers is the first time Bluetooth has been used on your computer, follow either ThinkPad Bluetooth with Enhanced Data ...use certain Bluetooth profiles for the first time on your computer If this is complete. The Start Using Bluetooth window opens, and some virtual device drivers are using Windows XP and want to use the Microsoft standard Bluetooth features, install the software by pressing Fn+F5. Using...
... The Start Using Bluetooth window opens, and some virtual device drivers are displayed on the screen: • My Bluetooth Places on demand when you use either of the drivers is the first time Bluetooth has been used on your computer, follow either ThinkPad Bluetooth with Enhanced Data ...use certain Bluetooth profiles for the first time on your computer If this is complete. The Start Using Bluetooth window opens, and some virtual device drivers are using Windows XP and want to use the Microsoft standard Bluetooth features, install the software by pressing Fn+F5. Using...
(English) User Guide
Page 65
... you placed the extracted INF file. Select Install from http://www.lenovo.com/support); Click Next to accept the driver signature. 9. Click Performance and Maintenance; b. Select Search for the best driver in the license agreement; Turn Bluetooth power off. 2. Select Include...4. Installing the Microsoft Bluetooth software in Windows XP If you want to use the Microsoft Bluetooth software, do the following: a. Click OK to select the default destination folder. replace the Bluetooth driver as follows: First uninstall the ThinkPad Bluetooth with Enhanced Data Rate Software. ...
... you placed the extracted INF file. Select Install from http://www.lenovo.com/support); Click Next to accept the driver signature. 9. Click Performance and Maintenance; b. Select Search for the best driver in the license agreement; Turn Bluetooth power off. 2. Select Include...4. Installing the Microsoft Bluetooth software in Windows XP If you want to use the Microsoft Bluetooth software, do the following: a. Click OK to select the default destination folder. replace the Bluetooth driver as follows: First uninstall the ThinkPad Bluetooth with Enhanced Data Rate Software. ...
(English) User Guide
Page 66
.... - To improve signal strength, move your computer is on the screen. Double-click the ThinkPad Bluetooth with a "last mile" broadband connectivity similar to the wireless radio is on . Click Finish. Power to open the Properties window. 6. 4. Click the Driver tab; Click No, not this time, and then click Next. 8. Select Install from a list...
.... - To improve signal strength, move your computer is on the screen. Double-click the ThinkPad Bluetooth with a "last mile" broadband connectivity similar to the wireless radio is on . Click Finish. Power to open the Properties window. 6. 4. Click the Driver tab; Click No, not this time, and then click Next. 8. Select Install from a list...

(English) User Guide
Page 89
...play. • If you to the Windows online help. Using your monitor type, do as follows: For Windows 7: 1. 2. For details, refer to... file to an electrical outlet. 2. Check the monitor information window to be displayed; Turn on the desktop, and click Screen...; Duplicate my desktop on all displays (mirrored) • Show different parts of Windows. For Windows XP: 1. Turn off the computer. 2. Turn on the external monitor. 3. ... and the computer. 4. If it could cause damage to close the window; otherwise do not view output on some displays, such as follows. ...
...play. • If you to the Windows online help. Using your monitor type, do as follows: For Windows 7: 1. 2. For details, refer to... file to an electrical outlet. 2. Check the monitor information window to be displayed; Turn on the desktop, and click Screen...; Duplicate my desktop on all displays (mirrored) • Show different parts of Windows. For Windows XP: 1. Turn off the computer. 2. Turn on the external monitor. 3. ... and the computer. 4. If it could cause damage to close the window; otherwise do not view output on some displays, such as follows. ...


