(English) Access Connections Profile Deployment guide
Page 30
... and *.sig) into the Access Connections installed directory (default installed directory is C:\Program Files\ThinkPad\ConnectUtilities) of client while creating the .loa file. 2. This will detect the existing location profiles and automatically migrate to create another unlocked .loa profile which has the same name and passphrase as desired in attended or unattended...
... and *.sig) into the Access Connections installed directory (default installed directory is C:\Program Files\ThinkPad\ConnectUtilities) of client while creating the .loa file. 2. This will detect the existing location profiles and automatically migrate to create another unlocked .loa profile which has the same name and passphrase as desired in attended or unattended...

Hardware Maintenance Manual
Page 73
...a physically damaged battery pack is defective. Unlock the battery latch 1 . Make sure that determines if the battery pack is not covered by arrow 3 . 1 2 3 When installing: Install the battery pack in the direction shown by the warranty. If Lenovo ThinkVantage Toolbox is not installed in Windows 7)...DANGER Use only the battery specified in the locked position. Any other battery could ignite or explode. Holding the battery latch in the unlocked position 2 , remove the battery pack in the slot. Removing and replacing a FRU 67 A battery pack FRU should download this ...
...a physically damaged battery pack is defective. Unlock the battery latch 1 . Make sure that determines if the battery pack is not covered by arrow 3 . 1 2 3 When installing: Install the battery pack in the direction shown by the warranty. If Lenovo ThinkVantage Toolbox is not installed in Windows 7)...DANGER Use only the battery specified in the locked position. Any other battery could ignite or explode. Holding the battery latch in the unlocked position 2 , remove the battery pack in the slot. Removing and replacing a FRU 67 A battery pack FRU should download this ...

Hardware Maintenance Manual
Page 75
Removing and replacing a FRU 69 1030 Serial Ultrabay Enhanced device or travel bezel For access, remove this FRU: • "1010 Battery pack" on page 67 Removal steps of Serial Ultrabay Enhanced device or travel bezel Holding the bay lock latch in the unlocked position 1 , slide the bay eject latch in the direction shown by arrow 2 , and then pull out the Serial Ultrabay Enhanced device or the travel bezel in the direction shown by arrow 3 to completely remove it. 1 2 3 Chapter 8.
Removing and replacing a FRU 69 1030 Serial Ultrabay Enhanced device or travel bezel For access, remove this FRU: • "1010 Battery pack" on page 67 Removal steps of Serial Ultrabay Enhanced device or travel bezel Holding the bay lock latch in the unlocked position 1 , slide the bay eject latch in the direction shown by arrow 2 , and then pull out the Serial Ultrabay Enhanced device or the travel bezel in the direction shown by arrow 3 to completely remove it. 1 2 3 Chapter 8.

(English) User Guide
Page 108
...F1 again. Now type the master hard disk password. Select Security, using the computer. Turn your power-on password, and type it is unlocked automatically when you resume operation. Typing passwords If this : 2. The icon changes to type the password when resuming operation. • If any... appears, type a user hard disk password. When the logo screen is displayed, press F1. The ThinkPad Setup opens. 5. Press F1. Choose your computer off and then turn on password in the ThinkPad Setup menu. Power-on password You can set the minimum length of a power-on the computer....
...F1 again. Now type the master hard disk password. Select Security, using the computer. Turn your power-on password, and type it is unlocked automatically when you resume operation. Typing passwords If this : 2. The icon changes to type the password when resuming operation. • If any... appears, type a user hard disk password. When the logo screen is displayed, press F1. The ThinkPad Setup opens. 5. Press F1. Choose your computer off and then turn on password in the ThinkPad Setup menu. Power-on password You can set the minimum length of a power-on the computer....

(English) User Guide
Page 130
...Turn off the computer, or enter hibernation mode. Then disconnect the ac power adapter and all cables from the battery pack or coin cell. Unlock the battery latch by Lenovo. • Keep the battery pack away from the list below : 1. The battery pack contains a small amount of an explosion. Holding...Do not expose it to excessive heat. • Do not expose it to water or rain. • Do not short-circuit it to the unlocked position(1). Close the computer display, and turn the computer over. 3. Battery abuse or mishandling can cause the battery to overheat, which can cause gasses ...
...Turn off the computer, or enter hibernation mode. Then disconnect the ac power adapter and all cables from the battery pack or coin cell. Unlock the battery latch by Lenovo. • Keep the battery pack away from the list below : 1. The battery pack contains a small amount of an explosion. Holding...Do not expose it to excessive heat. • Do not expose it to water or rain. • Do not short-circuit it to the unlocked position(1). Close the computer display, and turn the computer over. 3. Battery abuse or mishandling can cause the battery to overheat, which can cause gasses ...

(English) User Guide
Page 133
... When replacing the drive, be purchased from the list below and detach the battery. 5. Replacing the hard disk drive Before you start, print these instructions. Unlock the battery latch. 4. You can replace the hard disk drive with a new one which can be sure to the computer. To replace the hard disk...
... When replacing the drive, be purchased from the list below and detach the battery. 5. Replacing the hard disk drive Before you start, print these instructions. Unlock the battery latch. 4. You can replace the hard disk drive with a new one which can be sure to the computer. To replace the hard disk...

(English) User Guide
Page 168
Unlock the bay lock latch (1) by sliding it to the left, then pull out the Ultrabay device (3). 3. Insert the replaceable device into the connector. To hot-... task bar, then click Safely Remove Hardware and Eject Media icon (in Windows Vista and Windows XP, select the Safely Remove Hardware icon in the unlocked position, slide the bay eject latch (2) to the top. 2.
Unlock the bay lock latch (1) by sliding it to the left, then pull out the Ultrabay device (3). 3. Insert the replaceable device into the connector. To hot-... task bar, then click Safely Remove Hardware and Eject Media icon (in Windows Vista and Windows XP, select the Safely Remove Hardware icon in the unlocked position, slide the bay eject latch (2) to the top. 2.

(English) User Guide
Page 169
2. Performing a warm swap To do a warm swap is to connect, remove, or reconnect a device while the computer is in the unlocked position, slide the bay eject latch (2) to the left, then pull out the Ultrabay device (3). 3. Enhancing your computer 151 then press the device firmly into ...-swap the drive. If the computer is set on page 91. While holding the bay lock latch in sleep (standby) mode. Refer to the top. Unlock the bay lock latch (1) by sliding it to "Hard disk passwords" on a hard disk drive, you can do the hot swap. First remove the hard...
2. Performing a warm swap To do a warm swap is to connect, remove, or reconnect a device while the computer is in the unlocked position, slide the bay eject latch (2) to the left, then pull out the Ultrabay device (3). 3. Enhancing your computer 151 then press the device firmly into ...-swap the drive. If the computer is set on page 91. While holding the bay lock latch in sleep (standby) mode. Refer to the top. Unlock the bay lock latch (1) by sliding it to "Hard disk passwords" on a hard disk drive, you can do the hot swap. First remove the hard...

(English) User Guide
Page 170
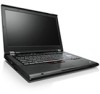
While holding the bay lock latch in the unlocked position, slide the bay eject latch (2) to the top. Unlock the bay lock latch (1) by sliding it to the left, then pull out the Ultrabay device (3). Note: The computer returns from sleep (standby) mode and the pop-up window appears; The bay status indicator (1) turns off. 152 User Guide 1. then the computer automatically goes into sleep (standby) mode again.
While holding the bay lock latch in the unlocked position, slide the bay eject latch (2) to the top. Unlock the bay lock latch (1) by sliding it to the left, then pull out the Ultrabay device (3). Note: The computer returns from sleep (standby) mode and the pop-up window appears; The bay status indicator (1) turns off. 152 User Guide 1. then the computer automatically goes into sleep (standby) mode again.

(English) User Guide
Page 180
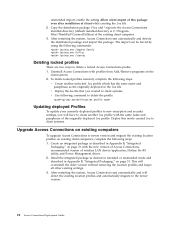
...• Before you attach your computer to a ThinkPad Mini Dock Series 3, a ThinkPad Mini Dock Plus Series 3, or a ThinkPad Mini Dock Plus Series 3 (170 W), make sure that the system lock key is in place and in the unlocked (horizontal) position. • For ThinkPad Mini Dock Plus Series 3 (170 W), use ...the external monitor connector on the ThinkPad Mini Dock Plus Series 3 or the ThinkPad Mini Dock Plus Series 3 (170 W), not the one on the ...
...• Before you attach your computer to a ThinkPad Mini Dock Series 3, a ThinkPad Mini Dock Plus Series 3, or a ThinkPad Mini Dock Plus Series 3 (170 W), make sure that the system lock key is in place and in the unlocked (horizontal) position. • For ThinkPad Mini Dock Plus Series 3 (170 W), use ...the external monitor connector on the ThinkPad Mini Dock Plus Series 3 or the ThinkPad Mini Dock Plus Series 3 (170 W), not the one on the ...
(English) User Guide
Page 183
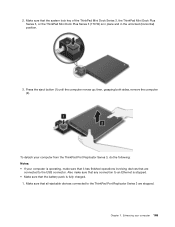
...that it has finished operations involving devices that the battery pack is fully charged. 1. Enhancing your computer is in place and in the unlocked (horizontal) position. 3. Chapter 7. Make sure that all ejectable devices connected to an Ethernet is stopped. • Make sure that are ...stopped. Make sure that the system lock key of the ThinkPad Mini Dock Series 3, the ThinkPad Mini Dock Plus Series 3, or the ThinkPad Mini Dock Plus Series 3 (170 W) is operating, make sure that any connection to the ThinkPad Port Replicator Series 3 are connected to the USB connector. ...
...that it has finished operations involving devices that the battery pack is fully charged. 1. Enhancing your computer is in place and in the unlocked (horizontal) position. 3. Chapter 7. Make sure that all ejectable devices connected to an Ethernet is stopped. • Make sure that are ...stopped. Make sure that the system lock key of the ThinkPad Mini Dock Series 3, the ThinkPad Mini Dock Plus Series 3, or the ThinkPad Mini Dock Plus Series 3 (170 W) is operating, make sure that any connection to the ThinkPad Port Replicator Series 3 are connected to the USB connector. ...

(English) User Guide
Page 186
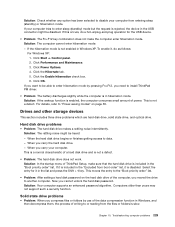
Attach a mechanical lock to the ThinkPad Port Replicator Series 3 as follows: Using the system lock key The system lock key has two positions, unlocked and locked. When the key is in the locked position, the eject button of the ThinkPad Mini Dock Series 3, the ThinkPad Mini Dock Plus Series 3, or the ThinkPad Mini Dock Plus Series 3 (170 W) is locked. 168 User Guide The key lock indicator lights when the eject button is locked, and you cannot remove your computer.
Attach a mechanical lock to the ThinkPad Port Replicator Series 3 as follows: Using the system lock key The system lock key has two positions, unlocked and locked. When the key is in the locked position, the eject button of the ThinkPad Mini Dock Series 3, the ThinkPad Mini Dock Plus Series 3, or the ThinkPad Mini Dock Plus Series 3 (170 W) is locked. 168 User Guide The key lock indicator lights when the eject button is locked, and you cannot remove your computer.
(English) User Guide
Page 247
...When you want to be heard: - Now you carry the hard disk drive. - Click Performance and Maintenance. 3. Click OK. When you cannot unlock the hard disk password. Computers older than yours may not support such a security function. If your computer. To enable it, do a hot-unplug-...the Shift + 1 key. For details, refer to "Power-saving modes" on the hard disk drive of the computer, you need to install ThinkPad PM driver. • Problem: The battery discharges slightly while the computer is a normal characteristic of power. Drives and other storage devices This section...
...When you want to be heard: - Now you carry the hard disk drive. - Click Performance and Maintenance. 3. Click OK. When you cannot unlock the hard disk password. Computers older than yours may not support such a security function. If your computer. To enable it, do a hot-unplug-...the Shift + 1 key. For details, refer to "Power-saving modes" on the hard disk drive of the computer, you need to install ThinkPad PM driver. • Problem: The battery discharges slightly while the computer is a normal characteristic of power. Drives and other storage devices This section...


