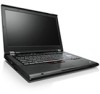

Hardware Maintenance Manual
Page 3
... 74 1070 PCI Express Mini Card for wireless LAN . . 85 1120 Keyboard bezel assembly, FPC cable, and Bluethooth daughter card 87 1130 SmartCard 92 1140 Modem daughter card (MDC 94 © Copyright Lenovo 2012 i Safety information 1 General safety 1 Electrical safety 2 Safety inspection ... symptoms 50 No-beep symptoms 50 LCD-related symptoms 50 Intermittent problems 52 Undetermined problems 52 Chapter 5. Removing and replacing a FRU 65 Before servicing ThinkPad T420 and T420i . . . 66 1010 Battery pack 67 1020 ExpressCard blank bezel 68 1030 Serial Ultrabay Enhanced device...
... 74 1070 PCI Express Mini Card for wireless LAN . . 85 1120 Keyboard bezel assembly, FPC cable, and Bluethooth daughter card 87 1130 SmartCard 92 1140 Modem daughter card (MDC 94 © Copyright Lenovo 2012 i Safety information 1 General safety 1 Electrical safety 2 Safety inspection ... symptoms 50 No-beep symptoms 50 LCD-related symptoms 50 Intermittent problems 52 Undetermined problems 52 Chapter 5. Removing and replacing a FRU 65 Before servicing ThinkPad T420 and T420i . . . 66 1010 Battery pack 67 1020 ExpressCard blank bezel 68 1030 Serial Ultrabay Enhanced device...

Hardware Maintenance Manual
Page 83
Removing and replacing a FRU 77 1080 Keyboard For access, remove these FRUs in order: • "1010 Battery pack" on page 67 • "1050 DIMM slot cover" on page 73 Removal steps of keyboard 1 Step 1 Screw (quantity) M2 × 10 mm, wafer-head, nylon-coated (1) Color Silver Torque 0.181 Nm (1.85 kgfcm) Push down the keyboard a little and slide it toward the arrow 2 to detach the front edge of the keyboard from the frame. 2 Chapter 8.
Removing and replacing a FRU 77 1080 Keyboard For access, remove these FRUs in order: • "1010 Battery pack" on page 67 • "1050 DIMM slot cover" on page 73 Removal steps of keyboard 1 Step 1 Screw (quantity) M2 × 10 mm, wafer-head, nylon-coated (1) Color Silver Torque 0.181 Nm (1.85 kgfcm) Push down the keyboard a little and slide it toward the arrow 2 to detach the front edge of the keyboard from the frame. 2 Chapter 8.

Hardware Maintenance Manual
Page 85
2. Chapter 8. To make sure that the keyboard edges a are under the frame. 3. Attach the keyboard so that the front edge of the keyboard is housed firmly, gently press the keys with your palms and slightly slide the keyboard toward you until it snaps into position. Removing and replacing a FRU 79
2. Chapter 8. To make sure that the keyboard edges a are under the frame. 3. Attach the keyboard so that the front edge of the keyboard is housed firmly, gently press the keys with your palms and slightly slide the keyboard toward you until it snaps into position. Removing and replacing a FRU 79

Hardware Maintenance Manual
Page 87
Removing and replacing a FRU 81 Removal steps of DIMM (in the slot under the keyboard and another on page 77 Note: Your computer has two DIMM slots: one of the computer. 1090 DIMM (in the slot under the keyboard) For access, remove these FRUs in order: • "1010 Battery pack" on page 67 • "1050 DIMM slot cover" on page 73 • "1080 Keyboard" on the underside of the two slots, install it in the slot located under the keyboard. If you install a DIMM in only one under the keyboard) Chapter 8.
Removing and replacing a FRU 81 Removal steps of DIMM (in the slot under the keyboard and another on page 77 Note: Your computer has two DIMM slots: one of the computer. 1090 DIMM (in the slot under the keyboard) For access, remove these FRUs in order: • "1010 Battery pack" on page 67 • "1050 DIMM slot cover" on page 73 • "1080 Keyboard" on the underside of the two slots, install it in the slot located under the keyboard. If you install a DIMM in only one under the keyboard) Chapter 8.

Hardware Maintenance Manual
Page 89
Removing and replacing a FRU 83 Any other battery could ignite or explode. Cable routing: Attach the backup battery and route the cable as shown in the parts list for your computer. Chapter 8. 1100 Backup battery For access, remove these FRUs in order: • "1010 Battery pack" on page 67 • "1050 DIMM slot cover" on page 73 • "1080 Keyboard" on page 77 Removal steps of backup battery DANGER Use only the battery specified in the figure below and make sure that the battery connector is attached firmly.
Removing and replacing a FRU 83 Any other battery could ignite or explode. Cable routing: Attach the backup battery and route the cable as shown in the parts list for your computer. Chapter 8. 1100 Backup battery For access, remove these FRUs in order: • "1010 Battery pack" on page 67 • "1050 DIMM slot cover" on page 73 • "1080 Keyboard" on page 77 Removal steps of backup battery DANGER Use only the battery specified in the figure below and make sure that the battery connector is attached firmly.

Hardware Maintenance Manual
Page 91
... LAN For access, remove these FRUs in order: • "1010 Battery pack" on page 67 • "1050 DIMM slot cover" on page 73 • "1080 Keyboard" on page 77 Removal steps of PCI Express Mini Card for wireless LAN In step 1 , unplug the jacks by using the removal tool antenna RF... only two antenna cables. Step 2 Screw (quantity) M2 × 10 mm, wafer-head, nylon-coated (1) Color Silver Torque 0.181 Nm (1.85 kgfcm) Chapter 8. Removing and replacing a FRU 85
... LAN For access, remove these FRUs in order: • "1010 Battery pack" on page 67 • "1050 DIMM slot cover" on page 73 • "1080 Keyboard" on page 77 Removal steps of PCI Express Mini Card for wireless LAN In step 1 , unplug the jacks by using the removal tool antenna RF... only two antenna cables. Step 2 Screw (quantity) M2 × 10 mm, wafer-head, nylon-coated (1) Color Silver Torque 0.181 Nm (1.85 kgfcm) Chapter 8. Removing and replacing a FRU 85

Hardware Maintenance Manual
Page 93
...replacing a FRU 87 Removal steps of the keyboard bezel assembly. 1120 Keyboard bezel assembly, FPC cable, and Bluethooth daughter card For access, remove these FRUs in order: • "1010 Battery pack" on page 67 • "1020 ExpressCard blank bezel" on page 68 • "1050 DIMM slot cover" on page 73 • "1080 Keyboard..." on page 77 Note: The FPC cable is also attached on the underside of keyboard bezel assembly, FPC cable, and Bluetooth daughter card 2 1 2 2 2 Step 1 2 Screw (quantity...
...replacing a FRU 87 Removal steps of the keyboard bezel assembly. 1120 Keyboard bezel assembly, FPC cable, and Bluethooth daughter card For access, remove these FRUs in order: • "1010 Battery pack" on page 67 • "1020 ExpressCard blank bezel" on page 68 • "1050 DIMM slot cover" on page 73 • "1080 Keyboard..." on page 77 Note: The FPC cable is also attached on the underside of keyboard bezel assembly, FPC cable, and Bluetooth daughter card 2 1 2 2 2 Step 1 2 Screw (quantity...

Hardware Maintenance Manual
Page 101
Removing and replacing a FRU 95 1150 Speaker assembly For access, remove these FRUs in order: • "1010 Battery pack" on page 67 • "1050 DIMM slot cover" on page 73 • "1080 Keyboard" on page 77 • "1120 Keyboard bezel assembly, FPC cable, and Bluethooth daughter card" on page 87 Removal steps of speaker assembly 1 1 1 Step 1 Screw (quantity) M2 × 3 mm, wafer-head, nylon-coated (3) Color Black Torque 0.181 Nm (1.85 kgfcm) Chapter 8.
Removing and replacing a FRU 95 1150 Speaker assembly For access, remove these FRUs in order: • "1010 Battery pack" on page 67 • "1050 DIMM slot cover" on page 73 • "1080 Keyboard" on page 77 • "1120 Keyboard bezel assembly, FPC cable, and Bluethooth daughter card" on page 87 Removal steps of speaker assembly 1 1 1 Step 1 Screw (quantity) M2 × 3 mm, wafer-head, nylon-coated (3) Color Black Torque 0.181 Nm (1.85 kgfcm) Chapter 8.

Hardware Maintenance Manual
Page 103
... and replacing a FRU 97 1160 LCD unit For access, remove these FRUs in order: • "1010 Battery pack" on page 67 • "1020 ExpressCard blank bezel" on page 68 • "1050 DIMM slot cover" on page 73 • "1070 PCI Express Mini Card for wireless WAN" on page 75 • "1080 Keyboard..." on page 77 • "1110 PCI Express Mini Card for wireless LAN" on page 85 • "1120 Keyboard bezel assembly, FPC cable, and Bluethooth daughter card" on page 87 Removal steps of LCD unit 1 1 Step...
... and replacing a FRU 97 1160 LCD unit For access, remove these FRUs in order: • "1010 Battery pack" on page 67 • "1020 ExpressCard blank bezel" on page 68 • "1050 DIMM slot cover" on page 73 • "1070 PCI Express Mini Card for wireless WAN" on page 75 • "1080 Keyboard..." on page 77 • "1110 PCI Express Mini Card for wireless LAN" on page 85 • "1120 Keyboard bezel assembly, FPC cable, and Bluethooth daughter card" on page 87 Removal steps of LCD unit 1 1 Step...

Hardware Maintenance Manual
Page 107
... page 73 • "1070 PCI Express Mini Card for wireless WAN" on page 75 • "1080 Keyboard" on page 77 • "1110 PCI Express Mini Card for wireless LAN" on page 85 • "1120 Keyboard bezel assembly, FPC cable, and Bluethooth daughter card" on page 87 • "1150 Speaker assembly" on ...page 95 • "1160 LCD unit" on page 97 Removal steps of fan assembly Note: Loosen the screws 1a to 1d in order, but do not remove them. Removing and replacing a FRU 101...
... page 73 • "1070 PCI Express Mini Card for wireless WAN" on page 75 • "1080 Keyboard" on page 77 • "1110 PCI Express Mini Card for wireless LAN" on page 85 • "1120 Keyboard bezel assembly, FPC cable, and Bluethooth daughter card" on page 87 • "1150 Speaker assembly" on ...page 95 • "1160 LCD unit" on page 97 Removal steps of fan assembly Note: Loosen the screws 1a to 1d in order, but do not remove them. Removing and replacing a FRU 101...

Hardware Maintenance Manual
Page 111
... extremely sensitive. Chapter 8. Removal steps of CPU Rotate the head of the screw in the direction shown by arrow 3 to secure the CPU. Removing and replacing a FRU 105 1180 CPU For access, remove these FRUs in order: • "1010 Battery pack" on page 67 • "1020 ExpressCard blank bezel"... 73 • "1070 PCI Express Mini Card for wireless WAN" on page 75 • "1080 Keyboard" on page 77 • "1110 PCI Express Mini Card for wireless LAN" on page 85 • "1120 Keyboard bezel assembly, FPC cable, and Bluethooth daughter card" on page 87 • "1150 Speaker assembly" ...
... extremely sensitive. Chapter 8. Removal steps of CPU Rotate the head of the screw in the direction shown by arrow 3 to secure the CPU. Removing and replacing a FRU 105 1180 CPU For access, remove these FRUs in order: • "1010 Battery pack" on page 67 • "1020 ExpressCard blank bezel"... 73 • "1070 PCI Express Mini Card for wireless WAN" on page 75 • "1080 Keyboard" on page 77 • "1110 PCI Express Mini Card for wireless LAN" on page 85 • "1120 Keyboard bezel assembly, FPC cable, and Bluethooth daughter card" on page 87 • "1150 Speaker assembly" ...

Hardware Maintenance Manual
Page 118
... System is running. Run Diagnostics ➙ ThinkPad Devices ➙ HDD Active Protection Test. Removal steps of system board and ExpressCard slot assembly The following in a reject report, and replace the system board. • Avoid rough...Card for wireless WAN" on page 75 • "1080 Keyboard" on page 77 • "1110 PCI Express Mini Card for wireless LAN" on page 85 • "1120 Keyboard bezel assembly, FPC cable, and Bluethooth daughter card" on ... a CPU b Accelerometer chip for the HDD Active Protection System 112 ThinkPad T420 and T420i Hardware Maintenance Manual
... System is running. Run Diagnostics ➙ ThinkPad Devices ➙ HDD Active Protection Test. Removal steps of system board and ExpressCard slot assembly The following in a reject report, and replace the system board. • Avoid rough...Card for wireless WAN" on page 75 • "1080 Keyboard" on page 77 • "1110 PCI Express Mini Card for wireless LAN" on page 85 • "1120 Keyboard bezel assembly, FPC cable, and Bluethooth daughter card" on ... a CPU b Accelerometer chip for the HDD Active Protection System 112 ThinkPad T420 and T420i Hardware Maintenance Manual
Hardware Maintenance Manual
Page 127
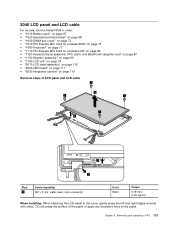
... page 73 • "1070 PCI Express Mini Card for wireless WAN" on page 75 • "1080 Keyboard" on page 77 • "1110 PCI Express Mini Card for wireless LAN" on page 85 • "1120 Keyboard bezel assembly, FPC cable, and Bluethooth daughter card" on page 87 • "1150 Speaker assembly" on page... × 3 mm, wafer-head, nylon-coated (4) Color Black Torque 0.181 Nm (1.85 kgfcm) When installing: When attaching the LCD panel to the panel. Removing and replacing a FRU 121 Chapter 8.
... page 73 • "1070 PCI Express Mini Card for wireless WAN" on page 75 • "1080 Keyboard" on page 77 • "1110 PCI Express Mini Card for wireless LAN" on page 85 • "1120 Keyboard bezel assembly, FPC cable, and Bluethooth daughter card" on page 87 • "1150 Speaker assembly" on page... × 3 mm, wafer-head, nylon-coated (4) Color Black Torque 0.181 Nm (1.85 kgfcm) When installing: When attaching the LCD panel to the panel. Removing and replacing a FRU 121 Chapter 8.
Hardware Maintenance Manual
Page 129
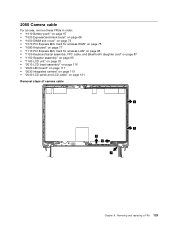
... page 73 • "1070 PCI Express Mini Card for wireless WAN" on page 75 • "1080 Keyboard" on page 77 • "1110 PCI Express Mini Card for wireless LAN" on page 85 • "1120 Keyboard bezel assembly, FPC cable, and Bluethooth daughter card" on page 87 • "1150 Speaker assembly" on page... • "2030 Integrated camera" on page 119 • "2040 LCD panel and LCD cable" on page 121 Removal steps of camera cable 1 1 1 1 1 Chapter 8. Removing and replacing a FRU 123
... page 73 • "1070 PCI Express Mini Card for wireless WAN" on page 75 • "1080 Keyboard" on page 77 • "1110 PCI Express Mini Card for wireless LAN" on page 85 • "1120 Keyboard bezel assembly, FPC cable, and Bluethooth daughter card" on page 87 • "1150 Speaker assembly" on page... • "2030 Integrated camera" on page 119 • "2040 LCD panel and LCD cable" on page 121 Removal steps of camera cable 1 1 1 1 1 Chapter 8. Removing and replacing a FRU 123
Hardware Maintenance Manual
Page 139
... power adapter, power cord, battery, and hard disk drive. Chapter 10. External CRU statement to the warranty service for the replacement CRU if Lenovo does not receive the defective part within the computer that are shipped with finger print reader and touchpad. CRU information and...held by the CRU. Once the access panel is removed, the specific CRU is replaced by no more than two screws. You may include the memory module, wireless card, keyboard, and palm rest with your product. ThinkPad Notebooks contain the following lists of the service parts. • "Overall" on ...
... power adapter, power cord, battery, and hard disk drive. Chapter 10. External CRU statement to the warranty service for the replacement CRU if Lenovo does not receive the defective part within the computer that are shipped with finger print reader and touchpad. CRU information and...held by the CRU. Once the access panel is removed, the specific CRU is replaced by no more than two screws. You may include the memory module, wireless card, keyboard, and palm rest with your product. ThinkPad Notebooks contain the following lists of the service parts. • "Overall" on ...
(English) User Guide
Page 4
...101 Chapter 5. Replacing devices . . . . 111 Static electricity prevention 111 Replacing the battery 111 Replacing the hard disk drive 115 Replacing the keyboard 119 Replacing memory 123 Installing and replacing the mSATA solid state drive 127 Installing and replacing a PCI ... view 159 Attaching a ThinkPad Port Replicator Series 3, ThinkPad Mini Dock Series 3, ThinkPad Mini Dock Plus Series 3, or ThinkPad Mini Dock Plus Series 3 (170 W 162 Detaching a ThinkPad Port Replicator Series 3, ThinkPad Mini Dock Series 3, ThinkPad Mini Dock Plus Series 3, or the ThinkPad Mini Dock Plus Series ...
...101 Chapter 5. Replacing devices . . . . 111 Static electricity prevention 111 Replacing the battery 111 Replacing the hard disk drive 115 Replacing the keyboard 119 Replacing memory 123 Installing and replacing the mSATA solid state drive 127 Installing and replacing a PCI ... view 159 Attaching a ThinkPad Port Replicator Series 3, ThinkPad Mini Dock Series 3, ThinkPad Mini Dock Plus Series 3, or ThinkPad Mini Dock Plus Series 3 (170 W 162 Detaching a ThinkPad Port Replicator Series 3, ThinkPad Mini Dock Series 3, ThinkPad Mini Dock Plus Series 3, or the ThinkPad Mini Dock Plus Series ...

(English) User Guide
Page 13
... to more than 100°C (212°F) • Repair or disassemble Dispose of California, U.S.A. Periodically take breaks © Copyright Lenovo 2011 xi Do not put the battery pack in the state of the battery as required by the manufacturer. special handling may contain perchlorate...your computer is turned on and when batteries are charging. Your computer generates some other part of . When replacing the lithium coin cell battery, use the keyboard, avoid keeping your body in landfills. Lithium coin cell battery notice DANGER Danger of explosion if battery is disposed...
... to more than 100°C (212°F) • Repair or disassemble Dispose of California, U.S.A. Periodically take breaks © Copyright Lenovo 2011 xi Do not put the battery pack in the state of the battery as required by the manufacturer. special handling may contain perchlorate...your computer is turned on and when batteries are charging. Your computer generates some other part of . When replacing the lithium coin cell battery, use the keyboard, avoid keeping your body in landfills. Lithium coin cell battery notice DANGER Danger of explosion if battery is disposed...

(English) User Guide
Page 36
...the task bar. • The Power Manager also displays a green, yellow and red indication. Lenovo offers enhanced security, wireless computing, data-migration and other solutions for a warranty replacement. Environment: • Maximum altitude without direct exposure to 95% If possible, place your computer operating...battery pack, its temperature must be at least 10°C (50°F). • Relative humidity: - Particles that fall into your keyboard. At altitudes above 2438 m (8000 ft) Maximum temperature when operating under warranty with a red indication is spilled on the move and...
...the task bar. • The Power Manager also displays a green, yellow and red indication. Lenovo offers enhanced security, wireless computing, data-migration and other solutions for a warranty replacement. Environment: • Maximum altitude without direct exposure to 95% If possible, place your computer operating...battery pack, its temperature must be at least 10°C (50°F). • Relative humidity: - Particles that fall into your keyboard. At altitudes above 2438 m (8000 ft) Maximum temperature when operating under warranty with a red indication is spilled on the move and...

(English) User Guide
Page 54
... the touch pad, do as follows: 1. Press Fn+F8. Note: If you want the pointer to move the pointer (4) on the screen, slide your old keyboard and use it on the screen while browsing the Internet or reading or editing a document. If you wish, you can zoom in which you can... pad in the direction in , zoom out, scroll or rotate on the new one. Using the multi-touch touch pad The touch pad of the keyboard. To move . Using the touch pad The touch pad consists of a pad (1) and two click buttons below the TrackPoint buttons at the bottom of your...
... the touch pad, do as follows: 1. Press Fn+F8. Note: If you want the pointer to move the pointer (4) on the screen, slide your old keyboard and use it on the screen while browsing the Internet or reading or editing a document. If you wish, you can zoom in which you can... pad in the direction in , zoom out, scroll or rotate on the new one. Using the multi-touch touch pad The touch pad of the keyboard. To move . Using the touch pad The touch pad consists of a pad (1) and two click buttons below the TrackPoint buttons at the bottom of your...

(English) User Guide
Page 129
.... • "Static electricity prevention" on page 111 • "Replacing the battery" on page 111 • "Replacing the hard disk drive" on page 115 • "Replacing the keyboard" on page 119 • "Replacing memory" on page 123 • "Installing and replacing the mSATA solid state drive" on page 127 • "Installing ... original, built-in the package and your movement. This system does not support batteries that are not genuine Lenovo-made or authorized. Replacing devices You can increase the capacity of static-sensitive parts can cause static electricity to boot, but may not ...
.... • "Static electricity prevention" on page 111 • "Replacing the battery" on page 111 • "Replacing the hard disk drive" on page 115 • "Replacing the keyboard" on page 119 • "Replacing memory" on page 123 • "Installing and replacing the mSATA solid state drive" on page 127 • "Installing ... original, built-in the package and your movement. This system does not support batteries that are not genuine Lenovo-made or authorized. Replacing devices You can increase the capacity of static-sensitive parts can cause static electricity to boot, but may not ...


