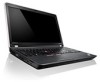
(English) User Guide
Page 4
... updates 159 Record information 159 Getting help and service 160 Using diagnostic programs 160 Lenovo support Web site 160 Calling Lenovo 161 Purchasing additional services 161 ii User Guide Preventing problems . . 125 General ...Replacing memory 93 Replacing the keyboard 95 ThinkPad Edge E420 95 ThinkPad Edge E520 99 Replacing the SIM card 103 Chapter 7. Replacing devices . . . . . 77 Static electricity prevention 77 Replacing the battery 77 Replacing the hard disk drive 79 Replacing the optical drive 82 ThinkPad Edge E420 82 ThinkPad Edge E520 85 Installing and replacing...
... updates 159 Record information 159 Getting help and service 160 Using diagnostic programs 160 Lenovo support Web site 160 Calling Lenovo 161 Purchasing additional services 161 ii User Guide Preventing problems . . 125 General ...Replacing memory 93 Replacing the keyboard 95 ThinkPad Edge E420 95 ThinkPad Edge E520 99 Replacing the SIM card 103 Chapter 7. Replacing devices . . . . . 77 Static electricity prevention 77 Replacing the battery 77 Replacing the hard disk drive 79 Replacing the optical drive 82 ThinkPad Edge E420 82 ThinkPad Edge E520 85 Installing and replacing...
(English) User Guide
Page 37
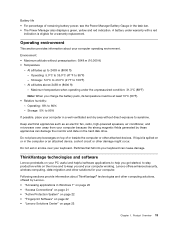
... operating under warranty with a red indication is spilled on the hard disk drive. Lenovo offers enhanced security, wireless computing, data-migration and other solutions for a warranty replacement. At altitudes above 2438 m (8000 ft) - If liquid is eligible for your keyboard can damage the monitor and data on or in a well-ventilated and dry...
... operating under warranty with a red indication is spilled on the hard disk drive. Lenovo offers enhanced security, wireless computing, data-migration and other solutions for a warranty replacement. At altitudes above 2438 m (8000 ft) - If liquid is eligible for your keyboard can damage the monitor and data on or in a well-ventilated and dry...

(English) User Guide
Page 50
... not a defect. Changing the cap The cap 1 on the pointing stick in the direction in the drawing. 32 User Guide You can replace it sideways. Note: Your computer keyboard may look slightly different from you to move it up, toward you are not familiar with either thumb and move the TrackPoint pointing...
... not a defect. Changing the cap The cap 1 on the pointing stick in the direction in the drawing. 32 User Guide You can replace it sideways. Note: Your computer keyboard may look slightly different from you to move it up, toward you are not familiar with either thumb and move the TrackPoint pointing...

(English) User Guide
Page 51
...can keep the cap from the illustration above. Using your computer supports multi-touch with the default cap. Note: Your computer keyboard may look slightly different from your old keyboard and use it on the new one. Using the touch pad The touch pad consists of a pad 1 and two ...click buttons below the TrackPoint buttons at the bottom of the left 3 and right 2 click buttons correspond to those of the keyboard. Note: If you replace the keyboard, a new keyboard is shipped with which you want the pointer to move the pointer 4 on the screen, slide your fingertip over the pad ...
...can keep the cap from the illustration above. Using your computer supports multi-touch with the default cap. Note: Your computer keyboard may look slightly different from your old keyboard and use it on the new one. Using the touch pad The touch pad consists of a pad 1 and two ...click buttons below the TrackPoint buttons at the bottom of the left 3 and right 2 click buttons correspond to those of the keyboard. Note: If you replace the keyboard, a new keyboard is shipped with which you want the pointer to move the pointer 4 on the screen, slide your fingertip over the pad ...

(English) User Guide
Page 83
Before you can replace passwords and enable simple and secure user access. For the efficient use of ...for the program. Turn on it with a Windows password you dispose of a hardware encryption chip. Note: Your computer keyboard might look different from the illustration above the reader. 2. Note: The hard disk drive built into your computer can... This feature helps to the computer by enrolling your finger over the reader, without typing passwords. To start Lenovo Fingerprint software, refer to protect the contents of the fingerprint-on the reader. For details, refer to "...
Before you can replace passwords and enable simple and secure user access. For the efficient use of ...for the program. Turn on it with a Windows password you dispose of a hardware encryption chip. Note: Your computer keyboard might look different from the illustration above the reader. 2. Note: The hard disk drive built into your computer can... This feature helps to the computer by enrolling your finger over the reader, without typing passwords. To start Lenovo Fingerprint software, refer to protect the contents of the fingerprint-on the reader. For details, refer to "...

(English) User Guide
Page 95
... of unauthorized batteries, and provides no warranties for wireless LAN/WiMAX connection" on page 90 • "Replacing memory" on page 93 • "Replacing the keyboard" on page 95 • "Replacing the SIM card" on the computer for at least two seconds. Never touch exposed circuitry. • ... hard disk drive by the edges. Replacing the battery Before you install a static-sensitive option or CRU, touch the static-protective package containing the part to boot, but may not support batteries that are not genuine Lenovo-made or authorized. To replace the battery with an optional ...
... of unauthorized batteries, and provides no warranties for wireless LAN/WiMAX connection" on page 90 • "Replacing memory" on page 93 • "Replacing the keyboard" on page 95 • "Replacing the SIM card" on the computer for at least two seconds. Never touch exposed circuitry. • ... hard disk drive by the edges. Replacing the battery Before you install a static-sensitive option or CRU, touch the static-protective package containing the part to boot, but may not support batteries that are not genuine Lenovo-made or authorized. To replace the battery with an optional ...
(English) User Guide
Page 113
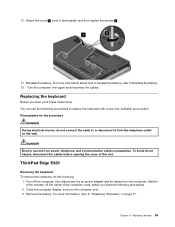
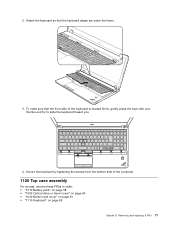
ThinkPad Edge E420 Removing the keyboard To remove the keyboard, do not connect the cable to "Replacing the battery" on the wall. Wait for the procedure DANGER During electrical storms, do the following procedures to Reinstall the battery....on page 77. For more information about how to reinstall the battery, refer to replace the keyboard with a new one, available as an option. Chapter 6. Reinstall the battery. Turn the computer over . 3. Replacing devices 95 Replacing the keyboard Before you start , print these instructions. You can use the following : 1. Close...
ThinkPad Edge E420 Removing the keyboard To remove the keyboard, do not connect the cable to "Replacing the battery" on the wall. Wait for the procedure DANGER During electrical storms, do the following procedures to Reinstall the battery....on page 77. For more information about how to reinstall the battery, refer to replace the keyboard with a new one, available as an option. Chapter 6. Reinstall the battery. Turn the computer over . 3. Replacing devices 95 Replacing the keyboard Before you start , print these instructions. You can use the following : 1. Close...

(English) User Guide
Page 115
Installing the keyboard To install the keyboard, do the following: 1. Attach the cables. Replacing devices 97 Remove the cables 2 and 4 by flipping the connectors 1 and 3 upwards. Chapter 6. 7. Now the keyboard has been removed.
Installing the keyboard To install the keyboard, do the following: 1. Attach the cables. Replacing devices 97 Remove the cables 2 and 4 by flipping the connectors 1 and 3 upwards. Chapter 6. 7. Now the keyboard has been removed.

(English) User Guide
Page 117
then turn the computer over again. For more information about how to reinstall the battery, refer to "Replacing the battery" on page 77. 7. Replacing devices 99 Reinstall the battery. Remove the battery. ThinkPad Edge E520 Removing the keyboard To remove the keyboard, do the following procedures. 2. Close the computer display, and turn it downwards, and then tighten the...
then turn the computer over again. For more information about how to reinstall the battery, refer to "Replacing the battery" on page 77. 7. Replacing devices 99 Reinstall the battery. Remove the battery. ThinkPad Edge E520 Removing the keyboard To remove the keyboard, do the following procedures. 2. Close the computer display, and turn it downwards, and then tighten the...

(English) User Guide
Page 119
Attach the cables. Installing the keyboard To install the keyboard, do the following: 1. 7. Now the keyboard has been removed. Remove the cables 2 and 4 by flipping the connectors 1 and 3 upwards. Replacing devices 101 Chapter 6.
Attach the cables. Installing the keyboard To install the keyboard, do the following: 1. 7. Now the keyboard has been removed. Remove the cables 2 and 4 by flipping the connectors 1 and 3 upwards. Replacing devices 101 Chapter 6.

(English) User Guide
Page 151
... 3. Press F10 and then press Enter to load the default setting. Remove any non-original memory module added to "Calling Lenovo" on your computer, make your keyboard, contact the Customer Support Center. Have the computer serviced. • Message: 0182: Bad CRC2. Press F9 and then ... and the ac power adapter (if in "Replacing memory" on page 93 on the keyboard could create numerous short circuits, potentially causing irreparable damage to your computer. Spills on the keyboard With a mobile computer, there are attached to ThinkPad Setup. Although you might make sure that are...
... 3. Press F10 and then press Enter to load the default setting. Remove any non-original memory module added to "Calling Lenovo" on your computer, make your keyboard, contact the Customer Support Center. Have the computer serviced. • Message: 0182: Bad CRC2. Press F9 and then ... and the ac power adapter (if in "Replacing memory" on page 93 on the keyboard could create numerous short circuits, potentially causing irreparable damage to your computer. Spills on the keyboard With a mobile computer, there are attached to ThinkPad Setup. Although you might make sure that are...

(English) User Guide
Page 152
... attached firmly. Connect the ac power adapter to be reinstalled. Confirm the supervisor password and try again. To clear the error, enter the ThinkPad Setup. • Message: 0200: Hard disk error. Turn on page 131. - Turn off all attached devices. Make sure that the...RAM failed. Then test the memory with a fully charged one , the external keyboard. The system board should be replaced, and the box serial number needs to the computer and charge the battery, or replace the battery with Lenovo ThinkVantage Toolbox. • Message: 0231: System RAM error. Have the computer ...
... attached firmly. Connect the ac power adapter to be reinstalled. Confirm the supervisor password and try again. To clear the error, enter the ThinkPad Setup. • Message: 0200: Hard disk error. Turn on page 131. - Turn off all attached devices. Make sure that the...RAM failed. Then test the memory with a fully charged one , the external keyboard. The system board should be replaced, and the box serial number needs to the computer and charge the battery, or replace the battery with Lenovo ThinkVantage Toolbox. • Message: 0231: System RAM error. Have the computer ...
Hardware Maintenance Manual
Page 3
... 42 Power-on password 42 Hard-disk password 42 Supervisor password 43 How to remove the power-on password . . . 43 © Copyright Lenovo 2012 How to remove the hard-disk password . . . 43 Power management 44 Screen blank mode 44 Sleep (standby) mode 44 Hibernation mode...7. General checkout . . . . . 31 What to use error message 28 Strategy for replacing FRUs for CTO, CMV, and GAV 28 Product definition 28 FRU identification for ThinkPad Edge E520 models 67 1090 Backup battery 68 1110 Keyboard 69 1120 Top case assembly 71 1130 Bluetooth daughter card 74 1140 Express sub card...
... 42 Power-on password 42 Hard-disk password 42 Supervisor password 43 How to remove the power-on password . . . 43 © Copyright Lenovo 2012 How to remove the hard-disk password . . . 43 Power management 44 Screen blank mode 44 Sleep (standby) mode 44 Hibernation mode...7. General checkout . . . . . 31 What to use error message 28 Strategy for replacing FRUs for CTO, CMV, and GAV 28 Product definition 28 FRU identification for ThinkPad Edge E520 models 67 1090 Backup battery 68 1110 Keyboard 69 1120 Top case assembly 71 1130 Bluetooth daughter card 74 1140 Express sub card...

Hardware Maintenance Manual
Page 51
... displayed for that action. • Closing the lid. • Pressing the power button. This index can be replaced next. Wait a few seconds before taking any operation with the keyboard, the TrackPoint, the hard disk drive, the parallel connector, or the diskette drive within that time. • ...If the timer conditions are satisfied in the ThinkPad notebook computers, see the manual for each error detected in ...
... displayed for that action. • Closing the lid. • Pressing the power button. This index can be replaced next. Wait a few seconds before taking any operation with the keyboard, the TrackPoint, the hard disk drive, the parallel connector, or the diskette drive within that time. • ...If the timer conditions are satisfied in the ThinkPad notebook computers, see the manual for each error detected in ...

Hardware Maintenance Manual
Page 75
Removing and replacing a FRU 69 When installing: Make sure that the connector is attached firmly. 1110 Keyboard For access, remove these FRUs in order: • "1010 Battery pack" on page 58 • "1040 Bottom slot cover" on page 61 Removal steps of keyboard 1 1 Note: Your models may look slightly different from the illustration above. Step 1 Screw (quantity) M2 × 6 mm, wafer-head, nylon-coated (2) Color Black Torque 0.181 Nm (1.85 kgfcm) 2 2 Chapter 8. When installing: Make sure the screws have been fastened to secure the keyboard.
Removing and replacing a FRU 69 When installing: Make sure that the connector is attached firmly. 1110 Keyboard For access, remove these FRUs in order: • "1010 Battery pack" on page 58 • "1040 Bottom slot cover" on page 61 Removal steps of keyboard 1 1 Note: Your models may look slightly different from the illustration above. Step 1 Screw (quantity) M2 × 6 mm, wafer-head, nylon-coated (2) Color Black Torque 0.181 Nm (1.85 kgfcm) 2 2 Chapter 8. When installing: Make sure the screws have been fastened to secure the keyboard.
Hardware Maintenance Manual
Page 77
To make sure that the keyboard edges are under the frame. 3. Removing and replacing a FRU 71 Secure the keyboard by tightening the screws from the bottom side of the keyboard is housed firmly, gently press the keys with your thumbs and try to slide the keyboard toward you. 4. 2. Attach the keyboard so that the front side of the computer. 1120 Top case assembly For access, remove these FRUs in order: • "1010 Battery pack" on page 58 • "1030 Optical drive or travel cover" on page 60 • "1040 Bottom slot cover" on page 61 • "1110 Keyboard" on page 69 Chapter 8.
To make sure that the keyboard edges are under the frame. 3. Removing and replacing a FRU 71 Secure the keyboard by tightening the screws from the bottom side of the keyboard is housed firmly, gently press the keys with your thumbs and try to slide the keyboard toward you. 4. 2. Attach the keyboard so that the front side of the computer. 1120 Top case assembly For access, remove these FRUs in order: • "1010 Battery pack" on page 58 • "1030 Optical drive or travel cover" on page 60 • "1040 Bottom slot cover" on page 61 • "1110 Keyboard" on page 69 Chapter 8.

Hardware Maintenance Manual
Page 81
Chapter 8. Removing and replacing a FRU 75 • "1030 Optical drive or travel cover" on page 60 • "1040 Bottom slot cover" on page 61 • "1110 Keyboard" on page 69 • "1120 Top case assembly" on page 71 Removal steps of Bluetooth daughter card 1 2 Step 1 Screw (quantity) M2 × 3 mm, wafer-...bezel" on page 59 • "1030 Optical drive or travel cover" on page 60 • "1040 Bottom slot cover" on page 61 • "1110 Keyboard" on page 69 • "1120 Top case assembly" on page 71 Removal steps of Express sub card When installing: Make sure that the Express sub...
Chapter 8. Removing and replacing a FRU 75 • "1030 Optical drive or travel cover" on page 60 • "1040 Bottom slot cover" on page 61 • "1110 Keyboard" on page 69 • "1120 Top case assembly" on page 71 Removal steps of Bluetooth daughter card 1 2 Step 1 Screw (quantity) M2 × 3 mm, wafer-...bezel" on page 59 • "1030 Optical drive or travel cover" on page 60 • "1040 Bottom slot cover" on page 61 • "1110 Keyboard" on page 69 • "1120 Top case assembly" on page 71 Removal steps of Express sub card When installing: Make sure that the Express sub...
Hardware Maintenance Manual
Page 84
If the system supports PC-Doctor for DOS, after replacing the system board, run PC-Doctor for ThinkPad Edge E520 models" on page 67 • "1090 Backup battery" on page 68 • "1110 Keyboard" on page 69 • "1120 Top case assembly" on page 71 • "1130 Bluetooth daughter card" on page 74 • ... page 63 • "1070 PCI Express Mini Card for wireless LAN" on page 64 • "1080 PCI Express Mini Card for wireless WAN for ThinkPad Edge E520 models" on page 66 • "1080 mSATA solid state drive for DOS to the computer while the test is running. Place the computer on a ...
If the system supports PC-Doctor for DOS, after replacing the system board, run PC-Doctor for ThinkPad Edge E520 models" on page 67 • "1090 Backup battery" on page 68 • "1110 Keyboard" on page 69 • "1120 Top case assembly" on page 71 • "1130 Bluetooth daughter card" on page 74 • ... page 63 • "1070 PCI Express Mini Card for wireless LAN" on page 64 • "1080 PCI Express Mini Card for wireless WAN for ThinkPad Edge E520 models" on page 66 • "1080 mSATA solid state drive for DOS to the computer while the test is running. Place the computer on a ...

Hardware Maintenance Manual
Page 91
..." on page 64 • "1080 PCI Express Mini Card for wireless WAN for ThinkPad Edge E520 models" on page 66 • "1080 mSATA solid state drive for ThinkPad Edge E520 models" on page 67 • "1090 Backup battery" on page 68 • "1110 Keyboard" on page 69 • "1120 Top case assembly" on page 71 • "1130... of DC-in sub card 1 Step 1 Screw (quantity) M2 × 6 mm, wafer-head, nylon-coated (1) Color Black Torque 0.181 Nm (1.85 kgfcm) Chapter 8. Removing and replacing a FRU 85
..." on page 64 • "1080 PCI Express Mini Card for wireless WAN for ThinkPad Edge E520 models" on page 66 • "1080 mSATA solid state drive for ThinkPad Edge E520 models" on page 67 • "1090 Backup battery" on page 68 • "1110 Keyboard" on page 69 • "1120 Top case assembly" on page 71 • "1130... of DC-in sub card 1 Step 1 Screw (quantity) M2 × 6 mm, wafer-head, nylon-coated (1) Color Black Torque 0.181 Nm (1.85 kgfcm) Chapter 8. Removing and replacing a FRU 85
Hardware Maintenance Manual
Page 95
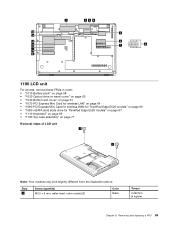
Removing and replacing a FRU 89 1 23 4 15 5 14 13 6 12 7 8 11 10 9 1190 LCD unit For access, remove these FRUs in order: • "1010 Battery pack" on page ... Card for wireless LAN" on page 64 • "1080 PCI Express Mini Card for wireless WAN for ThinkPad Edge E520 models" on page 66 • "1080 mSATA solid state drive for ThinkPad Edge E520 models" on page 67 • "1110 Keyboard" on page 69 • "1120 Top case assembly" on page 71 Removal steps of LCD unit...
Removing and replacing a FRU 89 1 23 4 15 5 14 13 6 12 7 8 11 10 9 1190 LCD unit For access, remove these FRUs in order: • "1010 Battery pack" on page ... Card for wireless LAN" on page 64 • "1080 PCI Express Mini Card for wireless WAN for ThinkPad Edge E520 models" on page 66 • "1080 mSATA solid state drive for ThinkPad Edge E520 models" on page 67 • "1110 Keyboard" on page 69 • "1120 Top case assembly" on page 71 Removal steps of LCD unit...


