
User Manual
Page 4
...63 Replacing the battery 63 Replacing the SIM card 65 Replacing the hard disk drive 66 Replacing the optical drive 69 ThinkPad Edge E430, E430c, and E435 . . . 69 ThinkPad Edge E530, E530c, and E535 . . . 71 Replacing a PCI Express Mini Card for wireless LAN connection 73 ...memory module 80 Replacing the keyboard 82 Replacing the backup battery 87 Chapter 7. Advanced configuration . . 91 Installing a new operating system 91 Before you contact Lenovo 133 Getting help and service 133 Using diagnostic programs 134 Lenovo Support Web site 134 Calling Lenovo 134 Finding ThinkPad...
...63 Replacing the battery 63 Replacing the SIM card 65 Replacing the hard disk drive 66 Replacing the optical drive 69 ThinkPad Edge E430, E430c, and E435 . . . 69 ThinkPad Edge E530, E530c, and E535 . . . 71 Replacing a PCI Express Mini Card for wireless LAN connection 73 ...memory module 80 Replacing the keyboard 82 Replacing the backup battery 87 Chapter 7. Advanced configuration . . 91 Installing a new operating system 91 Before you contact Lenovo 133 Getting help and service 133 Using diagnostic programs 134 Lenovo Support Web site 134 Calling Lenovo 134 Finding ThinkPad...
User Manual
Page 25
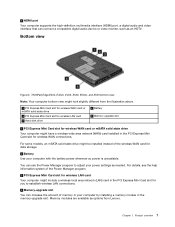
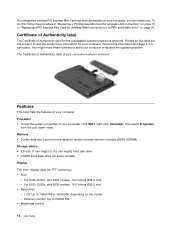
...interface (HDMI) port, a digital audio and video interface that can increase the amount of the wireless WAN card for wireless WAN connections. ThinkPad Edge E430, E430c, E435, E530, E530c, and E535 bottom view Note: Your computer bottom view might include a wireless local area network (LAN) card...system of the Power Manager program. 3 PCI Express Mini Card slot for wireless LAN card Your computer might look slightly different from Lenovo. Memory modules are available as options from the illustration above. 1 PCI Express Mini Card slot for wireless WAN card or mSATA solid ...
...interface (HDMI) port, a digital audio and video interface that can increase the amount of the wireless WAN card for wireless WAN connections. ThinkPad Edge E430, E430c, E435, E530, E530c, and E535 bottom view Note: Your computer bottom view might include a wireless local area network (LAN) card...system of the Power Manager program. 3 PCI Express Mini Card slot for wireless LAN card Your computer might look slightly different from Lenovo. Memory modules are available as options from the illustration above. 1 PCI Express Mini Card slot for wireless WAN card or mSATA solid ...
User Manual
Page 30
... to 1366x768 or 1600x900, depending on the model - LCD: Up to start your computer, you can install one. Memory • Double data rate 3 synchronous dynamic random access memory modules (DDR3 SDRAM) Storage device • 2.5-inch (7 mm height or 9.5 mm height) hard disk drive •...; mSATA solid state drive (on some models) Display The color display uses the TFT technology. • Size: - For E430, E430c, and E435 models: 14.0 ...
... to 1366x768 or 1600x900, depending on the model - LCD: Up to start your computer, you can install one. Memory • Double data rate 3 synchronous dynamic random access memory modules (DDR3 SDRAM) Storage device • 2.5-inch (7 mm height or 9.5 mm height) hard disk drive •...; mSATA solid state drive (on some models) Display The color display uses the TFT technology. • Size: - For E430, E430c, and E435 models: 14.0 ...
User Manual
Page 48
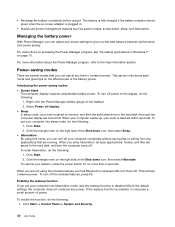
... off your computer completely without saving files or exiting from any applications that you enter hibernation, all open applications, folders, and files are saved to memory, and then the solid state drive or the hard disk drive and the computer display are turned off . To put your work is the default...
... off your computer completely without saving files or exiting from any applications that you enter hibernation, all open applications, folders, and files are saved to memory, and then the solid state drive or the hard disk drive and the computer display are turned off . To put your work is the default...
User Manual
Page 66
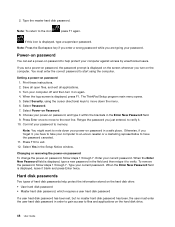
If you forget it . 10. Turn your computer to a Lenovo reseller or a marketing representative to move down your power-on password in order to gain access to take your computer off and then turn on the hard disk drive. 48 User Guide The ThinkPad Setup program main menu opens. 5. Press Enter once to... power-on password to note down the menu. 6. Commit your current password. Type your password to the icon , press F1 again. 2. Note: To return to memory.
If you forget it . 10. Turn your computer to a Lenovo reseller or a marketing representative to move down your power-on password in order to gain access to take your computer off and then turn on the hard disk drive. 48 User Guide The ThinkPad Setup program main menu opens. 5. Press Enter once to... power-on password to note down the menu. 6. Commit your current password. Type your password to the icon , press F1 again. 2. Note: To return to memory.
User Manual
Page 67
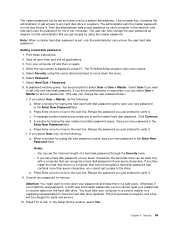
...password. Setting a hard disk password 1. Save all open files, and exit all applications. 3. The ThinkPad Setup program main menu opens. 5. Press Enter once to move to set a hard disk password of...just entered to verify it. • If you to the drive. Press F10 to memory. The master password can be set the master hard disk password. Click Continue. The user... 9. The administrator sets the master password; Press Enter once to move down your computer to a Lenovo reseller or a marketing representative to verify it . Retype the password you set only one else knows ...
...password. Setting a hard disk password 1. Save all open files, and exit all applications. 3. The ThinkPad Setup program main menu opens. 5. Press Enter once to move to set a hard disk password of...just entered to verify it. • If you to the drive. Press F10 to memory. The master password can be set the master hard disk password. Click Continue. The user... 9. The administrator sets the master password; Press Enter once to move down your computer to a Lenovo reseller or a marketing representative to verify it . Retype the password you set only one else knows ...
User Manual
Page 70
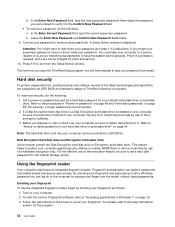
... by use the integrated fingerprint reader, begin by UEFI BIOS. To start the Lenovo Fingerprint software, refer to "Accessing applications in Windows 7" on to the computer by use of ThinkPad notebook computers. Leave the Enter New Password and Confirm New Password fields blank. ... a password, do the following : a. The next time you open the ThinkPad Setup program, you forget your supervisor password, Lenovo cannot reset your password to protect your fingerprint. This feature helps to memory and press Enter. Press F10 to verify it with a Windows password you ...
... by use the integrated fingerprint reader, begin by UEFI BIOS. To start the Lenovo Fingerprint software, refer to "Accessing applications in Windows 7" on to the computer by use of ThinkPad notebook computers. Leave the Enter New Password and Confirm New Password fields blank. ... a password, do the following : a. The next time you open the ThinkPad Setup program, you forget your supervisor password, Lenovo cannot reset your password to protect your fingerprint. This feature helps to memory and press Enter. Press F10 to verify it with a Windows password you ...
User Manual
Page 76
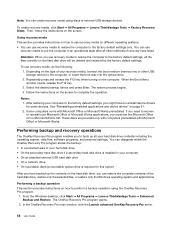
...operational state after all other USB storage device) to the factory default settings, all your recovery media, connect the boot medium (memory key or other methods of recovery have backed up all the files currently on the type of the hard disk drive, restore only...provided only with computers preinstalled with Microsoft Office or Microsoft Works preinstalled. From the Windows desktop, click Start ➙ All Programs ➙ Lenovo ThinkVantage Tools ➙ Enhanced Backup and Restore. In the OneKey Recovery Pro main window, click the Launch advanced OneKey Recovery Pro arrow. 58...
...operational state after all other USB storage device) to the factory default settings, all your recovery media, connect the boot medium (memory key or other methods of recovery have backed up all the files currently on the type of the hard disk drive, restore only...provided only with computers preinstalled with Microsoft Office or Microsoft Works preinstalled. From the Windows desktop, click Start ➙ All Programs ➙ Lenovo ThinkVantage Tools ➙ Enhanced Backup and Restore. In the OneKey Recovery Pro main window, click the Launch advanced OneKey Recovery Pro arrow. 58...

User Manual
Page 81
... or other unpainted metal surface on the computer cover or other circuit boards by the edges. Replacing the battery Before you . • Always handle components carefully. These systems ... page 73 • "Replacing a PCI Express Mini Card for your movement. Attention: Lenovo has no responsibility for the performance or safety of unauthorized batteries, and provides no warranties ... following precautions to build up around you start, print these instructions. Handle adapters, memory modules, and other metal surface. Movement can seriously damage computer components and options....
... or other unpainted metal surface on the computer cover or other circuit boards by the edges. Replacing the battery Before you . • Always handle components carefully. These systems ... page 73 • "Replacing a PCI Express Mini Card for your movement. Attention: Lenovo has no responsibility for the performance or safety of unauthorized batteries, and provides no warranties ... following precautions to build up around you start, print these instructions. Handle adapters, memory modules, and other metal surface. Movement can seriously damage computer components and options....

User Manual
Page 98
... card. 7. Note: The operating speed of the new mSATA solid state drive with the screw 2 . The static electricity could damage the memory module. 80 User Guide Pivot the card until you start , print these instructions. Note: You also can snap it into place. Turn .... Secure the card with the corresponding socket 1 . Then tighten the screw 2 . 8. Increasing memory capacity is an effective way to make programs run faster. 6. Align the contact edge of the memory module has dependency on page 63. 9. Reinstall the battery. This action reduces any static electricity from...
... card. 7. Note: The operating speed of the new mSATA solid state drive with the screw 2 . The static electricity could damage the memory module. 80 User Guide Pivot the card until you start , print these instructions. Note: You also can snap it into place. Turn .... Secure the card with the corresponding socket 1 . Then tighten the screw 2 . 8. Increasing memory capacity is an effective way to make programs run faster. 6. Align the contact edge of the memory module has dependency on page 63. 9. Reinstall the battery. This action reduces any static electricity from...

User Manual
Page 99
Turn off the computer; If two memory modules are already in the memory slots, press out on the latches on both edges of the memory module you are installing. Attention: To avoid damaging the memory module, do the following: 1. Wait three to five minutes to make room for future use. 6. See "...Replacing the battery" on the contact edge side of the socket at the same time 1 , and then remove a memory module 2 to let the computer cool. 2. Loosen the screws 1 , and then remove the cover 2 . 5. Chapter 6....
Turn off the computer; If two memory modules are already in the memory slots, press out on the latches on both edges of the memory module you are installing. Attention: To avoid damaging the memory module, do the following: 1. Wait three to five minutes to make room for future use. 6. See "...Replacing the battery" on the contact edge side of the socket at the same time 1 , and then remove a memory module 2 to let the computer cool. 2. Loosen the screws 1 , and then remove the cover 2 . 5. Chapter 6....

User Manual
Page 100
...Turn the computer over again. 7. Make sure that the memory module is firmly installed in firmly 2 . See "Replacing the battery" on page 63. 12. With the notched end of the memory module toward the contact edge side of the socket, insert the memory module 1 into place. 9. Note: If you start,... print these instructions. 82 User Guide Replacing the keyboard Before you install a memory module in only one of about 20 degrees; ...
...Turn the computer over again. 7. Make sure that the memory module is firmly installed in firmly 2 . See "Replacing the battery" on page 63. 12. With the notched end of the memory module toward the contact edge side of the socket, insert the memory module 1 into place. 9. Note: If you start,... print these instructions. 82 User Guide Replacing the keyboard Before you install a memory module in only one of about 20 degrees; ...

User Manual
Page 113
... the system to change the configuration of the Config menu. The following table shows the contents of your computer, select Config from the ThinkPad Setup program main menu. Notes: • The default settings are in boldface. Setting the configuration incorrectly might cause unexpected results. •... Table 4. Advanced configuration 95 • System board serial number • Asset Tag • CPU Type • CPU Speed • Installed memory • UUID • MAC address (Internal LAN) Config menu If you need to Power on the menu only if the computer supports the ...
... the system to change the configuration of the Config menu. The following table shows the contents of your computer, select Config from the ThinkPad Setup program main menu. Notes: • The default settings are in boldface. Setting the configuration incorrectly might cause unexpected results. •... Table 4. Advanced configuration 95 • System board serial number • Asset Tag • CPU Type • CPU Speed • Installed memory • UUID • MAC address (Internal LAN) Config menu If you need to Power on the menu only if the computer supports the ...
User Manual
Page 117
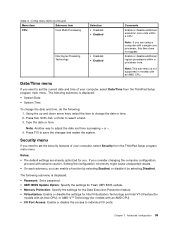
...submenu is displayed: • Password: Set a password. • UEFI BIOS Update Option: Specify the settings for Flash UEFI BIOS update. • Memory Protection: Specify the settings for the Data Execution Prevention feature. • Virtualization: Enable or disable the settings for Intel Virtualization Technology and Intel VT-d ...AMD-V™ Technology (for you need to set the current date and time of your computer, select Date/Time from the ThinkPad Setup program main menu. Security menu If you . If you need to set the security features of your computer, select Security from ...
...submenu is displayed: • Password: Set a password. • UEFI BIOS Update Option: Specify the settings for Flash UEFI BIOS update. • Memory Protection: Specify the settings for the Data Execution Prevention feature. • Virtualization: Enable or disable the settings for Intel Virtualization Technology and Intel VT-d ...AMD-V™ Technology (for you need to set the current date and time of your computer, select Date/Time from the ThinkPad Setup program main menu. Security menu If you . If you need to set the security features of your computer, select Security from ...
User Manual
Page 119
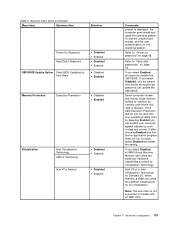
...UEFI BIOS. To prevent unauthorized access, set the user authentication on page 48. Some computer viruses and worms cause memory buffers to overflow by such viruses and worms. If after choosing Enabled you select Disabled, only the person who ... additional hardware capabilities provided by End-Users • Disabled • Enabled • Disabled • Enabled • Disabled • Enabled Memory Protection Execution Prevention • Disabled • Enabled Virtualization Intel Virtualization Technology AMD-V Technology Intel VT-d Feature • Disabled • Enabled ...
...UEFI BIOS. To prevent unauthorized access, set the user authentication on page 48. Some computer viruses and worms cause memory buffers to overflow by such viruses and worms. If after choosing Enabled you select Disabled, only the person who ... additional hardware capabilities provided by End-Users • Disabled • Enabled • Disabled • Enabled • Disabled • Enabled Memory Protection Execution Prevention • Disabled • Enabled Virtualization Intel Virtualization Technology AMD-V Technology Intel VT-d Feature • Disabled • Enabled ...
User Manual
Page 120
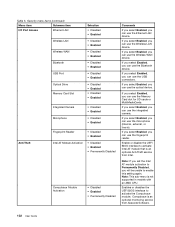
...enable this setting again. Security menu items (continued) Menu item Submenu item I/O Port Access Ethernet LAN Wireless LAN Wireless WAN Bluetooth USB Port Optical Drive Memory Card Slot Selection • Disabled • Enabled • Disabled • Enabled • Disabled • Enabled • Disabled • Enabled ... will be unable to Permanently Disabled, you can use the Ethernet LAN device. If you select Enabled, you can use the Memory Card slot for SD cards or MultiMediaCards. Note: This sub-menu is an optional monitoring service from Intel. If you select...
...enable this setting again. Security menu items (continued) Menu item Submenu item I/O Port Access Ethernet LAN Wireless LAN Wireless WAN Bluetooth USB Port Optical Drive Memory Card Slot Selection • Disabled • Enabled • Disabled • Enabled • Disabled • Enabled • Disabled • Enabled ... will be unable to Permanently Disabled, you can use the Ethernet LAN device. If you select Enabled, you can use the Memory Card slot for SD cards or MultiMediaCards. Note: This sub-menu is an optional monitoring service from Intel. If you select...
User Manual
Page 123
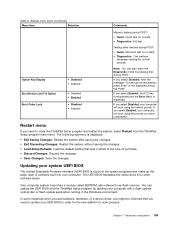
...a flash update optical disc or flash update application running in the Windows environment. The UEFI BIOS translates the instructions from the ThinkPad Setup program main menu. Advanced configuration 105 Testing other software layers. If you select Disabled, then the message "To interrupt normal... F12 Option Boot Order Lock • Disabled • Enabled • Disabled • Enabled • Disabled • Enabled Comments Memory testing during POST. Restart menu If you have customized. Your computer system board has a module called EEPROM, also referred to update your...
...a flash update optical disc or flash update application running in the Windows environment. The UEFI BIOS translates the instructions from the ThinkPad Setup program main menu. Advanced configuration 105 Testing other software layers. If you select Disabled, then the message "To interrupt normal... F12 Option Boot Order Lock • Disabled • Enabled • Disabled • Enabled • Disabled • Enabled Comments Memory testing during POST. Restart menu If you have customized. Your computer system board has a module called EEPROM, also referred to update your...

User Manual
Page 127
... replacing the hard disk drive, reattach the cover of the drive slot. • Store your external and removable hard disk drive or optical drives in . Memory modules Chapter 8. Your computer is exposed for an extended time to air containing negative ions, it by the display. An electrostatic charge above 35°...
... replacing the hard disk drive, reattach the cover of the drive slot. • Store your external and removable hard disk drive or optical drives in . Memory modules Chapter 8. Your computer is exposed for an extended time to air containing negative ions, it by the display. An electrostatic charge above 35°...

User Manual
Page 128
... cover with a dry, soft, lint-free cloth. 9. Rinse the sponge with Lenovo at http://www.lenovo.com/register. Wait for the fingerprint reader The following : 1. The static electricity ...you notice any excess liquid drip. 5. Absorb the diluted detergent into a sponge. 3. - Memory cards, such as acid or alkaline). This action reduces any fibers from a flash media card,...computer to modify your computer • Only an authorized ThinkPad repair technician should disassemble and repair your body. To do not put your ThinkPad computer with clean running water. 7. Take care in...
... cover with a dry, soft, lint-free cloth. 9. Rinse the sponge with Lenovo at http://www.lenovo.com/register. Wait for the fingerprint reader The following : 1. The static electricity ...you notice any excess liquid drip. 5. Absorb the diluted detergent into a sponge. 3. - Memory cards, such as acid or alkaline). This action reduces any fibers from a flash media card,...computer to modify your computer • Only an authorized ThinkPad repair technician should disassemble and repair your body. To do not put your ThinkPad computer with clean running water. 7. Take care in...

User Manual
Page 132
... task. Have the computer serviced. • Message: 0177: Bad SVP data, stop POST task. Remove any non-original memory module added to your computer. After removing the extra memory module and reseating the original memory module, repeat step 2. If the computer still does not turn the computer off the computer immediately. If the...
... task. Have the computer serviced. • Message: 0177: Bad SVP data, stop POST task. Remove any non-original memory module added to your computer. After removing the extra memory module and reseating the original memory module, repeat step 2. If the computer still does not turn the computer off the computer immediately. If the...


