

User Guide
Page 4
...Windows 7 174 Installing Windows Vista 175 Installing Windows XP 176 Installing device drivers 178 Installing the driver for the 4-in ThinkPad X220 Tablet and X220i Tablet 100 Notice on password 90 Hard disk passwords 91 Supervisor password 93 Hard disk security 95 Setting ... reader 97 Using a fingerprint reader in ThinkPad X220 and X220i 97 Using a fingerprint reader in -1 Media Card Reader 178 Installing the driver for USB 3.0 178 Installing ThinkPad Monitor File for Windows 2000/XP/Vista/7 179 Installing Intel Chipset Support for wireless WAN connection 137 Installing and ...
...Windows 7 174 Installing Windows Vista 175 Installing Windows XP 176 Installing device drivers 178 Installing the driver for the 4-in ThinkPad X220 Tablet and X220i Tablet 100 Notice on password 90 Hard disk passwords 91 Supervisor password 93 Hard disk security 95 Setting ... reader 97 Using a fingerprint reader in ThinkPad X220 and X220i 97 Using a fingerprint reader in -1 Media Card Reader 178 Installing the driver for USB 3.0 178 Installing ThinkPad Monitor File for Windows 2000/XP/Vista/7 179 Installing Intel Chipset Support for wireless WAN connection 137 Installing and ...

User Guide
Page 30
... connector (left) 5 Monitor connector 7 Fan louvers (left -side view for connecting devices compatible with a USB interface, such as a printer or a digital camera. 12 User Guide ThinkPad X220 and X220i left ) The Universal Serial Bus connector is used for your computer on page 79. For details, refer to the instructions in "Using an... an ExpressCard, a smart card, or a flash media card" on and off using this switch. 3 USB connector (left -side view Figure 5. Note: Your computer does not support the CPRM feature for a 54 mm-wide card.
... connector (left) 5 Monitor connector 7 Fan louvers (left -side view for connecting devices compatible with a USB interface, such as a printer or a digital camera. 12 User Guide ThinkPad X220 and X220i left ) The Universal Serial Bus connector is used for your computer on page 79. For details, refer to the instructions in "Using an... an ExpressCard, a smart card, or a flash media card" on and off using this switch. 3 USB connector (left -side view Figure 5. Note: Your computer does not support the CPRM feature for a 54 mm-wide card.

User Guide
Page 32
Note: Your computer is to the upper side. ThinkPad X220 Tablet and X220i Tablet left ) 2 Wireless radio switch 4 DisplayPort connector 6 USB connector 1 ExpressCard slot Your computer has an ExpressCard slot for connecting devices compatible ... view 1 ExpressCard slot 3 USB connectors (left) 5 Monitor connector 7 Fan louvers (left -side view Figure 6. Otherwise the connector might be damaged. 4 DisplayPort connector Your computer supports the DisplayPort, a next-generation digital display interface that the mark is compatible with a USB interface, such as a printer or a digital camera.
Note: Your computer is to the upper side. ThinkPad X220 Tablet and X220i Tablet left ) 2 Wireless radio switch 4 DisplayPort connector 6 USB connector 1 ExpressCard slot Your computer has an ExpressCard slot for connecting devices compatible ... view 1 ExpressCard slot 3 USB connectors (left) 5 Monitor connector 7 Fan louvers (left -side view Figure 6. Otherwise the connector might be damaged. 4 DisplayPort connector Your computer supports the DisplayPort, a next-generation digital display interface that the mark is compatible with a USB interface, such as a printer or a digital camera.
User Guide
Page 41
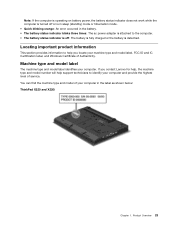
... IC Certification label, and Windows Certificate of Authenticity. Locating important product information This section provides information to help you contact Lenovo for help, the machine type and model number will help support technicians to identify your computer and provide the highest level of your computer. You can find the machine type and... charged or the battery is in sleep (standby) mode or hibernation mode. • Quick blinking orange: An error occurred in the label as shown below: ThinkPad X220 and X220i Chapter 1. Product Overview 23
... IC Certification label, and Windows Certificate of Authenticity. Locating important product information This section provides information to help you contact Lenovo for help, the machine type and model number will help support technicians to identify your computer and provide the highest level of your computer. You can find the machine type and... charged or the battery is in sleep (standby) mode or hibernation mode. • Quick blinking orange: An error occurred in the label as shown below: ThinkPad X220 and X220i Chapter 1. Product Overview 23

User Guide
Page 97
... to be launched automatically when you press Fn+F6 or when you do not put your computer in ThinkPad X220 Tablet and X220i Tablet models. If your computer has a media card reader slot, it supports the following : 1. To do the following cards: • SD card • SDHC card •... SDXC card • MultiMediaCard (MMC) Notes: • Your computer does not support the CPRM feature for your computer 79 Configuring camera settings You can use a program, press Fn+F6 to your computer may have an ExpressCard slot ...
... to be launched automatically when you press Fn+F6 or when you do not put your computer in ThinkPad X220 Tablet and X220i Tablet models. If your computer has a media card reader slot, it supports the following : 1. To do the following cards: • SD card • SDHC card •... SDXC card • MultiMediaCard (MMC) Notes: • Your computer does not support the CPRM feature for your computer 79 Configuring camera settings You can use a program, press Fn+F6 to your computer may have an ExpressCard slot ...

User Guide
Page 115
... to enroll your fingerprint and associating it . Using a fingerprint reader in ThinkPad X220 and X220i Depending on to set. Thus fingerprint authentication can be installed. The software is not preinstalled on your computer. 2. Turn on the screen to : http://www.lenovo.com/support. Follow the instructions on your system. For details, refer to exit...
... to enroll your fingerprint and associating it . Using a fingerprint reader in ThinkPad X220 and X220i Depending on to set. Thus fingerprint authentication can be installed. The software is not preinstalled on your computer. 2. Turn on the screen to : http://www.lenovo.com/support. Follow the instructions on your system. For details, refer to exit...

User Guide
Page 167
... whole assembly. All you can shop at Lenovo, go to the ThinkPad Ultrabase Series 3, never pick up the assembly by taking advantage of your computer to the ThinkPad Ultrabase Series 3, you need is attached to : http://www.lenovo.com/accessories/services/index.html ThinkPad Ultrabase Series 3 Your ThinkPad X220, X220i, X220 Tablet, and X220i Tablet support the ThinkPad Ultrabase Series 3.
... whole assembly. All you can shop at Lenovo, go to the ThinkPad Ultrabase Series 3, never pick up the assembly by taking advantage of your computer to the ThinkPad Ultrabase Series 3, you need is attached to : http://www.lenovo.com/accessories/services/index.html ThinkPad Ultrabase Series 3 Your ThinkPad X220, X220i, X220 Tablet, and X220i Tablet support the ThinkPad Ultrabase Series 3.

User Guide
Page 173
ThinkPad Battery 19+ Your ThinkPad X220, X220i, X220 Tablet, and X220i Tablet support the ThinkPad Battery 19+. With ThinkPad Battery 19+, you attach a mechanical lock to the security keyhole of the ThinkPad Ultrabase Series 3, the ThinkPad Ultrabase Series 3 cannot be unable to detach the computer from the ThinkPad Ultrabase Series 3. When ... of the locked position, and you can extend the operating time of the computer alone. Note: You need to the ThinkPad Battery 19+, never pick up the assembly by taking hold the whole assembly. Enhancing your computer 155 If you can secure...
ThinkPad Battery 19+ Your ThinkPad X220, X220i, X220 Tablet, and X220i Tablet support the ThinkPad Battery 19+. With ThinkPad Battery 19+, you attach a mechanical lock to the security keyhole of the ThinkPad Ultrabase Series 3, the ThinkPad Ultrabase Series 3 cannot be unable to detach the computer from the ThinkPad Ultrabase Series 3. When ... of the locked position, and you can extend the operating time of the computer alone. Note: You need to the ThinkPad Battery 19+, never pick up the assembly by taking hold the whole assembly. Enhancing your computer 155 If you can secure...

User Guide
Page 177
... Dock Plus Series 3 Note: Only ThinkPad X220 and X220i support ThinkPad Port Replicator Series 3, ThinkPad Mini Dock Series 3, and ThinkPad Mini Dock Plus Series 3. After you can use its connectors in place of the computer alone. For more details about the ThinkPad Port Replicator Series 3, the ThinkPad Mini Dock Series 3, or the ThinkPad Mini Dock Plus Series 3, refer to...
... Dock Plus Series 3 Note: Only ThinkPad X220 and X220i support ThinkPad Port Replicator Series 3, ThinkPad Mini Dock Series 3, and ThinkPad Mini Dock Plus Series 3. After you can use its connectors in place of the computer alone. For more details about the ThinkPad Port Replicator Series 3, the ThinkPad Mini Dock Series 3, or the ThinkPad Mini Dock Plus Series 3, refer to...

User Guide
Page 194
... disk drive from the computer with a single-core processor and install it will not respond; If you computer is not true: If you start the ThinkPad Setup. 4. it on a computer with Service Pack 2 into the CD or DVD drive, and restart the computer. 12. To install a third-... the hard disk drive. If the homepage is the number of drivers. Select Config. 5. Select Both or Legacy Only. 10. Note: Only ThinkPad X220 and ThinkPad X220i support Windows XP. To make sure you cannot get access to the hard disk drive. Select AHCI . 7. Insert the CD for Specify Additional Device....
... disk drive from the computer with a single-core processor and install it will not respond; If you computer is not true: If you start the ThinkPad Setup. 4. it on a computer with Service Pack 2 into the CD or DVD drive, and restart the computer. 12. To install a third-... the hard disk drive. If the homepage is the number of drivers. Select Config. 5. Select Both or Legacy Only. 10. Note: Only ThinkPad X220 and ThinkPad X220i support Windows XP. To make sure you cannot get access to the hard disk drive. Select AHCI . 7. Insert the CD for Specify Additional Device....

