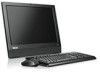
Hardware Maintenance Manual for ThinkCentre A70z
Page 6
...Removing the power supply assembly . . . 102 Installing a power supply assembly . . . . . 104 Replacing the LCD panel 106 Removing the LCD panel 106 Installing an LCD panel 107 Installing a computer wall mount 108 Completing the FRU installation 108 Installing a computer cover 108 Installing a computer stand... 109 Chapter 9. Notices 183 Television output notice 184 Trademarks 184 Index 185 iv ThinkCentre ...
Hardware Maintenance Manual for ThinkCentre A70z
Page 74
1 System board shielding 2 Integrated webcam 3 Heat sink assembly 4 Microprocessor fan assembly 5 Power supply assembly 6 Hard disk drive 7 Optical drive 8 Main bracket 9 LCD panel 10 Internal speaker 11 Front bezel 12 Internal speaker 13 Rear I/O assembly 14 Rear I/O shielding 15 Power connector bracket 16 Power supply assembly cage ... disk drive and optical 15 drive Rear USB assembly - 40 pin Internal USB assembly Debug pin Power switch assembly Internal speakers Mini PCI Express 68 ThinkCentre Hardware Maintenance Manual
Hardware Maintenance Manual for ThinkCentre A70z
Page 75
... the computer stand, do the following illustration. 7 Data cables for hard disk drive and optical 16 drive 8 Rear I/O assembly - 30 pin 17 9 Battery Integrated webcam LCD panel Adjusting the computer stand Your computer comes with a stand that the screen is against the surface and the cover is at an angle of...
Hardware Maintenance Manual for ThinkCentre A70z
Page 88
Remove all the 11 screws that secure the main bracket to the main bracket. 82 ThinkCentre Hardware Maintenance Manual Remove the optical drive and the rear I /O assembly" on page 92. 10. Remove the four screws that attach the LCD panel to the front bezel. 11. See "Removing the optical drive" on page 77 and "Removing the rear I /O assembly to gain access to all the 11 screws that hold the LCD panel. 9.
Hardware Maintenance Manual for ThinkCentre A70z
Page 89
... can route the microprocessor fan assembly cables through the hole in the main bracket. 12. Lift the main bracket up a little bit so that the LCD panel detaches from the main bracket, and you can gently pull out the microprocessor fan assembly cable connectors through the hole in the main bracket...
Hardware Maintenance Manual for ThinkCentre A70z
Page 90
Reinstall the four screws that secure the main bracket to the main bracket. 5. Reinstall all the 11 screws that attach the LCD panel to the front bezel. 84 ThinkCentre Hardware Maintenance Manual Route the microprocessor fan assembly cables so that they will not be pinched by the system board shielding. 4. 3.
Hardware Maintenance Manual for ThinkCentre A70z
Page 112
...page 77. 7. As you remove each FRU, set it aside, along with your computer. Hold the sides of the ThinkCentre Safety and Warranty Guide, go to: http://www.lenovo.com/support This section provides instructions on how to be removed. See "Replacing the hard disk drive" on page 71... See "Removing the memory module" on page 102. 10. See "Removing the microprocessor and heat sink assembly" on page 92. 9. Removing the LCD panel To remove the LCD panel, do the following: 1. See "Removing the rear I /O assembly. See "Removing the system board" on the desk or surface. Place ...
Hardware Maintenance Manual for ThinkCentre A70z
Page 113
Reinstall the four screws that secure the LCD panel to the main bracket. 15. Installing an LCD panel To install an LCD panel, do the following: 1. Place the main bracket over the front bezel, making sure the screw holes in the main bracket align with those in ... 107 This will allow the four screws to the front bezel. Note: First partially tighten all four screws, and then fully tighten them. Position the LCD panel and main bracket assembly over the LCD panel, make sure the four screw holes in the main bracket align with the mounting stands in the...
Hardware Maintenance Manual for ThinkCentre A70z
Page 122
...rubber foot • MT 1165: all models • MT 1184: all models • MT 1186: all models 19 inch 1440x900 LCD panel • MT 1165: all models • MT 1184: all models • MT 1186: all models FRU, front and ...: all models FRU # CRU 45K6426 N 89Y0897 N 03T9583 N 03T9566 N 03T9567 N 03T9568 N 03T9569 N 03T9570 N Keyboard and Mouse Keyboard (Lenovo Preferred Pro USB -- without hub) US English China • MT 1165: A1 A1U A2U A2M A3 A3U A3M A4 A4U AD A6 A7 A8... G2Q G3Q • MT 1184: A1G A2G A3G FRU # 41A5289 CRU 1 116 ThinkCentre Hardware Maintenance Manual
Hardware Maintenance Manual for ThinkCentre A70z
Page 131
... D5A D5T D6A D6T C7J APS APY AQG ARG C2S C3S C3M • MT 1184: • MT 1186: A3U A3F A4S A4Y 19 inch 1440x900 LCD panel • MT 1165: A1U A1F A2U A2F A2M A3U A3F A3M A4U A4F A5U A5F ADJ A6J A7J A8S A8Y A8J AAJ ABG ALG...
Hardware Maintenance Manual for ThinkCentre A70z
Page 150
...: all models • MT 0994: all models • MT 0421, 2565: all models 19-inch 1440x900 LCD panel • MT 0401: all models • MT 0994: all models • MT 0421, 2565: all models FRUs 144 ThinkCentre Hardware Maintenance Manual FRU # CRU 45K6426 N 45K6417 N 45K6418 N 45K6419 N 45K6420 N 45K6421 N 45K6422 N 45K6423 N 89Y0897 N Mechanical...
Hardware Maintenance Manual for ThinkCentre A70z
Page 151
... • MT 0401: all models • MT 0994: all models • MT 0421, 2565: all models 19inch 1440x900 LCD panel • MT 0401: all models • MT 0994: all models • MT 0421, 2565: all models Front and rear bezel, camera & optical drive model ...