
User Manual
Page 3
... 1-4 Setting up your monitor 1-4 Connecting and turning on your monitor 1-4 Registering your monitor 2-8 Detaching the monitor stand 2-8 Chapter 3. Service and Support A-1 Online technical support A-1 Telephone technical support A-1 Appendix B. Contents Safety information iii Chapter1. Reference information 3-1 Monitor specifications 3-1 Troubleshooting 3-2 Manual image setup 3-4 Manually installing the monitor driver 3-4 Installing the monitor driver in Windows XP 3-4 Installing the monitor driver in Windows 2000 3-5 Getting...
... 1-4 Setting up your monitor 1-4 Connecting and turning on your monitor 1-4 Registering your monitor 2-8 Detaching the monitor stand 2-8 Chapter 3. Service and Support A-1 Online technical support A-1 Telephone technical support A-1 Appendix B. Contents Safety information iii Chapter1. Reference information 3-1 Monitor specifications 3-1 Troubleshooting 3-2 Manual image setup 3-4 Manually installing the monitor driver 3-4 Installing the monitor driver in Windows XP 3-4 Installing the monitor driver in Windows 2000 3-5 Getting...
User Manual
Page 5
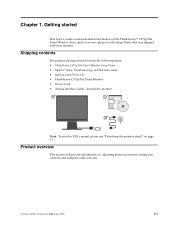
... mount, please see the Setup Poster that was shipped with your monitor. Shipping contents The product package should include the following items: • ThinkVision L171p Flat Panel Monitor Setup Poster • Monitor Safety, Troubleshooting, and Warranty Guide • Reference and Driver CD • ThinkVision L171p Flat Panel Monitor • Power Cord • Analog Interface Cable - Chapter 1. Product overview This...
... mount, please see the Setup Poster that was shipped with your monitor. Shipping contents The product package should include the following items: • ThinkVision L171p Flat Panel Monitor Setup Poster • Monitor Safety, Troubleshooting, and Warranty Guide • Reference and Driver CD • ThinkVision L171p Flat Panel Monitor • Power Cord • Analog Interface Cable - Chapter 1. Product overview This...

User Manual
Page 9
Connect the digital cable to the DVI connector of the computer. Plug the monitor power cord and the computer cord into grounded electrical outlets. Power on the back of the monitor and the other end on the monitor and the computer. Chapter 1. 1-5 Note: The digital cable is not included with the monitor. To install the monitor driver, insert the Reference and Driver CD, click Install driver, and follow the on-screen instructions.
Connect the digital cable to the DVI connector of the computer. Plug the monitor power cord and the computer cord into grounded electrical outlets. Power on the back of the monitor and the other end on the monitor and the computer. Chapter 1. 1-5 Note: The digital cable is not included with the monitor. To install the monitor driver, insert the Reference and Driver CD, click Install driver, and follow the on-screen instructions.

User Manual
Page 16
...; Check with image rotation can be downloaded from their support website. 2-6 ThinkVision L171p Flat Panel Monitor User's Guide Therefore, refer to your computer to see if this monitor, you may need to minimize flicker, LCD or Flat Panel technology is controlled by the computer. Factory set display modes... configured to a display mode outside the range of your computer documentation for details on your computer to see if graphic drivers with the manufacturer of this feature is normal and the image can be readjusted using automatic image setup and the image controls...
...; Check with image rotation can be downloaded from their support website. 2-6 ThinkVision L171p Flat Panel Monitor User's Guide Therefore, refer to your computer to see if this monitor, you may need to minimize flicker, LCD or Flat Panel technology is controlled by the computer. Factory set display modes... configured to a display mode outside the range of your computer documentation for details on your computer to see if graphic drivers with the manufacturer of this feature is normal and the image can be readjusted using automatic image setup and the image controls...
User Manual
Page 19
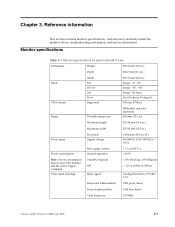
...Range: 110.0mm Yes (clockwise 90 degree) 100 mm (3.94 in.) Image Viewable image size IBM radial arm sold separately. 430 mm (17.0 in.) Maximum height 270.34 mm (10.6 in.) Maximum width 337.92 mm (13.3 in.) Power input Pixel pitch Supply voltage ...%) Power consumption Max supply current Normal operation 1.5 A at 120 V ac < 40 W Note: Power consumption figures are for the monitor and the power supply combined. Reference information This section contains monitor specifications, instructions to manually install the monitor driver, troubleshooting information, and service information...
...Range: 110.0mm Yes (clockwise 90 degree) 100 mm (3.94 in.) Image Viewable image size IBM radial arm sold separately. 430 mm (17.0 in.) Maximum height 270.34 mm (10.6 in.) Maximum width 337.92 mm (13.3 in.) Power input Pixel pitch Supply voltage ...%) Power consumption Max supply current Normal operation 1.5 A at 120 V ac < 40 W Note: Power consumption figures are for the monitor and the power supply combined. Reference information This section contains monitor specifications, instructions to manually install the monitor driver, troubleshooting information, and service information...
User Manual
Page 22
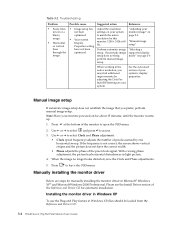
... menu. With a wrong phase adjustment, the picture has horizontal disturbances in Windows XP, files should be loaded from the Reference and Driver CD. 3-4 ThinkVision L171p Flat Panel Monitor User's Guide Installing the monitor driver in Windows XP To use the Plug and Play feature in light picture. 4. Use or to select Clock and Phase adjustment. •...
... menu. With a wrong phase adjustment, the picture has horizontal disturbances in Windows XP, files should be loaded from the Reference and Driver CD. 3-4 ThinkVision L171p Flat Panel Monitor User's Guide Installing the monitor driver in Windows XP To use the Plug and Play feature in light picture. 4. Use or to select Clock and Phase adjustment. •...
User Manual
Page 23
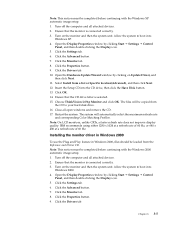
.... 11. Open the Hardware Update Wizard window by clicking on the monitor and then the system unit. Click OK. 14. Choose ThinkVision L171p Monitor and click OK. Restart the system. Installing the monitor driver in Windows 2000 To use the Plug and Play feature in Windows ... must be copied from the Reference and Driver CD. Close all attached devices. 2. Click the Monitor tab. 8. Chapter 3. 3-5 Open the Display Properties window by clicking Start J Settings J Control Panel, and then double-clicking the Display icon. 5. Note: On LCD monitors, unlike CRTs, a faster refresh rate...
.... 11. Open the Hardware Update Wizard window by clicking on the monitor and then the system unit. Click OK. 14. Choose ThinkVision L171p Monitor and click OK. Restart the system. Installing the monitor driver in Windows 2000 To use the Plug and Play feature in Windows ... must be copied from the Reference and Driver CD. Close all attached devices. 2. Click the Monitor tab. 8. Chapter 3. 3-5 Open the Display Properties window by clicking Start J Settings J Control Panel, and then double-clicking the Display icon. 5. Note: On LCD monitors, unlike CRTs, a faster refresh rate...
User Manual
Page 24
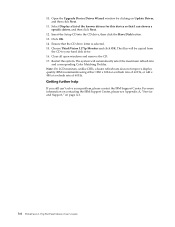
.... 15. Open the Upgrade Device Driver Wizard window by clicking on page A-1. 3-6 ThinkVision L171p Flat Panel Monitor User's Guide Choose ThinkVision L171p Monitor and click OK. Close all open windows and remove the CD. 17. The system will be copied from the CD to your problem, please contact the IBM Support Center. Note: On LCD monitors, unlike CRTs, a faster refresh...
.... 15. Open the Upgrade Device Driver Wizard window by clicking on page A-1. 3-6 ThinkVision L171p Flat Panel Monitor User's Guide Choose ThinkVision L171p Monitor and click OK. Close all open windows and remove the CD. 17. The system will be copied from the CD to your problem, please contact the IBM Support Center. Note: On LCD monitors, unlike CRTs, a faster refresh...


