
User Manual
Page 3
... 2-1 Positioning and viewing your monitor 2-1 Quick tips for healthy work habits 2-2 Accessibility information 2-2 Adjusting your monitor image 2-3 Using the direct access controls 2-3 Using the On-Screen Display (OSD) controls 2-3 Selecting a supported display mode 2-6 Image rotation 2-6 Understanding power management 2-7 Caring for your product 1-6 Chapter 2. Portions © IBM Corp. 2005 ii Reference information 3-1 Monitor specifications 3-1 Troubleshooting 3-2 Manual image setup 3-4 Manually installing the monitor driver 3-4 Installing the monitor driver in Windows XP...
... 2-1 Positioning and viewing your monitor 2-1 Quick tips for healthy work habits 2-2 Accessibility information 2-2 Adjusting your monitor image 2-3 Using the direct access controls 2-3 Using the On-Screen Display (OSD) controls 2-3 Selecting a supported display mode 2-6 Image rotation 2-6 Understanding power management 2-7 Caring for your product 1-6 Chapter 2. Portions © IBM Corp. 2005 ii Reference information 3-1 Monitor specifications 3-1 Troubleshooting 3-2 Manual image setup 3-4 Manually installing the monitor driver 3-4 Installing the monitor driver in Windows XP...
User Manual
Page 5
...8482; L171p Flat Panel Monitor. Shipping contents The product package should include the following items: • ThinkVision L171p Flat Panel Monitor Setup Poster • Monitor Safety, Troubleshooting, and Warranty Guide • Reference and Driver CD • ThinkVision L171p Flat Panel Monitor • Power Cord • Analog Interface Cable - Getting started This User's Guide contains detailed information on adjusting monitor positions, setting user controls, and using the cable lock slot. © Lenovo 2005. For a quick overview, please see "Detaching the monitor stand" on...
...8482; L171p Flat Panel Monitor. Shipping contents The product package should include the following items: • ThinkVision L171p Flat Panel Monitor Setup Poster • Monitor Safety, Troubleshooting, and Warranty Guide • Reference and Driver CD • ThinkVision L171p Flat Panel Monitor • Power Cord • Analog Interface Cable - Getting started This User's Guide contains detailed information on adjusting monitor positions, setting user controls, and using the cable lock slot. © Lenovo 2005. For a quick overview, please see "Detaching the monitor stand" on...

User Manual
Page 8
... section provides information to help you set up your computer and all attached devices, and unplug the computer power cord. 2. Cable lock slot Your monitor is already pre-attached to your monitor. 1-4 ThinkVision L171p Flat Panel Monitor User's Guide Connect the analog signal cable to the video port on the rear of the computer. Power off your monitor. Note: One end of the signal cable is equipped with the cable lock to learn how to read the...
... section provides information to help you set up your computer and all attached devices, and unplug the computer power cord. 2. Cable lock slot Your monitor is already pre-attached to your monitor. 1-4 ThinkVision L171p Flat Panel Monitor User's Guide Connect the analog signal cable to the video port on the rear of the computer. Power off your monitor. Note: One end of the signal cable is equipped with the cable lock to learn how to read the...

User Manual
Page 9
Power on -screen instructions. To install the monitor driver, insert the Reference and Driver CD, click Install driver, and follow the on the monitor and the computer. Chapter 1. 1-5 Connect the digital cable to the DVI connector of the monitor and the other end on the back of the computer. Note: The digital cable is not included with the monitor. Plug the monitor power cord and the computer cord into grounded electrical outlets.
Power on -screen instructions. To install the monitor driver, insert the Reference and Driver CD, click Install driver, and follow the on the monitor and the computer. Chapter 1. 1-5 Connect the digital cable to the DVI connector of the monitor and the other end on the back of the computer. Note: The digital cable is not included with the monitor. Plug the monitor power cord and the computer cord into grounded electrical outlets.

User Manual
Page 10
... manual image setup. This is warmed up for normal operation. Register your option on the IBM Web site at least 15 minutes. Note: If automatic image setup does not establish the image that you . To optimize your registered product unless you indicate on the Web site questionnaire that you do not want to receive further information. 1-6 ThinkVision L171p Flat Panel Monitor User's Guide Registering...
... manual image setup. This is warmed up for normal operation. Register your option on the IBM Web site at least 15 minutes. Note: If automatic image setup does not establish the image that you . To optimize your registered product unless you indicate on the Web site questionnaire that you do not want to receive further information. 1-6 ThinkVision L171p Flat Panel Monitor User's Guide Registering...

User Manual
Page 11
... . • Monitor height: Position the monitor so your monitor: © Lenovo 2005. For more detailed information on the screen from overhead lighting or nearby windows. Use a viewing distance that the top of the screen is at : http://www.ibm.com/pc/ww/healthycomputing Arranging your monitor does not have height adjustments, you are in comfort. If your work area Use a work in a comfortable and neutral (vertical, or upright) position. The...
... . • Monitor height: Position the monitor so your monitor: © Lenovo 2005. For more detailed information on the screen from overhead lighting or nearby windows. Use a viewing distance that the top of the screen is at : http://www.ibm.com/pc/ww/healthycomputing Arranging your monitor does not have height adjustments, you are in comfort. If your work area Use a work in a comfortable and neutral (vertical, or upright) position. The...
User Manual
Page 12
.../ 2-2 ThinkVision L171p Flat Panel Monitor User's Guide Be sure to accommodate changes in your operating system; Make use of any adjustments that might arise. • Use adequate lighting for the type of work you are already provided in posture • Short, periodic breaks help you remain comfortable and productive while you use your computer. • Good posture starts with equipment setup: The layout of your work area and the setup...
.../ 2-2 ThinkVision L171p Flat Panel Monitor User's Guide Be sure to accommodate changes in your operating system; Make use of any adjustments that might arise. • Use adequate lighting for the type of work you are already provided in posture • Short, periodic breaks help you remain comfortable and productive while you use your computer. • Good posture starts with equipment setup: The layout of your work area and the setup...

User Manual
Page 13
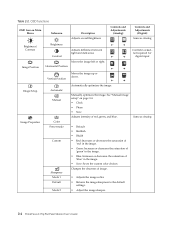
... use the controls: 1. Chapter 2. 2-3 Input Change Switches the video input source. Use or to access that function. Select an icon and press to move among the icons. Use or to the OSD. This will prevent accidental adjustments to make adjustments. Press to move between options using or , then press to the OSD. Press to open the main OSD menu. 2. Table 2-1. Press to save. 3. Using the On-Screen Display (OSD) controls The settings adjustable with the user controls are blue. Adjusting your monitor image. Using...
... use the controls: 1. Chapter 2. 2-3 Input Change Switches the video input source. Use or to access that function. Select an icon and press to move among the icons. Use or to the OSD. This will prevent accidental adjustments to make adjustments. Press to move between options using or , then press to the OSD. Press to open the main OSD menu. 2. Table 2-1. Press to save. 3. Using the On-Screen Display (OSD) controls The settings adjustable with the user controls are blue. Adjusting your monitor image. Using...
User Manual
Page 14
...; Adjusts the image softer. • Returns the image sharpness to the default settings. • Adjust the image sharper. 2-4 ThinkVision L171p Flat Panel Monitor User's Guide Changes the clearness of 'blue' in the image. • Save: Saves the custom color choices. Manually optimizes the image. Same as Analog Brightness/ Contrast Image Position Brightness Contrast Adjusts difference between light and dark areas Moves the image left or right. Image Setup Image Properties Automatic Manual Color Preset mode Custom Sharpness Mode 1 Default Mode 2 Automatically optimizes the image...
...; Adjusts the image softer. • Returns the image sharpness to the default settings. • Adjust the image sharper. 2-4 ThinkVision L171p Flat Panel Monitor User's Guide Changes the clearness of 'blue' in the image. • Save: Saves the custom color choices. Manually optimizes the image. Same as Analog Brightness/ Contrast Image Position Brightness Contrast Adjusts difference between light and dark areas Moves the image left or right. Image Setup Image Properties Automatic Manual Color Preset mode Custom Sharpness Mode 1 Default Mode 2 Automatically optimizes the image...

User Manual
Page 15
... a button is pressed. Same as Analog Same as Analog Options Options Information Language Menu Position Default Custom Reset - Chapter 2. 2-5 Most desktop computers use DVI connector. Selects DVI-Digital Shows resolution, refresh rate, and product details. This section lists the languages supported by your monitor. Note: This screen does not allow any software running on any changes to the original factory settings. Menu position adjusts menu location on Main Menu Submenu Input video signal Description Controls and Adjustments (Analog) This monitor can accept video...
... a button is pressed. Same as Analog Same as Analog Options Options Information Language Menu Position Default Custom Reset - Chapter 2. 2-5 Most desktop computers use DVI connector. Selects DVI-Digital Shows resolution, refresh rate, and product details. This section lists the languages supported by your monitor. Note: This screen does not allow any software running on any changes to the original factory settings. Menu position adjusts menu location on Main Menu Submenu Input video signal Description Controls and Adjustments (Analog) This monitor can accept video...

User Manual
Page 16
... on your computer is controlled by the computer. Check with image rotation can be downloaded from their support website. 2-6 ThinkVision L171p Flat Panel Monitor User's Guide Table 2-3. Try these steps to minimize flicker, LCD or Flat Panel technology is available. If you have been optimized at 60 Hz, which require a high refresh rate to check if image rotation is available on the desktop and click Properties. 2. The display modes shown below have ATI...
... on your computer is controlled by the computer. Check with image rotation can be downloaded from their support website. 2-6 ThinkVision L171p Flat Panel Monitor User's Guide Table 2-3. Try these steps to minimize flicker, LCD or Flat Panel technology is available. If you have been optimized at 60 Hz, which require a high refresh rate to check if image rotation is available on the desktop and click Properties. 2. The display modes shown below have ATI...

User Manual
Page 18
... items. This type of contact may harm the coating of your screen. • Use any maintenance on a clean surface or soft cloth, remove the four screws from the stand to your monitor with a damp cloth and a little mild detergent. This may cause permanent damage to remove it from the monitor. 2-8 ThinkVision L171p Flat Panel Monitor User's Guide Detaching the monitor stand After placing the monitor face down on the...
... items. This type of contact may harm the coating of your screen. • Use any maintenance on a clean surface or soft cloth, remove the four screws from the stand to your monitor with a damp cloth and a little mild detergent. This may cause permanent damage to remove it from the monitor. 2-8 ThinkVision L171p Flat Panel Monitor User's Guide Detaching the monitor stand After placing the monitor face down on the...
User Manual
Page 19
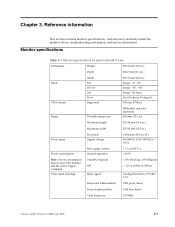
... Input signal < 2W (Anolog), Monitor specifications for type-model 9417-Hxx Dimensions Height 381.2 mm (15.0 in.) Depth 204.7 mm (8.1 in.) Stand VESA mount Width Tilt Swivel Lift Pivot Supported 367.5 mm (14.5 in.) Range: -0°, +30° Range: -45°, +45° Range: 110.0mm Yes (clockwise 90 degree) 100 mm (3.94 in.) Image Viewable image size IBM radial arm sold separately. 430 mm (17.0 in.) Maximum height...
... Input signal < 2W (Anolog), Monitor specifications for type-model 9417-Hxx Dimensions Height 381.2 mm (15.0 in.) Depth 204.7 mm (8.1 in.) Stand VESA mount Width Tilt Swivel Lift Pivot Supported 367.5 mm (14.5 in.) Range: -0°, +30° Range: -45°, +45° Range: 110.0mm Yes (clockwise 90 degree) 100 mm (3.94 in.) Image Viewable image size IBM radial arm sold separately. 430 mm (17.0 in.) Maximum height...

User Manual
Page 20
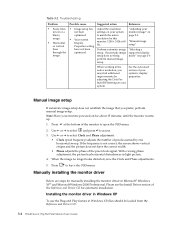
...-condensing Storage 5% to 95% non-condensing Shipping 5% to a display mode which is flashing green. The system is set to 95% non-condensing Troubleshooting If you have a problem setting up or using a Windows system, restart the system in safe mode, then select a supported display mode for your computer. If these options do not work, contact the IBM Support Center. 3-2 ThinkVision L171p Flat Panel Monitor User's Guide Before calling your dealer or IBM, try the...
...-condensing Storage 5% to 95% non-condensing Shipping 5% to a display mode which is flashing green. The system is set to 95% non-condensing Troubleshooting If you have a problem setting up or using a Windows system, restart the system in safe mode, then select a supported display mode for your computer. If these options do not work, contact the IBM Support Center. 3-2 ThinkVision L171p Flat Panel Monitor User's Guide Before calling your dealer or IBM, try the...

User Manual
Page 21
... there is not switched on page 1-4 no image. • The power cord is loose or disconnected from the OSD menu. The video signal cable is • Be sure the outlet has loose or power. Adjust the brightness and "Adjusting your monitor" on page 2-3 The automatic image setup function was not performed. disconnected. • Power on OSD menu. Be sure the signal cable is no power monitor. "Connecting and turning on your contrast setting on the monitor image" on the...
... there is not switched on page 1-4 no image. • The power cord is loose or disconnected from the OSD menu. The video signal cable is • Be sure the outlet has loose or power. Adjust the brightness and "Adjusting your monitor" on page 2-3 The automatic image setup function was not performed. disconnected. • Power on OSD menu. Be sure the signal cable is no power monitor. "Connecting and turning on your contrast setting on the monitor image" on the...
User Manual
Page 22
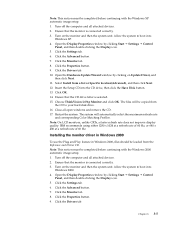
Troubleshooting Problem • Fuzzy lines in Windows XP, files should be loaded from the Reference and Driver CD. 3-4 ThinkVision L171p Flat Panel Monitor User's Guide "Adjusting your monitor powered on for manually installing the monitor driver in the native resolution, you prefer, perform manual image setup. When the image no longer looks distorted, save the Clock and Phase adjustments. 5. Installing the monitor driver in Windows XP To use the Plug and Play feature in text or a blurry image. • Horizontal or vertical lines through the image. Press...
Troubleshooting Problem • Fuzzy lines in Windows XP, files should be loaded from the Reference and Driver CD. 3-4 ThinkVision L171p Flat Panel Monitor User's Guide "Adjusting your monitor powered on for manually installing the monitor driver in the native resolution, you prefer, perform manual image setup. When the image no longer looks distorted, save the Clock and Phase adjustments. 5. Installing the monitor driver in Windows XP To use the Plug and Play feature in text or a blurry image. • Horizontal or vertical lines through the image. Press...
User Manual
Page 23
... a refresh rate of 60 Hz, or 640 x 480 at a refresh rate of 60 Hz. Open the Display Properties window by clicking Start J Settings J Control Panel, and then double-clicking the Display icon. 5. Click the Settings tab. 6. Click the Advanced button. 7. Turn off the computer and all open windows and remove the CD. 17. Ensure that the monitor is selected. 15. Installing the monitor driver in Windows 2000 To use the Plug and Play feature in Windows 2000...
... a refresh rate of 60 Hz, or 640 x 480 at a refresh rate of 60 Hz. Open the Display Properties window by clicking Start J Settings J Control Panel, and then double-clicking the Display icon. 5. Click the Settings tab. 6. Click the Advanced button. 7. Turn off the computer and all open windows and remove the CD. 17. Ensure that the monitor is selected. 15. Installing the monitor driver in Windows 2000 To use the Plug and Play feature in Windows 2000...
User Manual
Page 24
... Appendix A, "Service and Support," on Update Driver, and then click Next. 11. Restart the system. Note: On LCD monitors, unlike CRTs, a faster refresh rate does not improve display quality. Open the Upgrade Device Driver Wizard window by clicking on page A-1. 3-6 ThinkVision L171p Flat Panel Monitor User's Guide Getting further help If you still can choose a specific driver, and then click Next. 12. The system will be copied from the CD to your problem, please contact...
... Appendix A, "Service and Support," on Update Driver, and then click Next. 11. Restart the system. Note: On LCD monitors, unlike CRTs, a faster refresh rate does not improve display quality. Open the Upgrade Device Driver Wizard window by clicking on page A-1. 3-6 ThinkVision L171p Flat Panel Monitor User's Guide Getting further help If you still can choose a specific driver, and then click Next. 12. The system will be copied from the CD to your problem, please contact...
User Manual
Page 25
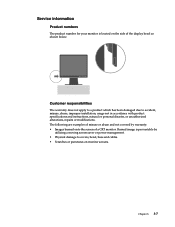
... specifications and instructions, natural or personal disaster, or unauthorized alterations, repairs or modifications. Burned image is located on monitor screens. Customer responsibilities The warranty does not apply to a product which has been damaged due to covers, bezel, base and cables. • Scratches or punctures on the side of the display bezel as shown below. Service information Product numbers The product number for your monitor...
... specifications and instructions, natural or personal disaster, or unauthorized alterations, repairs or modifications. Burned image is located on monitor screens. Customer responsibilities The warranty does not apply to a product which has been damaged due to covers, bezel, base and cables. • Scratches or punctures on the side of the display bezel as shown below. Service information Product numbers The product number for your monitor...

User Manual
Page 26
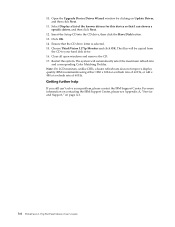
Parts are for service use by servicers and dealers authorized by Lenovo to support the customer warranty. Service parts The following parts are for use only. Table 3-3. L171p Video cable Stand Color Business Black Dual Tone (TCO'03) Graphite Silver Bezel Black Machine Type Model (MTM) 9417-HB7 9417-HG7 9417-HB7, HG7 9417-HB7, HG7 3-8 ThinkVision L171p Flat Panel Monitor User's Guide L171p Monitor- List of service parts FRU (Field Replaceable Unit) Part number 30R5060 30R5061 30R5047 30R5065 Description Monitor- The table below shows information for model 9417-Hxx.
Parts are for service use by servicers and dealers authorized by Lenovo to support the customer warranty. Service parts The following parts are for use only. Table 3-3. L171p Video cable Stand Color Business Black Dual Tone (TCO'03) Graphite Silver Bezel Black Machine Type Model (MTM) 9417-HB7 9417-HG7 9417-HB7, HG7 9417-HB7, HG7 3-8 ThinkVision L171p Flat Panel Monitor User's Guide L171p Monitor- List of service parts FRU (Field Replaceable Unit) Part number 30R5060 30R5061 30R5047 30R5065 Description Monitor- The table below shows information for model 9417-Hxx.


