
User Manual
Page 3
...and viewing your monitor 2-1 Quick tips for healthy work habits 2-2 Accessibility information 2-2 Adjusting your monitor image 2-3 Using... Adjustment 1-2 Monitor Pivot 1-3 User controls 1-3 Cable lock slot 1-4 Setting up your monitor 1-4 Connecting and turning on your monitor 1-4 Registering your monitor 2-8 Detaching the monitor stand 2-8... B. Reference information 3-1 Monitor specifications 3-1 Troubleshooting 3-2 Manual image setup 3-4 Manually installing the monitor driver 3-4 Installing the monitor driver in Windows XP 3-4 Installing the monitor driver in Windows 2000 3-5 ...
...and viewing your monitor 2-1 Quick tips for healthy work habits 2-2 Accessibility information 2-2 Adjusting your monitor image 2-3 Using... Adjustment 1-2 Monitor Pivot 1-3 User controls 1-3 Cable lock slot 1-4 Setting up your monitor 1-4 Connecting and turning on your monitor 1-4 Registering your monitor 2-8 Detaching the monitor stand 2-8... B. Reference information 3-1 Monitor specifications 3-1 Troubleshooting 3-2 Manual image setup 3-4 Manually installing the monitor driver 3-4 Installing the monitor driver in Windows XP 3-4 Installing the monitor driver in Windows 2000 3-5 ...
User Manual
Page 5
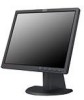
...; Lenovo 2005. Product overview This section will provide information on page 2-7. Getting started This User's Guide contains detailed information on the ThinkVision™ L171p Flat Panel Monitor. Chapter 1. Shipping contents The product package should include the following items: • ThinkVision L171p Flat Panel Monitor Setup Poster • Monitor Safety, Troubleshooting, and Warranty Guide • Reference and Driver CD • ThinkVision L171p...
...; Lenovo 2005. Product overview This section will provide information on page 2-7. Getting started This User's Guide contains detailed information on the ThinkVision™ L171p Flat Panel Monitor. Chapter 1. Shipping contents The product package should include the following items: • ThinkVision L171p Flat Panel Monitor Setup Poster • Monitor Safety, Troubleshooting, and Warranty Guide • Reference and Driver CD • ThinkVision L171p...

User Manual
Page 9
Connect the digital cable to the DVI connector of the monitor and the other end on the monitor and the computer. Plug the monitor power cord and the computer cord into grounded electrical outlets. Power on the back of the computer. To install the monitor driver, insert the Reference and Driver CD, click Install driver, and follow the on-screen instructions. Chapter 1. 1-5 Note: The digital cable is not included with the monitor.
Connect the digital cable to the DVI connector of the monitor and the other end on the monitor and the computer. Plug the monitor power cord and the computer cord into grounded electrical outlets. Power on the back of the computer. To install the monitor driver, insert the Reference and Driver CD, click Install driver, and follow the on-screen instructions. Chapter 1. 1-5 Note: The digital cable is not included with the monitor.

User Manual
Page 16
...monitor, you may need to see if graphic drivers with image rotation can be downloaded from their support website. 2-6 ThinkVision L171p Flat Panel Monitor User's Guide Note: If your system has previously been used with a CRT monitor... video graphic drivers that enable image rotation. Right-click on your computer to reattach the CRT monitor temporarily until ... Hz, 70 Hz, 75 Hz Image rotation Before rotating the monitor, you have been optimized at 60 Hz, which require a ... change display modes. Unlike CRT monitors, which is inherently flicker-free. preferably to 1280 x 1024 ...
...monitor, you may need to see if graphic drivers with image rotation can be downloaded from their support website. 2-6 ThinkVision L171p Flat Panel Monitor User's Guide Note: If your system has previously been used with a CRT monitor... video graphic drivers that enable image rotation. Right-click on your computer to reattach the CRT monitor temporarily until ... Hz, 70 Hz, 75 Hz Image rotation Before rotating the monitor, you have been optimized at 60 Hz, which require a ... change display modes. Unlike CRT monitors, which is inherently flicker-free. preferably to 1280 x 1024 ...
User Manual
Page 19
Reference information This section contains monitor specifications, instructions to manually install the monitor driver, troubleshooting information, and service information. Video input (Analog) Standby/Suspend Off Input signal < 2W (Anolog), Monitor specifications for type-model 9417-Hxx Dimensions Height 381.2 mm (15.0 in.) Depth 204.7 mm ... 110.0mm Yes (clockwise 90 degree) 100 mm (3.94 in.) Image Viewable image size IBM radial arm sold separately. 430 mm (17.0 in.) Maximum height 270.34 mm (10.6 in.) Maximum width 337.92 mm (13.3 in.) Power input Pixel pitch Supply ...
Reference information This section contains monitor specifications, instructions to manually install the monitor driver, troubleshooting information, and service information. Video input (Analog) Standby/Suspend Off Input signal < 2W (Anolog), Monitor specifications for type-model 9417-Hxx Dimensions Height 381.2 mm (15.0 in.) Depth 204.7 mm ... 110.0mm Yes (clockwise 90 degree) 100 mm (3.94 in.) Image Viewable image size IBM radial arm sold separately. 430 mm (17.0 in.) Maximum height 270.34 mm (10.6 in.) Maximum width 337.92 mm (13.3 in.) Power input Pixel pitch Supply ...
User Manual
Page 22
... page 2-6 When working in Windows XP, files should be loaded from the Reference and Driver CD. 3-4 ThinkVision L171p Flat Panel Monitor User's Guide Note: Have your system's display properties. Manually installing the monitor driver Below are steps for about 15 minutes, until the monitor warms up. 1. Press at 60 Hz. Use or to open the OSD menu...
... page 2-6 When working in Windows XP, files should be loaded from the Reference and Driver CD. 3-4 ThinkVision L171p Flat Panel Monitor User's Guide Note: Have your system's display properties. Manually installing the monitor driver Below are steps for about 15 minutes, until the monitor warms up. 1. Press at 60 Hz. Use or to open the OSD menu...
User Manual
Page 23
...clicking the Display icon. 5. Select Install from the Reference and Driver CD. Choose ThinkVision L171p Monitor and click OK. Turn on the monitor and then the system unit. Click the Properties button. 9. ... 2. Open the Display Properties window by clicking on Update Driver, and then click Next. 11. Click the Monitor tab. 8. Note: On LCD monitors, unlike CRTs, a faster refresh rate does not improve...16. Turn off the computer and all open windows and remove the CD. 17. Installing the monitor driver in Windows 2000 To use the Plug and Play feature in Windows 2000, ...
...clicking the Display icon. 5. Select Install from the Reference and Driver CD. Choose ThinkVision L171p Monitor and click OK. Turn on the monitor and then the system unit. Click the Properties button. 9. ... 2. Open the Display Properties window by clicking on Update Driver, and then click Next. 11. Click the Monitor tab. 8. Note: On LCD monitors, unlike CRTs, a faster refresh rate does not improve...16. Turn off the computer and all open windows and remove the CD. 17. Installing the monitor driver in Windows 2000 To use the Plug and Play feature in Windows 2000, ...
User Manual
Page 24
...17. Getting further help If you still can choose a specific driver, and then click Next. 12. The files will automatically select the maximum refresh rate and corresponding Color Matching Profiles. The system will be copied from the CD to your problem, please contact the IBM Support Center. Choose ThinkVision L171p Monitor... and click OK. Insert the Setup CD into the CD drive, then click the Have Disk button. 13. Click OK. 14. Note: On LCD monitors, unlike CRTs, a faster refresh rate does not ...
...17. Getting further help If you still can choose a specific driver, and then click Next. 12. The files will automatically select the maximum refresh rate and corresponding Color Matching Profiles. The system will be copied from the CD to your problem, please contact the IBM Support Center. Choose ThinkVision L171p Monitor... and click OK. Insert the Setup CD into the CD drive, then click the Have Disk button. 13. Click OK. 14. Note: On LCD monitors, unlike CRTs, a faster refresh rate does not ...


